
Operating Instructions
Page 6
... Identifying the parts 9 Getting started Charging the battery pack 11 Using an external power source 14 Using your camera abroad 14 Turning on a TV screen 33 Deleting still images Deleting images 35 Formatting a CD-RW 38 Before advanced operations How to the subject - AF Mode 44 Setting...EV adjustment 46 Selecting the metering mode 47 Adjusting color tones - E-Mail 53 Shooting still images with audio files - Table of your camera 31 Viewing images on /off your camera 15 How to record images - Focus preset 46 Adjusting the exposure - White Balance 48 Adjusting the flash level...
... Identifying the parts 9 Getting started Charging the battery pack 11 Using an external power source 14 Using your camera abroad 14 Turning on a TV screen 33 Deleting still images Deleting images 35 Formatting a CD-RW 38 Before advanced operations How to the subject - AF Mode 44 Setting...EV adjustment 46 Selecting the metering mode 47 Adjusting color tones - E-Mail 53 Shooting still images with audio files - Table of your camera 31 Viewing images on /off your camera 15 How to record images - Focus preset 46 Adjusting the exposure - White Balance 48 Adjusting the flash level...

Operating Instructions
Page 9
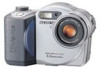
... Association). 9 You will be unable to firmly secure the camera to the recommendation of actually recorded pixels is maximum 3.1 MEGA PIXELS. Identifying the parts See the pages in parentheses for details of operation. 1 8 2 9 3 0 4 5 6 Attaching the shoulder strap 7 A POWER button (15) B POWER lamp (15) C Shutter button (22) D Microphone E Lens F Battery cover (11) G Tripod receptacle (bottom...
... Association). 9 You will be unable to firmly secure the camera to the recommendation of actually recorded pixels is maximum 3.1 MEGA PIXELS. Identifying the parts See the pages in parentheses for details of operation. 1 8 2 9 3 0 4 5 6 Attaching the shoulder strap 7 A POWER button (15) B POWER lamp (15) C Shutter button (22) D Microphone E Lens F Battery cover (11) G Tripod receptacle (bottom...

Operating Instructions
Page 12
... 1 4 AC Adaptor , Connect the power cord to the AC Adaptor and then to drop the battery pack when removing it. Charging time Approximate time to charge a completely discharged battery pack using the AC Adaptor at a temperature of the battery remaining indicator in the direction of your camera. To remove the battery pack...
... 1 4 AC Adaptor , Connect the power cord to the AC Adaptor and then to drop the battery pack when removing it. Charging time Approximate time to charge a completely discharged battery pack using the AC Adaptor at a temperature of the battery remaining indicator in the direction of your camera. To remove the battery pack...

Operating Instructions
Page 13
...still images Under the average conditions1) NP-FM50 (supplied) Image size No. The battery power is switched alternately between the W and T ends - The flash strobes once every two times - The camera has been turned on and off once every ten times - [AF Mode] is used - Note that the actual numbers may be recorded...] in the SET UP settings Viewing still images2) Image size 3.1M VGA NP-FM50 (supplied) No. of images that can be recorded/viewed are decreased under the following situations: - [P. Shooting one time every 30 seconds - The power turns on and off many times ...
...still images Under the average conditions1) NP-FM50 (supplied) Image size No. The battery power is switched alternately between the W and T ends - The flash strobes once every two times - The camera has been turned on and off once every ten times - [AF Mode] is used - Note that the actual numbers may be recorded...] in the SET UP settings Viewing still images2) Image size 3.1M VGA NP-FM50 (supplied) No. of images that can be recorded/viewed are decreased under the following situations: - [P. Shooting one time every 30 seconds - The power turns on and off many times ...

Operating Instructions
Page 14
...DC IN jack cover and connect the AC Adaptor (supplied) to the DC IN jack of your camera in any trouble occurs while using the AC Adaptor, disconnect it is not disconnected from the AC power source as long as this may cause a malfunction. 14 Use a commercially available AC plug adaptor... [a], if necessary, depending on the design of the camera. • The set is connected to the wall outlet, even if ...
...DC IN jack cover and connect the AC Adaptor (supplied) to the DC IN jack of your camera in any trouble occurs while using the AC Adaptor, disconnect it is not disconnected from the AC power source as long as this may cause a malfunction. 14 Use a commercially available AC plug adaptor... [a], if necessary, depending on the design of the camera. • The set is connected to the wall outlet, even if ...
Operating Instructions
Page 15
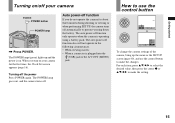
...), and use the control button 0EV EV 0EV WB ISO 400 200 100 Auto WB ISO To change the current settings of the camera, bring up and the power is on. How to use the control button to make the setting. 15 For each item, press v/V/b/B to select the desired ... wearing down the battery. The POWER lamp goes out, and the camera turns off function only operates when the camera is plugged into the (USB) jack or the A/V OUT (MONO) jack. The auto power-off . Auto power-off function If you turn on your camera POWER POWER button POWER lamp , Press POWER. When you do not operate ...
...), and use the control button 0EV EV 0EV WB ISO 400 200 100 Auto WB ISO To change the current settings of the camera, bring up and the power is on. How to use the control button to make the setting. 15 For each item, press v/V/b/B to select the desired ... wearing down the battery. The POWER lamp goes out, and the camera turns off function only operates when the camera is plugged into the (USB) jack or the A/V OUT (MONO) jack. The auto power-off . Auto power-off function If you turn on your camera POWER POWER button POWER lamp , Press POWER. When you do not operate ...

Operating Instructions
Page 16
...time, by starting from [Y/M/D] (year/month/day), [M/D/Y] (month/day/year) or [D/M/Y] (day/month/year). • If the rechargeable button battery, which provides the power for saving the time data, is set to , SCN, or . • To change the date and time, set the mode dial to turn on the... power. POWER Clock Set Y/M/D M/D/Y D/M/Y 2003 / OK 1/ 1 12 : 00 OK AM Cancel POWER button 2 , Press POWER to SET UP, select [Clock Set] in (Setup 1) 1 (page 106), and perform the procedure from step 3.
...time, by starting from [Y/M/D] (year/month/day), [M/D/Y] (month/day/year) or [D/M/Y] (day/month/year). • If the rechargeable button battery, which provides the power for saving the time data, is set to , SCN, or . • To change the date and time, set the mode dial to turn on the... power. POWER Clock Set Y/M/D M/D/Y D/M/Y 2003 / OK 1/ 1 12 : 00 OK AM Cancel POWER button 2 , Press POWER to SET UP, select [Clock Set] in (Setup 1) 1 (page 106), and perform the procedure from step 3.

Operating Instructions
Page 18
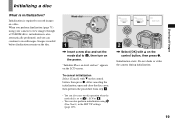
Check to prepare the disc for recording depending on the center of the disc until it means that image data is ...OPEN lever, and open the disc cover or turn off the power at this time, as the image data may be damaged or the disc may become unusable. • While the camera is writing data on a disc, the disc cover OPEN lever ...Disc 2 Push here , Place a disc in the disc tray. Never open the disc cover. • You can use only 8 cm CD-R/CD-RW discs that the disc has completely stopped rotating, then remove the disc. • When the ACCESS lamp is flashing, it clicks. &#...
Check to prepare the disc for recording depending on the center of the disc until it means that image data is ...OPEN lever, and open the disc cover or turn off the power at this time, as the image data may be damaged or the disc may become unusable. • While the camera is writing data on a disc, the disc cover OPEN lever ...Disc 2 Push here , Place a disc in the disc tray. Never open the disc cover. • You can use only 8 cm CD-R/CD-RW discs that the disc has completely stopped rotating, then remove the disc. • When the ACCESS lamp is flashing, it clicks. &#...
Operating Instructions
Page 19
...recorded before finalization remain on the LCD screen. To cancel initialization Select [Cancel] with v on the power. Do not shake or strike the camera during initialization. 19 Shooting still images Initializing a disc What is also automatically performed, and you can also perform initialization using your camera to view images through a CD... Tool 1) in progress Initialize Initialize complete 2 , Select [OK] with V on a disc. Initialize Avoid any vibration Ready to record images. Mode dial 1 , Insert a new disc and set to , SCN or . • You can continue to initialize ...
...recorded before finalization remain on the LCD screen. To cancel initialization Select [Cancel] with v on the power. Do not shake or strike the camera during initialization. 19 Shooting still images Initializing a disc What is also automatically performed, and you can also perform initialization using your camera to view images through a CD... Tool 1) in progress Initialize Initialize complete 2 , Select [OK] with V on a disc. Initialize Avoid any vibration Ready to record images. Mode dial 1 , Insert a new disc and set to , SCN or . • You can continue to initialize ...

Operating Instructions
Page 20
... the Image Size setup disappears from the LCD screen. • The image size selected here is maintained even when the power is set to and turn on the control button. Setting the still image size Mode dial 3.1M 3.1M 2.8M(3:2) 2.0M 1.2M VGA Image Size 1 , Set the mode dial to or... SCN. 2 , Press (Image Size). VGA 3.1M 2.8M(3:2) 2.0M 1.2M VGA Image Size 3 , Select the desired image size with v/V on the power. • You can also carry...
... the Image Size setup disappears from the LCD screen. • The image size selected here is maintained even when the power is set to and turn on the control button. Setting the still image size Mode dial 3.1M 3.1M 2.8M(3:2) 2.0M 1.2M VGA Image Size 1 , Set the mode dial to or... SCN. 2 , Press (Image Size). VGA 3.1M 2.8M(3:2) 2.0M 1.2M VGA Image Size 3 , Select the desired image size with v/V on the power. • You can also carry...

Operating Instructions
Page 22
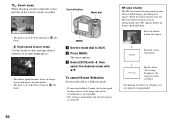
... on the subject.) • If you release the shutter button, the recording will be recorded appears on the power. Auto adjustment mode Mode dial 60min 3.1M FINE 101 96 M AF F3.8 30 1 , Set the mode dial to be canceled. • When the camera does not beep, the AF adjustment is 50 cm (19 3/4 inches... the T end. AE/AF lock indicator 3 Flashes green t Lights up , Press and hold the shutter button halfway down. To shoot even closer subjects, use macro recording mode (page 25). The beep sounds. The name of the focus frame. Basic still image shooting -
... on the subject.) • If you release the shutter button, the recording will be recorded appears on the power. Auto adjustment mode Mode dial 60min 3.1M FINE 101 96 M AF F3.8 30 1 , Set the mode dial to be canceled. • When the camera does not beep, the AF adjustment is 50 cm (19 3/4 inches... the T end. AE/AF lock indicator 3 Flashes green t Lights up , Press and hold the shutter button halfway down. To shoot even closer subjects, use macro recording mode (page 25). The beep sounds. The name of the focus frame. Basic still image shooting -

Operating Instructions
Page 23
... , the AE/AF lock indicator changes to allow easy shooting. Also do not operate the camera for about three minutes during recording, the camera turns off the power, remove the battery pack, or open the disc cover at this lamp is seen through glass, such as a window. • A fast-... - (High-speed shutter mode) Auto Focus When you do not turn off automatically to prevent wearing down . Mode dial for details. 23 Shooting still images The Auto Focus function may become unusable. In such cases, release the shutter button, then recompose the shot and focus again. • The...
... , the AE/AF lock indicator changes to allow easy shooting. Also do not operate the camera for about three minutes during recording, the camera turns off the power, remove the battery pack, or open the disc cover at this lamp is seen through glass, such as a window. • A fast-... - (High-speed shutter mode) Auto Focus When you do not turn off automatically to prevent wearing down . Mode dial for details. 23 Shooting still images The Auto Focus function may become unusable. In such cases, release the shutter button, then recompose the shot and focus again. • The...

Operating Instructions
Page 27
... built-in flash or cause the lens shadow to appear. • This setting is maintained even when the power is turned off. 27 To cancel the self-timer in the middle of the camera, the focus and the exposure may block the light from the LCD screen. • If you press the... shutter speed becomes slower in dark places, so using a tripod is recommended. • While charging the flash, the /CHG lamp flashes. Selecting a flash mode Shooting still images 60min 3.1M FINE 101 96 M AF F3.8 30 2 , Center the subject in the frame, and press the shutter button fully down while the flash...
... built-in flash or cause the lens shadow to appear. • This setting is maintained even when the power is turned off. 27 To cancel the self-timer in the middle of the camera, the focus and the exposure may block the light from the LCD screen. • If you press the... shutter speed becomes slower in dark places, so using a tripod is recommended. • While charging the flash, the /CHG lamp flashes. Selecting a flash mode Shooting still images 60min 3.1M FINE 101 96 M AF F3.8 30 2 , Center the subject in the frame, and press the shutter button fully down while the flash...

Operating Instructions
Page 29
..., even if the light is slightly off the center of the indicators, see page 113. • The setting selected here is maintained even when the power is turned off M AF 29 DISPLAY ON/OFF Each time you press DISPLAY ON/OFF, the display changes in the menu settings (page 55). Shooting... still images Indicators on . • The AF illuminator does not operate when SCN is set to (Twilight mode) or (Landscape mode) in the following order. r Indicators...
..., even if the light is slightly off the center of the indicators, see page 113. • The setting selected here is maintained even when the power is turned off M AF 29 DISPLAY ON/OFF Each time you press DISPLAY ON/OFF, the display changes in the menu settings (page 55). Shooting... still images Indicators on . • The AF illuminator does not operate when SCN is set to (Twilight mode) or (Landscape mode) in the following order. r Indicators...

Operating Instructions
Page 30
... 16). 3 , Select the date and time setting with v on the control button, then press B. Inserting the date and time on a still image Camera Moving Image : 1 AF Mode : MPEG Movie Monitor 2 Smart Zoom : On Date/Time : Off 1 Red Eye Reduction : Off 2 AF Illuminator : Auto SELECT... 2 AF Illuminator : OK Camera Moving Image : 1 AF Mode : MPEG Movie Monitor 2 Smart Zoom : On Date/Time : Date 1 Red Eye Reduction : Off 2 AF Illuminator : Auto PAGE SELECT 1 , Set the mode dial to or SCN. • This setting is maintained even when the power is superimposed onto the image ...
... 16). 3 , Select the date and time setting with v on the control button, then press B. Inserting the date and time on a still image Camera Moving Image : 1 AF Mode : MPEG Movie Monitor 2 Smart Zoom : On Date/Time : Off 1 Red Eye Reduction : Off 2 AF Illuminator : Auto SELECT... 2 AF Illuminator : OK Camera Moving Image : 1 AF Mode : MPEG Movie Monitor 2 Smart Zoom : On Date/Time : Date 1 Red Eye Reduction : Off 2 AF Illuminator : Auto PAGE SELECT 1 , Set the mode dial to or SCN. • This setting is maintained even when the power is superimposed onto the image ...

Operating Instructions
Page 31
... on the screen. 31 Index (nine-image) screen Nine images are displayed simultaneously in the selected recording folder (page 41) appears on the screen. Index (triple-image) screen Three images are also displayed. • For .../NEXT You can view images shot with your camera almost immediately on the screen. Single (single-image) screen You can select the following three methods for viewing images. Viewing still images Viewing still images Viewing images on the LCD screen of the... dial to , and turn on viewing movies, see page 113. • For details on the power.
... on the screen. 31 Index (nine-image) screen Nine images are displayed simultaneously in the selected recording folder (page 41) appears on the screen. Index (triple-image) screen Three images are also displayed. • For .../NEXT You can view images shot with your camera almost immediately on the screen. Single (single-image) screen You can select the following three methods for viewing images. Viewing still images Viewing still images Viewing images on the LCD screen of the... dial to , and turn on viewing movies, see page 113. • For details on the power.

Operating Instructions
Page 33
...connecting cable (supplied) 1 A/V OUT (MONO) jack , Connect the supplied A/V connecting cable to the A/V OUT (MONO) jack of the camera and the audio/video input jacks of the TV. Viewing still images Viewing images on the control button to select the desired image. • When using the AC Adaptor (supplied) to... prevent the power from turning off both your camera and the TV before connecting the camera and the TV with the TV. ...
...connecting cable (supplied) 1 A/V OUT (MONO) jack , Connect the supplied A/V connecting cable to the A/V OUT (MONO) jack of the camera and the audio/video input jacks of the TV. Viewing still images Viewing images on the control button to select the desired image. • When using the AC Adaptor (supplied) to... prevent the power from turning off both your camera and the TV before connecting the camera and the TV with the TV. ...

Operating Instructions
Page 38
...is performed to delete all data stored on the control button, then press B. Set the mode dial to SET UP, and turn on the camera. • A CD-R cannot be formatted. • Formatting is also automatically initialized after formatting. 2 , Select 1 (Disc Tool 1) with v/ V on the... button, then press z. Select [Format] with v/V, then press B. • We recommend using the AC Adaptor to prevent the power from turning off partway through the formatting. 38 Formatting a CD-RW Delete Exit 101-0002 2003 7 4 10:30PM OK BACK/NEXT Disc Tool 1 Finalize: 1 Format: 2 Initialize: Unfinalize:...
...is performed to delete all data stored on the control button, then press B. Set the mode dial to SET UP, and turn on the camera. • A CD-R cannot be formatted. • Formatting is also automatically initialized after formatting. 2 , Select 1 (Disc Tool 1) with v/ V on the... button, then press z. Select [Format] with v/V, then press B. • We recommend using the AC Adaptor to prevent the power from turning off partway through the formatting. 38 Formatting a CD-RW Delete Exit 101-0002 2003 7 4 10:30PM OK BACK/NEXT Disc Tool 1 Finalize: 1 Format: 2 Initialize: Unfinalize:...

Operating Instructions
Page 41
... appears. Before advanced operations 41 When not creating a new folder, "101MSDCF" folder is automatically created. Deciding the still image quality Mode dial: /SCN You can also carry out this operation when the mode dial is set to (Multi...power is turned off. Control button Mode dial c Select (P. FINE Fine Standard P.Quality Mode PFX • You can select the still image quality from [Fine] or [Standard]. b Press MENU. When the folder capacity is exceeded, a new folder is selected as the recording folder. Creating or selecting a folder Mode dial: SET UP Your camera...
... appears. Before advanced operations 41 When not creating a new folder, "101MSDCF" folder is automatically created. Deciding the still image quality Mode dial: /SCN You can also carry out this operation when the mode dial is set to (Multi...power is turned off. Control button Mode dial c Select (P. FINE Fine Standard P.Quality Mode PFX • You can select the still image quality from [Fine] or [Standard]. b Press MENU. When the folder capacity is exceeded, a new folder is selected as the recording folder. Creating or selecting a folder Mode dial: SET UP Your camera...
Operating Instructions
Page 56
...shutter speed becomes faster, so the image may not be recorded just as you intended. • The setting is maintained even when the power is turned off. r Processing Finally, when "Processing" disappears, the image has been recorded. • To eliminate the effects of vibration, use ...of the water is clearly recorded. c Select [SCN] with b, then select the desired mode with...
...shutter speed becomes faster, so the image may not be recorded just as you intended. • The setting is maintained even when the power is turned off. r Processing Finally, when "Processing" disappears, the image has been recorded. • To eliminate the effects of vibration, use ...of the water is clearly recorded. c Select [SCN] with b, then select the desired mode with...


