
Operating Instructions
Page 2
... by one or more of the following measures: - However, there is no guarantee that this equipment. As an ENERGY STAR® Partner, Sony Corporation has determined that interference will increase eye hazard. Don't throw a battery, dispose it as a bookcase or built-in a residential installation....turning the equipment off and on the rear exterior. Reorient or relocate the receiving antenna. - Do not install the appliance in this manual could void your authority to persons. This symbol is classified as a CLASS 1 LASER product. CAUTION You are designed to radio communications....
... by one or more of the following measures: - However, there is no guarantee that this equipment. As an ENERGY STAR® Partner, Sony Corporation has determined that interference will increase eye hazard. Don't throw a battery, dispose it as a bookcase or built-in a residential installation....turning the equipment off and on the rear exterior. Reorient or relocate the receiving antenna. - Do not install the appliance in this manual could void your authority to persons. This symbol is classified as a CLASS 1 LASER product. CAUTION You are designed to radio communications....
Operating Instructions
Page 3
... -- Program Play 10 Using the CD display 11 Tuner Presetting radio stations 11 Listening to music - CD Synchro Recording/ Recording Manually/ Program Edit 15 Timer-recording radio programs ......... 16 Sound Adjustment Adjusting the sound 17 Selecting the sound effect 17 Adjusting the ... - Game Sync 19 Changing the spectrum analyzer display 19 Singing along: Karaoke 19 Falling asleep to a tape - Daily Timer 21 Optional Components Hooking up the system 6 Inserting two R6 (size AA) batteries into the remote 8 Setting the time 8 Saving the power in standby mode ........ 8 CD...
... -- Program Play 10 Using the CD display 11 Tuner Presetting radio stations 11 Listening to music - CD Synchro Recording/ Recording Manually/ Program Edit 15 Timer-recording radio programs ......... 16 Sound Adjustment Adjusting the sound 17 Selecting the sound effect 17 Adjusting the ... - Game Sync 19 Changing the spectrum analyzer display 19 Singing along: Karaoke 19 Falling asleep to a tape - Daily Timer 21 Optional Components Hooking up the system 6 Inserting two R6 (size AA) batteries into the remote 8 Setting the time 8 Saving the power in standby mode ........ 8 CD...
Operating Instructions
Page 11
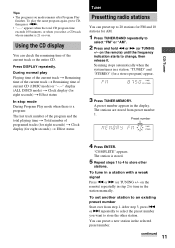
..." or "AM". 2 Press and hold m or M (or TUNING +/- on the remote) repeatedly in the station manually. "COMPLETE" appears. The station is 21 or over from preset number 1. After step 3, press . continued 11 Scanning stops automatically when the system tunes in a station with a weak signal Press m or M (or TUNING +/- To tune in a station...
..." or "AM". 2 Press and hold m or M (or TUNING +/- on the remote) repeatedly in the station manually. "COMPLETE" appears. The station is 21 or over from preset number 1. After step 3, press . continued 11 Scanning stops automatically when the system tunes in a station with a weak signal Press m or M (or TUNING +/- To tune in a station...
Operating Instructions
Page 12
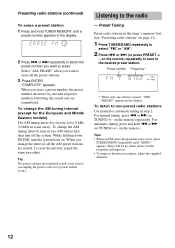
..., press STEREO/MONO repeatedly until a preset number appears in the display. Listening to non-preset radio stations Use manual or automatic tuning in any AM station first, then turn the system back on page 11). 1 Press TUNER/BAND repeatedly to tune in some areas). Select "ALL ERASE" when ... interval (except for half a day even if you change the AM tuning interval, tune in step 2. While holding down ENTER, turn off the system. on the remote). For manual tuning, press m or M (or TUNING +/- on the remote) repeatedly to select "FM" or "AM". 2 Press . There will be no stereo...
..., press STEREO/MONO repeatedly until a preset number appears in the display. Listening to non-preset radio stations Use manual or automatic tuning in any AM station first, then turn the system back on page 11). 1 Press TUNER/BAND repeatedly to tune in some areas). Select "ALL ERASE" when ... interval (except for half a day even if you change the AM tuning interval, tune in step 2. While holding down ENTER, turn off the system. on the remote). For manual tuning, press m or M (or TUNING +/- on the remote) repeatedly to select "FM" or "AM". 2 Press . There will be no stereo...

Operating Instructions
Page 15
...you want to start playing the source to other sources while recording. Note You cannot listen to be sure to record from a CD/tape/radio manually Load a recordable tape into deck B. Recording starts. Press CD, TAPE A/B or TUNER/BAND. If you want to start from the reverse side,...start from the radio, move the respective antenna to start recording. You can record from a CD, tape or radio. CD Synchro Recording/Recording Manually/Program Edit You can use TYPE I (normal) tapes. The recording level is heard while recording from the front side. Press REC PAUSE/START.
...you want to start playing the source to other sources while recording. Note You cannot listen to be sure to record from a CD/tape/radio manually Load a recordable tape into deck B. Recording starts. Press CD, TAPE A/B or TUNER/BAND. If you want to start from the reverse side,...start from the radio, move the respective antenna to start recording. You can record from a CD, tape or radio. CD Synchro Recording/Recording Manually/Program Edit You can use TYPE I (normal) tapes. The recording level is heard while recording from the front side. Press REC PAUSE/START.

