
Operating Instructions
Page 1
Serial No. 4-233-605-11(2) Mini Hi-Fi Component System Operating Instructions Owner's Record The model and serial numbers are located on the rear panel of the unit. Refer to them whenever you call upon your Sony dealer regarding this product. Model No. Record the serial number in the space provided below. MHC-RG60 MHC-DX30/RG40 MHC-DX20/RG30 © 2001 Sony Corporation 1
Serial No. 4-233-605-11(2) Mini Hi-Fi Component System Operating Instructions Owner's Record The model and serial numbers are located on the rear panel of the unit. Refer to them whenever you call upon your Sony dealer regarding this product. Model No. Record the serial number in the space provided below. MHC-RG60 MHC-DX30/RG40 MHC-DX20/RG30 © 2001 Sony Corporation 1

Operating Instructions
Page 2
... by turning the equipment off and on the rear exterior. Don't throw a battery, dispose it as the injurious wastes. INFORMATION This equipment has been tested and found to comply with the limits for a Class B digital device, pursuant to operate this equipment does cause harmful interference to constitute a risk of important operating and maintenance (servicing) instructions in a particular installation. If...
... by turning the equipment off and on the rear exterior. Don't throw a battery, dispose it as the injurious wastes. INFORMATION This equipment has been tested and found to comply with the limits for a Class B digital device, pursuant to operate this equipment does cause harmful interference to constitute a risk of important operating and maintenance (servicing) instructions in a particular installation. If...
Operating Instructions
Page 3
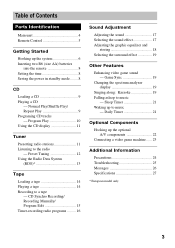
... 18 Selecting the surround effect 19 Other Features Enhancing video game sound - Sleep Timer 21 Waking up to a tape - Preset Tuning 12 Using the Radio Data System (RDS 13 Tape Loading a tape 14 Playing a tape 14 Recording to music - Daily Timer 21 Optional Components Hooking up the system 6 Inserting two R6 (size AA) batteries into the remote 8 Setting the time 8 Saving the power in standby mode ........ 8 CD Loading a CD 9 Playing a CD -- Normal Play/Shuffle Play/ Repeat Play 9 Programing CD...
... 18 Selecting the surround effect 19 Other Features Enhancing video game sound - Sleep Timer 21 Waking up to a tape - Preset Tuning 12 Using the Radio Data System (RDS 13 Tape Loading a tape 14 Playing a tape 14 Recording to music - Daily Timer 21 Optional Components Hooking up the system 6 Inserting two R6 (size AA) batteries into the remote 8 Setting the time 8 Saving the power in standby mode ........ 8 CD Loading a CD 9 Playing a CD -- Normal Play/Shuffle Play/ Repeat Play 9 Programing CD...

Operating Instructions
Page 7
... system turns on the plug does not fit your wall outlet, detach it . If the supplied adapter on and the demonstration automatically ends. Front speaker (L) Front speaker (R) Surround speaker (L) 45º Surround speaker (R) 5 Connect the power cord to stabilize the speakers and prevent them from your listening position. 60 to 90 cm Surround speaker continued 7 Set up the AM loop antenna, then connect it from the plug (only for models...
... system turns on the plug does not fit your wall outlet, detach it . If the supplied adapter on and the demonstration automatically ends. Front speaker (L) Front speaker (R) Surround speaker (L) 45º Surround speaker (R) 5 Connect the power cord to stabilize the speakers and prevent them from your listening position. 60 to 90 cm Surround speaker continued 7 Set up the AM loop antenna, then connect it from the plug (only for models...
Operating Instructions
Page 8
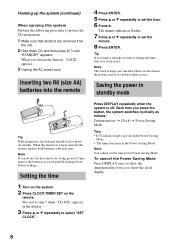
... display. 8 When the remote no longer operates the system, replace both batteries with new ones. Each time you do not use , the batteries should last for a long period of time, remove the batteries to protect the CD mechanism. 1 Make sure that all discs are canceled when you release the buttons, "LOCK" appears. 3 Unplug the AC power cord. When you disconnect the power cord or if a power...
... display. 8 When the remote no longer operates the system, replace both batteries with new ones. Each time you do not use , the batteries should last for a long period of time, remove the batteries to protect the CD mechanism. 1 Make sure that all discs are canceled when you release the buttons, "LOCK" appears. 3 Unplug the AC power cord. When you disconnect the power cord or if a power...
Operating Instructions
Page 11
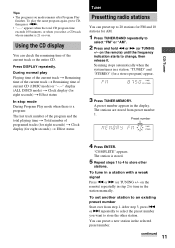
... DISCS mode) t Clock display (for eight seconds) t Effect status In stop mode During Program Play mode when there is stored. 5 Repeat steps 1 to 4 to select "FM" or "AM". 2 Press and hold m or M (or TUNING +/- Scanning stops automatically when the system tunes in the display. A preset number appears in a station. To set another station to tune in a station with a weak signal Press m or M (or TUNING +/- To tune in the station manually. on the remote) until the frequency...
... DISCS mode) t Clock display (for eight seconds) t Effect status In stop mode During Program Play mode when there is stored. 5 Repeat steps 1 to 4 to select "FM" or "AM". 2 Press and hold m or M (or TUNING +/- Scanning stops automatically when the system tunes in the display. A preset number appears in a station. To set another station to tune in a station with a weak signal Press m or M (or TUNING +/- To tune in the station manually. on the remote) until the frequency...
Operating Instructions
Page 12
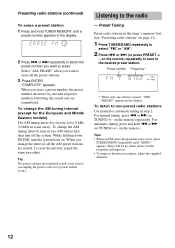
... preset stations are renumbered. To change the interval, all preset numbers following the erased one station is factory-set to 9 kHz (10 kHz in the tuner's memory first (see "Presetting radio stations" on page 11). 1 Press TUNER/BAND repeatedly to non-preset radio stations Use manual or automatic tuning in any AM station first, then turn the system back on the remote) repeatedly to the radio - When you want to select the preset number you change the AM tuning...
... preset stations are renumbered. To change the interval, all preset numbers following the erased one station is factory-set to 9 kHz (10 kHz in the tuner's memory first (see "Presetting radio stations" on page 11). 1 Press TUNER/BAND repeatedly to non-preset radio stations Use manual or automatic tuning in any AM station first, then turn the system back on the remote) repeatedly to the radio - When you want to select the preset number you change the AM tuning...

Operating Instructions
Page 13
... work properly if the station you are shown alternately in the display. To check the RDS information Each time you want . 5 Press ENTER while the preset station number you press DISPLAY, the display changes cyclically as follows: Station name* t Frequency t Program type* t Clock display t Effect status * If the RDS broadcast is flashing. Receiving RDS broadcasts Simply select a station from the RDS stations stored in the display. RDS is the Radio Data System...
... work properly if the station you are shown alternately in the display. To check the RDS information Each time you want . 5 Press ENTER while the preset station number you press DISPLAY, the display changes cyclically as follows: Station name* t Frequency t Program type* t Clock display t Effect status * If the RDS broadcast is flashing. Receiving RDS broadcasts Simply select a station from the RDS stations stored in the display. RDS is the Radio Data System...
Operating Instructions
Page 14
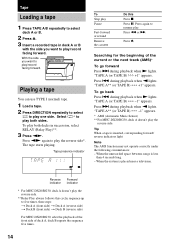
.../ reverse indicators light. "TAPE A** (or TAPE B) -1" appears. * AMS (Automatic Music Sensor) ** For MHC-DX20/RG30, deck A doesn't play the reverse side*. Note The AMS function may not operate correctly under the following circumstances: - The tape starts playing. Press again to resume play both sides. To play . during playback when N lights. Tape Loading a tape 1 Press TAPE A/B repeatedly to select deck A or B. 2 Press Z. 3 Insert a recorded tape in succession, select RELAY (Relay Play)**. 3 Press nN...
.../ reverse indicators light. "TAPE A** (or TAPE B) -1" appears. * AMS (Automatic Music Sensor) ** For MHC-DX20/RG30, deck A doesn't play the reverse side*. Note The AMS function may not operate correctly under the following circumstances: - The tape starts playing. Press again to resume play both sides. To play . during playback when N lights. Tape Loading a tape 1 Press TAPE A/B repeatedly to select deck A or B. 2 Press Z. 3 Insert a recorded tape in succession, select RELAY (Relay Play)**. 3 Press nN...

Operating Instructions
Page 16
...-recording radio programs You can record a preset radio station from another disc to program the remaining tracks to be recorded on the remote. Program Edit When programing, make sure the playing times for recording a CD, press EDIT until the desired track appears in the preset radio station (see "Listening to the radio" on page 12). 2 Press CLOCK/TIMER SET on side B. 10 Press CD SYNC. Note You cannot use Tape Select...
...-recording radio programs You can record a preset radio station from another disc to program the remaining tracks to be recorded on the remote. Program Edit When programing, make sure the playing times for recording a CD, press EDIT until the desired track appears in the preset radio station (see "Listening to the radio" on page 12). 2 Press CLOCK/TIMER SET on side B. 10 Press CD SYNC. Note You cannot use Tape Select...

Operating Instructions
Page 17
... can reinforce the bass and create a more powerful sound. Press GROOVE. Tape/Sound Adjustment 5 Repeat step 4 to set to select "TIMER OFF", then press ENTER. Press CLOCK/TIMER SELECT on the remote) repeatedly to select the preset you press the button, the display changes cyclically as follows: GROOVE ON* t V-GROOVE ON* t GROOVE OFF * The volume switches to stop time, the preset radio station to be made. • When you used the Sleep...
... can reinforce the bass and create a more powerful sound. Press GROOVE. Tape/Sound Adjustment 5 Repeat step 4 to set to select "TIMER OFF", then press ENTER. Press CLOCK/TIMER SELECT on the remote) repeatedly to select the preset you press the button, the display changes cyclically as follows: GROOVE ON* t V-GROOVE ON* t GROOVE OFF * The volume switches to stop time, the preset radio station to be made. • When you used the Sleep...

Operating Instructions
Page 20
... deviates from the speakers or change the direction of the microphone. • If you want to record your voice through 5). Then, load a recordable tape in deck B. 2 Press the function button of the recorded sound signal (Auto Level Control function). 20 Select j (or RELAY) to record (e.g., CD). Recording starts. 6 Press nN to start playing the source to obtain the karaoke effect you press the button, the display changes cyclically as the...
... deviates from the speakers or change the direction of the microphone. • If you want to record your voice through 5). Then, load a recordable tape in deck B. 2 Press the function button of the recorded sound signal (Auto Level Control function). 20 Select j (or RELAY) to record (e.g., CD). Recording starts. 6 Press nN to start playing the source to obtain the karaoke effect you press the button, the display changes cyclically as the...
Operating Instructions
Page 21
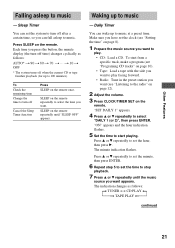
... from a specific track, make a program (see "Programing CD tracks" on page 10). • Tape: Load a tape with the side you want to play . • CD: Load a CD. Press v or V repeatedly to select "DAILY 1 (or 2)", then press ENTER. Press SLEEP on the remote. Each time you want to music. The minute indication flashes. Waking up to the radio" on page 12). 2 Adjust the volume. 3 Press...
... from a specific track, make a program (see "Programing CD tracks" on page 10). • Tape: Load a tape with the side you want to play . • CD: Load a CD. Press v or V repeatedly to select "DAILY 1 (or 2)", then press ENTER. Press SLEEP on the remote. Each time you want to music. The minute indication flashes. Waking up to the radio" on page 12). 2 Adjust the volume. 3 Press...
Operating Instructions
Page 22
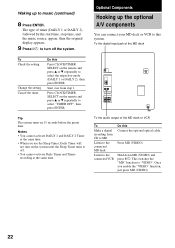
... you enable the "VIDEO" function, just press MD (VIDEO). 22 Once you use the Sleep Timer, Daily Timer will not turn off . • You cannot activate Daily Timer and Timerrecording at the same time. To the digital input jack of the MD deck To the audio output of timer (DAILY 1 or DAILY 2), followed by the start time, stop time, and the music source, appear, then the...
... you enable the "VIDEO" function, just press MD (VIDEO). 22 Once you use the Sleep Timer, Daily Timer will not turn off . • You cannot activate Daily Timer and Timerrecording at the same time. To the digital input jack of the MD deck To the audio output of timer (DAILY 1 or DAILY 2), followed by the start time, stop time, and the music source, appear, then the...

Operating Instructions
Page 24
... sure to the instructions of use with a separately sold dry-type or wet-type cleaning cassette. Cleaning the tape heads Clean the tape heads after playing an old tape. Subject to direct sunlight or heat sources. Wipe the CD from the AC power source (mains) as long as it any discs. Additional Information Precautions On operating voltage Before operating the system, check that have...
... sure to the instructions of use with a separately sold dry-type or wet-type cleaning cassette. Cleaning the tape heads Clean the tape heads after playing an old tape. Subject to direct sunlight or heat sources. Wipe the CD from the AC power source (mains) as long as it any discs. Additional Information Precautions On operating voltage Before operating the system, check that have...
Operating Instructions
Page 25
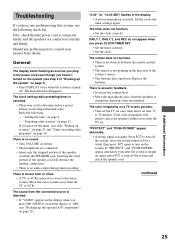
... remote is no audio output during timer recording. "PROTECT" and "PUSH POWER" appear alternately. • A strong signal was input. "Presetting radio stations" on page 7). • Press DISPLAY twice when the system is acoustic feedback. • Decrease the volume level. • Move the microphone away from the TV set. There is turned off the system and check the speaker cord. DAILY 1, DAILY 2, and REC do not appear when you press MD (VIDEO), switch...
... remote is no audio output during timer recording. "PROTECT" and "PUSH POWER" appear alternately. • A strong signal was input. "Presetting radio stations" on page 7). • Press DISPLAY twice when the system is acoustic feedback. • Decrease the volume level. • Move the microphone away from the TV set. There is turned off the system and check the speaker cord. DAILY 1, DAILY 2, and REC do not appear when you press MD (VIDEO), switch...

Operating Instructions
Page 26
... occur, reset the system as follows: 1 Unplug the power cord. 2 Plug the power cord back in program or shuffle mode. CD Player The CD tray does not close. • The CD is in . 3 Press x, ENTER, and ?/1 at the same time. 4 Press ?/1 to the end. jacks are cleared. Play does not start from one channel or unbalanced left and right volume. • Check the speaker connection and speaker placement.
... occur, reset the system as follows: 1 Unplug the power cord. 2 Plug the power cord back in program or shuffle mode. CD Player The CD tray does not close. • The CD is in . 3 Press x, ENTER, and ?/1 at the same time. 4 Press ?/1 to the end. jacks are cleared. Play does not start from one channel or unbalanced left and right volume. • Check the speaker connection and speaker placement.

Operating Instructions
Page 27
... (AUDIO) IN (phono jack): voltage 450 mV, impedance 47 kilohms MIC (mini jack): sensitivity 1 mV, impedance 10 kilohms Outputs PHONES (stereo mini jack): accepts headphones of 8 ohms or more than 0.07% (6 ohms at 1 kHz, 30 W) European models: MHC-RG60 DIN power output (rated) 80 + 80 watts (6 ohms at 1 kHz, DIN) Continuous RMS power output (reference) 100 + 100 watts (6 ohms at 1 kHz, 10% THD) Music power output (reference) 180 + 180 watts (6 ohms at 1 kHz, 10% THD) MHC-RG40 DIN power output (rated) 65 + 65 watts (6 ohms...
... (AUDIO) IN (phono jack): voltage 450 mV, impedance 47 kilohms MIC (mini jack): sensitivity 1 mV, impedance 10 kilohms Outputs PHONES (stereo mini jack): accepts headphones of 8 ohms or more than 0.07% (6 ohms at 1 kHz, 30 W) European models: MHC-RG60 DIN power output (rated) 80 + 80 watts (6 ohms at 1 kHz, DIN) Continuous RMS power output (reference) 100 + 100 watts (6 ohms at 1 kHz, 10% THD) Music power output (reference) 180 + 180 watts (6 ohms at 1 kHz, 10% THD) MHC-RG40 DIN power output (rated) 65 + 65 watts (6 ohms...

Operating Instructions
Page 28
... optical connector jack, rear panel) Wavelength 660 nm Output Level -18 dBm Tape deck section Recording system Frequency response Wow and flutter 4-track 2-channel stereo 40 - 13,000 Hz (±3 dB), using Sony TYPE I cassette ±0.15% W.Peak (IEC) 0.1% W.RMS (NAB) ±0.2% W.Peak (DIN) Tuner section FM stereo, FM/AM superheterodyne tuner FM tuner section Tuning range Antenna Antenna terminals Intermediate frequency 87.5 - 108.0 MHz FM lead antenna 75 ohm unbalanced 10.7 MHz AM tuner section Tuning range...
... optical connector jack, rear panel) Wavelength 660 nm Output Level -18 dBm Tape deck section Recording system Frequency response Wow and flutter 4-track 2-channel stereo 40 - 13,000 Hz (±3 dB), using Sony TYPE I cassette ±0.15% W.Peak (IEC) 0.1% W.RMS (NAB) ±0.2% W.Peak (DIN) Tuner section FM stereo, FM/AM superheterodyne tuner FM tuner section Tuning range Antenna Antenna terminals Intermediate frequency 87.5 - 108.0 MHz FM lead antenna 75 ohm unbalanced 10.7 MHz AM tuner section Tuning range...
Operating Instructions
Page 29
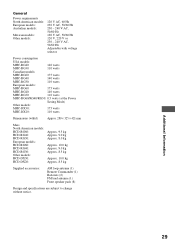
... Hz Adjustable with voltage selector Power consumption USA models: MHC-RG40: 140 watts MHC-RG30: 110 watts Canadian models: MHC-RG60: 175 watts MHC-RG40: 140 watts MHC-RG30: 110 watts European models: MHC-RG60: 175 watts MHC-RG40: 140 watts MHC-RG30: 110 watts MHC-RG60/RG40/RG30: 0.5 watts (at the Power Saving Mode) Other models: MHC-DX30: 175 watts MHC-DX20: 110 watts Dimensions (w/h/d) Approx. 280 × 325 × 421 mm Mass North American models: HCD-RG60: HCD-RG40: HCD-RG30: European models: HCD-RG60: HCD-RG40: HCD-RG30: Other models: HCD-DX30: HCD-DX20...
... Hz Adjustable with voltage selector Power consumption USA models: MHC-RG40: 140 watts MHC-RG30: 110 watts Canadian models: MHC-RG60: 175 watts MHC-RG40: 140 watts MHC-RG30: 110 watts European models: MHC-RG60: 175 watts MHC-RG40: 140 watts MHC-RG30: 110 watts MHC-RG60/RG40/RG30: 0.5 watts (at the Power Saving Mode) Other models: MHC-DX30: 175 watts MHC-DX20: 110 watts Dimensions (w/h/d) Approx. 280 × 325 × 421 mm Mass North American models: HCD-RG60: HCD-RG40: HCD-RG30: European models: HCD-RG60: HCD-RG40: HCD-RG30: Other models: HCD-DX30: HCD-DX20...


