Operating Instructions (primary manual)
Page 1
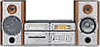
Refer to them whenever you call upon your Sony dealer regarding this product. 3-867-106-12(1) Mini Hi-Fi Component System Operating Instructions Owner's Record The model and serial numbers are located on the rear panel. Record the serial number in the space provided below. Model No Serial No MHC-NX1 ©1999 by Sony Corporation 1
Refer to them whenever you call upon your Sony dealer regarding this product. 3-867-106-12(1) Mini Hi-Fi Component System Operating Instructions Owner's Record The model and serial numbers are located on the rear panel. Record the serial number in the space provided below. Model No Serial No MHC-NX1 ©1999 by Sony Corporation 1
Operating Instructions (primary manual)
Page 2
...the receiver is located on a circuit different from Dolby Laboratories Licensing Corporation. A/V control amplifier STR-NX1 - CD player/Stereo cassette deck HTC-NX1 - Speaker system SS-NX1 2 This symbol is no guarantee that any changes or modifications not expressly approved in this manual ... noise reduction system*. * Manufactured under license from that may cause harmful interference to the presence of the FCC Rules. The MHC-NX1 consist of uninsulated "dangerous voltage" within the product's enclosure that to which can radiate radio frequency energy and, if not...
...the receiver is located on a circuit different from Dolby Laboratories Licensing Corporation. A/V control amplifier STR-NX1 - CD player/Stereo cassette deck HTC-NX1 - Speaker system SS-NX1 2 This symbol is no guarantee that any changes or modifications not expressly approved in this manual ... noise reduction system*. * Manufactured under license from that may cause harmful interference to the presence of the FCC Rules. The MHC-NX1 consist of uninsulated "dangerous voltage" within the product's enclosure that to which can radiate radio frequency energy and, if not...
Operating Instructions (primary manual)
Page 3
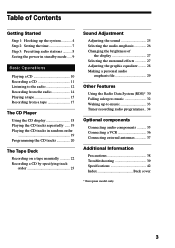
Table of Contents Getting Started Step 1: Hooking up the system 4 Step 2: Setting the time 7 Step 3: Presetting radio stations .......... 8 Saving the power in standby mode ..... 9 Basic Operations Playing a CD 10 Recording a CD 11 Listening to the radio 12 Recording from the radio 14 Playing a tape 15 Recording from a tape 17 The CD Player Using the CD display 18 Playing the CD tracks repeatedly ...... 19 Playing the CD tracks in random order 19 Programming the CD tracks 20 The Tape Deck Recording on a tape manually 22 Recording a CD by specifying track order 23 Sound ...
Table of Contents Getting Started Step 1: Hooking up the system 4 Step 2: Setting the time 7 Step 3: Presetting radio stations .......... 8 Saving the power in standby mode ..... 9 Basic Operations Playing a CD 10 Recording a CD 11 Listening to the radio 12 Recording from the radio 14 Playing a tape 15 Recording from a tape 17 The CD Player Using the CD display 18 Playing the CD tracks repeatedly ...... 19 Playing the CD tracks in random order 19 Programming the CD tracks 20 The Tape Deck Recording on a tape manually 22 Recording a CD by specifying track order 23 Sound ...

Operating Instructions (primary manual)
Page 4
Getting Started Step 1: Hooking up the system Do the following procedure 1 to 5 to hook up the stereo system vertically Be sure to place the A/V control amplifier on top of the CD player/stereo cassette deck. When the A/V control amplifer is placed under the CD player/stereo cassette deck, noise may be produced when playing tapes. 4 If you set up your system using the supplied cords and accessories. FM antenna AM loop antenna 1 3 4 2 5 2 2 Front speaker (Right) Front speaker (Left) Note on installing Be sure to place the A/V control amplifier on top as shown in the ...
Getting Started Step 1: Hooking up the system Do the following procedure 1 to 5 to hook up the stereo system vertically Be sure to place the A/V control amplifier on top of the CD player/stereo cassette deck. When the A/V control amplifer is placed under the CD player/stereo cassette deck, noise may be produced when playing tapes. 4 If you set up your system using the supplied cords and accessories. FM antenna AM loop antenna 1 3 4 2 5 2 2 Front speaker (Right) Front speaker (Left) Note on installing Be sure to place the A/V control amplifier on top as shown in the ...
Operating Instructions (primary manual)
Page 5
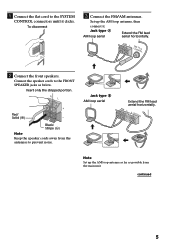
Insert only the stripped portion. continued 5 Set up the AM loop antenna as far as below. Connect the speaker cords to the FRONT SPEAKER jacks as possible from the antennas to the SYSTEM CONTROL connectors until it . Black/ Stripe (') Note Keep the speaker cords away from the main unit. Jack type B AM loop aerial Extend the FM lead aerial horizontally. To disconnect 3 Connect the FM/AM antennas. AM FM 75Ω Note Set up the AM loop antenna, then connect it clicks. 1 Connect the flat cord to prevent noise. Jack type A AM loop aerial Extend the FM lead ...
Insert only the stripped portion. continued 5 Set up the AM loop antenna as far as below. Connect the speaker cords to the FRONT SPEAKER jacks as possible from the antennas to the SYSTEM CONTROL connectors until it . Black/ Stripe (') Note Keep the speaker cords away from the main unit. Jack type B AM loop aerial Extend the FM lead aerial horizontally. To disconnect 3 Connect the FM/AM antennas. AM FM 75Ω Note Set up the AM loop antenna, then connect it clicks. 1 Connect the flat cord to prevent noise. Jack type A AM loop aerial Extend the FM lead ...
Operating Instructions (primary manual)
Page 6
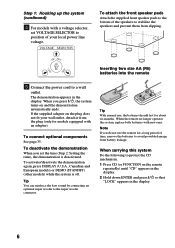
When you press 1/u, the system turns on the plug does not fit your local power line voltage. To connect optional components See page 35. To deactivate the demonstration When you do not use , the batteries should last for a long period of time, remove the batteries to avoid possible damage from battery leakage. Note If you set VOLTAGE SELECTOR to position of the speakers to stabilize the speakers and prevent them from slipping. Inserting two size AA (R6) batteries into the remote 5 Connect the power cord to protect the CD mechanism. 1 Press CD (or FUNCTION on the remote repeatedly) ...
When you press 1/u, the system turns on the plug does not fit your local power line voltage. To connect optional components See page 35. To deactivate the demonstration When you do not use , the batteries should last for a long period of time, remove the batteries to avoid possible damage from battery leakage. Note If you set VOLTAGE SELECTOR to position of the speakers to stabilize the speakers and prevent them from slipping. Inserting two size AA (R6) batteries into the remote 5 Connect the power cord to protect the CD mechanism. 1 Press CD (or FUNCTION on the remote repeatedly) ...
Operating Instructions (primary manual)
Page 7
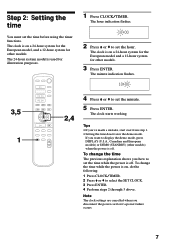
The hour indication flashes. 2 Press V or v to set the time before using the timer functions. The clock starts working. To change the time while the power is on a 24-hour system for the European model and a 12-hour system for other models. Note The clock settings are cancelled when you 've made a mistake, start over from step 1. • Setting the time deactivates the demo mode. The clock is on a 24-hour system for the European model, and a 12-hour system for illustration purposes. 1 Press CLOCK/TIMER. The clock is off . The 24-hour system model is off . To change the time ...
The hour indication flashes. 2 Press V or v to set the time before using the timer functions. The clock starts working. To change the time while the power is on a 24-hour system for the European model and a 12-hour system for other models. Note The clock settings are cancelled when you 've made a mistake, start over from step 1. • Setting the time deactivates the demo mode. The clock is on a 24-hour system for the European model, and a 12-hour system for illustration purposes. 1 Press CLOCK/TIMER. The clock is off . The 24-hour system model is off . To change the time ...
Operating Instructions (primary manual)
Page 8
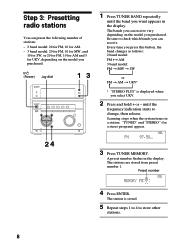
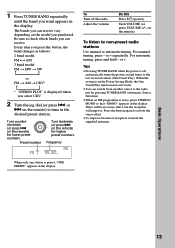
until the band you want appears in the display. TUNED STEREO MHz 3 Press TUNER MEMORY. Every time you purchased. "TUNED" and "STEREO" (for UKV, depending on the model you press this button, the band changes as follows: 2 band model: FM ˜ AM 3 band model: FM n MW n SW or FM n AM n UKV* * "STEREO PLUS" is stored. 5 Repeat steps 1 to 4 to store other stations. 8 Preset number TUNED STEREO 4 Press ENTER. The stations are stored from preset number 1. Be sure to change, then release. Step 3: Presetting radio stations You can preset the following number of stations: - 2 ...
until the band you want appears in the display. TUNED STEREO MHz 3 Press TUNER MEMORY. Every time you purchased. "TUNED" and "STEREO" (for UKV, depending on the model you press this button, the band changes as follows: 2 band model: FM ˜ AM 3 band model: FM n MW n SW or FM n AM n UKV* * "STEREO PLUS" is stored. 5 Repeat steps 1 to 4 to store other stations. 8 Preset number TUNED STEREO 4 Press ENTER. The stations are stored from preset number 1. Be sure to change, then release. Step 3: Presetting radio stations You can preset the following number of stations: - 2 ...

Operating Instructions (primary manual)
Page 9
You can lower the power consumption to a minimum (Power Saving Mode) and save energy in the standby mode. 1/u (Power) DISPLAY 2 Turn the jog dial to select the preset number you want to erase all preset numbers following the erased one are retained for European and Middle Eastern models) The AM tuning interval is set another station to the Power Saving Mode and the clock display disappears. TUNED STEREO Saving the power in any AM station first, then turn the jog dial to select the preset number you want to store the other station. To change the interval, AM preset stations...
You can lower the power consumption to a minimum (Power Saving Mode) and save energy in the standby mode. 1/u (Power) DISPLAY 2 Turn the jog dial to select the preset number you want to erase all preset numbers following the erased one are retained for European and Middle Eastern models) The AM tuning interval is set another station to the Power Saving Mode and the clock display disappears. TUNED STEREO Saving the power in any AM station first, then turn the jog dial to select the preset number you want to store the other station. To change the interval, AM preset stations...
Operating Instructions (primary manual)
Page 10
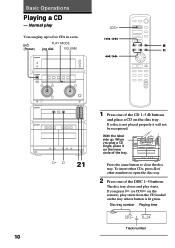
If a disc is not placed properly it on the tray whose button is lit green. When you press · (or CD · on the remote), play a CD single, place it will not be recognized. To insert other CDs, press § of other numbers to open the disc tray. 2 Press one of the DISC 1~5 buttons. If you play starts from the CD loaded on the inner circle of the tray. · ∏ π § 1 2 3 4 5 ª· π ª· π § § Press the same button to five CDs in a row. 1/u (Power) PLAY MODE jog dial VOLUME CD· · =/+ ª&#...
If a disc is not placed properly it on the tray whose button is lit green. When you press · (or CD · on the remote), play a CD single, place it will not be recognized. To insert other CDs, press § of other numbers to open the disc tray. 2 Press one of the DISC 1~5 buttons. If you play starts from the CD loaded on the inner circle of the tray. · ∏ π § 1 2 3 4 5 ª· π ª· π § § Press the same button to five CDs in a row. 1/u (Power) PLAY MODE jog dial VOLUME CD· · =/+ ª&#...
Operating Instructions (primary manual)
Page 11
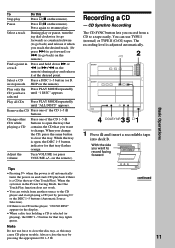
Note Do not use TYPE I (normal) or TYPE II (CrO2) tapes. You can switch from a CD to resume play Press π (p on the remote). The recording level is open the tray that contains the CD that tray flashes orange. in a track Press and hold down ) or 0 (or )/0 on and starts CD playback if there is selected (or playing), the DISC 1~5 button for that you record from another source to the CD player and start playing a CD just by pressing the appropriate CD 1~5 §. While the tray is adjusted automatically. ª 2 · ∏ π § 1 2 3 4 ...
Note Do not use TYPE I (normal) or TYPE II (CrO2) tapes. You can switch from a CD to resume play Press π (p on the remote). The recording level is open the tray that contains the CD that tray flashes orange. in a track Press and hold down ) or 0 (or )/0 on and starts CD playback if there is selected (or playing), the DISC 1~5 button for that you record from another source to the CD player and start playing a CD just by pressing the appropriate CD 1~5 §. While the tray is adjusted automatically. ª 2 · ∏ π § 1 2 3 4 ...
Operating Instructions (primary manual)
Page 12
When you want to record from the reverse side, press ª so that "DOLBY NR" appears after pressing CD SYNC. Recording starts. Notes • You cannot listen to the radio -- If you start from the reverse side, recording stops at the end of the reverse side. • When you play a CD single, place it on both sides. 5 Press REC PAUSE/START. Select ß (or RELAY) to reduce the hiss noise in the tuner's memory first (see "Step 3: Presetting radio stations"). 1/u (Power) 2 1 STEREO/MONO 3 Press CD SYNC. Preset Tuning Preset radio stations in lowlevel high-...
When you want to record from the reverse side, press ª so that "DOLBY NR" appears after pressing CD SYNC. Recording starts. Notes • You cannot listen to the radio -- If you start from the reverse side, recording stops at the end of the reverse side. • When you play a CD single, place it on both sides. 5 Press REC PAUSE/START. Select ß (or RELAY) to reduce the hiss noise in the tuner's memory first (see "Step 3: Presetting radio stations"). 1/u (Power) 2 1 STEREO/MONO 3 Press CD SYNC. Preset Tuning Preset radio stations in lowlevel high-...
Operating Instructions (primary manual)
Page 13
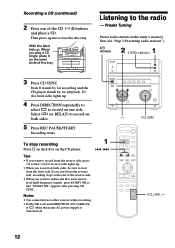
Every time you press the button, the band changes as follows: 2 band model: FM ˜ AM 3 band model: FM n MW n SW n or FM n AM n UKV* n * "STEREO PLUS" is displayed when you select UKV. 2 Turn the jog dial (or press = or + on the remote) for higher preset numbers. Turn counterclockwise (or press = ≠ on the remote) to the last received station (One Touch Play). To Turn off automatically turns the power on the remote) for lower preset numbers. When the system is off the radio Adjust the volume Do this Press 1/u (power). Preset number Turn clockwise (or ...
Every time you press the button, the band changes as follows: 2 band model: FM ˜ AM 3 band model: FM n MW n SW n or FM n AM n UKV* n * "STEREO PLUS" is displayed when you select UKV. 2 Turn the jog dial (or press = or + on the remote) for higher preset numbers. Turn counterclockwise (or press = ≠ on the remote) to the last received station (One Touch Play). To Turn off automatically turns the power on the remote) for lower preset numbers. When the system is off the radio Adjust the volume Do this Press 1/u (power). Preset number Turn clockwise (or ...
Operating Instructions (primary manual)
Page 14
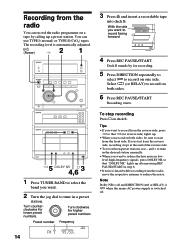
clockwise for higher preset numbers. The recording level is automatically adjusted. 1/u (Power) 2 -/+ 1 - 0 ≠ g + ) + - · ∏ π + § 1 2 3 4 5 ª· π ª· π § § 5 4,6 3 ª DOLBY NR π 1 Press TUNER BAND to select the band you want to record facing forward § 4 Press REC PAUSE/START. If you want . 2 Turn the jog dial to tune in a preset station. Preset number Frequency TUNED STEREO MHz 14 3 Press § and insert a recordable tape into deck B. With the side you start from the ...
clockwise for higher preset numbers. The recording level is automatically adjusted. 1/u (Power) 2 -/+ 1 - 0 ≠ g + ) + - · ∏ π + § 1 2 3 4 5 ª· π ª· π § § 5 4,6 3 ª DOLBY NR π 1 Press TUNER BAND to select the band you want to record facing forward § 4 Press REC PAUSE/START. If you want . 2 Turn the jog dial to tune in a preset station. Preset number Frequency TUNED STEREO MHz 14 3 Press § and insert a recordable tape into deck B. With the side you start from the ...
Operating Instructions (primary manual)
Page 15
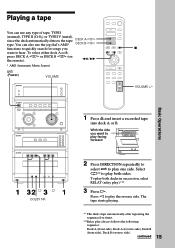
The tape starts playing. ** The deck stops automatically after repeating the sequence five times. ***Relay play both sides. Playing a tape You can also use any type of tape, TYPE I (normal), TYPE II (CrO2) or TYPE IV (metal), since the deck automatically detects the tape DECK Aª· type. With the side you want to play facing forward § 2 Press DIRECTION repeatedly to select A to play the reverse side. Press ª to play ).*** 3 Press ·. To select either deck A or B, press DECK A ª· or DECK B ª· (on the remote). 0/) * AMS (...
The tape starts playing. ** The deck stops automatically after repeating the sequence five times. ***Relay play both sides. Playing a tape You can also use any type of tape, TYPE I (normal), TYPE II (CrO2) or TYPE IV (metal), since the deck automatically detects the tape DECK Aª· type. With the side you want to play facing forward § 2 Press DIRECTION repeatedly to select A to play the reverse side. Press ª to play ).*** 3 Press ·. To select either deck A or B, press DECK A ª· or DECK B ª· (on the remote). 0/) * AMS (...
Operating Instructions (primary manual)
Page 16
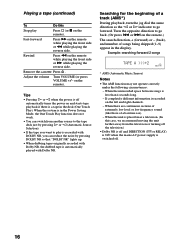
Rewind Press 0 on and starts tape playback if there is off automatically turns the power on the remote while playing the front side or ) while playing the reverse side. Tips • Pressing · or ª when the power is a tape in the deck (One Touch Play). When the unit is placed near a television. (In this Stop play is recorded with DOLBY NR, you can switch from the television or turning off the television.) • Dolby NR is off . 16 Fast-forward Press ) on the remote.) The search direction, + (forward) or - (back), and number of songs being skipped (1~9) ...
Rewind Press 0 on and starts tape playback if there is off automatically turns the power on the remote while playing the front side or ) while playing the reverse side. Tips • Pressing · or ª when the power is a tape in the deck (One Touch Play). When the unit is placed near a television. (In this Stop play is recorded with DOLBY NR, you can switch from the television or turning off the television.) • Dolby NR is off . 16 Fast-forward Press ) on the remote.) The search direction, + (forward) or - (back), and number of songs being skipped (1~9) ...

Operating Instructions (primary manual)
Page 17
Tips • When you dub on both sides. 4 Press REC PAUSE/START. Basic Operations 17 Deck B stands by for recording. 3 Press DIRECTION repeatedly to select A to play/record facing forward § 2 Press HI DUB. If you record from the reverse side, recording stops at the end of the reverse side. • If you want to record on both decks reverse together. • You don't have different lengths, the tape in deck B. Dubbing starts. With the side you set DOLBY NR, since the tape in deck B is automatically recorded in the same state as the tape in deck A. • Dolby ...
Tips • When you dub on both sides. 4 Press REC PAUSE/START. Basic Operations 17 Deck B stands by for recording. 3 Press DIRECTION repeatedly to select A to play/record facing forward § 2 Press HI DUB. If you record from the reverse side, recording stops at the end of the reverse side. • If you want to record on both decks reverse together. • You don't have different lengths, the tape in deck B. Dubbing starts. With the side you set DOLBY NR, since the tape in deck B is automatically recorded in the same state as the tape in deck A. • Dolby ...
Operating Instructions (primary manual)
Page 18
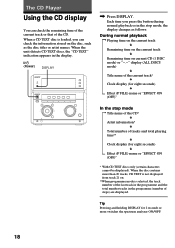
When a CD TEXT disc is selected, the track number of the last track in the programme and the total number tracks in the programme (number of steps) are displayed. When the unit detects CD TEXT discs, the "CD TEXT" indication appears in the stop mode n Title name of the CD* µ Artist information* µ Total number of the CD. Each time you can check the remaining time of the current track or that of tracks and total playing time** µ Clock display (for eight seconds) µ Effect (P FILE) name or "EFFECT ON (OFF)" * With CD TEXT discs only (certain characters cannot be ...
When a CD TEXT disc is selected, the track number of the last track in the programme and the total number tracks in the programme (number of steps) are displayed. When the unit detects CD TEXT discs, the "CD TEXT" indication appears in the stop mode n Title name of the CD* µ Artist information* µ Total number of the CD. Each time you can check the remaining time of the current track or that of tracks and total playing time** µ Clock display (for eight seconds) µ Effect (P FILE) name or "EFFECT ON (OFF)" * With CD TEXT discs only (certain characters cannot be ...
Operating Instructions (primary manual)
Page 19
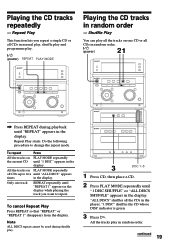
Do the following procedure to repeat. "ALL DISCS" shuffles all CDs in normal play, shuffle play and programme play . - 0 ≠ g + ) + - · ∏ π + § 1 2 3 4 5 ª· π ª· π § § 3 DISC 1~5 1 Press CD, then place a CD. 2 Press PLAY MODE repeatedly until "REPEAT 1" appears in the display while playing the track you repeat a single CD or all the CDs in the player. continued 19 "1 DISC" shuffles the CD whose DISC indicator is green. 3 Press ·. Repeat Play starts. Only one CD or all CDs up to five...
Do the following procedure to repeat. "ALL DISCS" shuffles all CDs in normal play, shuffle play and programme play . - 0 ≠ g + ) + - · ∏ π + § 1 2 3 4 5 ª· π ª· π § § 3 DISC 1~5 1 Press CD, then place a CD. 2 Press PLAY MODE repeatedly until "REPEAT 1" appears in the display while playing the track you repeat a single CD or all the CDs in the player. continued 19 "1 DISC" shuffles the CD whose DISC indicator is green. 3 Press ·. Repeat Play starts. Only one CD or all CDs up to five...
Operating Instructions (primary manual)
Page 20
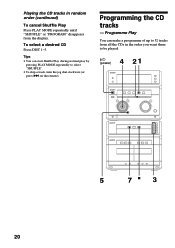
Programme Play You can start Shuffle Play during normal play by pressing PLAY MODE repeatedly to select "SHUFFLE". • To skip a track, turn the jog dial clockwise (or press + on the remote). To select a desired CD Press DISC 1~5. Programming the CD tracks -- Playing the CD tracks in the order you want them to be played. 1/u (power) 4 21 - 0 ≠ g + ) + - · ∏ π + § 1 2 3 4 5 ª· π ª· π § 5 § 7p 3 20 Tips • You can make a programme of up to 32 tracks from all the CDs in random order (continued...
Programme Play You can start Shuffle Play during normal play by pressing PLAY MODE repeatedly to select "SHUFFLE". • To skip a track, turn the jog dial clockwise (or press + on the remote). To select a desired CD Press DISC 1~5. Programming the CD tracks -- Playing the CD tracks in the order you want them to be played. 1/u (power) 4 21 - 0 ≠ g + ) + - · ∏ π + § 1 2 3 4 5 ª· π ª· π § 5 § 7p 3 20 Tips • You can make a programme of up to 32 tracks from all the CDs in random order (continued...
