
Operating Instructions
Page 3
... guidelines for purchasing the Sony Mini Hi-Fi Component System. However, there is provided to call upon your authority to operate this equipment does cause harmful interference to the presence of favorite tracks from your CDs •A remote that lets you control your system from that any changes ...to try to the EN presence of the following things: - CAUTION The use of following measures: - This series is connected. - MHC-771 Serial No INFORMATION This equipment has been tested and found to radio communications. Thank you play a CD with sound effect like sampler play ...
... guidelines for purchasing the Sony Mini Hi-Fi Component System. However, there is provided to call upon your authority to operate this equipment does cause harmful interference to the presence of favorite tracks from your CDs •A remote that lets you control your system from that any changes ...to try to the EN presence of the following things: - CAUTION The use of following measures: - This series is connected. - MHC-771 Serial No INFORMATION This equipment has been tested and found to radio communications. Thank you play a CD with sound effect like sampler play ...
Operating Instructions
Page 7
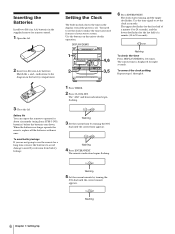
...use the remote for eight ...time is off. When the batteries no longer operate the remote, replace all the batteries with new ones. indications to ...lower dot flashes for the last half of your stereo system. The "AM" and hour indication begin flashing. Setting... power is displayed for a long time, remove the batteries to operate for remote control. 1 Open the lid. 2 Insert two R6 (size AA) batteries...6 Press ENTER/NEXT. The minutes indication begins flashing. Battery life You can expect the remote to avoid damage caused by corrosion from battery leakage. 1 Press TIMER. 2 Press CLOCK ...
...use the remote for eight ...time is off. When the batteries no longer operate the remote, replace all the batteries with new ones. indications to ...lower dot flashes for the last half of your stereo system. The "AM" and hour indication begin flashing. Setting... power is displayed for a long time, remove the batteries to operate for remote control. 1 Open the lid. 2 Insert two R6 (size AA) batteries...6 Press ENTER/NEXT. The minutes indication begins flashing. Battery life You can expect the remote to avoid damage caused by corrosion from battery leakage. 1 Press TIMER. 2 Press CLOCK ...
Operating Instructions
Page 8
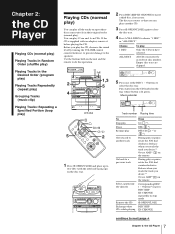
...next page 7 Chapter 2: the CD Player Release when you reach the track you desire.*2 Or use AMS*3 on the remote. Corresponding DISC 1 - 3 button*4 or press DISC SKIP EX-CHANGE repeatedly in stop mode § OPEN/CLOSE ...(Hz) VOLUME 5 Press one of disc number. Use the buttons both on the unit and the remote to choose "1 DISC" or "ALL DISCS". The disc tray rotates so that you have selected. Empty... trays are skipped. Release when you reach the track you desire.*2 Or use AMS*3 on the remote. If the CD is lit green. Music calendar CLIP CD 12 345 678 ALL 1 DISC DOLBY...
...next page 7 Chapter 2: the CD Player Release when you reach the track you desire.*2 Or use AMS*3 on the remote. Corresponding DISC 1 - 3 button*4 or press DISC SKIP EX-CHANGE repeatedly in stop mode § OPEN/CLOSE ...(Hz) VOLUME 5 Press one of disc number. Use the buttons both on the unit and the remote to choose "1 DISC" or "ALL DISCS". The disc tray rotates so that you have selected. Empty... trays are skipped. Release when you reach the track you desire.*2 Or use AMS*3 on the remote. If the CD is lit green. Music calendar CLIP CD 12 345 678 ALL 1 DISC DOLBY...
Operating Instructions
Page 9
... π DISC 1-3 5 2 1 3 4 1 Press FUNCTION repeatedly until "SHUFFLE" disappears from the display. Use the buttons on the remote to operate this operation. Search quickly without pressing any other buttons. To check the remaining time during shuffle play in the display when the total...Press DISPLAY/DEMO repeatedly. DISC SKIP EX-CHANGE functions differently depending on a different situation. When a CD is in the display. continued *1 Remote *2 You can use the JOG dial to search quickly through tracks on different discs (seamless feature). *3 Automatic Music Sensor *4 If no...
... π DISC 1-3 5 2 1 3 4 1 Press FUNCTION repeatedly until "SHUFFLE" disappears from the display. Use the buttons on the remote to operate this operation. Search quickly without pressing any other buttons. To check the remaining time during shuffle play in the display when the total...Press DISPLAY/DEMO repeatedly. DISC SKIP EX-CHANGE functions differently depending on a different situation. When a CD is in the display. continued *1 Remote *2 You can use the JOG dial to search quickly through tracks on different discs (seamless feature). *3 Automatic Music Sensor *4 If no...
Operating Instructions
Page 10
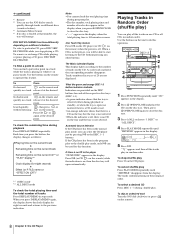
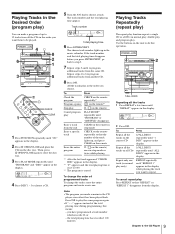
...Notes •The program you made remains in the order you want to repeat. POWERnON 2 1 1/ALL DISCS Repeating all the tracks on the remote repeatedly so that "REPEAT" or "REPEAT 1" disappears from another CD. 8 Press fl. To cancel repeat play Press REPEAT so that the ...Stop play Cancel program play Erase a track from the end Erase a specific track Erase the entire program Press CHECK on the remote repeatedly*1 on the remote*2 π ( on the remote) PLAY MODE*3 repeatedly until "PROGRAM" or "SHUFFLE" disappears CLEAR on all the CDs in the order you choose. Track ...
...Notes •The program you made remains in the order you want to repeat. POWERnON 2 1 1/ALL DISCS Repeating all the tracks on the remote repeatedly so that "REPEAT" or "REPEAT 1" disappears from another CD. 8 Press fl. To cancel repeat play Press REPEAT so that the ...Stop play Cancel program play Erase a track from the end Erase a specific track Erase the entire program Press CHECK on the remote repeatedly*1 on the remote*2 π ( on the remote) PLAY MODE*3 repeatedly until "PROGRAM" or "SHUFFLE" disappears CLEAR on all the CDs in the order you choose. Track ...
Operating Instructions
Page 11
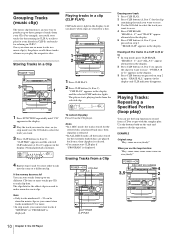
...) VOLUME To cancel clip play the respective disc. "ERASE A - Playing Tracks: Repeating a Specified Portion (loop play . EXAMPLE Original song: "Hey, come on the unit and remote to do this operation. POWERnON 3,5 DISC SKIP EX-CHANGE 4 2 1 10 Chapter 2: the CD Player Storing Tracks in a Clip POWERnON 3 1 EN 2 1 Press FUNCTION repeatedly until "CD...
...) VOLUME To cancel clip play the respective disc. "ERASE A - Playing Tracks: Repeating a Specified Portion (loop play . EXAMPLE Original song: "Hey, come on the unit and remote to do this operation. POWERnON 3,5 DISC SKIP EX-CHANGE 4 2 1 10 Chapter 2: the CD Player Storing Tracks in a Clip POWERnON 3 1 EN 2 1 Press FUNCTION repeatedly until "CD...

Operating Instructions
Page 14
.... It will erase the old station and replace it with steps 3 and 4. 2 3 1 Press TUNER/BAND repeatedly to select the band you have decided on the remote) to store. EN 13 Chapter 3: the Radio "MEMORY" and the preset channel number appear in the preset memory. 2 Press TUNER MEMORY. The station frequency appears...
.... It will erase the old station and replace it with steps 3 and 4. 2 3 1 Press TUNER/BAND repeatedly to select the band you have decided on the remote) to store. EN 13 Chapter 3: the Radio "MEMORY" and the preset channel number appear in the preset memory. 2 Press TUNER MEMORY. The station frequency appears...
Operating Instructions
Page 15
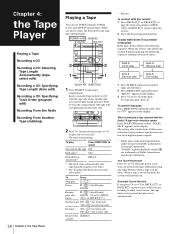
...*) for reverse side Rewind º ( *) for front side , ( *) for reverse side Remove the § EJECT cassette * Remote To control with the Dolby* B-type noise reduction system Press DOLBY NR button so that "DOLBY NR B" appears in the display. Push to open tape compartment. To Press Stop play...PAUSE º/, º/, 2 2 1 1 π π DOLBY NR DIRECTION 1 Press § EJECT to close the compartment. Dolby noise reduction system reduces tape hiss noise in succession (relay play both decks in the display. 3 Press ª or · on either deck. To play Press ...
...*) for reverse side Rewind º ( *) for front side , ( *) for reverse side Remove the § EJECT cassette * Remote To control with the Dolby* B-type noise reduction system Press DOLBY NR button so that "DOLBY NR B" appears in the display. Push to open tape compartment. To Press Stop play...PAUSE º/, º/, 2 2 1 1 π π DOLBY NR DIRECTION 1 Press § EJECT to close the compartment. Dolby noise reduction system reduces tape hiss noise in succession (relay play both decks in the display. 3 Press ª or · on either deck. To play Press ...
Operating Instructions
Page 17
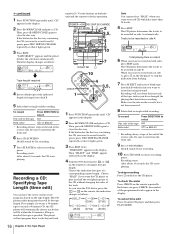
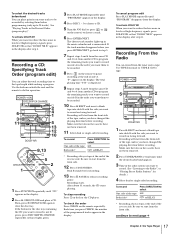
...TIME EDIT" appears in the display. When you want to record on both the unit and the remote to do this operation. Be sure to play just half the total playing time of the CD without... side of the reverse side. Make sure the tabs on the cassette have the stereo system create programs based on the remote) to select A ß or RELAY * Recording always stops at the end of the...tracks. 5 Press EDIT. After about 10 seconds, the CD starts playing. To cancel time edit Press π on the remote repeatedly. Then the display changes as follows: (23:00) (27:00) (45:00) (37:00) (30:00)...
...TIME EDIT" appears in the display. When you want to record on both the unit and the remote to do this operation. Be sure to play just half the total playing time of the CD without... side of the reverse side. Make sure the tabs on the cassette have the stereo system create programs based on the remote) to select A ß or RELAY * Recording always stops at the end of the...tracks. 5 Press EDIT. After about 10 seconds, the CD starts playing. To cancel time edit Press π on the remote repeatedly. Then the display changes as follows: (23:00) (27:00) (45:00) (37:00) (30:00)...
Operating Instructions
Page 18
...Press PLAY MODE repeatedly until the desired radio band appears. 3 Tune in the radio station you want them to be recorded. 8 Press on the remote to the Radio", or "Playing Preset Radio Stations" for the disc tray containing the CD you want to release recording pause. To stop recording Press... § EJECT and insert a blank tape into deck B with the side you want to record is memorized. To check the order Press CHECK on the remote) to select A ß or RELAY * Recording always stops at the end of the tape Both sides* Press DIRECTION to choose a track. 6 Press ENTER...
...Press PLAY MODE repeatedly until the desired radio band appears. 3 Tune in the radio station you want them to be recorded. 8 Press on the remote to the Radio", or "Playing Preset Radio Stations" for the disc tray containing the CD you want to release recording pause. To stop recording Press... § EJECT and insert a blank tape into deck B with the side you want to record is memorized. To check the order Press CHECK on the remote) to select A ß or RELAY * Recording always stops at the end of the tape Both sides* Press DIRECTION to choose a track. 6 Press ENTER...
Operating Instructions
Page 20
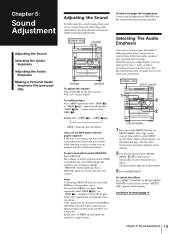
... full strength, the equalizer curve changes and the "GROOVE" button lights up. See the chart "Music menu options" on the remote) repeatedly to musical genre or use the DBFB System with the graphic equalizer If the bass is provided with DBFB or GROOVE activated when connecting an optional super woofer... (Sony SA-W10, etc.) to the previous volume. To cancel the effect Press EFFECT ON/OFF (or MUSIC MENU ON/OFF on the remote) so that menu...
... full strength, the equalizer curve changes and the "GROOVE" button lights up. See the chart "Music menu options" on the remote) repeatedly to musical genre or use the DBFB System with the graphic equalizer If the bass is provided with DBFB or GROOVE activated when connecting an optional super woofer... (Sony SA-W10, etc.) to the previous volume. To cancel the effect Press EFFECT ON/OFF (or MUSIC MENU ON/OFF on the remote) so that menu...
Operating Instructions
Page 22
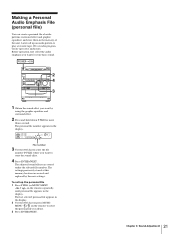
... Chapter 5: Sound Adjustment Later call up the personal file 1 Press P FILE (or MUSIC MENU / on the remote) repeatedly until personal file appears in the display. 2 Use the JOG dial (or press MUSIC MENU / on the remote) to store the sound effect. 4 Press ENTER/NEXT. POWERnON 2 4 3 1 Obtain the sound effect you want by...
... Chapter 5: Sound Adjustment Later call up the personal file 1 Press P FILE (or MUSIC MENU / on the remote) repeatedly until personal file appears in the display. 2 Use the JOG dial (or press MUSIC MENU / on the remote) to store the sound effect. 4 Press ENTER/NEXT. POWERnON 2 4 3 1 Obtain the sound effect you want by...
Operating Instructions
Page 23
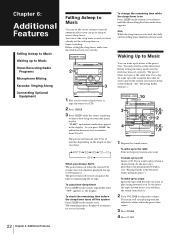
...Singing Along Connecting Optional EN Equipment 22 Chapter 6: Additional Features Falling Asleep to Music You can set the stereo system to turn off after 90 to 10 minutes depending on the remote repeatedly until the desired length of the radio, be sure to preset the station you want to listen to ... programmed CD play. (see "Playing Tracks in minutes for up to choose how long you choose AUTO The power turns off the system Press SLEEP on the remote several seconds. The power will turn off automatically so you will start playing with the side you want the music to play it...
...Singing Along Connecting Optional EN Equipment 22 Chapter 6: Additional Features Falling Asleep to Music You can set the stereo system to turn off after 90 to 10 minutes depending on the remote repeatedly until the desired length of the radio, be sure to preset the station you want to listen to ... programmed CD play. (see "Playing Tracks in minutes for up to choose how long you choose AUTO The power turns off the system Press SLEEP on the remote several seconds. The power will turn off automatically so you will start playing with the side you want the music to play it...
Operating Instructions
Page 29
... clean the CD When a CD is an obstacle between the remote and the system. There is a scratch, dirt or fingerprints on the heads to begin to the stereo system. The headphones are reversed. Sound comes from an optional super woofer (Sony SA-W10, etc.) is in program or shuffle mode. Check... the speaker connection for about an hour until the moisture evaporates. Move the stereo system away from the center out. The remote does not function. There is dirty, clean it...
... clean the CD When a CD is an obstacle between the remote and the system. There is a scratch, dirt or fingerprints on the heads to begin to the stereo system. The headphones are reversed. Sound comes from an optional super woofer (Sony SA-W10, etc.) is in program or shuffle mode. Check... the speaker connection for about an hour until the moisture evaporates. Move the stereo system away from the center out. The remote does not function. There is dirty, clean it...
Operating Instructions
Page 30
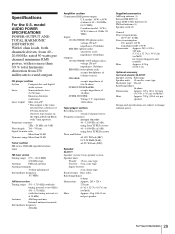
...1 V, impedance 1 kilo ohms. Tape player section Recording system 4-track 2-channel stereo Frequency response (DOLBY NR OFF) 40 - 13,000 Hz (±3 dB), using Sony TYPE I cassette 40 - 14,000 Hz (±3 dB), using Sony TYPE II cassette Wow and flutter ±0.15% W.Peak...360 mm (11 1/8 x 12 7/8 x 14 1/4 in ) (w/h/d/) Approx. 700 g (1 lb 8 oz) per speaker Supplied accessories AM loop antenna (1) Remote RM-SD50 (1) Sony SUM-3 (NS) batteries (2) FM lead antenna (1) Speaker cords (2) General Power requirements 120 V AC, 60 Hz Power consumption U.S. projecting parts and controls Mass ...
...1 V, impedance 1 kilo ohms. Tape player section Recording system 4-track 2-channel stereo Frequency response (DOLBY NR OFF) 40 - 13,000 Hz (±3 dB), using Sony TYPE I cassette 40 - 14,000 Hz (±3 dB), using Sony TYPE II cassette Wow and flutter ±0.15% W.Peak...360 mm (11 1/8 x 12 7/8 x 14 1/4 in ) (w/h/d/) Approx. 700 g (1 lb 8 oz) per speaker Supplied accessories AM loop antenna (1) Remote RM-SD50 (1) Sony SUM-3 (NS) batteries (2) FM lead antenna (1) Speaker cords (2) General Power requirements 120 V AC, 60 Hz Power consumption U.S. projecting parts and controls Mass ...
Operating Instructions
Page 32
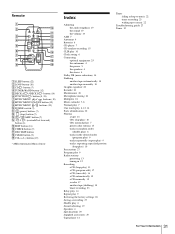
Remote 1 2 !º !¡ 3 !™ 4 !£ 5 !¢ !∞ 6 !§ 7 !¶ 8 !• 9 !ª 1 SLEEP button (22) 2 LOOP button (10) 3 CD button (7) 4 TUNER/BAND button (12) 5 DECK A /DECK B button (...
Remote 1 2 !º !¡ 3 !™ 4 !£ 5 !¢ !∞ 6 !§ 7 !¶ 8 !• 9 !ª 1 SLEEP button (22) 2 LOOP button (10) 3 CD button (7) 4 TUNER/BAND button (12) 5 DECK A /DECK B button (...


