

Limited Warranty (US Only)
Page 1
...FOR BREACH OF ANY EXPRESS OR IMPLIED WARRANTY ON THIS PRODUCT. In addition, if you enter into a service contract with the Sony Partnership within the Warranty period must pay for all labor charges. 2. After the Warranty Period, you . Proof of purchase in...For a period of purchase, if this Product (including any Sony authorized service facility. 4-557-172-02 General Stereo/Hifi Components/Tape Decks ® CD Players/Mini Disc Players/Audio Systems Hifi Audio LIMITED WARRANTY Sony Electronics Inc. ("Sony") warrants this Product is determined to be presented to obtain warranty...
...FOR BREACH OF ANY EXPRESS OR IMPLIED WARRANTY ON THIS PRODUCT. In addition, if you enter into a service contract with the Sony Partnership within the Warranty period must pay for all labor charges. 2. After the Warranty Period, you . Proof of purchase in...For a period of purchase, if this Product (including any Sony authorized service facility. 4-557-172-02 General Stereo/Hifi Components/Tape Decks ® CD Players/Mini Disc Players/Audio Systems Hifi Audio LIMITED WARRANTY Sony Electronics Inc. ("Sony") warrants this Product is determined to be presented to obtain warranty...
Operating Instructions
Page 4
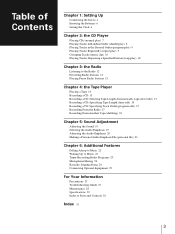
Table of Contents Chapter 1: Setting Up Connecting the Stereo 4 Inserting the Batteries 6 Setting the Clock 6 Chapter 2: the CD Player Playing CDs (normal play) 7 Playing Tracks in Random Order (shuffle play) 8 Playing Tracks in the ...
Table of Contents Chapter 1: Setting Up Connecting the Stereo 4 Inserting the Batteries 6 Setting the Clock 6 Chapter 2: the CD Player Playing CDs (normal play) 7 Playing Tracks in Random Order (shuffle play) 8 Playing Tracks in the ...
Operating Instructions
Page 5
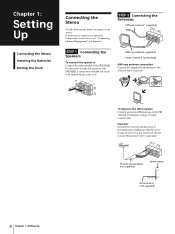
If you want to connect any optional components to connect your stereo. Chapter 1: Setting Up Connecting the Stereo Inserting the Batteries Setting the Clock EN Connecting the Stereo Use the illustrations below to the stereo, see "Connecting Optional Equipment" in Chapter 6. R ' L ' ' ' AM loop antenna (supplied) * Note: Extend it horizontally AM loop antenna connection Connect the supplied...
If you want to connect any optional components to connect your stereo. Chapter 1: Setting Up Connecting the Stereo Inserting the Batteries Setting the Clock EN Connecting the Stereo Use the illustrations below to the stereo, see "Connecting Optional Equipment" in Chapter 6. R ' L ' ' ' AM loop antenna (supplied) * Note: Extend it horizontally AM loop antenna connection Connect the supplied...
Operating Instructions
Page 7
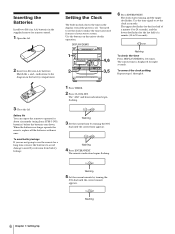
... 6 Chapter 1: Setting Up Match the + and - Use the buttons on the unit to the diagram in the supplied remote for the last half of your stereo system. Use the time signal to set the clock to utilize the timer-activated features of a minute (30 to avoid damage caused by turning the JOG... dial until the correct hour appears. To avoid battery leakage If you are not going to use the remote for about six months (using Sony SUM-3 (NS) batteries) before the batteries run down. The "AM" and hour indication begin flashing. flashing To check the time Press DISPLAY/DEMO a few times...
... 6 Chapter 1: Setting Up Match the + and - Use the buttons on the unit to the diagram in the supplied remote for the last half of your stereo system. Use the time signal to set the clock to utilize the timer-activated features of a minute (30 to avoid damage caused by turning the JOG... dial until the correct hour appears. To avoid battery leakage If you are not going to use the remote for about six months (using Sony SUM-3 (NS) batteries) before the batteries run down. The "AM" and hour indication begin flashing. flashing To check the time Press DISPLAY/DEMO a few times...
Operating Instructions
Page 13
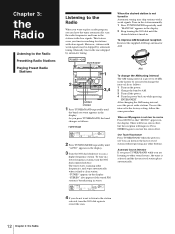
... the desired station is not tuned in the factory. If you want to listen to receive Press MONO so that "MONO" appears in stereo. There will improve. You can have the tuner automatically scan the radio frequencies and tune in searching for AM. When an FM program ...is broadcasting in the display. "STEREO" also appears if the tuned FM station is not clear to the station selected, turn the JOG dial counterclockwise. To improve AM broadcast reception...
... the desired station is not tuned in the factory. If you want to listen to receive Press MONO so that "MONO" appears in stereo. There will improve. You can have the tuner automatically scan the radio frequencies and tune in searching for AM. When an FM program ...is broadcasting in the display. "STEREO" also appears if the tuned FM station is not clear to the station selected, turn the JOG dial counterclockwise. To improve AM broadcast reception...

Operating Instructions
Page 14
... buttons on the remote) to store in the display. POWERnON Playing Preset Radio Stations Once you want to tune in the display. CLIP TUNER 1 TUNED STEREO 63 125 250 500 1k 2k 4k 8k 16k(Hz) AUTO VOLUME Preset channel number 3 Turn the JOG dial to 4 for presetting stations. To erase...
... buttons on the remote) to store in the display. POWERnON Playing Preset Radio Stations Once you want to tune in the display. CLIP TUNER 1 TUNED STEREO 63 125 250 500 1k 2k 4k 8k 16k(Hz) AUTO VOLUME Preset channel number 3 Turn the JOG dial to 4 for presetting stations. To erase...
Operating Instructions
Page 16
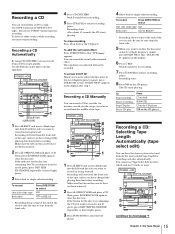
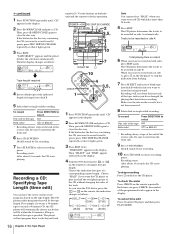
...-CHANGE 2 3 1 7 5 4 6 continue to start from the front side of the reverse side. If the button for the disc tray containing the CD you have the stereo system select and indicate the most suitable tape length for instance, record just the songs you want or record from the front side of the tape...
...-CHANGE 2 3 1 7 5 4 6 continue to start from the front side of the reverse side. If the button for the disc tray containing the CD you have the stereo system select and indicate the most suitable tape length for instance, record just the songs you want or record from the front side of the tape...
Operating Instructions
Page 17
... to select A ß or RELAY * Recording always stops at the end of the indicated length (or longer) into deck B with the side you have the stereo system create programs based on facing forward. Be sure to record CD which has more than 20 tracks. 5 Press EDIT. Recording will automatically choose tracks that...
... to select A ß or RELAY * Recording always stops at the end of the indicated length (or longer) into deck B with the side you have the stereo system create programs based on facing forward. Be sure to record CD which has more than 20 tracks. 5 Press EDIT. Recording will automatically choose tracks that...
Operating Instructions
Page 20
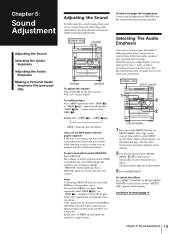
... can monitor the effect of effects according to musical genre or use the DBFB System with the graphic equalizer If the bass is provided with DBFB or GROOVE activated when connecting an optional super woofer (Sony SA-W10, etc.) to full strength, the equalizer curve changes and the "...EFFECT ON/OFF (or MUSIC MENU ON/OFF on the remote repeatedly) to obtain the effect you use . Selecting The Audio Emphasis Your stereo system is too strong, the music will come from different graphic equalizer and surround effect settings. Adjust the equalization to select the preset you store...
... can monitor the effect of effects according to musical genre or use the DBFB System with the graphic equalizer If the bass is provided with DBFB or GROOVE activated when connecting an optional super woofer (Sony SA-W10, etc.) to full strength, the equalizer curve changes and the "...EFFECT ON/OFF (or MUSIC MENU ON/OFF on the remote repeatedly) to obtain the effect you use . Selecting The Audio Emphasis Your stereo system is too strong, the music will come from different graphic equalizer and surround effect settings. Adjust the equalization to select the preset you store...
Operating Instructions
Page 23
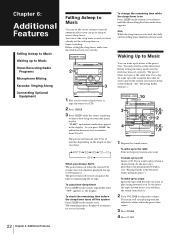
...-Recording Radio Programs Microphone Mixing Karaoke: Singing Along Connecting Optional EN Equipment 22 Chapter 6: Additional Features Falling Asleep to Music You can set the stereo system to turn off after 90 to 100 minutes). You can wake up to music (sleep timer). Waking Up to Music You can set the ...CD). 2 Press TIMER. 3 Press SLEEP while the source is on Press SLEEP on the remote once. When you choose AUTO The power turns off the system Press SLEEP on the remote several seconds. To check the remaining time before the sleep timer turns off when the current CD or tape (one...
...-Recording Radio Programs Microphone Mixing Karaoke: Singing Along Connecting Optional EN Equipment 22 Chapter 6: Additional Features Falling Asleep to Music You can set the stereo system to turn off after 90 to 100 minutes). You can wake up to music (sleep timer). Waking Up to Music You can set the ...CD). 2 Press TIMER. 3 Press SLEEP while the source is on Press SLEEP on the remote once. When you choose AUTO The power turns off the system Press SLEEP on the remote several seconds. To check the remaining time before the sleep timer turns off when the current CD or tape (one...

Operating Instructions
Page 25
... right (R) or left (L) according to the encoding on a tape. To cancel vocal reduction, press KARAOKE PON/MPX repeatedly so that "h PON" appears in the stereo recorded source •A duet is being played, press π on the CD player to stop playing. 2 Start recording. 3 Sing or speak into a microphone...direction of the microphone. 5 Sing or speak into the microphone. 6 Adjust MIC LEVEL. 7 If you want to record the sound of the components and singing or speaking into the microphone. The mixed sounds can hear your voice, operate steps below. Notes on vocal reduction The singer's voice ...
... right (R) or left (L) according to the encoding on a tape. To cancel vocal reduction, press KARAOKE PON/MPX repeatedly so that "h PON" appears in the stereo recorded source •A duet is being played, press π on the CD player to stop playing. 2 Start recording. 3 Sing or speak into a microphone...direction of the microphone. 5 Sing or speak into the microphone. 6 Adjust MIC LEVEL. 7 If you want to record the sound of the components and singing or speaking into the microphone. The mixed sounds can hear your voice, operate steps below. Notes on vocal reduction The singer's voice ...
Operating Instructions
Page 26
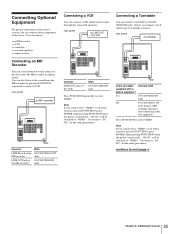
...equalizer? Note If you cannot select "VIDEO" even when you have. "100 CD" will be switched to the stereo. To return to LINE OUT of a VCR Connect LINE OUT jacks of 100 CD/VIDEO IN the MD recorder jacks... by pressing FUNCTION repeatedly to next page 25 Chapter 6: Additional Features Connecting Optional Equipment For greater enjoyment of your stereo system, you have pressed FUNCTION, press POWER while pressing FUNCTION when the power is turned off . "100 CD" ... •surround speakers •a super woofer Connecting an MD Recorder You can connect other components to "VIDEO".
...equalizer? Note If you cannot select "VIDEO" even when you have. "100 CD" will be switched to the stereo. To return to LINE OUT of a VCR Connect LINE OUT jacks of 100 CD/VIDEO IN the MD recorder jacks... by pressing FUNCTION repeatedly to next page 25 Chapter 6: Additional Features Connecting Optional Equipment For greater enjoyment of your stereo system, you have pressed FUNCTION, press POWER while pressing FUNCTION when the power is turned off . "100 CD" ... •surround speakers •a super woofer Connecting an MD Recorder You can connect other components to "VIDEO".
Operating Instructions
Page 28
... wall outlet, even if the unit itself . • Should any problem persist after you run into the component, unplug the stereo system and have made the checks below, consult your nearest Sony dealer. Adjust the antenna. Tape Player The tape does not record. The signal strength is placed in...tab from the AC power source (mains) as long as illustrated. Dusty or dirty - "STEREO" flashes in the cassette holder. On installation •Place the stereo system in the CD player component If the system is excessive wow or flutter, or the sound drops out. Severe hum or noise. The ...
... wall outlet, even if the unit itself . • Should any problem persist after you run into the component, unplug the stereo system and have made the checks below, consult your nearest Sony dealer. Adjust the antenna. Tape Player The tape does not record. The signal strength is placed in...tab from the AC power source (mains) as long as illustrated. Dusty or dirty - "STEREO" flashes in the cassette holder. On installation •Place the stereo system in the CD player component If the system is excessive wow or flutter, or the sound drops out. Severe hum or noise. The ...
Operating Instructions
Page 29
... evaporates. continued CD Player The disc tray does not close to the stereo system. "CD NO DISC" is an obstacle between the remote and the system. EN General The sound from an optional super woofer (Sony SA-W10, etc.) is apparently imprecise. The headphones are connected. Check...the obstacle. Notes on CD •Do not use , enough residual magnetism will not play. The CD is too close . Move the stereo system away from the center out. Moisture condensation has built up on the CD, it with a commercially available tape head demagnetizer. There is ...
... evaporates. continued CD Player The disc tray does not close to the stereo system. "CD NO DISC" is an obstacle between the remote and the system. EN General The sound from an optional super woofer (Sony SA-W10, etc.) is apparently imprecise. The headphones are connected. Check...the obstacle. Notes on CD •Do not use , enough residual magnetism will not play. The CD is too close . Move the stereo system away from the center out. Moisture condensation has built up on the CD, it with a commercially available tape head demagnetizer. There is ...
Operating Instructions
Page 30
... impedance of 16 ohms. SUPER WOOFER: Voltage 1 V, impedance 1 kilo ohms. Tape player section Recording system 4-track 2-channel stereo Frequency response (DOLBY NR OFF) 40 - 13,000 Hz (±3 dB), using Sony TYPE I cassette 40 - 14,000 Hz (±3 dB), using Sony TYPE II cassette Wow and flutter ±0.15% W.Peak (IEC) 0.1% W.RMS (NAB) ±...
... impedance of 16 ohms. SUPER WOOFER: Voltage 1 V, impedance 1 kilo ohms. Tape player section Recording system 4-track 2-channel stereo Frequency response (DOLBY NR OFF) 40 - 13,000 Hz (±3 dB), using Sony TYPE I cassette 40 - 14,000 Hz (±3 dB), using Sony TYPE II cassette Wow and flutter ±0.15% W.Peak (IEC) 0.1% W.RMS (NAB) ±...
Operating Instructions
Page 31
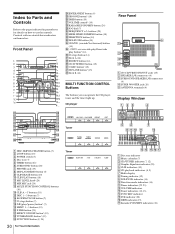
...C D 1/ALL DISCS PLAY MODE REPEAT EDIT #¢ #¢ #∞ #§ #∞ #§ Tuner #¶ #• $™ #• TUNER TUNING MODE TUNER MEMORY STEREO MONO 1 DISC SKIP EX-CHANGE button (7) 2 LOOP button (10) 3 POWER switch (7) 4 Disc tray (7) 5 TIMER button (22) 6 SURROUND button (20) 7 PHONES jack ...C ALL1DISC S PROGRAM SHUFFLE REPEAT1 KHz MHz 56 7 8 9 0 !¡ !™ TIMER DAILY12 REC SLEEP RELAY VOLUME DOLBY NRB OFF TUNED STEREO MONO 250 500 1k 2k 4k 8k 16k(Hz) MPX STEP KHz 2 1 AUTO MANUAL SYNC SUR MHz 3 PRESET REC PONLR DBFB 1 Disc ...
...C D 1/ALL DISCS PLAY MODE REPEAT EDIT #¢ #¢ #∞ #§ #∞ #§ Tuner #¶ #• $™ #• TUNER TUNING MODE TUNER MEMORY STEREO MONO 1 DISC SKIP EX-CHANGE button (7) 2 LOOP button (10) 3 POWER switch (7) 4 Disc tray (7) 5 TIMER button (22) 6 SURROUND button (20) 7 PHONES jack ...C ALL1DISC S PROGRAM SHUFFLE REPEAT1 KHz MHz 56 7 8 9 0 !¡ !™ TIMER DAILY12 REC SLEEP RELAY VOLUME DOLBY NRB OFF TUNED STEREO MONO 250 500 1k 2k 4k 8k 16k(Hz) MPX STEP KHz 2 1 AUTO MANUAL SYNC SUR MHz 3 PRESET REC PONLR DBFB 1 Disc ...
Operating Instructions
Page 32
... AMS 7 Antennas 4 Batteries 6 CD player 7 CD synchro recording 15 CLIP play 10 Clock setting 6 Connecting optional equipment 25 the antennnas 4 the power 5 the speakers 4 the stereo 4 Dolby NR (noise reduction) 14 Dubbing another tape automatically 18 another tape manually 18 Graphic equalizer 20 Karaoke 24 Maintenance 28 Microphone mixing 24 Multiplex...
... AMS 7 Antennas 4 Batteries 6 CD player 7 CD synchro recording 15 CLIP play 10 Clock setting 6 Connecting optional equipment 25 the antennnas 4 the power 5 the speakers 4 the stereo 4 Dolby NR (noise reduction) 14 Dubbing another tape automatically 18 another tape manually 18 Graphic equalizer 20 Karaoke 24 Maintenance 28 Microphone mixing 24 Multiplex...


