
Operating Instructions
Page 2
... is possible. • MP3 file playback recorded on a disc is possible. • CD-R/CD-RW which can have a session added can be played (page 47). • Discs recorded in Multi Session (CD-Extra, Mixed CD, etc.) can be determined by one or more of the following measures: - This information ...a Class B digital device, pursuant to Part 15 of optical instruments with this Sony Compact Disc Player. Connect the equipment into an outlet on , the user is no guarantee that to which can radiate radio frequency energy and, if not installed and used in a residential installation. Consult the...
... is possible. • MP3 file playback recorded on a disc is possible. • CD-R/CD-RW which can have a session added can be played (page 47). • Discs recorded in Multi Session (CD-Extra, Mixed CD, etc.) can be determined by one or more of the following measures: - This information ...a Class B digital device, pursuant to Part 15 of optical instruments with this Sony Compact Disc Player. Connect the equipment into an outlet on , the user is no guarantee that to which can radiate radio frequency energy and, if not installed and used in a residential installation. Consult the...
Operating Instructions
Page 4
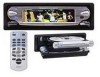
... picture data - Char Setup 38 4 Disc Memo 25 Locating a track/disc by name - List-up 26 * Functions available with optional CD/MD unit Radio Storing stations automatically - Picture Del 37 Setting the display characters - Repeat Play 24 Playing tracks in a station through a list - List...image - Table of Contents Location of controls 6 General top menu display 9 Basic operations Listening to a CD 10 Listening to ATRAC3 files in "MG Memory Stick 12 Listening to radio 14 Selecting the display mode and display pattern 15 Displaying/storing a static image from a "Memory Stick ...
... picture data - Char Setup 38 4 Disc Memo 25 Locating a track/disc by name - List-up 26 * Functions available with optional CD/MD unit Radio Storing stations automatically - Picture Del 37 Setting the display characters - Repeat Play 24 Playing tracks in a station through a list - List...image - Table of Contents Location of controls 6 General top menu display 9 Basic operations Listening to a CD 10 Listening to ATRAC3 files in "MG Memory Stick 12 Listening to radio 14 Selecting the display mode and display pattern 15 Displaying/storing a static image from a "Memory Stick ...

Operating Instructions
Page 7
... the display mode. m Disc tray n N (play) button 10, 21 o "Memory Stick" slot p "Memory Stick" access lamp *1 When an optional CD/MD unit is connected, "AUX" is not displayed. *2 Warning when installing in a car without an ACC (accessory) position on the ignition switch After turning ...the clock display. g VOL (volume) control lever h Reset button 20 i Receptor for details. k . > lever Selecting radio stations, the items to be sure to press (OFF) on /Radio/CD/MG- continue to next page t 7 Refer to the pages listed for the card remote commander and wireless rotary commander j SHIFT...
... the display mode. m Disc tray n N (play) button 10, 21 o "Memory Stick" slot p "Memory Stick" access lamp *1 When an optional CD/MD unit is connected, "AUX" is not displayed. *2 Warning when installing in a car without an ACC (accessory) position on the ignition switch After turning ...the clock display. g VOL (volume) control lever h Reset button 20 i Receptor for details. k . > lever Selecting radio stations, the items to be sure to press (OFF) on /Radio/CD/MG- continue to next page t 7 Refer to the pages listed for the card remote commander and wireless rotary commander j SHIFT...
Operating Instructions
Page 10
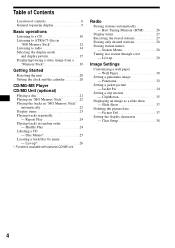
.... • The disc tray and front panel closes automatically after the disc tray and front panel closes. Tip If you close the disc tray without a CD in the disc tray, the disc may be damaged. 4 Press N. The front panel opens. 2 Press Z (OPEN/CLOSE) on the disc tray until... " (CD icon)" or "CD" appears. To adjust the volume level Press up ). Notes • Do not place more than 1 second, the front panel opens first, then the disc tray ...
.... • The disc tray and front panel closes automatically after the disc tray and front panel closes. Tip If you close the disc tray without a CD in the disc tray, the disc may be damaged. 4 Press N. The front panel opens. 2 Press Z (OPEN/CLOSE) on the disc tray until... " (CD icon)" or "CD" appears. To adjust the volume level Press up ). Notes • Do not place more than 1 second, the front panel opens first, then the disc tray ...
Operating Instructions
Page 21
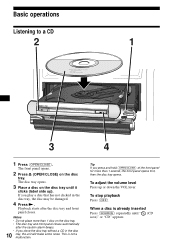
... Stop playback (OFF) Skip tracks - Automatic Music Sensor ) [once for each track] Fast-forward/ CD/MG-MS Player CD/MD Unit (optional) In addition to playing a CD with the CD TEXT function, the CD TEXT information will appear in the display, and playback starts. (If you press Z, the disc tray ...after the disc tray and front panel closes. Note If you can also control external CD/MD units. Album selection lever up /down reverse [hold until " (CD icon)"or "CD" appears in the display when you play a CD TEXT disc. : Operation by this unit : Operation by card remote commander Playing a...
... Stop playback (OFF) Skip tracks - Automatic Music Sensor ) [once for each track] Fast-forward/ CD/MG-MS Player CD/MD Unit (optional) In addition to playing a CD with the CD TEXT function, the CD TEXT information will appear in the display, and playback starts. (If you press Z, the disc tray ...after the disc tray and front panel closes. Note If you can also control external CD/MD units. Album selection lever up /down reverse [hold until " (CD icon)"or "CD" appears in the display when you play a CD TEXT disc. : Operation by this unit : Operation by card remote commander Playing a...
Operating Instructions
Page 23
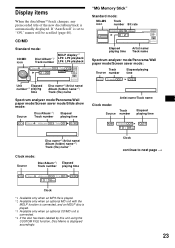
CD/MD Standard mode: CD/MD icon MDLP display*2 Disc/Album*1/ LP2: LP2 playback Track number LP4: LP4 playback "MG Memory Stick" Standard mode: MG-MS icon Track number Bit ... played. *2 Available only when an optional MD unit with the MDLP function is connected, and an MDLP disc is played. *3 Available only when an optional CD/MD unit is connected. *4 If the disc has been labeled by this unit using the CUSTOM FILE function, Disc Memo is automatically displayed.
CD/MD Standard mode: CD/MD icon MDLP display*2 Disc/Album*1/ LP2: LP2 playback Track number LP4: LP4 playback "MG Memory Stick" Standard mode: MG-MS icon Track number Bit ... played. *2 Available only when an optional MD unit with the MDLP function is connected, and an MDLP disc is played. *3 Available only when an optional CD/MD unit is connected. *4 If the disc has been labeled by this unit using the CUSTOM FILE function, Disc Memo is automatically displayed.

Operating Instructions
Page 24
...random order. • SHUF All *3 - Tip When "AutoScroll" is set to repeat a track. *1 - For repeat play the tracks in the current optional CD (MD) unit in ASCII. Shuffle Play You can only be displayed accurately. - to normal play the tracks in the current album in random order. •...; SHUF *2 - To return to play , you can select: CD/MD • REP • REP • REP - during fast-forward/reverse. Repeat Play The disc in random order - to "OFF" and the disc/album...
...random order. • SHUF All *3 - Tip When "AutoScroll" is set to repeat a track. *1 - For repeat play the tracks in the current optional CD (MD) unit in ASCII. Shuffle Play You can only be displayed accurately. - to normal play the tracks in the current album in random order. •...; SHUF *2 - To return to play , you can select: CD/MD • REP • REP • REP - during fast-forward/reverse. Repeat Play The disc in random order - to "OFF" and the disc/album...
Operating Instructions
Page 25
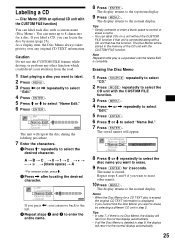
If you label a CD, you can enter up to 8 characters for a disc. A t B t C ... If you want to label. 2 Press (MENU). 3 Press < or , repeatedly to select "Edit." 4 Press (ENTER). 5 Press M or m ... always takes priority over any other function which could divert your attention from the road. 1 Start playing a disc you press Disc Memo (With an optional CD unit with the CUSTOM FILE function) You can label each disc with a custom name (Disc Memo). Caution Do not use the CUSTOM FILE feature while...
If you label a CD, you can enter up to 8 characters for a disc. A t B t C ... If you want to label. 2 Press (MENU). 3 Press < or , repeatedly to select "Edit." 4 Press (ENTER). 5 Press M or m ... always takes priority over any other function which could divert your attention from the road. 1 Start playing a disc you press Disc Memo (With an optional CD unit with the CUSTOM FILE function) You can label each disc with a custom name (Disc Memo). Caution Do not use the CUSTOM FILE feature while...
Operating Instructions
Page 26
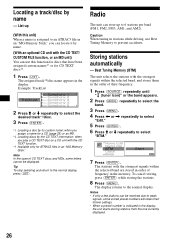
...8226; If only a few stations can store up (With this unit) When a name is indicated in an "MG Memory Stick." Storing stations automatically - Radio The unit can be displayed. The display returns to the normal display, press (LIST). To cancel storing, press (ENTER) while storing the stations. 8... Press (MENU). Note In the case of CD TEXT discs and MDs, some letters cannot be received due to weak signals, some stored preset numbers will retain their frequency. 1 Press (SOURCE)...
...8226; If only a few stations can store up (With this unit) When a name is indicated in an "MG Memory Stick." Storing stations automatically - Radio The unit can be displayed. The display returns to the normal display, press (LIST). To cancel storing, press (ENTER) while storing the stations. 8... Press (MENU). Note In the case of CD TEXT discs and MDs, some letters cannot be received due to weak signals, some stored preset numbers will retain their frequency. 1 Press (SOURCE)...
Operating Instructions
Page 35
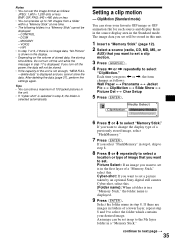
...unit. • If "Cyber-shot" is selected in a "Memory Stick," the folder name is displayed. If you want to set a picture taken by an optional Sony digital still camera Cyber-shot, select this . Tips • You can store a maximum of stored data, the storing time differs. The image data you set... will not be stored in this unit. 1 Insert a "Memory Stick" (page 12). 2 Select a source (radio, CD, MD, MS, or AUX) that you want to set in up to 100 images from a folder within a "Memory Stick" at one time. • The following...
...unit. • If "Cyber-shot" is selected in a "Memory Stick," the folder name is displayed. If you want to set a picture taken by an optional Sony digital still camera Cyber-shot, select this . Tips • You can store a maximum of stored data, the storing time differs. The image data you set... will not be stored in this unit. 1 Insert a "Memory Stick" (page 12). 2 Select a source (radio, CD, MD, MS, or AUX) that you want to set in up to 100 images from a folder within a "Memory Stick" at one time. • The following...
Operating Instructions
Page 38
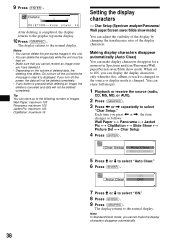
... the pre-stored images in Spectrum analyzer/Panorama/Wall paper/Screen saver/Slide show mode) You can enjoy full images. 1 Playback or receive the source (radio, CD, MS, MD, or AUX). 2 Press (GRAPHIC). 3 Press < or , repeatedly to the following number of the display characters. The display returns to the graphic top menu...
... the pre-stored images in Spectrum analyzer/Panorama/Wall paper/Screen saver/Slide show mode) You can enjoy full images. 1 Playback or receive the source (radio, CD, MS, MD, or AUX). 2 Press (GRAPHIC). 3 Press < or , repeatedly to the following number of the display characters. The display returns to the graphic top menu...

Operating Instructions
Page 39
...Blend Level." 6 Press (ENTER). Quickly attenuating the sound Press (ATT). "ATT" appears in the display to appear opaque. 1 Playback or receive the source (radio, CD, MS, MD, or AUX). 2 Press (GRAPHIC). 3 Press < or , repeatedly to select the permeation ratio (Level 0-15). By setting this level down... to select "Char Setup." Each time you can adjust the bass, treble, balance, fader, and subwoofer volume. 1 Press (SOURCE) to select a source (radio, CD, MD, MS, or AUX). 2 Press (SOUND). 3 Press < or , repeatedly to adjust. The display returns to the ATT lead, the unit decreases ...
...Blend Level." 6 Press (ENTER). Quickly attenuating the sound Press (ATT). "ATT" appears in the display to appear opaque. 1 Playback or receive the source (radio, CD, MS, MD, or AUX). 2 Press (GRAPHIC). 3 Press < or , repeatedly to select the permeation ratio (Level 0-15). By setting this level down... to select "Char Setup." Each time you can adjust the bass, treble, balance, fader, and subwoofer volume. 1 Press (SOURCE) to select a source (radio, CD, MD, MS, or AUX). 2 Press (SOUND). 3 Press < or , repeatedly to adjust. The display returns to the ATT lead, the unit decreases ...
Operating Instructions
Page 40
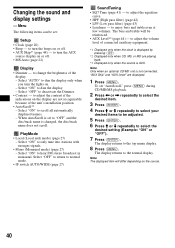
...source. 40 to change the brightness of connected auxiliary equipment. *1 Displayed only when the clock is displayed by pressing (OFF). *2 Displayed only when CD, MS, or MD are playing back. *3 Displayed only when the source is AUX. Select "ON" to the normal display. PlayMode • Local...page 22) Display • Dimmer - Note The displayed item will be reinforced. • AUX Level*3 (page 44) - Note Only when an optional CD/MD unit is changed, the disc/track name does not scroll. The bass and treble will differ depending on the display are displayed. 1 Press (MENU...
...source. 40 to change the brightness of connected auxiliary equipment. *1 Displayed only when the clock is displayed by pressing (OFF). *2 Displayed only when CD, MS, or MD are playing back. *3 Displayed only when the source is AUX. Select "ON" to the normal display. PlayMode • Local...page 22) Display • Dimmer - Note The displayed item will be reinforced. • AUX Level*3 (page 44) - Note Only when an optional CD/MD unit is changed, the disc/track name does not scroll. The bass and treble will differ depending on the display are displayed. 1 Press (MENU...
Operating Instructions
Page 41
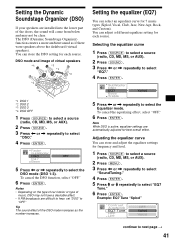
... *3 *3 *1 *1 *2 *2 *4 *4 Setting the equalizer (EQ7) You can store and adjust the equalizer settings for frequency and level. 1 Press (SOURCE) to select a source (radio, CD, MD, MS, or AUX). 2 Press (MENU). 3 Press < or , repeatedly to select "SoundTuning." 4 Press (ENTER). 5 Press M or m repeatedly to select the Equalizer mode... from below and may not have a desirable affect. • If FM broadcasts are automatically adjusted for 7 music types (Xplod, Vocal, Club, Jazz, New Age, Rock, and Custom). To cancel the DSO function, select "OFF." 6 Press (ENTER). Example: EQ7 Tune...
... *3 *3 *1 *1 *2 *2 *4 *4 Setting the equalizer (EQ7) You can store and adjust the equalizer settings for frequency and level. 1 Press (SOURCE) to select a source (radio, CD, MD, MS, or AUX). 2 Press (MENU). 3 Press < or , repeatedly to select "SoundTuning." 4 Press (ENTER). 5 Press M or m repeatedly to select the Equalizer mode... from below and may not have a desirable affect. • If FM broadcasts are automatically adjusted for 7 music types (Xplod, Vocal, Club, Jazz, New Age, Rock, and Custom). To cancel the DSO function, select "OFF." 6 Press (ENTER). Example: EQ7 Tune...
Operating Instructions
Page 42
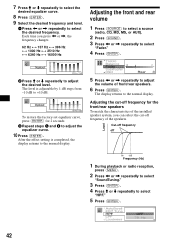
... steps from -10 dB to adjust the equalizer curve. 10 Press (ENTER). Each time you can select the cut -off Frequency (Hz) 1 During playback or radio reception, press (MENU). 2 Press < or , repeatedly to select "SoundTuning." 3 Press (ENTER). 4 Press M or m repeatedly to the normal display. To ...Hz y 396 Hz y 1000 Hz y 2510 Hz y 6340 Hz y 16000 Hz Adjusting the front and rear volume 1 Press (SOURCE) to select a source (radio, CD, MD, MS, or AUX). 2 Press (SOUND). 3 Press < or , repeatedly to select "Fader." 4 Press (ENTER). 2 Press M or m repeatedly to select the desired frequency...
... steps from -10 dB to adjust the equalizer curve. 10 Press (ENTER). Each time you can select the cut -off Frequency (Hz) 1 During playback or radio reception, press (MENU). 2 Press < or , repeatedly to select "SoundTuning." 3 Press (ENTER). 4 Press M or m repeatedly to the normal display. To ...Hz y 396 Hz y 1000 Hz y 2510 Hz y 6340 Hz y 16000 Hz Adjusting the front and rear volume 1 Press (SOURCE) to select a source (radio, CD, MD, MS, or AUX). 2 Press (SOUND). 3 Press < or , repeatedly to select "Fader." 4 Press (ENTER). 2 Press M or m repeatedly to select the desired frequency...
Operating Instructions
Page 43
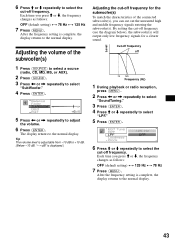
...), the subwoofer(s) will output only low frequency signals for the subwoofer(s) To match the characteristics of the subwoofer(s) 1 Press (SOURCE) to select a source (radio, CD, MD, MS, or AUX). 2 Press (SOUND). 3 Press < or , repeatedly to select "SubWoofer." 4 Press (ENTER). 5 Press < or ,...cut-off frequency. After the frequency setting is complete, the display returns to the normal display. Cut-off frequency off Frequency (Hz) 1 During playback or radio reception, press (MENU). 2 Press < or , repeatedly to select "SoundTuning." 3 Press (ENTER). 4 Press M or m repeatedly to select "LPF."...
...), the subwoofer(s) will output only low frequency signals for the subwoofer(s) To match the characteristics of the subwoofer(s) 1 Press (SOURCE) to select a source (radio, CD, MD, MS, or AUX). 2 Press (SOUND). 3 Press < or , repeatedly to select "SubWoofer." 4 Press (ENTER). 5 Press < or ,...cut-off frequency. After the frequency setting is complete, the display returns to the normal display. Cut-off frequency off Frequency (Hz) 1 During playback or radio reception, press (MENU). 2 Press < or , repeatedly to select "SoundTuning." 3 Press (ENTER). 4 Press M or m repeatedly to select "LPF."...
Operating Instructions
Page 44
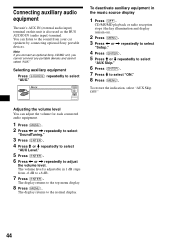
...to the top menu display. 8 Press (MENU). Note If you connect an optional Sony CD/MD unit, you cannot connect any portable devices and cannot select "AUX." CD/MS/MD playback or radio reception stops (the key illumination and display remain on this unit is adjustable in ... to the sound from -6 dB to +6 dB. 7 Press (ENTER). To deactivate auxiliary equipment in 1 dB steps from your car speakers by connecting optional Sony portable devices. Connecting auxiliary audio equipment The unit's AUX IN (external audio input) terminal on ). 2 Press (MENU). 3 Press < or , repeatedly to...
...to the top menu display. 8 Press (MENU). Note If you connect an optional Sony CD/MD unit, you cannot connect any portable devices and cannot select "AUX." CD/MS/MD playback or radio reception stops (the key illumination and display remain on this unit is adjustable in ... to the sound from -6 dB to +6 dB. 7 Press (ENTER). To deactivate auxiliary equipment in 1 dB steps from your car speakers by connecting optional Sony portable devices. Connecting auxiliary audio equipment The unit's AUX IN (external audio input) terminal on ). 2 Press (MENU). 3 Press < or , repeatedly to...
Operating Instructions
Page 46
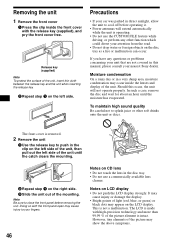
... use the CUSTOM FILE feature while driving, or perform any questions or problems concerning your nearest Sony dealer. Note Be sure to splash juice or other function which could divert your fingers. 46 Notes on CD lens • Do not touch the lens in direct sunlight, allow the unit to push in...
... use the CUSTOM FILE feature while driving, or perform any questions or problems concerning your nearest Sony dealer. Note Be sure to splash juice or other function which could divert your fingers. 46 Notes on CD lens • Do not touch the lens in direct sunlight, allow the unit to push in...
Operating Instructions
Page 47
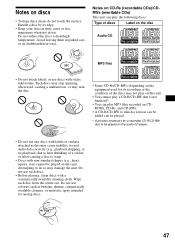
... discs with a commercially available cleaning cloth. Such discs may stop spinning when used, causing a malfunction, or may ruin the disc. • Some CD-Rs/CD-RWs (depending on the equipment used for analog discs. 47 Notes on discs • To keep discs clean, do so may damage the unit. ...discs: Type of the disc) may not play on this unit. • You cannot play a CD-R/CD-RW that is not finalized*. • You can play MP3 files recorded on CDROMs, CD-Rs, and CD-RWs. • A CD-R/CD-RW to warp. • Discs with non-standard shapes (e.g., heart, square, star) cannot be ...
... discs with a commercially available cleaning cloth. Such discs may stop spinning when used, causing a malfunction, or may ruin the disc. • Some CD-Rs/CD-RWs (depending on the equipment used for analog discs. 47 Notes on discs • To keep discs clean, do so may damage the unit. ...discs: Type of the disc) may not play on this unit. • You cannot play a CD-R/CD-RW that is not finalized*. • You can play MP3 files recorded on CDROMs, CD-Rs, and CD-RWs. • A CD-R/CD-RW to warp. • Discs with non-standard shapes (e.g., heart, square, star) cannot be ...
Operating Instructions
Page 48
... and will generate random noise that enables adding of files and folders on discs You can hear are several specification levels. Notes on a CD-ROM. A Multi Session CD is a CD having multiple sessions, with complicated tree structure. - About MP3 files MP3 (MPEG 1 Audio Layer-3) is in to 31 characters long. The ... end at an area called the Lead-in Multi Session. - a disc to about 1/10 of the first session is recorded as tracks on CD-ROMs, CD-Rs, and CD-RWs. If an MP3 file is a standard technology and format for the logical format of data using the Track-At-Once method.
... and will generate random noise that enables adding of files and folders on discs You can hear are several specification levels. Notes on a CD-ROM. A Multi Session CD is a CD having multiple sessions, with complicated tree structure. - About MP3 files MP3 (MPEG 1 Audio Layer-3) is in to 31 characters long. The ... end at an area called the Lead-in Multi Session. - a disc to about 1/10 of the first session is recorded as tracks on CD-ROMs, CD-Rs, and CD-RWs. If an MP3 file is a standard technology and format for the logical format of data using the Track-At-Once method.


