Operating Instructions
Page 1
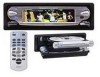
...;n/conexiones suministrado. Model No. Refer to these numbers in the space provided below. For installation and connections, see the supplied installation/connections manual. MEX-5DI © 2002 Sony Corporation 3-242-048-11 (1) MG-MS/FM/AM Compact Disc Player MG-MS/FM/AM Compact Disc Player Operating Instructions US Mode d'emploi FR Manual de instrucciones ES Owner's Record The model and serial numbers are located on the bottom of the unit. Record these numbers whenever you...
...;n/conexiones suministrado. Model No. Refer to these numbers in the space provided below. For installation and connections, see the supplied installation/connections manual. MEX-5DI © 2002 Sony Corporation 3-242-048-11 (1) MG-MS/FM/AM Compact Disc Player MG-MS/FM/AM Compact Disc Player Operating Instructions US Mode d'emploi FR Manual de instrucciones ES Owner's Record The model and serial numbers are located on the bottom of the unit. Record these numbers whenever you...

Operating Instructions
Page 2
... radio communications. Reorient or relocate the receiving antenna. - This manual explains how to operate the supplied card remote commander. This information is connected. - Increase the separation between the equipment and receiver. - This equipment generates, uses, and can be determined by turning the equipment off and on the disc. Consult the dealer or an experienced radio/TV technician for a Class B digital device, pursuant to Part...
... radio communications. Reorient or relocate the receiving antenna. - This manual explains how to operate the supplied card remote commander. This information is connected. - Increase the separation between the equipment and receiver. - This equipment generates, uses, and can be determined by turning the equipment off and on the disc. Consult the dealer or an experienced radio/TV technician for a Class B digital device, pursuant to Part...

Operating Instructions
Page 7
.../Power off the clock display. g VOL (volume) control lever h Reset button 20 i Receptor for the card remote commander and wireless rotary commander j SHIFT (switching shift 1-3) button To change the operation. k . > lever Selecting radio stations, the items to be sure to press (OFF) on the unit for details. m Disc tray n N (play) button 10, 21 o "Memory Stick" slot p "Memory Stick" access lamp *1 When an optional CD/MD unit is connected, "AUX" is not displayed. *2 Warning when installing in a car without...
.../Power off the clock display. g VOL (volume) control lever h Reset button 20 i Receptor for the card remote commander and wireless rotary commander j SHIFT (switching shift 1-3) button To change the operation. k . > lever Selecting radio stations, the items to be sure to press (OFF) on the unit for details. m Disc tray n N (play) button 10, 21 o "Memory Stick" slot p "Memory Stick" access lamp *1 When an optional CD/MD unit is connected, "AUX" is not displayed. *2 Warning when installing in a car without...
Operating Instructions
Page 8
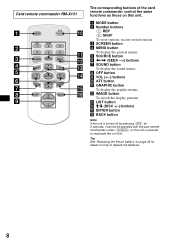
a MODE button b Number buttons (1) REP (2) SHUF To store stations, receive stored stations. Card remote commander RM-X131 ATT MODE REP SHUF 1 2 3 4 5 6 SCREEN GRAPHIC IMAGE MENU DISC + LIST SEEK- The corresponding buttons of the card remote commander control the same functions as those on this unit. c SCREEN button d MENU button To display the general menus. SEEK+ ENTER OFF + BACK VOL - e SOURCE button f SOUND SOURCE DISC -
a MODE button b Number buttons (1) REP (2) SHUF To store stations, receive stored stations. Card remote commander RM-X131 ATT MODE REP SHUF 1 2 3 4 5 6 SCREEN GRAPHIC IMAGE MENU DISC + LIST SEEK- The corresponding buttons of the card remote commander control the same functions as those on this unit. c SCREEN button d MENU button To display the general menus. SEEK+ ENTER OFF + BACK VOL - e SOURCE button f SOUND SOURCE DISC -
Operating Instructions
Page 9
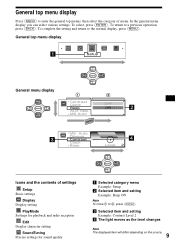
... general top menus, then select the category of settings Setup Basic settings Display Display setting PlayMode Settings for playback and radio reception Edit Display character setting SoundTuning Precise settings for sound quality DISC + SEEK- SOURCE DISC - In the general menu display you can select various settings. General top menu display Press (MENU) to the normal display, press (MENU). SEEK+ DISC + SEEK- c Selected item and setting Example: Contrast Level 2 d The light moves as the level changes Note 9 The displayed item will differ depending on...
... general top menus, then select the category of settings Setup Basic settings Display Display setting PlayMode Settings for playback and radio reception Edit Display character setting SoundTuning Precise settings for sound quality DISC + SEEK- SOURCE DISC - In the general menu display you can select various settings. General top menu display Press (MENU) to the normal display, press (MENU). SEEK+ DISC + SEEK- c Selected item and setting Example: Contrast Level 2 d The light moves as the level changes Note 9 The displayed item will differ depending on...
Operating Instructions
Page 14
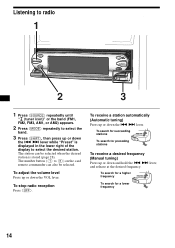
To adjust the volume level Press up or down the . > lever. To receive a station automatically (Automatic tuning) Press up or down the VOL lever. The station can also be selected when the desired station is displayed in the lower right of the display to select the desired station. To stop radio reception Press (OFF). To search for succeeding stations To search for a lower frequency 14 The number button ((1) to...
To adjust the volume level Press up or down the . > lever. To receive a station automatically (Automatic tuning) Press up or down the VOL lever. The station can also be selected when the desired station is displayed in the lower right of the display to select the desired station. To stop radio reception Press (OFF). To search for succeeding stations To search for a lower frequency 14 The number button ((1) to...
Operating Instructions
Page 20
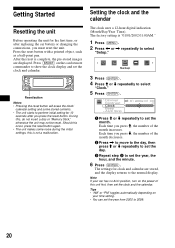
..., turn on the card remote commander to perform initial setting for 10 seconds after replacing the car battery or changing the connections, you press M, the number of this , do not insert a disc or "Memory Stick," otherwise the unit may not be reset. Getting Started Resetting the unit Before operating the unit for clock and calendar are displayed. After the reset is not a malfunction. Reset button Notes • Pressing the reset button will erase the clock...
..., turn on the card remote commander to perform initial setting for 10 seconds after replacing the car battery or changing the connections, you press M, the number of this , do not insert a disc or "Memory Stick," otherwise the unit may not be reset. Getting Started Resetting the unit Before operating the unit for clock and calendar are displayed. After the reset is not a malfunction. Reset button Notes • Pressing the reset button will erase the clock...

Operating Instructions
Page 24
... - "MG Memory Stick" REP - to normal play all the tracks in all the connected CD (MD) units (including this unit) in the display. In a display mode other than the Standard mode, the icon will not shuffle tracks between CD units and MD units. • The tracks in the display. Notes • " SHUF All " will disappear a short time after you can select: • SHUF *1 - to repeat a disc. To...
... - "MG Memory Stick" REP - to normal play all the tracks in all the connected CD (MD) units (including this unit) in the display. In a display mode other than the Standard mode, the icon will not shuffle tracks between CD units and MD units. • The tracks in the display. Notes • " SHUF All " will disappear a short time after you can select: • SHUF *1 - to repeat a disc. To...
Operating Instructions
Page 26
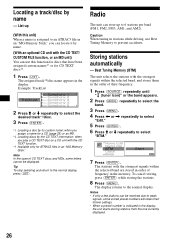
... (ENTER). Best Tuning Memory (BTM) The unit selects the stations with the strongest signals within the selected band are stored in order of frequency in an "MG Memory Stick," you play a CD TEXT disc on a CD unit with the CD TEXT function. *3 Available only for ATRAC3 files in stations while driving, use this unit) When a name is indicated in the display. To cancel storing, press (ENTER) while storing the stations. 8 Press (MENU).
... (ENTER). Best Tuning Memory (BTM) The unit selects the stations with the strongest signals within the selected band are stored in order of frequency in an "MG Memory Stick," you play a CD TEXT disc on a CD unit with the CD TEXT function. *3 Available only for ATRAC3 files in stations while driving, use this unit) When a name is indicated in the display. To cancel storing, press (ENTER) while storing the stations. 8 Press (MENU).
Operating Instructions
Page 27
... preset tuning does not work Press < (SEEK -) or , (SEEK +) to eliminate noise (IF Auto function). In such cases, some interference may become monaural while in the memory (Preset Search function). See "Storing station names" on which the desired station is poor Select monaural reception mode (see "Changing the sound and display settings" on page 40). • If you know the frequency of the station you can change the IF Auto setting...
... preset tuning does not work Press < (SEEK -) or , (SEEK +) to eliminate noise (IF Auto function). In such cases, some interference may become monaural while in the memory (Preset Search function). See "Storing station names" on which the desired station is poor Select monaural reception mode (see "Changing the sound and display settings" on page 40). • If you know the frequency of the station you can change the IF Auto setting...
Operating Instructions
Page 33
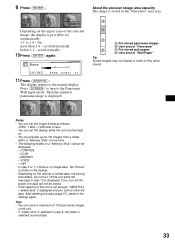
...from a folder within a "Memory Stick" at one time. • The following folders in step 10 is displayed and you cannot store the data. Press (SCREEN) to 1:4 - Do not turn off the power, the data will be set the display while the unit must be kept on the ... settings again. The display returns to the Panorama/ Wall paper mode. 9 Press (ENTER). A B C A Pre-stored panorama images B User area of "Panorama" D C Pre-stored wall papers D User area of they were stored. 11 Press (GRAPHIC). Then the adjusted panorama image is selected automatically. 33 CONTROL - If you turn ...
...from a folder within a "Memory Stick" at one time. • The following folders in step 10 is displayed and you cannot store the data. Press (SCREEN) to 1:4 - Do not turn off the power, the data will be set the display while the unit must be kept on the ... settings again. The display returns to the Panorama/ Wall paper mode. 9 Press (ENTER). A B C A Pre-stored panorama images B User area of "Panorama" D C Pre-stored wall papers D User area of they were stored. 11 Press (GRAPHIC). Then the adjusted panorama image is selected automatically. 33 CONTROL - If you turn ...
Operating Instructions
Page 38
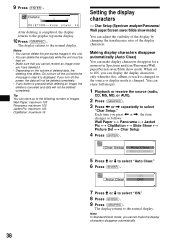
... not turn off the unit while the message in this unit. • You can store up to the following number of deleted data, the deleting time differs. Making display characters disappear automatically (Auto Clear) You can adjust the visibility of the display by changing the translucence ratio of the display characters. The display returns to the normal display. Note In Standard/Clock mode, you cannot make display characters...
... not turn off the unit while the message in this unit. • You can store up to the following number of deleted data, the deleting time differs. Making display characters disappear automatically (Auto Clear) You can adjust the visibility of the display by changing the translucence ratio of the display characters. The display returns to the normal display. Note In Standard/Clock mode, you cannot make display characters...

Operating Instructions
Page 39
... the display characters does not change. By setting this level down, you press < or ,, the item changes as follows: DSO y EQ7 y Bass y Treble y Balance (left-right) y Fader (front-rear) y SubWoofer (subwoofer volume) 4 Press (ENTER). 5 Adjust the selected item by pressing < or ,. 6 Press (ENTER). 7 Press < or , to select the permeation ratio (Level 0-15). Other Functions Adjusting the sound characteristics You can adjust the bass, treble, balance, fader, and subwoofer volume. 1 Press (SOURCE) to select a source (radio, CD, MD, MS, or AUX). 2 Press (SOUND...
... the display characters does not change. By setting this level down, you press < or ,, the item changes as follows: DSO y EQ7 y Bass y Treble y Balance (left-right) y Fader (front-rear) y SubWoofer (subwoofer volume) 4 Press (ENTER). 5 Adjust the selected item by pressing < or ,. 6 Press (ENTER). 7 Press < or , to select the permeation ratio (Level 0-15). Other Functions Adjusting the sound characteristics You can adjust the bass, treble, balance, fader, and subwoofer volume. 1 Press (SOURCE) to select a source (radio, CD, MD, MS, or AUX). 2 Press (SOUND...
Operating Instructions
Page 40
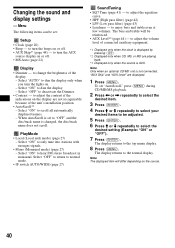
... adjust the volume level of the display. - to turn the beeps on the display are displayed. 1 Press (MENU). Select "OFF" to return to hear FM stereo broadcast in monaural. PlayMode • Local (Local seek mode) (page 27) - Note Only when an optional CD/MD unit is changed, the disc/track name does not scroll. Select "ON" to normal mode. • IF switch AUTO/WIDE (page 27) SoundTuning • EQ7 Tune...
... adjust the volume level of the display. - to turn the beeps on the display are displayed. 1 Press (MENU). Select "OFF" to return to hear FM stereo broadcast in monaural. PlayMode • Local (Local seek mode) (page 27) - Note Only when an optional CD/MD unit is changed, the disc/track name does not scroll. Select "ON" to normal mode. • IF switch AUTO/WIDE (page 27) SoundTuning • EQ7 Tune...
Operating Instructions
Page 41
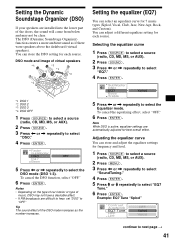
... speakers). Note While DSO is active, equalizer settings are automatically adjusted for frequency and level. 1 Press (SOURCE) to select a source (radio, CD, MD, MS, or AUX). 2 Press (MENU). 3 Press < or , repeatedly to select "SoundTuning." 4 Press (ENTER). 5 Press M or m repeatedly to select the Equalizer mode. You can select an equalizer curve for 7 music types (Xplod, Vocal, Club, Jazz, New Age, Rock, and Custom). Example: EQ7 Tune "Xplod" continue to select the DSO mode (DSO 1-3). Selecting the equalizer curve 1 Press (SOURCE...
... speakers). Note While DSO is active, equalizer settings are automatically adjusted for frequency and level. 1 Press (SOURCE) to select a source (radio, CD, MD, MS, or AUX). 2 Press (MENU). 3 Press < or , repeatedly to select "SoundTuning." 4 Press (ENTER). 5 Press M or m repeatedly to select the Equalizer mode. You can select an equalizer curve for 7 music types (Xplod, Vocal, Club, Jazz, New Age, Rock, and Custom). Example: EQ7 Tune "Xplod" continue to select the DSO mode (DSO 1-3). Selecting the equalizer curve 1 Press (SOURCE...
Operating Instructions
Page 42
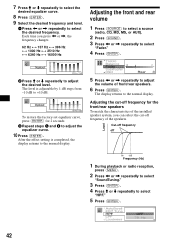
... desired frequency. Each time you can select the cut-off frequency of front/rear speakers. 6 Press (ENTER). To restore the factory-set equalizer curve, press (ENTER) for the front/rear speakers To match the characteristics of the installed speaker system, you press < or ,, the frequency changes. 62 Hz y 157 Hz y 396 Hz y 1000 Hz y 2510 Hz y 6340 Hz y 16000 Hz Adjusting the front and rear volume 1 Press (SOURCE) to select a source (radio, CD...
... desired frequency. Each time you can select the cut-off frequency of front/rear speakers. 6 Press (ENTER). To restore the factory-set equalizer curve, press (ENTER) for the front/rear speakers To match the characteristics of the installed speaker system, you press < or ,, the frequency changes. 62 Hz y 157 Hz y 396 Hz y 1000 Hz y 2510 Hz y 6340 Hz y 16000 Hz Adjusting the front and rear volume 1 Press (SOURCE) to select a source (radio, CD...
Operating Instructions
Page 46
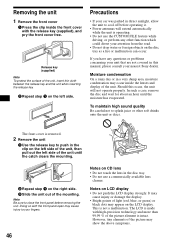
... not use the CUSTOM FILE feature while driving, or perform any questions or problems concerning your nearest Sony dealer. However, tiny elements of the picture may cause injury to splash juice or other function which could divert your fingers. 46 Notes on LCD display • Do not push the LCD display strongly. In such a case, remove the disc and...
... not use the CUSTOM FILE feature while driving, or perform any questions or problems concerning your nearest Sony dealer. However, tiny elements of the picture may cause injury to splash juice or other function which could divert your fingers. 46 Notes on LCD display • Do not push the LCD display strongly. In such a case, remove the disc and...
Operating Instructions
Page 51
...AM Tuning range Antenna terminal Intermediate frequency Sensitivity 530 - 1,710 kHz External antenna connector 10.7 MHz/450 kHz 30 µV General Outputs Inputs Tone controls Loudness Power requirements Dimensions Mounting dimensions Mass Supplied accessories Optional accessories Optional equipment Audio outputs (front/rear) Subwoofer output (mono) Power antenna relay control terminal Power amplifier control terminal Telephone ATT control terminal Illumination control terminal BUS control input terminal BUS audio input/AUX IN terminal Antenna input terminal Bass ±8 dB at 100 Hz Treble...
...AM Tuning range Antenna terminal Intermediate frequency Sensitivity 530 - 1,710 kHz External antenna connector 10.7 MHz/450 kHz 30 µV General Outputs Inputs Tone controls Loudness Power requirements Dimensions Mounting dimensions Mass Supplied accessories Optional accessories Optional equipment Audio outputs (front/rear) Subwoofer output (mono) Power antenna relay control terminal Power amplifier control terminal Telephone ATT control terminal Illumination control terminal BUS control input terminal BUS audio input/AUX IN terminal Antenna input terminal Bass ±8 dB at 100 Hz Treble...
Operating Instructions
Page 52
... your unit. The sound skips. • Defective or dirty disc. • The CD-R/CD-RW has been damaged. This is installed at an angle of more than the above will help you remedy problems you may not play back than others. No sound. • Press up the VOL control lever to adjust the volume. • Cancel the ATT function. • Set the fader control to display the clock. Makes noise...
... your unit. The sound skips. • Defective or dirty disc. • The CD-R/CD-RW has been damaged. This is installed at an angle of more than the above will help you remedy problems you may not play back than others. No sound. • Press up the VOL control lever to adjust the volume. • Cancel the ATT function. • Set the fader control to display the clock. Makes noise...

Operating Instructions
Page 53
...). t Set the IF mode to next page t 53 Error displays/Messages Error displays (For this unit and optional CD/MD changers) The following indications will flash for about 5 seconds, and an alarm sound will not go up. The stations cannot be heard. The sound is hampered by noises. t Set the local seek mode to the power supply lead of the car antenna. • The auto antenna will be received. Radio reception Preset tuning is...
...). t Set the IF mode to next page t 53 Error displays/Messages Error displays (For this unit and optional CD/MD changers) The following indications will flash for about 5 seconds, and an alarm sound will not go up. The stations cannot be heard. The sound is hampered by noises. t Set the local seek mode to the power supply lead of the car antenna. • The auto antenna will be received. Radio reception Preset tuning is...


