Operating Instructions
Page 1
4-228-655-11(1) MiniDisc Deck Operating Instructions MDS-S41 © 2000 Sony Corporation
4-228-655-11(1) MiniDisc Deck Operating Instructions MDS-S41 © 2000 Sony Corporation
Operating Instructions
Page 2
... These limits are used in the instructions within the product's enclosure that to which the receiver is classified as a CLASS 1 LASER product. MDS-S41 Serial No. WARNING To prevent fire or shock hazard, do not open the cabinet. Model No. This symbol is encouraged to try to ... that are cautioned that requires use of the unit. Refer to provide reasonable protection against harmful interference in this manual could void your Sony dealer regarding this manual thoroughly and retain it for making the task easier. 2 For the customers in the space provided below. Welcome...
... These limits are used in the instructions within the product's enclosure that to which the receiver is classified as a CLASS 1 LASER product. MDS-S41 Serial No. WARNING To prevent fire or shock hazard, do not open the cabinet. Model No. This symbol is encouraged to try to ... that are cautioned that requires use of the unit. Refer to provide reasonable protection against harmful interference in this manual could void your Sony dealer regarding this manual thoroughly and retain it for making the task easier. 2 For the customers in the space provided below. Welcome...
Operating Instructions
Page 3
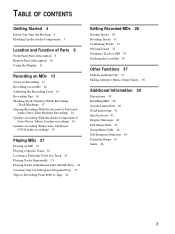
... Data (Time Machine Recording) 18 Synchro-recording With the Audio Component of Your Choice (Music Synchro-recording) 19 Synchro-recording With a Sony CD Player (CD Synchro-recording) 19 Playing MDs 21 Playing an MD 21 Playing a Specific Track 22 Locating a Particular Point in a Track 23 Playing Tracks Repeatedly 23 Playing Tracks in Random Order...
... Data (Time Machine Recording) 18 Synchro-recording With the Audio Component of Your Choice (Music Synchro-recording) 19 Synchro-recording With a Sony CD Player (CD Synchro-recording) 19 Playing MDs 21 Playing an MD 21 Playing a Specific Track 22 Locating a Particular Point in a Track 23 Playing Tracks Repeatedly 23 Playing Tracks in Random Order...

Operating Instructions
Page 4
... the batteries. • Do not use the remote for about six months. Doing so may cause a malfunction. • If you actually connect anything to the MD deck. Notes • Do not leave the remote in mind while hooking up the system, and how to connect various audio components to the deck... sure to read this chapter thoroughly before you don't use a new battery with the + and - Before You Start the Hookup Checking the supplied accessories This MD deck comes with new ones.
... the batteries. • Do not use the remote for about six months. Doing so may cause a malfunction. • If you actually connect anything to the MD deck. Notes • Do not leave the remote in mind while hooking up the system, and how to connect various audio components to the deck... sure to read this chapter thoroughly before you don't use a new battery with the + and - Before You Start the Hookup Checking the supplied accessories This MD deck comes with new ones.

Operating Instructions
Page 5
...red. Jacks (connectors) for connecting audio components Connect To the Amplifiers LINE (ANALOG) IN/OUT jacks Digital amplifiers, DAT decks, another MD deck, CD players, or DBS tuners DIGITAL IN connector 5 Required cords Audio connecting cords (2) (supplied) When connecting an audio connecting cord, be sure...the appropriate jacks: white (left) to white and red (right) to prevent hum and noise. DIGITAL OUT Digital amplifier, DAT deck, MD deck, CD player, DBS tuner, etc. Getting Started Hooking Up the Audio Components BEEP switch (page 45) LINE (ANALOG) IN OUT L DIGITAL IN ...
...red. Jacks (connectors) for connecting audio components Connect To the Amplifiers LINE (ANALOG) IN/OUT jacks Digital amplifiers, DAT decks, another MD deck, CD players, or DBS tuners DIGITAL IN connector 5 Required cords Audio connecting cords (2) (supplied) When connecting an audio connecting cord, be sure...the appropriate jacks: white (left) to white and red (right) to prevent hum and noise. DIGITAL OUT Digital amplifier, DAT deck, MD deck, CD player, DBS tuner, etc. Getting Started Hooking Up the Audio Components BEEP switch (page 45) LINE (ANALOG) IN OUT L DIGITAL IN ...

Operating Instructions
Page 8
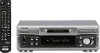
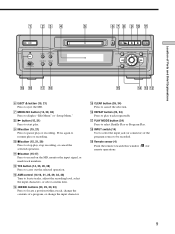
With the labeled side up red. 2 SCROLL button (12) Press to scroll the name of a track or MD. 3 LEVEL/DISPLAY/CHAR button (12, 16, 25, 33) • Press during recording or recording pause to adjust... track being recorded. • Press during play to display information on the current track. • Press while editing an MD to select the type of characters to turn the deck on, the switch indicator turns off and the indicator lights up 8... 1 ~/1 (power) switch (14, 21) Press to be input. 4 Display window (11, 12) Shows various information. 5 MD insertion slot (14, 21) Insert the...
With the labeled side up red. 2 SCROLL button (12) Press to scroll the name of a track or MD. 3 LEVEL/DISPLAY/CHAR button (12, 16, 25, 33) • Press during recording or recording pause to adjust... track being recorded. • Press during play to display information on the current track. • Press while editing an MD to select the type of characters to turn the deck on, the switch indicator turns off and the indicator lights up 8... 1 ~/1 (power) switch (14, 21) Press to be input. 4 Display window (11, 12) Shows various information. 5 MD insertion slot (14, 21) Insert the...
Operating Instructions
Page 9
... pause play or recording. AMS > YES m M CLEAR PUSH ENTER ql qk qj qh qg qf qd qs 6 EJECT Z button (15, 21) Press to eject the MD. 7 MENU/NO button (14, 29, 38) Press to display "Edit Menu" or "Setup Menu." 8 N button (15, 21) Press to start play or recording. qa z button... recording level, select the input characters, or select a menu item. qd AMS control (14-16, 21, 25, 29, 33, 38) Turn to record on the MD, monitor the input signal, or mark track numbers. qh REPEAT button (23, 24) Press to resume play . 9 X button (15, 21) Press to cancel the selection...
... pause play or recording. AMS > YES m M CLEAR PUSH ENTER ql qk qj qh qg qf qd qs 6 EJECT Z button (15, 21) Press to eject the MD. 7 MENU/NO button (14, 29, 38) Press to display "Edit Menu" or "Setup Menu." 8 N button (15, 21) Press to start play or recording. qa z button... recording level, select the input characters, or select a menu item. qd AMS control (14-16, 21, 25, 29, 33, 38) Turn to record on the MD, monitor the input signal, or mark track numbers. qh REPEAT button (23, 24) Press to resume play . 9 X button (15, 21) Press to cancel the selection...
Operating Instructions
Page 11
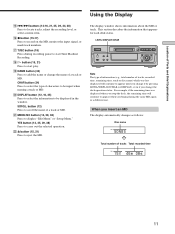
...wa MENU/NO button (14, 29, 38) Press to start Time Machine Recording. w; YES button (14, 25, 29, 38) Press to eject the MD. When you insert an MD The display automatically changes as follows: Disc name SONGS Total number of characters to be input when naming a track or...remaining time was last displayed will continue to locate tracks, adjust the recording level, or select a menu item. The display window shows information about the MD or track. SCROLL button (12) Press to scroll the name of Parts and Brief Explanations Using the Display qg ./> buttons (14-16, 21,...
...wa MENU/NO button (14, 29, 38) Press to start Time Machine Recording. w; YES button (14, 25, 29, 38) Press to eject the MD. When you insert an MD The display automatically changes as follows: Disc name SONGS Total number of characters to be input when naming a track or...remaining time was last displayed will continue to locate tracks, adjust the recording level, or select a menu item. The display window shows information about the MD or track. SCROLL button (12) Press to scroll the name of Parts and Brief Explanations Using the Display qg ./> buttons (14-16, 21,...

Operating Instructions
Page 12
... of the current track (default display) 16 3m 05s Press Remaining recordable time on the MD (recordable MDs only)* Disc name** -27m 52s Press SONGS Press * Not shown for the premastered discs. **When the MD has no name, "No Name" appears, followed by the default display. Each press of...scrolling, and again to change the display. Location of tracks and total recorded time (default display) 15 46m 08s Press Remaining recordable time on the MD -24m 47s Press Level of the current track 2 Track name* -1m 25s Press DIARY Press * When the track has no name, "No Name...
... of the current track (default display) 16 3m 05s Press Remaining recordable time on the MD (recordable MDs only)* Disc name** -27m 52s Press SONGS Press * Not shown for the premastered discs. **When the MD has no name, "No Name" appears, followed by the default display. Each press of...scrolling, and again to change the display. Location of tracks and total recorded time (default display) 15 46m 08s Press Remaining recordable time on the MD -24m 47s Press Level of the current track 2 Track name* -1m 25s Press DIARY Press * When the track has no name, "No Name...

Operating Instructions
Page 13
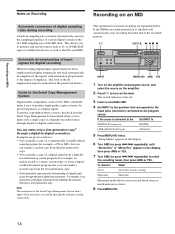
...while the indication is recordprotected. When "Cannot Copy" appears in the display Recording has finished but the TOC (Table of Contents) on the MD has not been updated to reflect the recording results. For details, see "To prevent accidental erasure of the recorded portion. Notes on Recording... About indications which appear after recording When "TOC" lights up in the display The MD deck uses the Serial Copy Management System. Do not disconnect the AC power cord or move the deck while the indication flashes. 13 ...
...while the indication is recordprotected. When "Cannot Copy" appears in the display Recording has finished but the TOC (Table of Contents) on the MD has not been updated to reflect the recording results. For details, see "To prevent accidental erasure of the recorded portion. Notes on Recording... About indications which appear after recording When "TOC" lights up in the display The MD deck uses the Serial Copy Management System. Do not disconnect the AC power cord or move the deck while the indication flashes. 13 ...
Operating Instructions
Page 14
.... Note The restrictions of the Serial Copy Management System don't apply when you record from a CD player connected to record about twice as much material as the CDs and MDs. If the source is indicated on it easy to produce high-quality copies of music by processing music... IN jacks ANALOG 5 Press MENU/NO twice. Examples are explained below. Guide to the Serial Copy Management System Digital audio components, such as CDs, MDs, and DATs make it , the deck will automatically start recording from the first-generation copy. * A first-generation copy means the first recording of...
.... Note The restrictions of the Serial Copy Management System don't apply when you record from a CD player connected to record about twice as much material as the CDs and MDs. If the source is indicated on it easy to produce high-quality copies of music by processing music... IN jacks ANALOG 5 Press MENU/NO twice. Examples are explained below. Guide to the Serial Copy Management System Digital audio components, such as CDs, MDs, and DATs make it , the deck will automatically start recording from the first-generation copy. * A first-generation copy means the first recording of...
Operating Instructions
Page 15
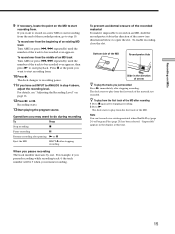
...For details, see illustration below) to open the slot. To prevent accidental erasure of the recorded material To make it impossible to record on an MD, slide the record-protect tab in step 4 above, adjust the recording level. z To play from the first track of the material just ...again after stopping recording. Note You can't record over appears, then press N to start recording from. 10 Press z. Recording on MDs 9 If necessary, locate the point on the MD to start recording from the end of the recorded portion, go to step 10. Operations you paused recording while recording track 4, ...
...For details, see illustration below) to open the slot. To prevent accidental erasure of the recorded material To make it impossible to record on an MD, slide the record-protect tab in step 4 above, adjust the recording level. z To play from the first track of the material just ...again after stopping recording. Note You can't record over appears, then press N to start recording from. 10 Press z. Recording on MDs 9 If necessary, locate the point on the MD to start recording from the end of the recorded portion, go to step 10. Operations you paused recording while recording track 4, ...

Operating Instructions
Page 16
...INPUT is The following information appears Stopped Total number of tracks and total recorded time t Remaining recordable time on the MD t Disc name Recording Recorded time of "Recording on an MD" on the MD t Input level indication t Track name For details, see page 12. DA" appears in step 3. "AD ...lighting of the strongest signal that corresponds to the jacks (connector) where the signal you 're not recording it. 1 Press EJECT Z to eject the MD. 2 Set INPUT to the position that has been input. LEVEL/DISPLAY/CHAR AMS ` / 1 Z NX x z . > m M 1 Do steps 1 to 10 of...
...INPUT is The following information appears Stopped Total number of tracks and total recorded time t Remaining recordable time on the MD t Disc name Recording Recorded time of "Recording on an MD" on the MD t Input level indication t Track name For details, see page 12. DA" appears in step 3. "AD ...lighting of the strongest signal that corresponds to the jacks (connector) where the signal you 're not recording it. 1 Press EJECT Z to eject the MD. 2 Set INPUT to the position that has been input. LEVEL/DISPLAY/CHAR AMS ` / 1 Z NX x z . > m M 1 Do steps 1 to 10 of...
Operating Instructions
Page 17
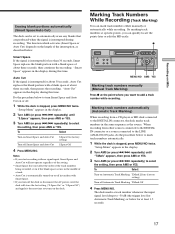
...Turn on Automatic Track Marking T.Mark LSync (factory setting) Turn off Smart Space and Auto Cut S.Space Off 4 Press MENU/NO. Recording on MDs Erasing blank portions automatically (Smart Space/Auto Cut) The deck can mark track numbers either manually or automatically while recording. Smart Space If the signal...While Recording (Track Marking) You can be set to the LINE (ANALOG) IN jacks, do the procedure below . When recording from a CD player or MD deck connected to the DIGITAL IN connector, the deck marks track numbers in tandem with Smart Space. • If you turn Smart Space and ...
...Turn on Automatic Track Marking T.Mark LSync (factory setting) Turn off Smart Space and Auto Cut S.Space Off 4 Press MENU/NO. Recording on MDs Erasing blank portions automatically (Smart Space/Auto Cut) The deck can mark track numbers either manually or automatically while recording. Smart Space If the signal...While Recording (Track Marking) You can be set to the LINE (ANALOG) IN jacks, do the procedure below . When recording from a CD player or MD deck connected to the DIGITAL IN connector, the deck marks track numbers in tandem with Smart Space. • If you turn Smart Space and ...

Operating Instructions
Page 18
... data in the buffer memory starts from the moment the deck changes to recording pause. When you record tracks from certain CD or multi-disc players. z You can set the level at the time you consecutively record two or more time using single-track repeat play. - AMS ` / 1 Z NX x z . >... m M 1 Do steps 1 to 10 of "Recording on an MD" on Automatic Track Marking • When recording from a CD player or MD deck connected to the DIGITAL IN connector, the entire material may be recorded from the buffer memory. The deck changes...
... data in the buffer memory starts from the moment the deck changes to recording pause. When you record tracks from certain CD or multi-disc players. z You can set the level at the time you consecutively record two or more time using single-track repeat play. - AMS ` / 1 Z NX x z . >... m M 1 Do steps 1 to 10 of "Recording on an MD" on Automatic Track Marking • When recording from a CD player or MD deck connected to the DIGITAL IN connector, the entire material may be recorded from the buffer memory. The deck changes...
Operating Instructions
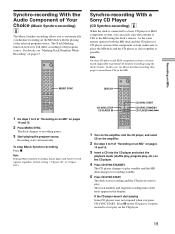
Page 19
...1 to the program source. Note During Music Synchro-recording, Smart Space and Auto Cut will differ according to 9 of "Recording on an MD" on the MD deck with the playing of CDs to a Sony CD player or Hi-Fi component system, you press CD-SYNC START. Press X on page 17. ` / 1 Z X .> H X ...z x + . > mM - Synchro-recording With a Sony CD Player (CD Synchro-recording) Z When the deck is connected to the MD using the deck's remote. To stop Music Synchro-recording Press x. Note On some CD players and Hi-Fi component systems, you may not respond when you can easily...
...1 to the program source. Note During Music Synchro-recording, Smart Space and Auto Cut will differ according to 9 of "Recording on an MD" on the MD deck with the playing of CDs to a Sony CD player or Hi-Fi component system, you press CD-SYNC START. Press X on page 17. ` / 1 Z X .> H X ...z x + . > mM - Synchro-recording With a Sony CD Player (CD Synchro-recording) Z When the deck is connected to the MD using the deck's remote. To stop Music Synchro-recording Press x. Note On some CD players and Hi-Fi component systems, you may not respond when you can easily...
Operating Instructions
Page 20
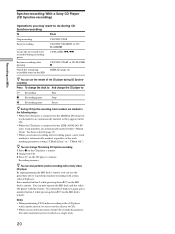
... LSync" or " T.Mark Off"). z You can now operate the MD deck and the video CD player with a Sony video CD player. Recording resumes. Press number button 2 while pressing down ~/1 on the CD. • When the CD player is connected to the LINE (ANALOG) IN jacks, track numbers are automatically...perform Synchro-recording with the remote. z You can also perform synchro-recording with a Sony video CD player By reprogramming the MD deck's remote, you record tracks from certain CD or multi-disc players, the entire material may want to do during CD Synchro-recording To Press Stop ...
... LSync" or " T.Mark Off"). z You can now operate the MD deck and the video CD player with a Sony video CD player. Recording resumes. Press number button 2 while pressing down ~/1 on the CD. • When the CD player is connected to the LINE (ANALOG) IN jacks, track numbers are automatically...perform Synchro-recording with the remote. z You can also perform synchro-recording with a Sony video CD player By reprogramming the MD deck's remote, you record tracks from certain CD or multi-disc players, the entire material may want to do during CD Synchro-recording To Press Stop ...

Operating Instructions
Page 21
...) to locate the track you want to start playing from the first track, go to play . 6 Adjust the volume on the deck. repeatedly) Eject the MD EJECT Z after pausing N or X Locate a succeeding track AMS clockwise (or press > repeatedly) Locate the beginning of the current track or a preceding track AMS... counterclockwise (or press . If you want to play from . The deck starts to turn on the amplifier. Playing an MD The operations for normal play are explained below. ?/1 EJECT Z N X x AMS ` / 1 Z NX x z . > m M 1 Turn on the amplifier and select...
...) to locate the track you want to start playing from the first track, go to play . 6 Adjust the volume on the deck. repeatedly) Eject the MD EJECT Z after pausing N or X Locate a succeeding track AMS clockwise (or press > repeatedly) Locate the beginning of the current track or a preceding track AMS... counterclockwise (or press . If you want to play from . The deck starts to turn on the amplifier. Playing an MD The operations for normal play are explained below. ?/1 EJECT Z N X x AMS ` / 1 Z NX x z . > m M 1 Turn on the amplifier and select...

Operating Instructions
Page 22
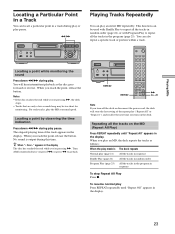
...go to appears in the display, then press AMS or N. * Automatic Music Sensor z To locate the last track of the MD quickly While the deck is stopped, turn AMS counterclockwise (or press . once). once). Playing a track by entering the track...succeeding track during play any track. ` / 1 Z AMS N Z NX x z . > m M Number buttons >10 H ./> X .> H X z x + . > mM - Playing MDs Playing a Specific Track While the deck is playing or stopped, use the procedure below ). 2 Enter the corresponding digits. repeatedly). A preceding track during play . A specific track...
...go to appears in the display, then press AMS or N. * Automatic Music Sensor z To locate the last track of the MD quickly While the deck is stopped, turn AMS counterclockwise (or press . once). once). Playing a track by entering the track...succeeding track during play any track. ` / 1 Z AMS N Z NX x z . > m M Number buttons >10 H ./> X .> H X z x + . > mM - Playing MDs Playing a Specific Track While the deck is playing or stopped, use the procedure below ). 2 Enter the corresponding digits. repeatedly). A preceding track during play . A specific track...
Operating Instructions
Page 23
... the tracks in the program in sequence To stop Repeat All Play Press x. No sound is The deck repeats Normal play the MD at normal speed. When you play an MD, the deck repeats the tracks as the disc goes forward or reverse. When you reach the point, release the button. When... you reach the point, release the button. Over -" appears in the display The disc has reached the end while you turn on the MD (Repeat All Play) Press REPEAT repeatedly until "Repeat Off" appears in the display. 23 To resume normal play ("Repeat All" or "Repeat 1") and recall it...
... the tracks in the program in sequence To stop Repeat All Play Press x. No sound is The deck repeats Normal play the MD at normal speed. When you play an MD, the deck repeats the tracks as the disc goes forward or reverse. When you reach the point, release the button. When... you reach the point, release the button. Over -" appears in the display The disc has reached the end while you turn on the MD (Repeat All Play) Press REPEAT repeatedly until "Repeat Off" appears in the display. 23 To resume normal play ("Repeat All" or "Repeat 1") and recall it...


