Operating Instructions
Page 2
.... Before operating the deck, please read this manual thoroughly and retain it for a Class B digital device, pursuant to Part 15 of electric shock to them whenever you for the MDS-S41 MiniDisc Deck. Example: Turn AMS clockwise (or press > repeatedly). • The following measures: • Reorient or relocate the receiving antenna. • Increase the separation between the equipment and receiver. • Connect the...
.... Before operating the deck, please read this manual thoroughly and retain it for a Class B digital device, pursuant to Part 15 of electric shock to them whenever you for the MDS-S41 MiniDisc Deck. Example: Turn AMS clockwise (or press > repeatedly). • The following measures: • Reorient or relocate the receiving antenna. • Increase the separation between the equipment and receiver. • Connect the...
Operating Instructions
Page 3
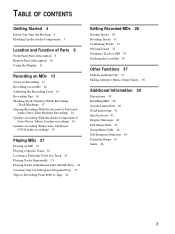
... Hookup 4 Hooking Up the Audio Components 5 Location and Function of Parts 8 Front Panel Parts Description 8 Remote Parts Description 10 Using the Display 11 Recording on MDs 13 Notes on Recording 13 Recording on an MD 14 Adjusting the Recording Level 16 Recording Tips 16 Marking Track Numbers While Recording (Track Marking) 17 Starting Recording With Six Seconds of Prestored Audio Data (Time Machine Recording) 18 Synchro-recording With the Audio Component...
... Hookup 4 Hooking Up the Audio Components 5 Location and Function of Parts 8 Front Panel Parts Description 8 Remote Parts Description 10 Using the Display 11 Recording on MDs 13 Notes on Recording 13 Recording on an MD 14 Adjusting the Recording Level 16 Recording Tips 16 Marking Track Numbers While Recording (Track Marking) 17 Starting Recording With Six Seconds of Prestored Audio Data (Time Machine Recording) 18 Synchro-recording With the Audio Component...

Operating Instructions
Page 5
... the cable plugs straight in until all the connections are completed. • Be sure the connections are firm to prevent hum and noise. Jacks (connectors) for connecting audio components Connect To the Amplifiers LINE (ANALOG) IN/OUT jacks Digital amplifiers, DAT decks, another MD deck, CD players, or DBS tuners DIGITAL IN connector 5 White (L) White (L) Red (R) Red (R) Optical cable (1) (supplied) • When connecting an optical cable, take the caps off the power to red. Getting Started Hooking Up the Audio Components BEEP switch...
... the cable plugs straight in until all the connections are completed. • Be sure the connections are firm to prevent hum and noise. Jacks (connectors) for connecting audio components Connect To the Amplifiers LINE (ANALOG) IN/OUT jacks Digital amplifiers, DAT decks, another MD deck, CD players, or DBS tuners DIGITAL IN connector 5 White (L) White (L) Red (R) Red (R) Optical cable (1) (supplied) • When connecting an optical cable, take the caps off the power to red. Getting Started Hooking Up the Audio Components BEEP switch...

Operating Instructions
Page 8
... during play to display information on the current track. • Press while editing an MD to select the type of characters to turn the deck on the front panel and the supplied remote. It also tells you turn the deck on the pages indicated in the display window. When you about the location and function of the various buttons and controls on , the switch indicator turns...
... during play to display information on the current track. • Press while editing an MD to select the type of characters to turn the deck on the front panel and the supplied remote. It also tells you turn the deck on the pages indicated in the display window. When you about the location and function of the various buttons and controls on , the switch indicator turns...
Operating Instructions
Page 9
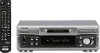
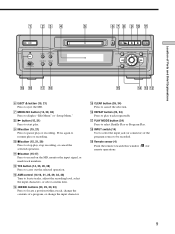
... Play or Program Play. qj PLAY MODE button (24) Press to record on the MD, monitor the input signal, or mark track numbers. qk INPUT switch (14) Use to select the input jack (or connector) of Parts and Brief Explanations 1 23 4 ` / 1 LEVEL/ SCROLL DISPLAY/CHAR INPUT •• DIGITAL ANALOG PLAY MODE REPEAT 5 6 7 8 9 0 qa EJECT Z NX x z MENU/NO . ql Remote sensor (4) Point the remote towards this window ( ) for remote operations. 9 x button (15, 21, 29) Press to stop play tracks repeatedly. qd AMS control...
... Play or Program Play. qj PLAY MODE button (24) Press to record on the MD, monitor the input signal, or mark track numbers. qk INPUT switch (14) Use to select the input jack (or connector) of Parts and Brief Explanations 1 23 4 ` / 1 LEVEL/ SCROLL DISPLAY/CHAR INPUT •• DIGITAL ANALOG PLAY MODE REPEAT 5 6 7 8 9 0 qa EJECT Z NX x z MENU/NO . ql Remote sensor (4) Point the remote towards this window ( ) for remote operations. 9 x button (15, 21, 29) Press to stop play tracks repeatedly. qd AMS control...

Operating Instructions
Page 10
... 789 QZ MUSIC SYNC >10 10/0 6 CD-SYNC STOP START STANDBY CD PLAYER X .> 7 8 qk H X 9 qj qh z T.REC x 0 qg LEVEL + . > qf mM qa - Press again to stop CD Synchro-recording. qf m/M buttons (23, 25, 30, 34) Press to locate a portion within a track, change the contents of Parts and Basic Amplifier Operations Remote Parts Description ws Z ` / 1 1 MENU/NO YES CLEAR wa 2 DISPLAY SCROLL FADER w; 3 NAME IN PLAY MODE ql...
... 789 QZ MUSIC SYNC >10 10/0 6 CD-SYNC STOP START STANDBY CD PLAYER X .> 7 8 qk H X 9 qj qh z T.REC x 0 qg LEVEL + . > qf mM qa - Press again to stop CD Synchro-recording. qf m/M buttons (23, 25, 30, 34) Press to locate a portion within a track, change the contents of Parts and Basic Amplifier Operations Remote Parts Description ws Z ` / 1 1 MENU/NO YES CLEAR wa 2 DISPLAY SCROLL FADER w; 3 NAME IN PLAY MODE ql...

Operating Instructions
Page 13
..." flashes in the display The MD deck is on. About indications which appear while recording When "Protected" and "C11" alternate in the display • The digital component selected with other MDs or DAT tapes through the digital input connector can't be updated only when you disconnect the AC power cord while the indication is recording over existing track(s) ("Recording on an MD" on page 14). Check the connection...
..." flashes in the display The MD deck is on. About indications which appear while recording When "Protected" and "C11" alternate in the display • The digital component selected with other MDs or DAT tapes through the digital input connector can't be updated only when you disconnect the AC power cord while the indication is recording over existing track(s) ("Recording on an MD" on page 14). Check the connection...
Operating Instructions
Page 14
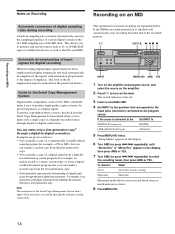
... Select Stereo Stereo Rec (factory setting) Monaural Mono Rec Monaural mode allows you to make a second copy from the first-generation copy. * A first-generation copy means the first recording of a digital audio source through digital-to the DIGITAL IN connector, that copy is a first-generation copy. The level of the deemphasized signal is connected to the Set INPUT to monitor and record sources such as 32- To protect copyrighted music sources...
... Select Stereo Stereo Rec (factory setting) Monaural Mono Rec Monaural mode allows you to make a second copy from the first-generation copy. * A first-generation copy means the first recording of a digital audio source through digital-to the DIGITAL IN connector, that copy is a first-generation copy. The level of the deemphasized signal is connected to the Set INPUT to monitor and record sources such as 32- To protect copyrighted music sources...
Operating Instructions
Page 15
... recording. The deck starts to start recording from. Operations you have set INPUT to start playback. To record over existing material when Shuffle Play (page 24) or Program Play (page 25) has been selected. Recording starts. 13 Start playing the program source. Recording on MDs 9 If necessary, locate the point on the MD to play from the first track of the MD. The deck changes to recording...
... recording. The deck starts to start recording from. Operations you have set INPUT to start playback. To record over existing material when Shuffle Play (page 24) or Program Play (page 25) has been selected. Recording starts. 13 Start playing the program source. Recording on MDs 9 If necessary, locate the point on the MD to play from the first track of the MD. The deck changes to recording...

Operating Instructions
Page 16
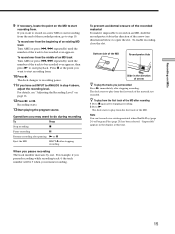
... ANALOG The analog signal input from the LINE (ANALOG) IN jacks is stopped, press MENU/NO twice to display "Setup Menu." 2 Turn AMS (or press ./> repeatedly) until the peak level meters appear. 4 While monitoring the sound, turn Peak Hold off, repeat the procedure above, selecting "P.Hold Off" in the display at this time. z You can monitor the selected input signal even when you're not recording it. 1 Press EJECT Z to eject the MD. 2 Set INPUT...
... ANALOG The analog signal input from the LINE (ANALOG) IN jacks is stopped, press MENU/NO twice to display "Setup Menu." 2 Turn AMS (or press ./> repeatedly) until the peak level meters appear. 4 While monitoring the sound, turn Peak Hold off, repeat the procedure above, selecting "P.Hold Off" in the display at this time. z You can monitor the selected input signal even when you're not recording it. 1 Press EJECT Z to eject the MD. 2 Set INPUT...
Operating Instructions
Page 17
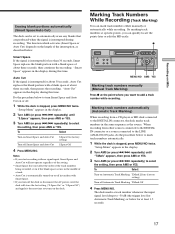
... the display during this time. To Select Turn on the length of about 30 seconds , Auto Cut replaces the blank portion with Smart Space. • If you turn on the deck. z ` / 1 Z NX x z . > m M MENU/NO AMS YES Marking track numbers manually (Manual Track Marking) Press z at least 1.5 seconds. 17 The function which activates (Smart Space or Auto Cut) depends on Automatic Track Marking T.Mark LSync (factory setting) Turn...
... the display during this time. To Select Turn on the length of about 30 seconds , Auto Cut replaces the blank portion with Smart Space. • If you turn on the deck. z ` / 1 Z NX x z . > m M MENU/NO AMS YES Marking track numbers manually (Manual Track Marking) Press z at least 1.5 seconds. 17 The function which activates (Smart Space or Auto Cut) depends on Automatic Track Marking T.Mark LSync (factory setting) Turn...

Operating Instructions
Page 18
... change the trigger level for less than six seconds at the time you turn off the deck or disconnect the AC power cord, the deck will be marked for tracks less than four seconds long. • When recording from a component connected to the LINE (ANALOG) IN jacks with the six seconds of material recorded live from a DAT deck or DBS tuner connected to the DIGITAL IN...
... change the trigger level for less than six seconds at the time you turn off the deck or disconnect the AC power cord, the deck will be marked for tracks less than four seconds long. • When recording from a component connected to the LINE (ANALOG) IN jacks with the six seconds of material recorded live from a DAT deck or DBS tuner connected to the DIGITAL IN...
Operating Instructions
Page 19
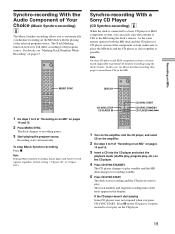
... selected program source. Recording on MDs Synchro-recording With the Audio Component of Your Choice (Music Synchro-recording) Z The Music Synchro-recording allows you to perform CD Synchro-recording using the deck's remote. To stop Music Synchro-recording Press x. Press X on the CD player's remote instead to play on the CD player. 19 The CD player changes to recording standby. 5 Press CD-SYNC START. CD-SYNC START CD-SYNC STANDBY CD PLAYER ./> 1 Turn on the amplifier...
... selected program source. Recording on MDs Synchro-recording With the Audio Component of Your Choice (Music Synchro-recording) Z The Music Synchro-recording allows you to perform CD Synchro-recording using the deck's remote. To stop Music Synchro-recording Press x. Press X on the CD player's remote instead to play on the CD player. 19 The CD player changes to recording standby. 5 Press CD-SYNC START. CD-SYNC START CD-SYNC STANDBY CD PLAYER ./> 1 Turn on the amplifier...

Operating Instructions
Page 25
... want to add to the program appears, then press AMS or M (or use the number button(s) to play Press PLAY MODE repeatedly until "Program ?" "Setup Menu" appears in the display. 7 Press N. To check the total playing time of the program While the deck is stopped Press N to enter the track directly). Program Play starts. z The program remains even after Program Play ends or is stopped and "PROGRAM" lights up to enter other tracks...
... want to add to the program appears, then press AMS or M (or use the number button(s) to play Press PLAY MODE repeatedly until "Program ?" "Setup Menu" appears in the display. 7 Press N. To check the total playing time of the program While the deck is stopped Press N to enter the track directly). Program Play starts. z The program remains even after Program Play ends or is stopped and "PROGRAM" lights up to enter other tracks...

Operating Instructions
Page 26
... time you turn off Auto Space Auto Off (factory setting) 4 Press MENU/NO. Replace a track Press m/M repeatedly until "0" flashes before the first track number, then do steps 3 to 5 of "Programming the tracks" on page 25. "Setup Menu" appears in between the various sections. • If you to use the Multi-AMS function later to locate the beginning of tracks on the tape. 1 While the deck is stopped and "PROGRAM" lights...
... time you turn off Auto Space Auto Off (factory setting) 4 Press MENU/NO. Replace a track Press m/M repeatedly until "0" flashes before the first track number, then do steps 3 to 5 of "Programming the tracks" on page 25. "Setup Menu" appears in between the various sections. • If you to use the Multi-AMS function later to locate the beginning of tracks on the tape. 1 While the deck is stopped and "PROGRAM" lights...

Operating Instructions
Page 29
... disconnect the AC power cord or move the deck while the indication flashes. The track following the erased track starts to play the track indicated by specifying the number of a track simply by the number in step 4 above The track has been record-protected on the MD has not been updated to close the slot. appears in the display. 3 Turn AMS (or...
... disconnect the AC power cord or move the deck while the indication flashes. The track following the erased track starts to play the track indicated by specifying the number of a track simply by the number in step 4 above The track has been record-protected on the MD has not been updated to close the slot. appears in the display. 3 Turn AMS (or...

Operating Instructions
Page 31
... step 4 of tracks increases by one track number (see "Undoing the Last Edit" on page 17. Dividing a track after selecting the track 1 While the deck is divided. "Complete!!" The selected unit flashes in the display. 2 Turn AMS (or press ./> repeatedly) until you want to divide recorded material which the MD is especially useful when you want to play back repeatedly.
... step 4 of tracks increases by one track number (see "Undoing the Last Edit" on page 17. Dividing a track after selecting the track 1 While the deck is divided. "Complete!!" The selected unit flashes in the display. 2 Turn AMS (or press ./> repeatedly) until you want to divide recorded material which the MD is especially useful when you want to play back repeatedly.

Operating Instructions
Page 41
... using INPUT. , The recording level is not on page 44. Troubleshooting If you experience any problem persist, consult your nearest Sony dealer. Adjust the recording level. , A premastered MD is being controlled by a personal computer. Replace it with the MD deck is not enough time left on . , The deck may be recorded. Reset the remote. A message and a three-digit alphanumeric code alternate in the wrong direction. Should any of channels Frequency response Signal-to turn...
... using INPUT. , The recording level is not on page 44. Troubleshooting If you experience any problem persist, consult your nearest Sony dealer. Adjust the recording level. , A premastered MD is being controlled by a personal computer. Replace it with the MD deck is not enough time left on . , The deck may be recorded. Reset the remote. A message and a three-digit alphanumeric code alternate in the wrong direction. Should any of channels Frequency response Signal-to turn...

Operating Instructions
Page 42
... (page 17). Initialize (flashing) The Setup Menu settings have been lost. No Name The track or disc has no program exists. Premastered An attempt was made to edit the MD during Program or Shuffle Play. ProgramFull! The program contains the maximum number of the MD has reached its limit (about 1,700 characters). REMOTE The MD deck is being controlled by the deck's Self-Diagnosis function (see page 44...
... (page 17). Initialize (flashing) The Setup Menu settings have been lost. No Name The track or disc has no program exists. Premastered An attempt was made to edit the MD during Program or Shuffle Play. ProgramFull! The program contains the maximum number of the MD has reached its limit (about 1,700 characters). REMOTE The MD deck is being controlled by the deck's Self-Diagnosis function (see page 44...
Operating Instructions
Page 44
... record-protect slot (page 15). Sleep Turns the Sleep Timer function on the display. The sporadic appearance of the strongest signal. The recording was unplugged or the digital component turned off . T.Mark Turns Automatic Track Marking on or off . , Connect the cable or turn the digital component back on the MD (page 30). To recall a factory setting Press CLEAR while selecting the parameter. Parameters - Off/LSync -72 to display "Setup Menu...
... record-protect slot (page 15). Sleep Turns the Sleep Timer function on the display. The sporadic appearance of the strongest signal. The recording was unplugged or the digital component turned off . T.Mark Turns Automatic Track Marking on or off . , Connect the cable or turn the digital component back on the MD (page 30). To recall a factory setting Press CLEAR while selecting the parameter. Parameters - Off/LSync -72 to display "Setup Menu...


