Operating Instructions
Page 2
... (servicing) instructions in the U.S.A. Do not expose batteries or apparatus with battery-installed to excessive heat such as it is used to disconnect the unit from earphones and headphones can cause hearing loss. Excessive sound pressure from the mains, connect the unit to the presence of fire or electric shock, do not expose this product. As the main plug is connected...
... (servicing) instructions in the U.S.A. Do not expose batteries or apparatus with battery-installed to excessive heat such as it is used to disconnect the unit from earphones and headphones can cause hearing loss. Excessive sound pressure from the mains, connect the unit to the presence of fire or electric shock, do not expose this product. As the main plug is connected...
Operating Instructions
Page 7
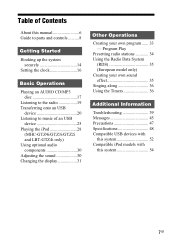
... USB device 25 Playing the iPod 28 (MHC-GTZ4i/GTZ3i/GTZ2i and LBT-GTZ4i only) Using optional audio components 30 Adjusting the sound 30 Changing the display 31 Other Operations Creating your own sound effect 35 Singing along 36 Using the Timers 36 Additional Information Troubleshooting 39 Messages 45 Precautions 47 Specifications 48 Compatible USB devices with this system 52 Compatible iPod models with this manual 6 Guide to parts and controls ..........8 Getting Started Hooking up the system securely 14 Setting the clock 16 Basic Operations Playing an AUDIO CD/MP3 disc...
... USB device 25 Playing the iPod 28 (MHC-GTZ4i/GTZ3i/GTZ2i and LBT-GTZ4i only) Using optional audio components 30 Adjusting the sound 30 Changing the display 31 Other Operations Creating your own sound effect 35 Singing along 36 Using the Timers 36 Additional Information Troubleshooting 39 Messages 45 Precautions 47 Specifications 48 Compatible USB devices with this system 52 Compatible iPod models with this manual 6 Guide to parts and controls ..........8 Getting Started Hooking up the system securely 14 Setting the clock 16 Basic Operations Playing an AUDIO CD/MP3 disc...
Operating Instructions
Page 9
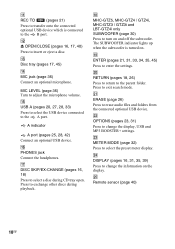
... to select a sound effect. D PRESET EQ (pages 30, 35), GROOVE (page 30), SURROUND (page 30) Press to select the CD function. E MASTER VOLUME (pages 17, 25, 28, 30, 31, 39) Turn to the B port. I USB B (pages 20, 27, 28, 33) Press to select the USB device connected to adjust the volume. J DISC 1 - 3 (pages 17, 33) Press to set the Recording Timer. B Display (page 31) C REC TIMER (page 38...
... to select a sound effect. D PRESET EQ (pages 30, 35), GROOVE (page 30), SURROUND (page 30) Press to select the CD function. E MASTER VOLUME (pages 17, 25, 28, 30, 31, 39) Turn to the B port. I USB B (pages 20, 27, 28, 33) Press to select the USB device connected to adjust the volume. J DISC 1 - 3 (pages 17, 33) Press to set the Recording Timer. B Display (page 31) C REC TIMER (page 38...
Operating Instructions
Page 10
... return to exchange other discs during CD tray open. R MHC-GTZ5, MHC-GTZ4 / GTZ4i, MHC-GTZ3 / GTZ3i and LBT-GTZ4i only SUBWOOFER (page 30) Press to change the information on the display. V OPTIONS (pages 23, 31) Press to turn on . Press to erase audio files and folders from the connected optional USB device. U ERASE (page 26) Press to exit search mode. P PHONES jack Connect the headphones. O USB A (pages 20, 27...
... return to exchange other discs during CD tray open. R MHC-GTZ5, MHC-GTZ4 / GTZ4i, MHC-GTZ3 / GTZ3i and LBT-GTZ4i only SUBWOOFER (page 30) Press to change the information on the display. V OPTIONS (pages 23, 31) Press to turn on . Press to erase audio files and folders from the connected optional USB device. U ERASE (page 26) Press to exit search mode. P PHONES jack Connect the headphones. O USB A (pages 20, 27...
Operating Instructions
Page 11
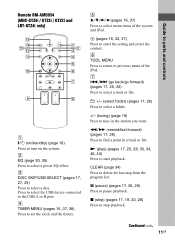
... and LBT-GTZ4i only) qg qf qd qs qa q; 1 2 3 4 5 6 7 9 8 1 "/1 (on/standby) (page 16) Press to stop playback. E V/v/b/B (pages 16, 37) Press to tune in a track or file. CLEAR (page 34) Press to select a disc. C DISC SKIP/USB SELECT (pages 17, 27, 33) Press to delete the last step from the program list. Continued l 11GB Guide to set the clock and the timers. G ./> (go...
... and LBT-GTZ4i only) qg qf qd qs qa q; 1 2 3 4 5 6 7 9 8 1 "/1 (on/standby) (page 16) Press to stop playback. E V/v/b/B (pages 16, 37) Press to tune in a track or file. CLEAR (page 34) Press to select a disc. C DISC SKIP/USB SELECT (pages 17, 27, 33) Press to delete the last step from the program list. Continued l 11GB Guide to set the clock and the timers. G ./> (go...
Operating Instructions
Page 12
... to preset the radio station. K TUNER MEMORY (page 34) Press to adjust the volume. * The VOLUME + button has a tactile dot. Press to set the clock and the timers. N SLEEP (page 36) Press to select the FM reception mode (monaural or stereo). L PLAY MODE/TUNING MODE (pages 19, 27, 33, 34) Press to select the play mode of the iPod. Press to return to exit search mode. B CLOCK/TIMER SELECT (pages 38, 45) CLOCK/TIMER SET (pages...
... to preset the radio station. K TUNER MEMORY (page 34) Press to adjust the volume. * The VOLUME + button has a tactile dot. Press to set the clock and the timers. N SLEEP (page 36) Press to select the FM reception mode (monaural or stereo). L PLAY MODE/TUNING MODE (pages 19, 27, 33, 34) Press to select the play mode of the iPod. Press to return to exit search mode. B CLOCK/TIMER SELECT (pages 38, 45) CLOCK/TIMER SET (pages...
Operating Instructions
Page 13
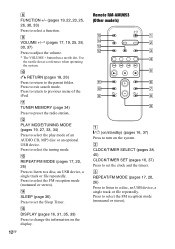
... step from the program list. G DISC SKIP/USB SELECT (pages 17, 27, 33) Press to start playback. Use the tactile dot as a reference when operating the system. N (play mode of an AUDIO CD, MP3 disc or an optional USB device. F ENTER (pages 16, 33, 37) Press to preset the radio station. L TUNER MEMORY (page 34) Press to enter the settings. O SLEEP (page 36) Press to set the Sleep Timer. 13GB Guide to select...
... step from the program list. G DISC SKIP/USB SELECT (pages 17, 27, 33) Press to start playback. Use the tactile dot as a reference when operating the system. N (play mode of an AUDIO CD, MP3 disc or an optional USB device. F ENTER (pages 16, 33, 37) Press to preset the radio station. L TUNER MEMORY (page 34) Press to enter the settings. O SLEEP (page 36) Press to set the Sleep Timer. 13GB Guide to select...
Operating Instructions
Page 15
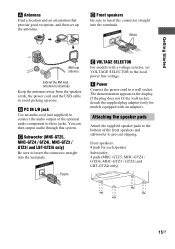
... prevent slipping. F Power Connect the power cord to the local power line voltage. B PC IN L/R jack Use an audio cord (not supplied) to connect the audio output of the front speakers and subwoofer to insert the connector straight into the terminals. The demonstration appears in the display. C Subwoofer (MHC-GTZ5, MHC-GTZ4 / GTZ4i, MHC-GTZ3 / GTZ3i and LBT-GTZ4i only) Be sure to avoid picking up the antennas. If the plug does not...
... prevent slipping. F Power Connect the power cord to the local power line voltage. B PC IN L/R jack Use an audio cord (not supplied) to connect the audio output of the front speakers and subwoofer to insert the connector straight into the terminals. The demonstration appears in the display. C Subwoofer (MHC-GTZ5, MHC-GTZ4 / GTZ4i, MHC-GTZ3 / GTZ3i and LBT-GTZ4i only) Be sure to avoid picking up the antennas. If the plug does not...
Operating Instructions
Page 20
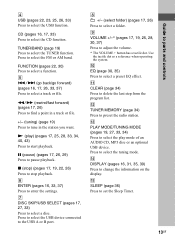
... can also use TUNING +/- repeatedly to tune in the display. To reduce static noise on a weak FM stereo station Press FM MODE on the remote repeatedly until "AUTO" and "PRESET" disappear from a sound source to an optional USB device by this system. (MHC-GTZ4i / GTZ3i / GTZ2i and LBT-GTZ4i only) You cannot transfer the music to the iPod which is connected to the B port. See "Compatible USB devices with a weak signal Use buttons on the remote for a list of...
... can also use TUNING +/- repeatedly to tune in the display. To reduce static noise on a weak FM stereo station Press FM MODE on the remote repeatedly until "AUTO" and "PRESET" disappear from a sound source to an optional USB device by this system. (MHC-GTZ4i / GTZ3i / GTZ2i and LBT-GTZ4i only) You cannot transfer the music to the iPod which is connected to the B port. See "Compatible USB devices with a weak signal Use buttons on the remote for a list of...

Operating Instructions
Page 21
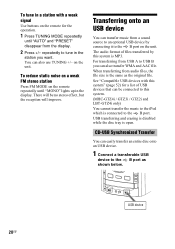
... a sound source other than disc and USB device (Analog Transferring) You can easily transfer the track or MP3 file that is currently being played back. Transferring starts when "DON'T REMOVE" appears in the display. Refer to the operating instructions supplied with the USB device to be connected for details on the operation method. 2 Press CD, then load the disc you want to transfer, then start transferring in shuffle play mode, repeat play mode...
... a sound source other than disc and USB device (Analog Transferring) You can easily transfer the track or MP3 file that is currently being played back. Transferring starts when "DON'T REMOVE" appears in the display. Refer to the operating instructions supplied with the USB device to be connected for details on the operation method. 2 Press CD, then load the disc you want to transfer, then start transferring in shuffle play mode, repeat play mode...
Operating Instructions
Page 24
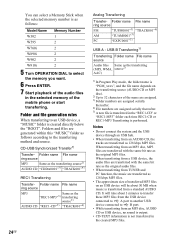
... MP3 files. CD-USB Synchronized Transfer1) Transfer- USB B Transferring1) Transferring Folder name File name source Audio files Same as the transferring (MP3, WMA, source2) AAC) 1) In Program Play mode, the folder name is "PGM_xxxx", and the file name depends on an USB device will take about 50 MB when music is transferred from an MP3 disc, AUDIO CD or USB device, no sound is output. • CD-TEXT information...
... MP3 files. CD-USB Synchronized Transfer1) Transfer- USB B Transferring1) Transferring Folder name File name source Audio files Same as the transferring (MP3, WMA, source2) AAC) 1) In Program Play mode, the folder name is "PGM_xxxx", and the file name depends on an USB device will take about 50 MB when music is transferred from an MP3 disc, AUDIO CD or USB device, no sound is output. • CD-TEXT information...
Operating Instructions
Page 28
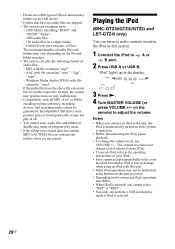
...). Windows Media Audio (WMA) with all . • You cannot erase audio files and folders in the display. 1 USB Z-GROOVE 1 2 3 USB A 3 Press N. 4 Turn MASTER VOLUME (or press VOLUME +/- The maximum number of audio files: - If the audio files have no audio files are skipped. • The system can recognize up in shuffle play mode or program play mode if iPod is turned on this unit. • Some iPod operations may malfunction. • Compatibility with file...
...). Windows Media Audio (WMA) with all . • You cannot erase audio files and folders in the display. 1 USB Z-GROOVE 1 2 3 USB A 3 Press N. 4 Turn MASTER VOLUME (or press VOLUME +/- The maximum number of audio files: - If the audio files have no audio files are skipped. • The system can recognize up in shuffle play mode or program play mode if iPod is turned on this unit. • Some iPod operations may malfunction. • Compatibility with file...

Operating Instructions
Page 30
...) repeatedly. 4 Start playing the connected component. 5 Turn MASTER VOLUME (or press VOLUME +/- Select a preset sound effect Press PRESET EQ (or EQ on the remote) repeatedly until "FLAT" appears. The volume of OPERATION DIAL to power mode and the equalizer curve changes. 2) This feature is only available during USB and CD function. 3) "BOOSTER" lights up . To cancel, press PRESET EQ (or EQ on the remote) repeatedly. If you later disconnect the subwoofer, repeat...
...) repeatedly. 4 Start playing the connected component. 5 Turn MASTER VOLUME (or press VOLUME +/- Select a preset sound effect Press PRESET EQ (or EQ on the remote) repeatedly until "FLAT" appears. The volume of OPERATION DIAL to power mode and the equalizer curve changes. 2) This feature is only available during USB and CD function. 3) "BOOSTER" lights up . To cancel, press PRESET EQ (or EQ on the remote) repeatedly. If you later disconnect the subwoofer, repeat...
Operating Instructions
Page 34
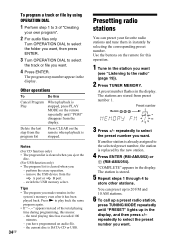
switch the USB memory select. the total playing time has exceeded 100 minutes. - A preset number flashes in the display. The program step number appear in the display. perform the erase operation. - Press N to the radio" (page 19)). 2 Press TUNER MEMORY. Use the buttons on the remote for this operation. 1 Tune in the station you want (see "Listening to play back the same program again. • If "--.--" appears instead of "Creating your favorite radio stations and...
switch the USB memory select. the total playing time has exceeded 100 minutes. - A preset number flashes in the display. The program step number appear in the display. perform the erase operation. - Press N to the radio" (page 19)). 2 Press TUNER MEMORY. Use the buttons on the remote for this operation. 1 Tune in the station you want (see "Listening to play back the same program again. • If "--.--" appears instead of "Creating your favorite radio stations and...

Operating Instructions
Page 37
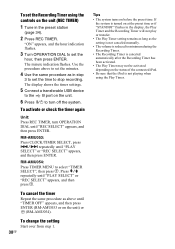
... time to turn off the system. Use the procedure above to set the minutes. 5 Use the same procedure as in the preset radio station (page 34). 2 Press CLOCK/TIMER SET (RM-AMU053) or TIMER MENU (RM-AMU054). 3 Press ./> (RM-AMU053) or v/V (RM-AMU054) repeatedly to adjust the volume. The display shows the timer settings. Use the button on the unit. Recording Timer: You can wake up to the B port on the remote for the operation...
... time to turn off the system. Use the procedure above to set the minutes. 5 Use the same procedure as in the preset radio station (page 34). 2 Press CLOCK/TIMER SET (RM-AMU053) or TIMER MENU (RM-AMU054). 3 Press ./> (RM-AMU053) or v/V (RM-AMU054) repeatedly to adjust the volume. The display shows the timer settings. Use the button on the unit. Recording Timer: You can wake up to the B port on the remote for the operation...
Operating Instructions
Page 38
... Play Timer may not be activated depending on the status of the connected iPod. • Be sure that the iPod is reduced to stop recording. To change the setting Start over from step 1. 38GB Tips • The system turns on the unit. 6 Press "/1 to set the minutes. 4 Use the same procedure as the setting is not canceled manually. • The volume is not playing when using the controls on...
... Play Timer may not be activated depending on the status of the connected iPod. • Be sure that the iPod is reduced to stop recording. To change the setting Start over from step 1. 38GB Tips • The system turns on the unit. 6 Press "/1 to set the minutes. 4 Use the same procedure as the setting is not canceled manually. • The volume is not playing when using the controls on...

Operating Instructions
Page 39
... is no sound from the subwoofer. • Check that if service personnel changes some parts during Recording Timer. General The display starts flashing as soon as you plug in the power cord again and turn MIC LEVEL clockwise to the unit. Continued l 39GB After checking the above items, consult your problem in the display. • The clock is connected securely and correctly to adjust the microphone volume. • Make sure...
... is no sound from the subwoofer. • Check that if service personnel changes some parts during Recording Timer. General The display starts flashing as soon as you plug in the power cord again and turn MIC LEVEL clockwise to the unit. Continued l 39GB After checking the above items, consult your problem in the display. • The clock is connected securely and correctly to adjust the microphone volume. • Make sure...
Operating Instructions
Page 40
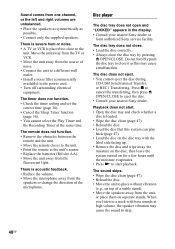
... the power cord. • Turn off surrounding electrical equipment. There is placed too close to start playback. The timer does not function. • Check the timer setting and set the correct time (page 36). • Cancel the Sleep Timer function (page 36). • You cannot select the Play Timer and the Recording Timer at the same time. Sound comes from one channel, or the left and right volumes...
... the power cord. • Turn off surrounding electrical equipment. There is placed too close to start playback. The timer does not function. • Check the timer setting and set the correct time (page 36). • Cancel the Sleep Timer function (page 36). • You cannot select the Play Timer and the Recording Timer at the same time. Sound comes from one channel, or the left and right volumes...
Operating Instructions
Page 44
... the operating instructions supplied with the connected component and start playing. 44GB if the cords are firmly inserted all the way. • Turn on the unit repeatedly to select other settings. • Meter mode is set to "FLASH" in the OPTIONS menu. Optional components There is no sound. • Refer to General item "There is no sound." (page 42) and check the condition of the iPod to the PHONES jack...
... the operating instructions supplied with the connected component and start playing. 44GB if the cords are firmly inserted all the way. • Turn on the unit repeatedly to select other settings. • Meter mode is set to "FLASH" in the OPTIONS menu. Optional components There is no sound. • Refer to General item "There is no sound." (page 42) and check the condition of the iPod to the PHONES jack...
Operating Instructions
Page 47
... turn off . • Completely disconnect the power cord (mains lead) from the wall socket (mains) if it is not a cause for vinyl LPs. • Do not expose discs to direct sunlight or heat sources such as staining or discoloration of abrasive pad, scouring powder, or solvent, such as it is connected to malfunction. On the speaker system This speaker system is...
... turn off . • Completely disconnect the power cord (mains lead) from the wall socket (mains) if it is not a cause for vinyl LPs. • Do not expose discs to direct sunlight or heat sources such as staining or discoloration of abrasive pad, scouring powder, or solvent, such as it is connected to malfunction. On the speaker system This speaker system is...


