Component Setup Guide
Page 1
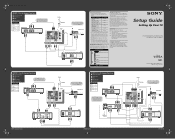
... all the components: 1 Plug in U.S.A. 4-097-808-22 Use this guide to program the TV's remote control to operate your DVD player to the TV's VIDEO 5 inputs, press TV/VIDEO until "VIDEO 5" appears on -screen Auto Setup program, which cables you 'll need . Connections that 's compatible with your DVD ... operating instructions, see the manuals that came with the diagram to purchase extra accessories, such as described below. TV Cable Box IN OUT IN LINE IN LINE OUT OUT R L VIDEO AUDIO VCR © 2003 Sony Corporation Printed in all the AC power cords and turn on the...
... all the components: 1 Plug in U.S.A. 4-097-808-22 Use this guide to program the TV's remote control to operate your DVD player to the TV's VIDEO 5 inputs, press TV/VIDEO until "VIDEO 5" appears on -screen Auto Setup program, which cables you 'll need . Connections that 's compatible with your DVD ... operating instructions, see the manuals that came with the diagram to purchase extra accessories, such as described below. TV Cable Box IN OUT IN LINE IN LINE OUT OUT R L VIDEO AUDIO VCR © 2003 Sony Corporation Printed in all the AC power cords and turn on the...
Primary User Manual
Page 2
...call the CATV system installer's attention to Article 820-40 of television closed captioning in accordance with your projection TV, or viewing a TV station whose logo always stays on the screen, keep the brightness and contrast functions at a high brightness or contrast setting, the image can be ...no guarantee that to which can radiate radio frequency energy and, if not installed and used in accordance with radio communications. If this manual could void your dealer. ❑ If any changes or modifications not expressly approved in a residential installation. You are unable to ...
...call the CATV system installer's attention to Article 820-40 of television closed captioning in accordance with your projection TV, or viewing a TV station whose logo always stays on the screen, keep the brightness and contrast functions at a high brightness or contrast setting, the image can be ...no guarantee that to which can radiate radio frequency energy and, if not installed and used in accordance with radio communications. If this manual could void your dealer. ❑ If any changes or modifications not expressly approved in a residential installation. You are unable to ...
Primary User Manual
Page 4
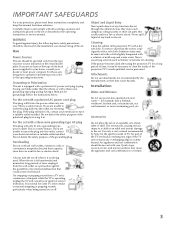
...not defeat the safety purpose of the projection TV with a soft cloth. Accessories Do not place the set or described in the operating instructions or service manual. any kind into the outlet, try reversing the plug. If a snapping or popping sound from the screen, wipe it gently with a dry ... the projection TV for the specific model of the projection TV. Installation Water and Moisture Do not use strong solvents such as they may touch dangerous voltage points or short out parts that could result in a fire or electric shock. Use only a cart or stand recommended by Sony for ...
...not defeat the safety purpose of the projection TV with a soft cloth. Accessories Do not place the set or described in the operating instructions or service manual. any kind into the outlet, try reversing the plug. If a snapping or popping sound from the screen, wipe it gently with a dry ... the projection TV for the specific model of the projection TV. Installation Water and Moisture Do not use strong solvents such as they may touch dangerous voltage points or short out parts that could result in a fire or electric shock. Use only a cart or stand recommended by Sony for ...
Primary User Manual
Page 8
Contents Introducing the Projection TV Welcome ...9 Package Contents 9 Features 9 Setting Up the TV Overview ...11 Carrying Your Projection TV 12 Installing the TV 12 TV Controls and Connectors 13 Front Video Controls 13 KP-57/65WV600 Front Panel 14 KP-57/65WV700 Front Panel 15 Rear Panel 16 Basic ... List 43 Using Auto Setup 43 Adjusting the Convergence Automatically (Flash Focus 44 Adjusting the Convergence Manually 45 Notes on Adjusting the Convergence Manually 46 Using the Remote Control Overview ...47 Inserting Batteries 47 Button Descriptions 48 Programming the Remote...
Contents Introducing the Projection TV Welcome ...9 Package Contents 9 Features 9 Setting Up the TV Overview ...11 Carrying Your Projection TV 12 Installing the TV 12 TV Controls and Connectors 13 Front Video Controls 13 KP-57/65WV600 Front Panel 14 KP-57/65WV700 Front Panel 15 Rear Panel 16 Basic ... List 43 Using Auto Setup 43 Adjusting the Convergence Automatically (Flash Focus 44 Adjusting the Convergence Manually 45 Notes on Adjusting the Convergence Manually 46 Using the Remote Control Overview ...47 Inserting Batteries 47 Button Descriptions 48 Programming the Remote...
Primary User Manual
Page 10
...10065; Favorite Channels: Allows you to connect your new TV include: ❑ Wide Screen Mode: Watch conventional 4:3 aspect ratio broadcasts in wide screen (16:9) mode. ❑ DRC® (Digital...Projection TV Welcome Thank you for quality sources, such as DVD, satellite, and digital camcorders. This manual is to be used with the following models: ❑ KP-57WV600 ❑ KP-65WV600 ❑ KP-57WV700 ❑ KP-65WV700 Package Contents Along with the necessary cables to create up and operate the projection TV in four times the density for purchasing the Sony Projection TV...
...10065; Favorite Channels: Allows you to connect your new TV include: ❑ Wide Screen Mode: Watch conventional 4:3 aspect ratio broadcasts in wide screen (16:9) mode. ❑ DRC® (Digital...Projection TV Welcome Thank you for quality sources, such as DVD, satellite, and digital camcorders. This manual is to be used with the following models: ❑ KP-57WV600 ❑ KP-65WV600 ❑ KP-57WV700 ❑ KP-65WV700 Package Contents Along with the necessary cables to create up and operate the projection TV in four times the density for purchasing the Sony Projection TV...
Primary User Manual
Page 12
Topic Carrying Your Projection TV Installing the TV TV Controls and Connectors Basic Connections: Connecting a Cable or Antenna Connecting Optional Equipment VCR and Cable VCR and Cable Box Two VCRs for setting up your TV. Setting Up the TV Overview This chapter includes illustrated instructions for Tape ... Satellite Receiver Satellite Receiver and VCR DVD Player with Component Video Connectors DVD Player with S VIDEO and Audio Connectors Digital TV Set-Top Box with Component Video Connectors Camcorder Audio Receiver Using the CONTROL S Feature Setting Up the Channel List Adjusting the...
Topic Carrying Your Projection TV Installing the TV TV Controls and Connectors Basic Connections: Connecting a Cable or Antenna Connecting Optional Equipment VCR and Cable VCR and Cable Box Two VCRs for setting up your TV. Setting Up the TV Overview This chapter includes illustrated instructions for Tape ... Satellite Receiver Satellite Receiver and VCR DVD Player with Component Video Connectors DVD Player with S VIDEO and Audio Connectors Digital TV Set-Top Box with Component Video Connectors Camcorder Audio Receiver Using the CONTROL S Feature Setting Up the Channel List Adjusting the...

Primary User Manual
Page 18
...VIDEO 2) is located on your VCR or other Sony infrared-controlled audio or video equipment that came with your VHF/UHF antenna or cable. 0 CONTROL S IN/OUT Allows the TV to receive (IN) and send (OUT) remote... to switch between scrambled channels (coming through your stereo system. 6 HD/DVD IN 5/6 Connect to your TV to your VCR or other video equipment that has S VIDEO. When two VCRs are connected, you need...CATV cable, or cable box output jack. See the instruction manual that has the CONTROL S function. *High-bandwidth Digital Content Protection SETUP SETUP SETUP SETUP 17
...VIDEO 2) is located on your VCR or other Sony infrared-controlled audio or video equipment that came with your VHF/UHF antenna or cable. 0 CONTROL S IN/OUT Allows the TV to receive (IN) and send (OUT) remote... to switch between scrambled channels (coming through your stereo system. 6 HD/DVD IN 5/6 Connect to your TV to your VCR or other video equipment that has S VIDEO. When two VCRs are connected, you need...CATV cable, or cable box output jack. See the instruction manual that has the CONTROL S function. *High-bandwidth Digital Content Protection SETUP SETUP SETUP SETUP 17
Primary User Manual
Page 45
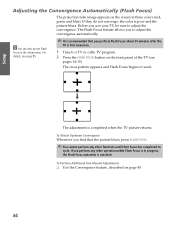
... convergence. To Perform Additional Fine Manual Adjustments ❑ Use the Convergence feature, described on page 45. The Flash Focus feature allows you use your TV, be sure to adjust the convergence automatically. SETUP SETUP 44 SETUP Adjusting the Convergence Automatically (Flash Focus) The projection tube image appears on the screen in progress, the Flash...
... convergence. To Perform Additional Fine Manual Adjustments ❑ Use the Convergence feature, described on page 45. The Flash Focus feature allows you use your TV, be sure to adjust the convergence automatically. SETUP SETUP 44 SETUP Adjusting the Convergence Automatically (Flash Focus) The projection tube image appears on the screen in progress, the Flash...
Primary User Manual
Page 46
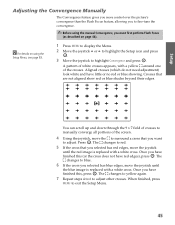
The changes to red. 5 If the cross that you must first perform Flash Focus (as described on using the manual Convergence, you selected has red edges, move the to manually converge all portions of the screen. 4 Using the joystick, move the joystick until the blue image is replaced with a yellow around one of crosses...
The changes to red. 5 If the cross that you must first perform Flash Focus (as described on using the manual Convergence, you selected has red edges, move the to manually converge all portions of the screen. 4 Using the joystick, move the joystick until the blue image is replaced with a yellow around one of crosses...
Primary User Manual
Page 47
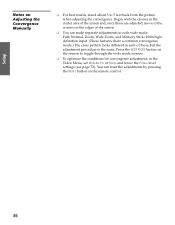
..., but the adjustment procedure is the same. SETUP Notes on the edges of the screen. ❑ You can reset the adjustments by pressing the RESET button on the remote to toggle through the wide mode screens. ❑ To optimize the conditions for convergence adjustment, in the Video Menu, set... lower the Picture level settings (see page 72). Begin with the crosses in the center area of the screen and, once those are adjusted, move to the crosses on Adjusting the Convergence Manually ❑ For best results, stand about 3 to 5 feet back from the picture when adjusting the convergence...
..., but the adjustment procedure is the same. SETUP Notes on the edges of the screen. ❑ You can reset the adjustments by pressing the RESET button on the remote to toggle through the wide mode screens. ❑ To optimize the conditions for convergence adjustment, in the Video Menu, set... lower the Picture level settings (see page 72). Begin with the crosses in the center area of the screen and, once those are adjusted, move to the crosses on Adjusting the Convergence Manually ❑ For best results, stand about 3 to 5 feet back from the picture when adjusting the convergence...
Primary User Manual
Page 81
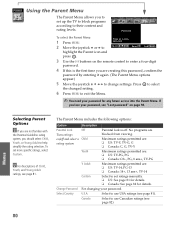
...Youth, or Young Adult to highlight the Parent icon and press . Press to select the changed setting. 6 Press MENU to set ratings manually. ❏ US: See page 81 for details. ❏ Canada: See page 82 for any future access into the Parent Menu. ... Parent Menu includes the following options: Option Description Parental Lock Off Turn ratings on page 94. Maximum ratings permitted are: ❏ US: TV-Y, TV-G, G ❏ Canada: C, G, TV-Y Youth Maximum ratings permitted are blocked from viewing. Change Password For changing your password, see page 81. Password: _ _ _ _ To...
...Youth, or Young Adult to highlight the Parent icon and press . Press to select the changed setting. 6 Press MENU to set ratings manually. ❏ US: See page 81 for details. ❏ Canada: See page 82 for any future access into the Parent Menu. ... Parent Menu includes the following options: Option Description Parental Lock Off Turn ratings on page 94. Maximum ratings permitted are: ❏ US: TV-Y, TV-G, G ❏ Canada: C, G, TV-Y Youth Maximum ratings permitted are blocked from viewing. Change Password For changing your password, see page 81. Password: _ _ _ _ To...
Primary User Manual
Page 86
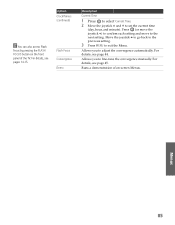
..., see page 45. Flash Focus Convergence Demo Description Current Time 1 Press to select Current Time. 2 Move the joystick V and v to fine-tune the convergence manually. For details, see page 44. Move the joystick B to go back to the previous setting. 3 Press MENU to the next setting. Press (or move the... joystick b) to confirm each setting and move to exit the Menu. Runs a demonstration of on the front panel of the TV. For details, see pages 14-15. SETUP Option Clock/Timers (continued) z You can also access Flash Focus by pressing the FLASH FOCUS button on...
..., see page 45. Flash Focus Convergence Demo Description Current Time 1 Press to select Current Time. 2 Move the joystick V and v to fine-tune the convergence manually. For details, see page 44. Move the joystick B to go back to the previous setting. 3 Press MENU to the next setting. Press (or move the... joystick b) to confirm each setting and move to exit the Menu. Runs a demonstration of on the front panel of the TV. For details, see pages 14-15. SETUP Option Clock/Timers (continued) z You can also access Flash Focus by pressing the FLASH FOCUS button on...

Primary User Manual
Page 98
...Favorite Channels clearing 62 in Channel Menu 78 using with A/V connectors, connecting 38 DVI. DVD player using with TV remote control 54 with TV remote control 54 Caption Vision 83 carrying the TV 12 CATV. Index 0-9 buttons 49, 56 16:9 aspect ratio 58 4:3 aspect ratio 58 4:3 Default settings ..., 83 CODE SET button 49 color, adjusting 72 CONTROL S 42 CONTROL S IN/OUT jacks, described 17 Convergence, adjusting automatically 44 Convergence, adjusting manually 45 Cool, Color Temperature 72 D Demo, Menus 85 Digital Reality Creation 9 Digital Visual Interface (DVI) 10, 17 DISC MENU button 50, 54...
...Favorite Channels clearing 62 in Channel Menu 78 using with A/V connectors, connecting 38 DVI. DVD player using with TV remote control 54 with TV remote control 54 Caption Vision 83 carrying the TV 12 CATV. Index 0-9 buttons 49, 56 16:9 aspect ratio 58 4:3 aspect ratio 58 4:3 Default settings ..., 83 CODE SET button 49 color, adjusting 72 CONTROL S 42 CONTROL S IN/OUT jacks, described 17 Convergence, adjusting automatically 44 Convergence, adjusting manually 45 Cool, Color Temperature 72 D Demo, Menus 85 Digital Reality Creation 9 Digital Visual Interface (DVI) 10, 17 DISC MENU button 50, 54...


