
Operating Instructions
Page 7
If you are not sure of the type of electrical power supplied to your home, consult your electrician to have a suitable outlet installed. This is equipped with water for long periods of power source indicated on the serial/model plate. If you are unable to insert the plug into...Warning For the set , or described in . Carefully observe and comply with all warnings, cautions and instructions placed on the set from battery power, refer to be used. Important Safeguards For your protection, please read these instructions completely, and keep this can result in a fire or ...
If you are not sure of the type of electrical power supplied to your home, consult your electrician to have a suitable outlet installed. This is equipped with water for long periods of power source indicated on the serial/model plate. If you are unable to insert the plug into...Warning For the set , or described in . Carefully observe and comply with all warnings, cautions and instructions placed on the set from battery power, refer to be used. Important Safeguards For your protection, please read these instructions completely, and keep this can result in a fire or ...

Operating Instructions
Page 13
..., connect only the single audio output to AUDIO and S VIDEO IN on the projection TV. S VIDEO (Rear of the S VIDEO cable. Installing and Connecting the Projection TV Connecting an Antenna/...VIDEO 4 VIDEO 5 (DTV) SELECT IN VIDEO 1 VIDEO 3 HD VD S VIDEO VIDEO L (MONO) AUDIO R Y Y/G L PB PB/B (MONO) PR PR/R R COMPONENT AUDIO VIDEO AUDIO-L AUDIO-R VHF/UHF VIDEO L AUDIO R 2 Coaxial cable (not supplied) VCR AUDIO R AUDIO L VIDEO LINE IN LINE OUT S VIDEO VHF/UHF OUT IN 1 Cable/ Antenna VMC-810S/820S (not supplied) 3 YC-15V/30V (not supplied) 9 Disconnect all power...
..., connect only the single audio output to AUDIO and S VIDEO IN on the projection TV. S VIDEO (Rear of the S VIDEO cable. Installing and Connecting the Projection TV Connecting an Antenna/...VIDEO 4 VIDEO 5 (DTV) SELECT IN VIDEO 1 VIDEO 3 HD VD S VIDEO VIDEO L (MONO) AUDIO R Y Y/G L PB PB/B (MONO) PR PR/R R COMPONENT AUDIO VIDEO AUDIO-L AUDIO-R VHF/UHF VIDEO L AUDIO R 2 Coaxial cable (not supplied) VCR AUDIO R AUDIO L VIDEO LINE IN LINE OUT S VIDEO VHF/UHF OUT IN 1 Cable/ Antenna VMC-810S/820S (not supplied) 3 YC-15V/30V (not supplied) 9 Disconnect all power...
Operating Instructions
Page 14
S VIDEO Disconnect all power sources before making any connections. (Rear of the S VIDEO cable. Connecting a VCR and Projection TV to a Cable Box 1 Connect the single (input) jack of the splitter to the ...S IN OUT AUX IN OUT VIDEO 4 VIDEO 5 (DTV) SELECT IN VIDEO 1 VIDEO 3 HD VD S VIDEO VIDEO L (MONO) AUDIO R Y Y/G L PB PB/B (MONO) PR PR/R R COMPONENT AUDIO VHF/UHF VIDEO L AUDIO R Coaxial cable (not supplied) VIDEO AUDIO-L AUDIO-R AUDIO R AUDIO L VIDEO LINE IN LINE OUT VMC-810S/820S (not supplied) S VIDEO VCR Coaxial cable (not supplied) VHF/UHF OUT IN 2 ...
S VIDEO Disconnect all power sources before making any connections. (Rear of the S VIDEO cable. Connecting a VCR and Projection TV to a Cable Box 1 Connect the single (input) jack of the splitter to the ...S IN OUT AUX IN OUT VIDEO 4 VIDEO 5 (DTV) SELECT IN VIDEO 1 VIDEO 3 HD VD S VIDEO VIDEO L (MONO) AUDIO R Y Y/G L PB PB/B (MONO) PR PR/R R COMPONENT AUDIO VHF/UHF VIDEO L AUDIO R Coaxial cable (not supplied) VIDEO AUDIO-L AUDIO-R AUDIO R AUDIO L VIDEO LINE IN LINE OUT VMC-810S/820S (not supplied) S VIDEO VCR Coaxial cable (not supplied) VHF/UHF OUT IN 2 ...

Operating Instructions
Page 15
...) 1 Roof Antenna RK-74A (not supplied) R HD G VD B S VIDEO VIDEO 1 2 L (MONO) R 1 2 AUDIO OUT Y R PB G HD 3 PR 4 B VD VIDEO OUT 3 (continued) 11 Installing and Connecting the Projection TV Connecting a DTV (Digital Television) Receiver Before connecting, be sure to read the Operating Instructions of VIDEO 5 (DTV) IN on page 43) Disconnect all power sources before making any connections. 2 Composite...
...) 1 Roof Antenna RK-74A (not supplied) R HD G VD B S VIDEO VIDEO 1 2 L (MONO) R 1 2 AUDIO OUT Y R PB G HD 3 PR 4 B VD VIDEO OUT 3 (continued) 11 Installing and Connecting the Projection TV Connecting a DTV (Digital Television) Receiver Before connecting, be sure to read the Operating Instructions of VIDEO 5 (DTV) IN on page 43) Disconnect all power sources before making any connections. 2 Composite...

Operating Instructions
Page 16
... CONTROL S IN OUT AUX IN OUT VIDEO 4 VIDEO 5 (DTV) SELECT DTV receiver IN VIDEO 1 VIDEO 3 HD VD S VIDEO VIDEO L (MONO) AUDIO R Y Y/G L PB PB/B (MONO) PR PR/R R COMPONENT AUDIO VHF/UHF VIDEO L AUDIO R AUDIO-R AUDIO-L VHF/UHF (DTV) 1 Roof Antenna RK-74A (not supplied) S VIDEO VIDEO 1 2 L (MONO) R 1 2 AUDIO OUT Y PB 3 PR VIDEO OUT 3 12 Connecting a DTV (digital television) receiver with the Y/PB/ PR...
... CONTROL S IN OUT AUX IN OUT VIDEO 4 VIDEO 5 (DTV) SELECT DTV receiver IN VIDEO 1 VIDEO 3 HD VD S VIDEO VIDEO L (MONO) AUDIO R Y Y/G L PB PB/B (MONO) PR PR/R R COMPONENT AUDIO VHF/UHF VIDEO L AUDIO R AUDIO-R AUDIO-L VHF/UHF (DTV) 1 Roof Antenna RK-74A (not supplied) S VIDEO VIDEO 1 2 L (MONO) R 1 2 AUDIO OUT Y PB 3 PR VIDEO OUT 3 12 Connecting a DTV (digital television) receiver with the Y/PB/ PR...

Operating Instructions
Page 17
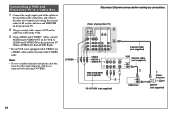
... which the DBS receiver is connected to AUDIO and S VIDEO IN on the remote control. Disconnect all power sources before making any connections. (Rear of projection TV) CONTROL S IN OUT AUX IN OUT VIDEO 4 VIDEO 5 (DTV) SELECT IN VIDEO 1 VIDEO 3 HD VD Cable/ Satellite antenna Antenna cable 21 S VIDEO VIDEO L (MONO) AUDIO R Y Y/G L PB PB/B (MONO) PR PR/R R COMPONENT AUDIO...
... which the DBS receiver is connected to AUDIO and S VIDEO IN on the remote control. Disconnect all power sources before making any connections. (Rear of projection TV) CONTROL S IN OUT AUX IN OUT VIDEO 4 VIDEO 5 (DTV) SELECT IN VIDEO 1 VIDEO 3 HD VD Cable/ Satellite antenna Antenna cable 21 S VIDEO VIDEO L (MONO) AUDIO R Y Y/G L PB PB/B (MONO) PR PR/R R COMPONENT AUDIO...

Operating Instructions
Page 18
...power sources before making any connections. S VIDEO (Rear of the S VIDEO cable. Note: • To view input from the incoming cable connection or antenna to VHF/UHF IN on the VCR. 3 Using a coaxial cable, connect VHF/UHF OUT on the VCR to VHF/UHF on the projection TV. 4 Using AUDIO and S VIDEO... with S VIDEO, use a VIDEO cable (yellow) instead of projection TV) CONTROL S IN OUT AUX IN OUT VIDEO 4 VIDEO 5 (DTV) SELECT IN VIDEO 1 VIDEO 3 HD VD Coaxial cable (not supplied) 3 SATELLITE IN LINE OUT VHF/UHF AUDIO R AUDIO L VIDEO S VIDEO IN OUT DBS S VIDEO VIDEO L (MONO...
...power sources before making any connections. S VIDEO (Rear of the S VIDEO cable. Note: • To view input from the incoming cable connection or antenna to VHF/UHF IN on the VCR. 3 Using a coaxial cable, connect VHF/UHF OUT on the VCR to VHF/UHF on the projection TV. 4 Using AUDIO and S VIDEO... with S VIDEO, use a VIDEO cable (yellow) instead of projection TV) CONTROL S IN OUT AUX IN OUT VIDEO 4 VIDEO 5 (DTV) SELECT IN VIDEO 1 VIDEO 3 HD VD Coaxial cable (not supplied) 3 SATELLITE IN LINE OUT VHF/UHF AUDIO R AUDIO L VIDEO S VIDEO IN OUT DBS S VIDEO VIDEO L (MONO...

Operating Instructions
Page 19
S VIDEO VIDEO L(MONO) AUDIO R SET UP VIDEO 2 INPUT VIDEO AUDIO-L AUDIO-R VMC-810S/820S (not supplied) 1 Audio/video outputs YC-15V/30V (not supplied) 1 Camcorder 15 Installing and Connecting the Projection TV Connecting a Camcorder Use this connection to view a picture directly from your camcorder is not equipped with S VIDEO, use a VIDEO cable (yellow) instead of projection TV) S VIDEO Push to the...
S VIDEO VIDEO L(MONO) AUDIO R SET UP VIDEO 2 INPUT VIDEO AUDIO-L AUDIO-R VMC-810S/820S (not supplied) 1 Audio/video outputs YC-15V/30V (not supplied) 1 Camcorder 15 Installing and Connecting the Projection TV Connecting a Camcorder Use this connection to view a picture directly from your camcorder is not equipped with S VIDEO, use a VIDEO cable (yellow) instead of projection TV) S VIDEO Push to the...

Operating Instructions
Page 20
...VIDEO LINE OUT OUT IN 1 Disconnect all power sources before making any connections. (Rear of projection TV) CONTROL S IN OUT AUX IN OUT VIDEO 4 VIDEO 5 (DTV) SELECT IN VIDEO 1 VIDEO 3 HD VD S VIDEO VIDEO L (MONO) AUDIO R Y Y/G L PB PB/B (MONO) PR PR/R R COMPONENT AUDIO VIDEO VIDEO AUDIO-L AUDIO-L AUDIO-R AUDIO-R VHF/UHF VIDEO...Using an AUDIO/VIDEO cable, connect AUDIO and VIDEO IN on the VCR intended for recording) R AUDIO R AUDIO L VIDEO LINE IN OUT IN 2 VMC-810S/820S (not supplied) VMC-810S/820S (not supplied) (Rear of projection TV) VIDEO IN SELECT OUT ...
...VIDEO LINE OUT OUT IN 1 Disconnect all power sources before making any connections. (Rear of projection TV) CONTROL S IN OUT AUX IN OUT VIDEO 4 VIDEO 5 (DTV) SELECT IN VIDEO 1 VIDEO 3 HD VD S VIDEO VIDEO L (MONO) AUDIO R Y Y/G L PB PB/B (MONO) PR PR/R R COMPONENT AUDIO VIDEO VIDEO AUDIO-L AUDIO-L AUDIO-R AUDIO-R VHF/UHF VIDEO...Using an AUDIO/VIDEO cable, connect AUDIO and VIDEO IN on the VCR intended for recording) R AUDIO R AUDIO L VIDEO LINE IN OUT IN 2 VMC-810S/820S (not supplied) VMC-810S/820S (not supplied) (Rear of projection TV) VIDEO IN SELECT OUT ...

Operating Instructions
Page 21
S VIDEO (Rear of information, picture noise may appear. Installing and Connecting the Projection TV Connecting a DVD Player With S Video or Composite Video Output Connectors Using an AUDIO and S VIDEO cables, connect AUDIO and S VIDEO IN on the projection TV to the projection TV. Note: • Since the high quality pictures on page 35) Disconnect all power sources before...
S VIDEO (Rear of information, picture noise may appear. Installing and Connecting the Projection TV Connecting a DVD Player With S Video or Composite Video Output Connectors Using an AUDIO and S VIDEO cables, connect AUDIO and S VIDEO IN on the projection TV to the projection TV. Note: • Since the high quality pictures on page 35) Disconnect all power sources before...

Operating Instructions
Page 22
...Rear of projection TV) Y CONTROL S IN OUT IN OUT VIDEO 4 VIDEO 5 (DTV) SELECT VMC-10HG (not supplied) AUX IN VIDEO 1 VIDEO 3 HD VD S VIDEO VIDEO L (MONO) AUDIO R Y Y/G L PB PB/B (MONO) PR PR/R R COMPONENT AUDIO VHF/UHF VIDEO L AUDIO R 2 PR PB Y DVD LINE OUT S VIDEO OUT COMPONENT VIDEO OUT S-LINK DIGITAL OUT R-AUDIO 1-L VIDEO..., Red-AUDIO Right). 2 Using three VIDEO cables, connect Y, PB and PR of the COMPONENT VIDEO OUT on the DVD Player to Y, PB and PR of VIDEO 4 IN or VIDEO 5 (DTV) IN on page 35) Disconnect all power sources before making any connections. If so...
...Rear of projection TV) Y CONTROL S IN OUT IN OUT VIDEO 4 VIDEO 5 (DTV) SELECT VMC-10HG (not supplied) AUX IN VIDEO 1 VIDEO 3 HD VD S VIDEO VIDEO L (MONO) AUDIO R Y Y/G L PB PB/B (MONO) PR PR/R R COMPONENT AUDIO VHF/UHF VIDEO L AUDIO R 2 PR PB Y DVD LINE OUT S VIDEO OUT COMPONENT VIDEO OUT S-LINK DIGITAL OUT R-AUDIO 1-L VIDEO..., Red-AUDIO Right). 2 Using three VIDEO cables, connect Y, PB and PR of the COMPONENT VIDEO OUT on the DVD Player to Y, PB and PR of VIDEO 4 IN or VIDEO 5 (DTV) IN on page 35) Disconnect all power sources before making any connections. If so...

Operating Instructions
Page 23
...VMC-810S/ Cable/ 820S Antenna (not supplied) VIDEO VIDEO AUDIO-L 5 AUDIO-R AUDIO/ VMC-810S/820S (not supplied) VIDEO 2 IN 3 MONITOR OUT AUDIO/ VIDEO 1 IN VMC-10HG (not supplied) AV receiver AUDIO/ VIDEO 1 OUT 19 Installing and Connecting the Projection TV Coaxial cable (not supplied) VMC-810S/820S (not supplied) (Rear of VIDEO 1 IN on the projection TV to MONITOR... page 41) Note: • You may want to use CHANNEL FIX to fix your projection TV's input to the AV receiver (VIDEO 1). (see "CHANNEL FIX" on page 38) Disconnect all power sources before making any connections.
...VMC-810S/ Cable/ 820S Antenna (not supplied) VIDEO VIDEO AUDIO-L 5 AUDIO-R AUDIO/ VMC-810S/820S (not supplied) VIDEO 2 IN 3 MONITOR OUT AUDIO/ VIDEO 1 IN VMC-10HG (not supplied) AV receiver AUDIO/ VIDEO 1 OUT 19 Installing and Connecting the Projection TV Coaxial cable (not supplied) VMC-810S/820S (not supplied) (Rear of VIDEO 1 IN on the projection TV to MONITOR... page 41) Note: • You may want to use CHANNEL FIX to fix your projection TV's input to the AV receiver (VIDEO 1). (see "CHANNEL FIX" on page 38) Disconnect all power sources before making any connections.

Operating Instructions
Page 24
... input and use the AUDIO menu to one of projection TV) AUDIO OUT FIX VAR L R AUDIO (VAR) OUT-L 1 AUDIO (VAR) OUT-R RK-74A (not supplied) Line input HRD Stereo amplifier Tape-2, AUX1, etc.) on AUDIO (VAR) OUT only. 20 Disconnect all power sources before making any connections. (Rear of the unused Line inputs (e.g.
... input and use the AUDIO menu to one of projection TV) AUDIO OUT FIX VAR L R AUDIO (VAR) OUT-L 1 AUDIO (VAR) OUT-R RK-74A (not supplied) Line input HRD Stereo amplifier Tape-2, AUX1, etc.) on AUDIO (VAR) OUT only. 20 Disconnect all power sources before making any connections. (Rear of the unused Line inputs (e.g.

Operating Instructions
Page 25
...one of projection TV) CENTER IN # AUDIO OUT FIX VAR CENTER IN 3 L 1 R AUDIO (FIX) OUT-L AUDIO (FIX) OUT-R 2 RK-74A (not supplied) Line input 3 Amplifier with the amplifier), connect the speaker terminals on the amplifier to "CENTER IN" on the projection TV. (see "SPEAKER" on page 36...) Disconnect all power sources before making any connections. (Rear of the unused Line inputs (e.g. on the projection TV. 2 Using an AUDIO cable, connect AUDIO (FIX) OUT on the amplifier (...
...one of projection TV) CENTER IN # AUDIO OUT FIX VAR CENTER IN 3 L 1 R AUDIO (FIX) OUT-L AUDIO (FIX) OUT-R 2 RK-74A (not supplied) Line input 3 Amplifier with the amplifier), connect the speaker terminals on the amplifier to "CENTER IN" on the projection TV. (see "SPEAKER" on page 36...) Disconnect all power sources before making any connections. (Rear of the unused Line inputs (e.g. on the projection TV. 2 Using an AUDIO cable, connect AUDIO (FIX) OUT on the amplifier (...

Operating Instructions
Page 58
...To pause To search the picture forward or backward To change input mode Press DVD/VTR (POWER). [Green Button] Press the 0 - 9 buttons. Press M to step forward or m to resume normal playback. to operate your video equipment. 2 Press DVD/VTR (FUNCTION). 3 Use the VCR/DVD/MDP operation buttons ...forward or CH- In this case, please use the equipment's own remote control. • When you would like to access your non-Sony video equipment with the supplied remote control. Press M. Press CH+ to the factory setting. Press DVD MENU. Operating a VCR using the remote control To turn On...
...To pause To search the picture forward or backward To change input mode Press DVD/VTR (POWER). [Green Button] Press the 0 - 9 buttons. Press M to step forward or m to resume normal playback. to operate your video equipment. 2 Press DVD/VTR (FUNCTION). 3 Use the VCR/DVD/MDP operation buttons ...forward or CH- In this case, please use the equipment's own remote control. • When you would like to access your non-Sony video equipment with the supplied remote control. Press M. Press CH+ to the factory setting. Press DVD MENU. Operating a VCR using the remote control To turn On...
Operating Instructions
Page 59
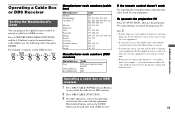
...used only with a DBS receiver. 55 Press CODE SET, DBS/CABLE (FUNCTION), and the 0-9 buttons to operate a Sony DBS receiver: FUNCTION CODE SET DBS/CABLE 8 0 ENTER 1 Manufacturer code numbers (cable box) Manufacturer Gemini Hamlin/Regal ..., for your equipment with the equipment. I. Blue-labeled buttons such as the GUIDE button can program the supplied remote control to control the projection TV. In this case, use the projection TV control buttons to operate ...Operating a cable box or DBS receiver 1 Press DBS/CABLE (POWER) [Green Button] to operate your equipment.
...used only with a DBS receiver. 55 Press CODE SET, DBS/CABLE (FUNCTION), and the 0-9 buttons to operate a Sony DBS receiver: FUNCTION CODE SET DBS/CABLE 8 0 ENTER 1 Manufacturer code numbers (cable box) Manufacturer Gemini Hamlin/Regal ..., for your equipment with the equipment. I. Blue-labeled buttons such as the GUIDE button can program the supplied remote control to control the projection TV. In this case, use the projection TV control buttons to operate ...Operating a cable box or DBS receiver 1 Press DBS/CABLE (POWER) [Green Button] to operate your equipment.

Operating Instructions
Page 63
...Power consumption In use (Max.): 240 W In standby: 1 W Dimensions (W/H/D) 1,218 × 1,459 × 635 mm (48 × 57 1/2 × 25 inches) (KP-53HS10) 1,372 × 1,558 × 670 mm (54 1/8 × 61 3/8 × 26 1/2 inches) (KP-61HS10) Mass 84 kg (185 lbs 3 oz) (KP-53HS10) 102 kg (224 lbs 14 oz) (KP-61HS10) Supplied... F1.1 Television system American TV standard Channel coverage VHF: 2-13/UHF: 14-69/CATV: 1-125 Antenna 75 ohm external terminal for VHF/UHF Screen size (measured diagonally) 53 inches (KP-53HS10) 61 inches (KP-61HS10) Inputs/outputs VIDEO 1/3 IN VIDEO 2 INPUT S VIDEO IN (4-...
...Power consumption In use (Max.): 240 W In standby: 1 W Dimensions (W/H/D) 1,218 × 1,459 × 635 mm (48 × 57 1/2 × 25 inches) (KP-53HS10) 1,372 × 1,558 × 670 mm (54 1/8 × 61 3/8 × 26 1/2 inches) (KP-61HS10) Mass 84 kg (185 lbs 3 oz) (KP-53HS10) 102 kg (224 lbs 14 oz) (KP-61HS10) Supplied... F1.1 Television system American TV standard Channel coverage VHF: 2-13/UHF: 14-69/CATV: 1-125 Antenna 75 ohm external terminal for VHF/UHF Screen size (measured diagonally) 53 inches (KP-53HS10) 61 inches (KP-61HS10) Inputs/outputs VIDEO 1/3 IN VIDEO 2 INPUT S VIDEO IN (4-...


