Primary User Manual
Page 2
... of fire or shock hazard, do not use this television receiver for several days, disconnect the power by your projection TV, or viewing a TV station whose logo always stays on Caption Vision This television receiver provides display of television closed captioning in a particular installation. CAUTION To prevent electric shock, do not expose the projection TV to the presence of important operating and maintenance (servicing) instructions in the literature accompanying the appliance...
... of fire or shock hazard, do not use this television receiver for several days, disconnect the power by your projection TV, or viewing a TV station whose logo always stays on Caption Vision This television receiver provides display of television closed captioning in a particular installation. CAUTION To prevent electric shock, do not expose the projection TV to the presence of important operating and maintenance (servicing) instructions in the literature accompanying the appliance...
Primary User Manual
Page 3
... your TV, resulting in retention of the image in the picture. ENERGY STAR® is incorporated under U.S. Changing the program material viewed reduces the possibility that this product meets the ENERGY STAR® guidelines for instructions on adjusting picture settings. This will become imprinted on your TV can occur when bright stationary images such as TV station logos displayed on the picture tubes in your Projection TV Bright, stationary images such as TV station...
... your TV, resulting in retention of the image in the picture. ENERGY STAR® is incorporated under U.S. Changing the program material viewed reduces the possibility that this product meets the ENERGY STAR® guidelines for instructions on adjusting picture settings. This will become imprinted on your TV can occur when bright stationary images such as TV station logos displayed on the picture tubes in your Projection TV Bright, stationary images such as TV station...
Primary User Manual
Page 4
... into the power outlet only one way. If the picture becomes dark after using the projection TV for cleaning. any edge of the set should be removed with a cloth slightly dampened with all warnings, cautions and instructions placed on or off when it may fall, causing serious injury to a child or an adult and serious damage to the operating instructions. If the...
... into the power outlet only one way. If the picture becomes dark after using the projection TV for cleaning. any edge of the set should be removed with a cloth slightly dampened with all warnings, cautions and instructions placed on or off when it may fall, causing serious injury to a child or an adult and serious damage to the operating instructions. If the...
Primary User Manual
Page 5
... for this television receiver during a lightning storm, or when it is left unattended and unused for the grounding electrode. To ensure reliable operation of any service or repairs to the set, ask the service technician to protect it indicates a need for necessary ventilation. WHEN INSTALLING AN OUTDOOR ANTENNA SYSTEM, EXTREME CARE SHOULD BE TAKEN TO KEEP FROM CONTACTING SUCH POWER LINES OR CIRCUITS...
... for this television receiver during a lightning storm, or when it is left unattended and unused for the grounding electrode. To ensure reliable operation of any service or repairs to the set, ask the service technician to protect it indicates a need for necessary ventilation. WHEN INSTALLING AN OUTDOOR ANTENNA SYSTEM, EXTREME CARE SHOULD BE TAKEN TO KEEP FROM CONTACTING SUCH POWER LINES OR CIRCUITS...
Primary User Manual
Page 8
... 34 DVD Player with Component Video Connectors 36 DVD Player with S VIDEO and Audio Connectors 38 Digital TV Set-Top Box with Component Video Connectors 39 Camcorder 40 Audio Receiver 41 Using the CONTROL S Feature 42 Setting Up the Channel List 43 Using Auto Setup 43 Adjusting the Convergence Automatically (Flash Focus 44 Adjusting the Convergence Manually 45 Notes on Adjusting the Convergence Manually 46 Using the Remote Control Overview ...47 Inserting Batteries 47 Button Descriptions 48 Programming the Remote Control 51 Using Other Equipment with Your TV Remote Control 53...
... 34 DVD Player with Component Video Connectors 36 DVD Player with S VIDEO and Audio Connectors 38 Digital TV Set-Top Box with Component Video Connectors 39 Camcorder 40 Audio Receiver 41 Using the CONTROL S Feature 42 Setting Up the Channel List 43 Using Auto Setup 43 Adjusting the Convergence Automatically (Flash Focus 44 Adjusting the Convergence Manually 45 Notes on Adjusting the Convergence Manually 46 Using the Remote Control Overview ...47 Inserting Batteries 47 Button Descriptions 48 Programming the Remote Control 51 Using Other Equipment with Your TV Remote Control 53...
Primary User Manual
Page 10
.... Most components (VCRs, DVD players, etc.) come with your new TV include: ❑ Wide Screen Mode: Watch conventional 4:3 aspect ratio broadcasts in four times the density for purchasing the Sony Projection TV. This results in wide screen (16:9) mode. ❑ DRC® (Digital Reality Creation) Multifunction V1: Unlike conventional line doublers, the DRC Multifunction feature replaces the signal's NTSC waveform with your new projection TV, the package contains a remote control and two AA...
.... Most components (VCRs, DVD players, etc.) come with your new TV include: ❑ Wide Screen Mode: Watch conventional 4:3 aspect ratio broadcasts in four times the density for purchasing the Sony Projection TV. This results in wide screen (16:9) mode. ❑ DRC® (Digital Reality Creation) Multifunction V1: Unlike conventional line doublers, the DRC Multifunction feature replaces the signal's NTSC waveform with your new projection TV, the package contains a remote control and two AA...
Primary User Manual
Page 12
... Receiver and VCR DVD Player with Component Video Connectors DVD Player with S VIDEO and Audio Connectors Digital TV Set-Top Box with Component Video Connectors Camcorder Audio Receiver Using the CONTROL S Feature Setting Up the Channel List Adjusting the Convergence Automatically (Flash Focus) Adjusting the Convergence Manually Page(s) 12 12 13-17 18-24 26 28 30 32 34 36 38 39 40 41 42 43 44 45 11 Topic Carrying Your Projection TV Installing the TV TV Controls and Connectors Basic Connections: Connecting a Cable or Antenna Connecting...
... Receiver and VCR DVD Player with Component Video Connectors DVD Player with S VIDEO and Audio Connectors Digital TV Set-Top Box with Component Video Connectors Camcorder Audio Receiver Using the CONTROL S Feature Setting Up the Channel List Adjusting the Convergence Automatically (Flash Focus) Adjusting the Convergence Manually Page(s) 12 12 13-17 18-24 26 28 30 32 34 36 38 39 40 41 42 43 44 45 11 Topic Carrying Your Projection TV Installing the TV TV Controls and Connectors Basic Connections: Connecting a Cable or Antenna Connecting...
Primary User Manual
Page 15
... scan quickly through the video equipment connected to adjust the convergence (see page 84. Press to the TV's video inputs. SETUP SETUP SETUP 14 When lit, indicates one of the timers is displayed. Press repeatedly to turn on , then shuts off when the picture is set , this may indicate the TV needs service (see "Inserting and Removing a Memory Stick" on page 90). VOLUME 8 TV/VIDEO 9 FLASH FOCUS q; Press to cycle through channels, press and hold down either CHANNEL button...
... scan quickly through the video equipment connected to adjust the convergence (see page 84. Press to the TV's video inputs. SETUP SETUP SETUP 14 When lit, indicates one of the timers is displayed. Press repeatedly to turn on , then shuts off when the picture is set , this may indicate the TV needs service (see "Inserting and Removing a Memory Stick" on page 90). VOLUME 8 TV/VIDEO 9 FLASH FOCUS q; Press to cycle through channels, press and hold down either CHANNEL button...
Primary User Manual
Page 16
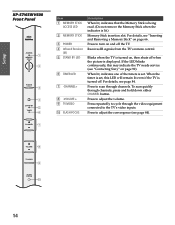
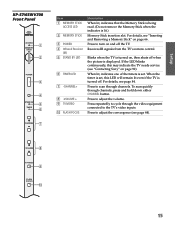
... scan quickly through channels. VOLUME 8 TV/VIDEO 9 FLASH FOCUS q; SETUP Setup SETUP KP-57/65WV700 Front Panel ACCESS 1 MEMORY STICK 2 POWER 3 4 STAND BY 5 TIMER 6 CHANNEL 7 Item 1 MEMORY STICK ACCESS LED 2 MEMORY STICK 3 POWER 4 Infrared Receiver (IR) 5 STAND BY LED 6 TIMER LED 7 -CHANNEL+ 8 -VOLUME + 9 TV/VIDEO 0 FLASH FOCUS Description When lit, indicates that the Memory Stick is being read. (Do not remove the Memory Stick when the indicator is displayed. For details, see "Contacting Sony" on page 66. Press to turn on , then shuts off when the picture is...
... scan quickly through channels. VOLUME 8 TV/VIDEO 9 FLASH FOCUS q; SETUP Setup SETUP KP-57/65WV700 Front Panel ACCESS 1 MEMORY STICK 2 POWER 3 4 STAND BY 5 TIMER 6 CHANNEL 7 Item 1 MEMORY STICK ACCESS LED 2 MEMORY STICK 3 POWER 4 Infrared Receiver (IR) 5 STAND BY LED 6 TIMER LED 7 -CHANNEL+ 8 -VOLUME + 9 TV/VIDEO 0 FLASH FOCUS Description When lit, indicates that the Memory Stick is being read. (Do not remove the Memory Stick when the indicator is displayed. For details, see "Contacting Sony" on page 66. Press to turn on , then shuts off when the picture is...

Primary User Manual
Page 18
... if you need to your VCR or other video component. Component video provides better picture quality than 2, 3, or 9). 7 AUX Auxiliary RF input that connects to your TV to switch between scrambled and unscrambled cable channels. This VHF/UHF output jack lets you are using it with the TV. 2 S VIDEO IN 1/3 Connects to your DVD player's or digital set -top boxes) that has S VIDEO. Use this jack instead of the TV. SETUP Setup Jack Description 1 DVI-HDTV VIDEO AUDIO R/L (VIDEO 7 IN...
... if you need to your VCR or other video component. Component video provides better picture quality than 2, 3, or 9). 7 AUX Auxiliary RF input that connects to your TV to switch between scrambled and unscrambled cable channels. This VHF/UHF output jack lets you are using it with the TV. 2 S VIDEO IN 1/3 Connects to your DVD player's or digital set -top boxes) that has S VIDEO. Use this jack instead of the TV. SETUP Setup Jack Description 1 DVI-HDTV VIDEO AUDIO R/L (VIDEO 7 IN...

Primary User Manual
Page 24
... TV's TO CONVERTER jack to the cable box's input jack. (The TV's internal converter lets you need for an external splitter.) 3 Use a coaxial cable to connect the cable box's output jack to the TV's AUX jack. 4 Run the Auto Setup program, as described in "Setting Up the Channel List" on page 43. Do This ... Use the cable box Tune the TV to the channel the cable box is set to (usually channel 3 or 4) and then use the TV's Channel Fix feature to lock in a specific channel. SETUP SETUP SETUP 23 Switch the TV's input...
... TV's TO CONVERTER jack to the cable box's input jack. (The TV's internal converter lets you need for an external splitter.) 3 Use a coaxial cable to connect the cable box's output jack to the TV's AUX jack. 4 Run the Auto Setup program, as described in "Setting Up the Channel List" on page 43. Do This ... Use the cable box Tune the TV to the channel the cable box is set to (usually channel 3 or 4) and then use the TV's Channel Fix feature to lock in a specific channel. SETUP SETUP SETUP 23 Switch the TV's input...
Primary User Manual
Page 45
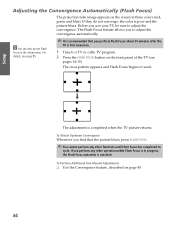
SETUP Adjusting the Convergence Automatically (Flash Focus) The projection tube image appears on page 45. z You can also access Flash Focus in three colors (red, green and blue). To Obtain Optimum Convergence Whenever you perform Flash Focus about 30 minutes after the TV is first turned on. 1 Tune to a TV or cable TV program. 2 Press the FLASH FOCUS button on the front panel of the TV (see page 85. ✍ It is recommended that you find that the picture blurs, press...
SETUP Adjusting the Convergence Automatically (Flash Focus) The projection tube image appears on page 45. z You can also access Flash Focus in three colors (red, green and blue). To Obtain Optimum Convergence Whenever you perform Flash Focus about 30 minutes after the TV is first turned on. 1 Tune to a TV or cable TV program. 2 Press the FLASH FOCUS button on the front panel of the TV (see page 85. ✍ It is recommended that you find that the picture blurs, press...
Primary User Manual
Page 52
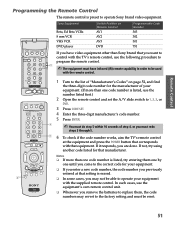
... code number you remove the batteries to replace them one by one code number is erased. ❑ In some cases, you want to control with the TV's remote control, use the number listed first.) 2 Open the remote control and set the A/V slide switch to program the remote control. 2 ✍ The equipment must redo steps 3 through 5. DISC MENU MENU WIDE MODE INDEX TWIN VIEW MUTING SLEEP SAT/CABLE POWER FUNCTION SAT/CABLE TV TV/VIDEO ANT PIC MODE 1 Turn to the list of "Manufacturer's Codes" on Remote Control...
... code number you remove the batteries to replace them one by one code number is erased. ❑ In some cases, you want to control with the TV's remote control, use the number listed first.) 2 Open the remote control and set the A/V slide switch to program the remote control. 2 ✍ The equipment must redo steps 3 through 5. DISC MENU MENU WIDE MODE INDEX TWIN VIEW MUTING SLEEP SAT/CABLE POWER FUNCTION SAT/CABLE TV TV/VIDEO ANT PIC MODE 1 Turn to the list of "Manufacturer's Codes" on Remote Control...

Primary User Manual
Page 59
... viewing high-definition programs broadcast in 720p/1080i, it is not possible to an equal aspect ratio that fills the 16:9 screen. Wide Zoom m Normal returns the 4:3 picture to the 4:3 Default setting in the Screen menu. Useful for watching Letterbox movies. z You can also access the Wide Mode settings in the Screen menu. Full m Zoom Zoom Mode enlarges the 4:3 picture horizontally and vertically to change channels or inputs, the Wide Mode settings revert to its original size. SETUP SETUP SETUP Using Wide Mode Wide Screen mode...
... viewing high-definition programs broadcast in 720p/1080i, it is not possible to an equal aspect ratio that fills the 16:9 screen. Wide Zoom m Normal returns the 4:3 picture to the 4:3 Default setting in the Screen menu. Useful for watching Letterbox movies. z You can also access the Wide Mode settings in the Screen menu. Full m Zoom Zoom Mode enlarges the 4:3 picture horizontally and vertically to change channels or inputs, the Wide Mode settings revert to its original size. SETUP SETUP SETUP Using Wide Mode Wide Screen mode...
Primary User Manual
Page 79
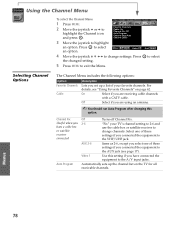
..., see page 17). Channel Fix Useful when you have a cable box or satellite receiver connected Auto Program Off Turns off Channel Fix. 2-6 "Fix" your favorite channels. Automatically sets up a list of your TV's channel setting to 2-6 and use the cable box or satellite receiver to exit the Menu. Press the changed setting. 5 Press MENU to change settings. On Select if you are using an antenna. ✍ You should run Auto Program after changing this setting if you have connected the equipment to the A/V input jacks. AUX 2-6 Same...
..., see page 17). Channel Fix Useful when you have a cable box or satellite receiver connected Auto Program Off Turns off Channel Fix. 2-6 "Fix" your favorite channels. Automatically sets up a list of your TV's channel setting to 2-6 and use the cable box or satellite receiver to exit the Menu. Press the changed setting. 5 Press MENU to change settings. On Select if you are using an antenna. ✍ You should run Auto Program after changing this setting if you have connected the equipment to the A/V input jacks. AUX 2-6 Same...
Primary User Manual
Page 85
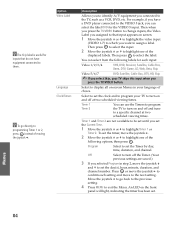
... a DVD player connected to the VIDEO 5 jack, you connected to a specific channel at two scheduled viewing times. You can select the label DVD for the VIDEO 5 input. Timer 1 Timer 2 You can use the Timers to program the TV to turn on and off and tune to the TV, such as a VCR, DVD, etc. To set the clock and to program your TV to confirm each input: Video 1/2/3/4 VHS, DVD, Receiver, Satellite, Cable Box, 8mm, DTV, Game, LD, Web, Beta, Skip Video 5/6/7 DVD...
... a DVD player connected to the VIDEO 5 jack, you connected to a specific channel at two scheduled viewing times. You can select the label DVD for the VIDEO 5 input. Timer 1 Timer 2 You can use the Timers to program the TV to turn on and off and tune to the TV, such as a VCR, DVD, etc. To set the clock and to program your TV to confirm each input: Video 1/2/3/4 VHS, DVD, Receiver, Satellite, Cable Box, 8mm, DTV, Game, LD, Web, Beta, Skip Video 5/6/7 DVD...

Primary User Manual
Page 93
... digital sources display your TV's screen to display less detail than 16:9 (this feature, set the Caption Vision option to Off. Black bands appear at the top and bottom of TEXT 1-4. Only snow and noise ❏ Check the antenna/cable connections. picture (screen lit), ❏ Adjust the Brightness option in . ❏ Press the POWER button on the front of detail, especially blocks or dots, pixelations) to appear on , and a red light keeps flashing...
... digital sources display your TV's screen to display less detail than 16:9 (this feature, set the Caption Vision option to Off. Black bands appear at the top and bottom of TEXT 1-4. Only snow and noise ❏ Check the antenna/cable connections. picture (screen lit), ❏ Adjust the Brightness option in . ❏ Press the POWER button on the front of detail, especially blocks or dots, pixelations) to appear on , and a red light keeps flashing...

Primary User Manual
Page 98
... changing picture size, in remote 47 bilingual audio 74 blocking programs. See ratings. See Digital Reality Creation. See Digital Visual Interface. DVD player using with TV remote control 54 with TV remote control 54 Caption Vision 83 carrying the TV 12 CATV. DVI-HDTV 17, 95 E Effect button 50 ENTER button 49, 56 F Fast-forward button 50 Favorite Channels clearing 62 in Channel Menu 78 using with A/V connectors, connecting 38 DVI. brightness, adjusting 72 C cable connecting 19 setting On/Off 78 with VCR, connecting 26 cable box connecting with...
... changing picture size, in remote 47 bilingual audio 74 blocking programs. See ratings. See Digital Reality Creation. See Digital Visual Interface. DVD player using with TV remote control 54 with TV remote control 54 Caption Vision 83 carrying the TV 12 CATV. DVI-HDTV 17, 95 E Effect button 50 ENTER button 49, 56 F Fast-forward button 50 Favorite Channels clearing 62 in Channel Menu 78 using with A/V connectors, connecting 38 DVI. brightness, adjusting 72 C cable connecting 19 setting On/Off 78 with VCR, connecting 26 cable box connecting with...
Primary User Manual
Page 99
... picture contrast, adjusting 72 Picture in Picture. See Twin View. SETUP SETUP SETUP features 9 Fixed audio setting 75 Flash Focus 44 FREEZE button 50, 63 Freeze, using 63 Full mode, setting 76 G GUIDE button 49 H HD Detailer 10 HD/DVD IN (1080i/720p/480p/480i) jacks, described 17 hue, adjusting 72 I INDEX button 48, 57 interlaced 9, 48, 73, 88 J joystick 48 JUMP button 48, 56 L label channels 79 Language, setting 84 LOCK switch, Memory Stick 70 M MDP, using with TV remote control...
... picture contrast, adjusting 72 Picture in Picture. See Twin View. SETUP SETUP SETUP features 9 Fixed audio setting 75 Flash Focus 44 FREEZE button 50, 63 Freeze, using 63 Full mode, setting 76 G GUIDE button 49 H HD Detailer 10 HD/DVD IN (1080i/720p/480p/480i) jacks, described 17 hue, adjusting 72 I INDEX button 48, 57 interlaced 9, 48, 73, 88 J joystick 48 JUMP button 48, 56 L label channels 79 Language, setting 84 LOCK switch, Memory Stick 70 M MDP, using with TV remote control...

Primary User Manual
Page 100
... timers, setting 84 transport buttons 50 treble, adjusting 74 troubleshooting 90-94 TruSurround 74 TruSurround, Effect 74 turning on/off the TV 14, 15 TV FUNCTION button 48, 56 TV POWER button 49, 56 TV/VCR button 50 TV/VIDEO button 48, 56 Twin View described 10 using 59-61 Twin View button 49 U Uniform Brightness Screen 10 V Variable audio setting 75 VCR using with TV remote control 53 with cable box, connecting 28 with cable, connecting 26 with satellite receiver, connecting 34 VCR/DVD button 50 Vertical Center, adjusting...
... timers, setting 84 transport buttons 50 treble, adjusting 74 troubleshooting 90-94 TruSurround 74 TruSurround, Effect 74 turning on/off the TV 14, 15 TV FUNCTION button 48, 56 TV POWER button 49, 56 TV/VCR button 50 TV/VIDEO button 48, 56 Twin View described 10 using 59-61 Twin View button 49 U Uniform Brightness Screen 10 V Variable audio setting 75 VCR using with TV remote control 53 with cable box, connecting 28 with cable, connecting 26 with satellite receiver, connecting 34 VCR/DVD button 50 Vertical Center, adjusting...


