
Limited Warranty (U.S. Only)
Page 1
.... PARTS: In addition, Sony will repair or replace the Product, at no charge, or pay for 19" (measured diagonally), or larger screen size through a Sony authorized service facility. 4-557-168-03 ® LIMITED WARRANTY HDTV Color TV XBR Projection TV Sony Electronics Inc. ("Sony") warrants this Product is provided during the initial one (1) year period for all accessories are for a period of one (1) year (color picture tube - REPAIR OR REPLACEMENT...
.... PARTS: In addition, Sony will repair or replace the Product, at no charge, or pay for 19" (measured diagonally), or larger screen size through a Sony authorized service facility. 4-557-168-03 ® LIMITED WARRANTY HDTV Color TV XBR Projection TV Sony Electronics Inc. ("Sony") warrants this Product is provided during the initial one (1) year period for all accessories are for a period of one (1) year (color picture tube - REPAIR OR REPLACEMENT...

Operating Instructions
Page 2
... comply with the instruction manual. If this manual could void your warranty. NO USER-SERVICEABLE PARTS INSIDE. However, there is encouraged to try to correct the interference by your authority to operate this television receiver for proper grounding and, in accordance with an extension cord, receptacle or other than private viewing of programs broadcast on convergence adjustment Before you use of time, especially at low settings. FLASH FOCUS™ -" on...
... comply with the instruction manual. If this manual could void your warranty. NO USER-SERVICEABLE PARTS INSIDE. However, there is encouraged to try to correct the interference by your authority to operate this television receiver for proper grounding and, in accordance with an extension cord, receptacle or other than private viewing of programs broadcast on convergence adjustment Before you use of time, especially at low settings. FLASH FOCUS™ -" on...
Operating Instructions
Page 4
.... If the picture becomes dark after using the projection TV for long periods of time, unplug it from the type of any kind on the set is operating, unplug the TV and consult your protection, please read these instructions completely, and keep this can result in a fire or electric shock. If a snapping or popping sound from battery power, refer to clean the inside of an...
.... If the picture becomes dark after using the projection TV for long periods of time, unplug it from the type of any kind on the set is operating, unplug the TV and consult your protection, please read these instructions completely, and keep this can result in a fire or electric shock. If a snapping or popping sound from battery power, refer to clean the inside of an...
Operating Instructions
Page 5
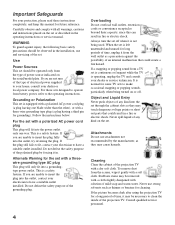
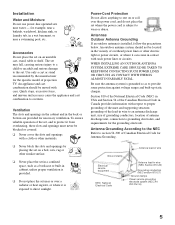
Installation Water and Moisture Do not use power-line operated sets near a swimming pool, etc. Use only a cart or stand recommended by the manufacturer for the specific model of overhead power lines or other electric light or power circuits, or where it can come in contact with a cloth or other materials. ❑ Never block the slots and openings by placing the set on a bed, sofa, rug or...
Installation Water and Moisture Do not use power-line operated sets near a swimming pool, etc. Use only a cart or stand recommended by the manufacturer for the specific model of overhead power lines or other electric light or power circuits, or where it can come in contact with a cloth or other materials. ❑ Never block the slots and openings by placing the set on a bed, sofa, rug or...
Operating Instructions
Page 6
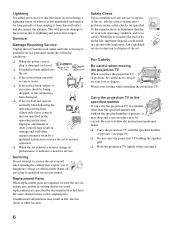
... set does not operate normally when following the operating instructions. Ask a qualified service technician to drop it on your footing while installing the projection TV. This will often require extensive work by the manufacturer) to normal operation. ❑ When the set is in position, be caused. Adjust only those controls that are required, be sure the service technician certifies in writing that he has used replacement parts...
... set does not operate normally when following the operating instructions. Ask a qualified service technician to drop it on your footing while installing the projection TV. This will often require extensive work by the manufacturer) to normal operation. ❑ When the set is in position, be caused. Adjust only those controls that are required, be sure the service technician certifies in writing that he has used replacement parts...

Operating Instructions
Page 7
...Your Projection TV 10 Installing the Projection TV 11 Connector Types 12 Projection TV Controls and Connectors 13 Basic Connections (Connecting Cable TV or Antenna 16 Connecting a VCR and Cable 19 Connecting a VCR and Cable Box 20 Connecting Two VCRs for Tape Editing 22 Connecting a Satellite Receiver 23 Connecting a Satellite Receiver with a VCR.........24 Connecting an Audio Receiver 25 Connecting a DVD Player with Component Video Connectors 26 Connecting a DVD Player with Your Projection TV Remote Control 68 Troubleshooting 70 Specifications 73 7 FLASH FOCUS 33 Using the...
...Your Projection TV 10 Installing the Projection TV 11 Connector Types 12 Projection TV Controls and Connectors 13 Basic Connections (Connecting Cable TV or Antenna 16 Connecting a VCR and Cable 19 Connecting a VCR and Cable Box 20 Connecting Two VCRs for Tape Editing 22 Connecting a Satellite Receiver 23 Connecting a Satellite Receiver with a VCR.........24 Connecting an Audio Receiver 25 Connecting a DVD Player with Component Video Connectors 26 Connecting a DVD Player with Your Projection TV Remote Control 68 Troubleshooting 70 Specifications 73 7 FLASH FOCUS 33 Using the...
Operating Instructions
Page 8
... (digital television) receiver to view DTV programs. ❑ DRC™ Multi-Function: Unlike conventional line doublers, the DRC feature doubles vertical and horizontal lines, resulting in one picture and listen to block unsuitable programming for younger viewers. ❑ Component Video Inputs: Offers the best video quality for DVD (480p, 480i) and Digital Set-top box (1080i, 720p, 480p, 480i) connections. ❑ S-VIDEO Inputs: Provides a high-quality image for illustration purposes. Model KP-53HS30 is consistent output...
... (digital television) receiver to view DTV programs. ❑ DRC™ Multi-Function: Unlike conventional line doublers, the DRC feature doubles vertical and horizontal lines, resulting in one picture and listen to block unsuitable programming for younger viewers. ❑ Component Video Inputs: Offers the best video quality for DVD (480p, 480i) and Digital Set-top box (1080i, 720p, 480p, 480i) connections. ❑ S-VIDEO Inputs: Provides a high-quality image for illustration purposes. Model KP-53HS30 is consistent output...
Operating Instructions
Page 9
... Sony Projection TV Introducing the Sony Projection TV ❑ Channel Index: Allows you to view and choose from twelve programs. ❑ Flash Focus™: Allows you to access on the projection TV console. 9 It shows you how to install your projection TV, to connect your new components and to connect the antenna and cable. 2 Using the Features This section shows you how to begin using your projection TV settings. It shows you how to use your initial setup. Instructions...
... Sony Projection TV Introducing the Sony Projection TV ❑ Channel Index: Allows you to view and choose from twelve programs. ❑ Flash Focus™: Allows you to access on the projection TV console. 9 It shows you how to install your projection TV, to connect your new components and to connect the antenna and cable. 2 Using the Features This section shows you how to begin using your projection TV settings. It shows you how to use your initial setup. Instructions...
Operating Instructions
Page 15
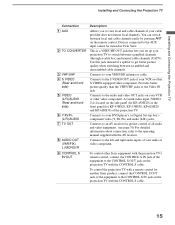
... projection TV with the AV receiver. To control the projection TV with the CONTROL S cable. 15 You can switch between scrambled and unscrambled cable channels. A fourth video input (VIDEO 2) is a VHF/UHF OUT jack that lets you to your audio or video component. 9 CONTROL S IN/OUT To control other S VIDEO-equipped video component. Connects to the AUX input cannot be viewed in Twin View. Connects to the left and right audio inputs of your DVD player's or Digital Set-top box's component video...
... projection TV with the AV receiver. To control the projection TV with the CONTROL S cable. 15 You can switch between scrambled and unscrambled cable channels. A fourth video input (VIDEO 2) is a VHF/UHF OUT jack that lets you to your audio or video component. 9 CONTROL S IN/OUT To control other S VIDEO-equipped video component. Connects to the AUX input cannot be viewed in Twin View. Connects to the left and right audio inputs of your DVD player's or Digital Set-top box's component video...

Operating Instructions
Page 22
... you to switch between the two to be connected to provide sound. ✍ You cannot record signals from equipment connected to change the video input on the other. Rear of the yellow video cable on your VCR. Consult your VCR's operating manual for instructions. ✍ If your VCRs have an S VIDEO jack: For best picture quality, use an S VIDEO connection instead of projection TV VCR (playback) VCR (recording) AUDIO-R (red) AUDIO-L (white) VIDEO (yellow) VMC-810S/820S (not supplied) ✍...
... you to switch between the two to be connected to provide sound. ✍ You cannot record signals from equipment connected to change the video input on the other. Rear of the yellow video cable on your VCR. Consult your VCR's operating manual for instructions. ✍ If your VCRs have an S VIDEO jack: For best picture quality, use an S VIDEO connection instead of projection TV VCR (playback) VCR (recording) AUDIO-R (red) AUDIO-L (white) VIDEO (yellow) VMC-810S/820S (not supplied) ✍...
Operating Instructions
Page 27
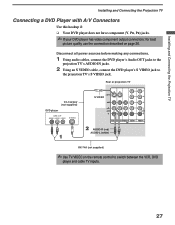
... Using an S VIDEO cable, connect the DVD player's S VIDEO jack to switch between the VCR, DVD player and cable TV inputs. 27 Rear or projection TV YC-15V/30V (not supplied) DVD player S VIDEO AUDIO-R (red) AUDIO-L (white) RK-74A (not supplied) ✍ Use TV/VIDEO on page 26. Installing and Connecting the Projection TV Installing and Connecting the Projection TV Connecting a DVD Player with A/V Connectors Use this hookup if: ❑ Your DVD player does not have component (Y, PB, PR) jacks. ✍ If your DVD player has video component output connectors: for best picture quality use...
... Using an S VIDEO cable, connect the DVD player's S VIDEO jack to switch between the VCR, DVD player and cable TV inputs. 27 Rear or projection TV YC-15V/30V (not supplied) DVD player S VIDEO AUDIO-R (red) AUDIO-L (white) RK-74A (not supplied) ✍ Use TV/VIDEO on page 26. Installing and Connecting the Projection TV Installing and Connecting the Projection TV Connecting a DVD Player with A/V Connectors Use this hookup if: ❑ Your DVD player does not have component (Y, PB, PR) jacks. ✍ If your DVD player has video component output connectors: for best picture quality use...
Operating Instructions
Page 32
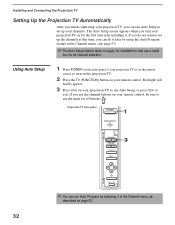
... projection TV on your remote control, be sure to use a cable box for the first time after installing it later by using the Auto Program feature in the Channel menu, as described on your projection TV to run Auto Setup, or press CH- Red light will briefly appear. 3 Press CH+ on page 53. 32 Projection TV front panel ✍ You can do not want to exit. The Auto Setup screen appears when you use the channel buttons on your remote control. Using Auto Setup 1 Press POWER...
... projection TV on your remote control, be sure to use a cable box for the first time after installing it later by using the Auto Program feature in the Channel menu, as described on your projection TV to run Auto Setup, or press CH- Red light will briefly appear. 3 Press CH+ on page 53. 32 Projection TV front panel ✍ You can do not want to exit. The Auto Setup screen appears when you use the channel buttons on your remote control. Using Auto Setup 1 Press POWER...
Operating Instructions
Page 33
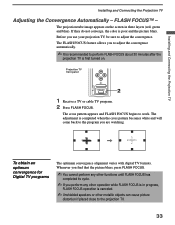
...The FLASH FOCUS feature allows you use your projection TV, be sure to work. The adjustment is poor and the picture blurs. Installing and Connecting the Projection TV Installing and Connecting the Projection TV Adjusting the Convergence Automatically - Before you to adjust the convergence automatically. ✍ It is recommended to perform FLASH FOCUS about 30 minutes after the projection TV is first turned on the screen in progress, FLASH FOCUS operation is in three layers (red, green and blue). Projection TV front panel 1 Receive a TV or cable TV program. 2 Press FLASH FOCUS...
...The FLASH FOCUS feature allows you use your projection TV, be sure to work. The adjustment is poor and the picture blurs. Installing and Connecting the Projection TV Installing and Connecting the Projection TV Adjusting the Convergence Automatically - Before you to adjust the convergence automatically. ✍ It is recommended to perform FLASH FOCUS about 30 minutes after the projection TV is first turned on the screen in progress, FLASH FOCUS operation is in three layers (red, green and blue). Projection TV front panel 1 Receive a TV or cable TV program. 2 Press FLASH FOCUS...
Operating Instructions
Page 34
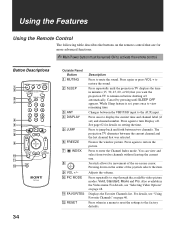
... time. Displays the Favorite Channels list. Press when in a menu to reset the settings to the AUX input. Cancel by pressing until the projection TV displays the time in the Video menu. See page 62 for movement of the joystick selects the item. Changes between the current channel and the last channel that are for more advanced functions. ✍ Main Power button must be turned ON to enter the Channel Index mode...
... time. Displays the Favorite Channels list. Press when in a menu to reset the settings to the AUX input. Cancel by pressing until the projection TV displays the time in the Video menu. See page 62 for movement of the joystick selects the item. Changes between the current channel and the last channel that are for more advanced functions. ✍ Main Power button must be turned ON to enter the Channel Index mode...
Operating Instructions
Page 38
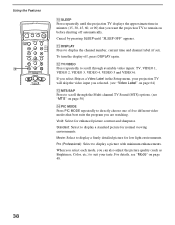
... the projection TV displays the approximate time in the Setup menu, your taste. If you select Skip as Brightness, Color, etc.) to suit your projection TV will skip the video input you selected. (see "Mode" on before shutting off , press DISPLAY again. qa DISPLAY Press to display a standard picture for normal viewing environments. Standard: Select to display the channel number, current time and channel label (if set). Pro (Professional): Select to scroll through the Multi-channel TV Sound...
... the projection TV displays the approximate time in the Setup menu, your taste. If you select Skip as Brightness, Color, etc.) to suit your projection TV will skip the video input you selected. (see "Mode" on before shutting off , press DISPLAY again. qa DISPLAY Press to display a standard picture for normal viewing environments. Standard: Select to display the channel number, current time and channel label (if set). Pro (Professional): Select to scroll through the Multi-channel TV Sound...
Operating Instructions
Page 48
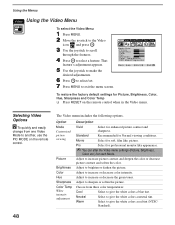
.../set. 7 Press MENU to increase picture contrast and deepen the color or decrease picture contrast and soften the color. To restore the factory default settings for Picture, Brightness, Color, Hue, Sharpness and Color Temp ❑ Press RESET on the remote control. Selecting Video Options z To quickly and easily change from three color temperatures: Cool Select to brighten or darken the picture. Adjust to exit the menu screen. Using the Menus Using the Video Menu To select the Video Menu 1 Press MENU...
.../set. 7 Press MENU to increase picture contrast and deepen the color or decrease picture contrast and soften the color. To restore the factory default settings for Picture, Brightness, Color, Hue, Sharpness and Color Temp ❑ Press RESET on the remote control. Selecting Video Options z To quickly and easily change from three color temperatures: Cool Select to brighten or darken the picture. Adjust to exit the menu screen. Using the Menus Using the Video Menu To select the Video Menu 1 Press MENU...

Operating Instructions
Page 70
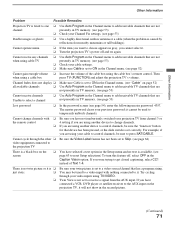
... antenna/cable connections. ❏ Make sure the channel is connected securely to the wall outlet. ❏ Push the power button on , and a red light keeps flashing, your projection TV may need service. Call your local Sony Service Center. dryers. 70 Other Information Troubleshooting If, after reading these operating instructions, you can receive digital broadcasts in your area. residents only) or (416) 499-SONY (7669) (Canadian residents only). Problem Possible Remedies No picture (screen not lit), no sound...
... antenna/cable connections. ❏ Make sure the channel is connected securely to the wall outlet. ❏ Push the power button on , and a red light keeps flashing, your projection TV may need service. Call your local Sony Service Center. dryers. 70 Other Information Troubleshooting If, after reading these operating instructions, you can receive digital broadcasts in your area. residents only) or (416) 499-SONY (7669) (Canadian residents only). Problem Possible Remedies No picture (screen not lit), no sound...
Operating Instructions
Page 71
...; Check your cable settings. ❏ Make sure Cable is not set to ON in the Channel menu. (see page 53) Double images or ghosts ❏ Use a highly directional outdoor antenna or a cable (when the problem is a black box on the screen ❏ You have connected a VCR, DVD player or satellite receiver to press SAT/CABLE. You may be used to reset Setup selections) To turn this feature off and on the projection TV, it cannot be tuned to a video input...
...; Check your cable settings. ❏ Make sure Cable is not set to ON in the Channel menu. (see page 53) Double images or ghosts ❏ Use a highly directional outdoor antenna or a cable (when the problem is a black box on the screen ❏ You have connected a VCR, DVD player or satellite receiver to press SAT/CABLE. You may be used to reset Setup selections) To turn this feature off and on the projection TV, it cannot be tuned to a video input...
Operating Instructions
Page 75
... View screen 41 Adding channels to the channel list 53 Adjusting audio, Steady Sound 50 ANT button 34 Antenna, connecting Aspect ratio, 16:9 in Twin View 42 Audio menu 47, 50 Audio receiver, connecting 25 Audio/Video cable 12 Auto Program (channel setup) 32, 53 Auto Setup 32, 53 AV receiver, connecting to TV OUT 15 B Balance, adjusting 50 Bass, adjusting 50 Batteries, inserting in Twin View 43 Extended Data Service 63 (Continued) 75 Other Information Brightness, adjusting 48 C Cable setting ON/OFF 52 with VCR, connecting 19 Cable box connecting with VCR 20 using with TV remote control...
... View screen 41 Adding channels to the channel list 53 Adjusting audio, Steady Sound 50 ANT button 34 Antenna, connecting Aspect ratio, 16:9 in Twin View 42 Audio menu 47, 50 Audio receiver, connecting 25 Audio/Video cable 12 Auto Program (channel setup) 32, 53 Auto Setup 32, 53 AV receiver, connecting to TV OUT 15 B Balance, adjusting 50 Bass, adjusting 50 Batteries, inserting in Twin View 43 Extended Data Service 63 (Continued) 75 Other Information Brightness, adjusting 48 C Cable setting ON/OFF 52 with VCR, connecting 19 Cable box connecting with VCR 20 using with TV remote control...
Operating Instructions
Page 76
...38 Muting, using 37 P Parent menu 47, 54 Parental control, described 8 Password, changing 56 PIC MODE button 34 Picture contrast, adjusting 48 Picture size, adjusting in Twin View 43 POWER button 36 POWER buttons (GREEN) 35 Presetting channels 32 Problems, troubleshooting 70 R Ratings setting 54-56 viewing blocked programs 56 Rear panel controls and connections 14, 15 Remote control buttons inside panel 36 Function of buttons 37 inserting batteries 10 programming 65-67 Remote control, operating other components with Cable box 69 DVD player 68 Satellite receiver 69 VCR 68 Removing channels from...
...38 Muting, using 37 P Parent menu 47, 54 Parental control, described 8 Password, changing 56 PIC MODE button 34 Picture contrast, adjusting 48 Picture size, adjusting in Twin View 43 POWER button 36 POWER buttons (GREEN) 35 Presetting channels 32 Problems, troubleshooting 70 R Ratings setting 54-56 viewing blocked programs 56 Rear panel controls and connections 14, 15 Remote control buttons inside panel 36 Function of buttons 37 inserting batteries 10 programming 65-67 Remote control, operating other components with Cable box 69 DVD player 68 Satellite receiver 69 VCR 68 Removing channels from...


