Operating Instructions
Page 3
... of the FCC Rules. ClearEdge VM, and HD Detailer are not of Sony Corporation. For details, see "Important Safety Instructions" on page 3. This equipment generates, uses, and can be determined by turning the equipment off and on, the user is no guarantee that interference will...to adjust convergence. Note on Convergence Adjustment Before you place the projection TV in position, be using the projection TV for several days, disconnect the power by cable companies for safety purposes, to cover the windows that face the screen with opaque drapery. Use of this case, please wait a...
... of the FCC Rules. ClearEdge VM, and HD Detailer are not of Sony Corporation. For details, see "Important Safety Instructions" on page 3. This equipment generates, uses, and can be determined by turning the equipment off and on, the user is no guarantee that interference will...to adjust convergence. Note on Convergence Adjustment Before you place the projection TV in position, be using the projection TV for several days, disconnect the power by cable companies for safety purposes, to cover the windows that face the screen with opaque drapery. Use of this case, please wait a...
Operating Instructions
Page 13
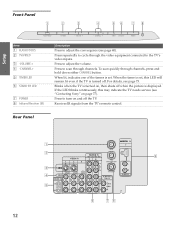
..., this LED will remain lit even if the TV is turned off when the picture is turned on page 77). Press to turn on and off the TV. To scan quickly through the video equipment connected to adjust the convergence (see "Contacting Sony" on , then shuts off . CHANNEL +... TIMER STAND BY POWER Item 1 FLASH FOCUS 2 TV/VIDEO 3 -VOLUME + 4 -CHANNEL+ 5 TIMER LED 6...
..., this LED will remain lit even if the TV is turned off when the picture is turned on page 77). Press to turn on and off the TV. To scan quickly through the video equipment connected to adjust the convergence (see "Contacting Sony" on , then shuts off . CHANNEL +... TIMER STAND BY POWER Item 1 FLASH FOCUS 2 TV/VIDEO 3 -VOLUME + 4 -CHANNEL+ 5 TIMER LED 6...

Operating Instructions
Page 19
.... the picture displays only in the right window, but does not scramble all the dual picture features for unscrambled channels coming directly into the TV's VHF/UHF input jack. SETUP Setup Cable Box and Cable Only ✍ DIGITAL CABLE BOX USERS: Do not use all channels. ❑...), but you cannot swap the pictures between the left window. For example, if you turn on page 46.) ❑ Use the TV remote control to change channels coming directly into the TV's VHF/UHF input. (The TV's tuner provides a better signal than the cable box.) About Using This Connection with digital...
.... the picture displays only in the right window, but does not scramble all the dual picture features for unscrambled channels coming directly into the TV's VHF/UHF input jack. SETUP Setup Cable Box and Cable Only ✍ DIGITAL CABLE BOX USERS: Do not use all channels. ❑...), but you cannot swap the pictures between the left window. For example, if you turn on page 46.) ❑ Use the TV remote control to change channels coming directly into the TV's VHF/UHF input. (The TV's tuner provides a better signal than the cable box.) About Using This Connection with digital...
Operating Instructions
Page 36
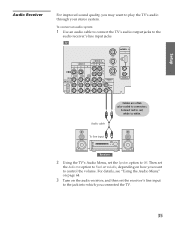
... input Cables are often color-coded to white. Receiver 2 Using the TV's Audio Menu, set the receiver's line input to the jack into which you connected the TV. 35 SETUP For details, see "Using the Audio Menu" on page 64. 3 Turn on how you may want to control the volume. To connect an... audio system 1 Use an audio cable to connect the TV's audio output jacks to Off.
... input Cables are often color-coded to white. Receiver 2 Using the TV's Audio Menu, set the receiver's line input to the jack into which you connected the TV. 35 SETUP For details, see "Using the Audio Menu" on page 64. 3 Turn on how you may want to control the volume. To connect an... audio system 1 Use an audio cable to connect the TV's audio output jacks to Off.
Operating Instructions
Page 40
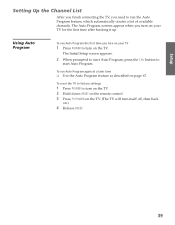
... SETUP 39 The Initial Setup screen appears. 2 When prompted to start Auto Program. SETUP Setup Setting Up the Channel List After you finish connecting the TV, you turn on your TV 1 Press POWER to turn on the TV. To reset the TV to factory settings 1 Press ...POWER to start Auto Program, press the CH+ button to turn on the TV. 2 Hold down RESET on the remote control. 3 Press TV POWER on the TV. (The TV will turn itself off, then back on.) 4 Release RESET. The Auto Program screens...
... SETUP 39 The Initial Setup screen appears. 2 When prompted to start Auto Program. SETUP Setup Setting Up the Channel List After you finish connecting the TV, you turn on your TV 1 Press POWER to turn on the TV. To reset the TV to factory settings 1 Press ...POWER to start Auto Program, press the CH+ button to turn on the TV. 2 Hold down RESET on the remote control. 3 Press TV POWER on the TV. (The TV will turn itself off, then back on.) 4 Release RESET. The Auto Program screens...
Operating Instructions
Page 41
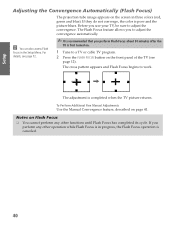
... to work. , The adjustment is completed when the TV picture returns. The cross pattern appears and Flash Focus begins to adjust the convergence. z You can also access Flash Focus in progress, the Flash Focus operation is first turned on. 1 Tune to adjust the convergence automatically. SETUP... details, see page 12). Notes on the screen in three colors (red, green and blue). If you to a TV or cable TV program. 2 Press the FLASH FOCUS button on page 41. SETUP Setup Adjusting the Convergence Automatically (Flash Focus) The projection tube image appears on Flash Focus ❑ You...
... to work. , The adjustment is completed when the TV picture returns. The cross pattern appears and Flash Focus begins to adjust the convergence. z You can also access Flash Focus in progress, the Flash Focus operation is first turned on. 1 Tune to adjust the convergence automatically. SETUP... details, see page 12). Notes on the screen in three colors (red, green and blue). If you to a TV or cable TV program. 2 Press the FLASH FOCUS button on page 41. SETUP Setup Adjusting the Convergence Automatically (Flash Focus) The projection tube image appears on Flash Focus ❑ You...

Operating Instructions
Page 45
Also available in the Screen Menu. q; Press to adjust the volume. * * MUTING and VOL +/- m Rewind N Play M Fast forward x Stop X Pause z Record (press together with Sony DVD Dream™ Systems SETUP SETUP SETUP 44 For details, see page 59. qd FREEZE qf VOL +/- ...Pro. SETUP SETUP Remote Control Button Descriptions 1 qj Button DVD/ SAT/ POWER MUTING VCR CABLE 2 qk 1 DVD/VCR 3 MODE TV/ PICTURE WIDE DISPLAY VIDEO ql POWER w; 2 MUTING 4 Description Press to turn on and off the DVD player or VCR. For details, see pages 53 and 66. 5 0-9 Press 0 - 9 to ...
Also available in the Screen Menu. q; Press to adjust the volume. * * MUTING and VOL +/- m Rewind N Play M Fast forward x Stop X Pause z Record (press together with Sony DVD Dream™ Systems SETUP SETUP SETUP 44 For details, see page 59. qd FREEZE qf VOL +/- ...Pro. SETUP SETUP Remote Control Button Descriptions 1 qj Button DVD/ SAT/ POWER MUTING VCR CABLE 2 qk 1 DVD/VCR 3 MODE TV/ PICTURE WIDE DISPLAY VIDEO ql POWER w; 2 MUTING 4 Description Press to turn on and off the DVD player or VCR. For details, see pages 53 and 66. 5 0-9 Press 0 - 9 to ...
Operating Instructions
Page 46
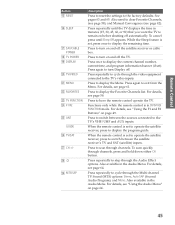
...SETUP SETUP 45 Press repeatedly until Sleep Off appears. While the Sleep feature is set , press once to turn Display off automatically. Press to display the remaining time. Press repeatedly to the TV's video inputs. Functions only while the remote control is set ). Press repeatedly to step through the video ... SETUP SETUP Remote Control Button qg RESET qh SLEEP qj SAT/CABLE POWER qk TV POWER ql DISPLAY w; TV/VIDEO wa MENU ws FAVORITES wd TV FUNCTION wf F1/F2 wg ANT GUIDE wh TV/SAT wj CH +/- Press to turn on page 64. For details, see "Using the Audio Menu" on and ...
...SETUP SETUP 45 Press repeatedly until Sleep Off appears. While the Sleep feature is set , press once to turn Display off automatically. Press to display the remaining time. Press repeatedly to the TV's video inputs. Functions only while the remote control is set ). Press repeatedly to step through the video ... SETUP SETUP Remote Control Button qg RESET qh SLEEP qj SAT/CABLE POWER qk TV POWER ql DISPLAY w; TV/VIDEO wa MENU ws FAVORITES wd TV FUNCTION wf F1/F2 wg ANT GUIDE wh TV/SAT wj CH +/- Press to turn on page 64. For details, see "Using the Audio Menu" on and ...
Operating Instructions
Page 47
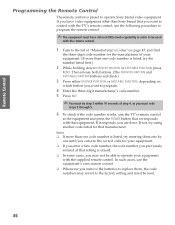
... in order to replace them one by one until you must redo steps 3 through 5. 6 To check if the code number works, aim the TV's remote control at that equipment. Then release both buttons. (The DVD/VCR FUNCTION and SAT/CABLE FUNCTION buttons will flash.) 3 Press either DVD/VCR...correct code for that corresponds with the remote control. 1 Turn to the list of "Manufacturer's Codes" on which button you want to control with the TV's remote control, use the equipment's own remote control. ❑ Whenever you want to operate Sony brand video equipment. If not, try the number listed ...
... in order to replace them one by one until you must redo steps 3 through 5. 6 To check if the code number works, aim the TV's remote control at that equipment. Then release both buttons. (The DVD/VCR FUNCTION and SAT/CABLE FUNCTION buttons will flash.) 3 Press either DVD/VCR...correct code for that corresponds with the remote control. 1 Turn to the list of "Manufacturer's Codes" on which button you want to control with the TV's remote control, use the equipment's own remote control. ❑ Whenever you want to operate Sony brand video equipment. If not, try the number listed ...
Operating Instructions
Page 49
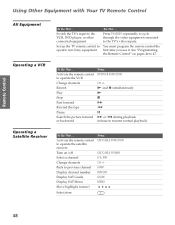
... FUNCTION CH +/N and z simultaneously N x M m X M or m during playback (release to the TV's video inputs. Activate the remote control to operate the satellite receiver Turn on pages 46 to operate non-Sony equipment Do This ... SETUP SETUP Remote Control Using Other Equipment with Your TV Remote Control All Equipment Operating a VCR Operating a Satellite Receiver To Do...
... FUNCTION CH +/N and z simultaneously N x M m X M or m during playback (release to the TV's video inputs. Activate the remote control to operate the satellite receiver Turn on pages 46 to operate non-Sony equipment Do This ... SETUP SETUP Remote Control Using Other Equipment with Your TV Remote Control All Equipment Operating a VCR Operating a Satellite Receiver To Do...
Operating Instructions
Page 50
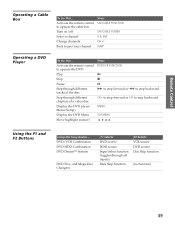
... N x X M to step forward or m to step backward CH+ to step backward MENU TOP MENU V v B b Using the F1 and F2 Buttons Using this Sony Device ... Activate the remote control to operate the DVD Play Stop Pause Step through different tracks of the disc Step through all inputs) Disk Skip... SETUP SETUP SETUP 49 DVD/VCR Combination DVD HDD Combination DVD Dream™ System DVD Five- Activate the remote control to operate the cable box Turn on/off Select a channel Change channels Back to previous channel Press SAT/CABLE FUNCTION SAT/CABLE POWER 0-9, ENT CH +/JUMP Operating a DVD Player...
... N x X M to step forward or m to step backward CH+ to step backward MENU TOP MENU V v B b Using the F1 and F2 Buttons Using this Sony Device ... Activate the remote control to operate the DVD Play Stop Pause Step through different tracks of the disc Step through all inputs) Disk Skip... SETUP SETUP SETUP 49 DVD/VCR Combination DVD HDD Combination DVD Dream™ System DVD Five- Activate the remote control to operate the cable box Turn on/off Select a channel Change channels Back to previous channel Press SAT/CABLE FUNCTION SAT/CABLE POWER 0-9, ENT CH +/JUMP Operating a DVD Player...

Operating Instructions
Page 53
... to the VCR, DVD player, or other information) number, current time, and channel label (if set parental controls, and more Press MENU to turn Display off the TV Press TV POWER Tune directly to a channel To tune to channels, press 0-9 and then ENT. Press DISPLAY again to display the Menu. Change video and...
... to the VCR, DVD player, or other information) number, current time, and channel label (if set parental controls, and more Press MENU to turn Display off the TV Press TV POWER Tune directly to a channel To tune to channels, press 0-9 and then ENT. Press DISPLAY again to display the Menu. Change video and...
Operating Instructions
Page 64
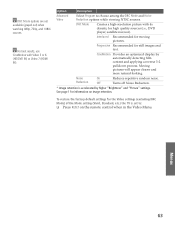
... optimized display by higher "Brightness" and "Picture" settings. Interlaced Recommended for high quality sources (i.e., DVD player, satellite receiver). Turns off Noise Reduction. * Image retention is set to choose among the DRC Mode and Noise Reduction options while viewing NTSC sources... sources. Progressive Recommended for the Video settings (excluding DRC Mode) of the Mode setting (Vivid, Standard, etc.) the TV is accelerated by automatically detecting film content and applying a reverse 3-2 pulldown process. Moving pictures will appear clearer and more natural-looking.
... optimized display by higher "Brightness" and "Picture" settings. Interlaced Recommended for high quality sources (i.e., DVD player, satellite receiver). Turns off Noise Reduction. * Image retention is set to choose among the DRC Mode and Noise Reduction options while viewing NTSC sources... sources. Progressive Recommended for the Video settings (excluding DRC Mode) of the Mode setting (Vivid, Standard, etc.) the TV is accelerated by automatically detecting film content and applying a reverse 3-2 pulldown process. Moving pictures will appear clearer and more natural-looking.

Operating Instructions
Page 65
Press to turn off Steady Sound. Off Select to confirm the selection. Simulated Off Stereo Adds a surround-like effect to emphasize left or right speaker balance. Select for ... exit the Menu, press MENU. Display Menu 2. Auto SAP Mono On Off Select to automatically switch the TV to second audio programs when a signal is received. (If no SAP signal is present, the TV remains in speakers. On Select to give sound more impact by compensating for stereo programs only). TruSurround Select...
Press to turn off Steady Sound. Off Select to confirm the selection. Simulated Off Stereo Adds a surround-like effect to emphasize left or right speaker balance. Select for ... exit the Menu, press MENU. Display Menu 2. Auto SAP Mono On Off Select to automatically switch the TV to second audio programs when a signal is received. (If no SAP signal is present, the TV remains in speakers. On Select to give sound more impact by compensating for stereo programs only). TruSurround Select...

Operating Instructions
Page 66
...audio output from your audio system. SETUP Option Speaker Audio Out Easy control of volume adjustments Description On Select to turn off and the audio output of the TV is set to adjust the volume (and other audio settings) through your external audio system speakers. SETUP Menus SETUP ... be set only when the Speaker option is fixed. Use your audio receiver's remote control to Off. Variable The TV's speakers are turned off the TV speakers and listen to turn on the remote control when in the Audio Menu. To restore the factory default settings for Treble, Bass, and ...
...audio output from your audio system. SETUP Option Speaker Audio Out Easy control of volume adjustments Description On Select to turn off and the audio output of the TV is set to adjust the volume (and other audio settings) through your external audio system speakers. SETUP Menus SETUP ... be set only when the Speaker option is fixed. Use your audio receiver's remote control to Off. Variable The TV's speakers are turned off the TV speakers and listen to turn on the remote control when in the Audio Menu. To restore the factory default settings for Treble, Bass, and ...

Operating Instructions
Page 68
.... Menus SETUP Menus SETUP 67 Press to the AUX jack (see "Using Favorite Channels" on the TV for all receivable channels. Select one of these settings if you select one of your TV's channel setting to 2-6 and use the cable box or satellite receiver to the A/V input jacks. ...Off Turns off Channel Fix. 2-6 "Fix" your favorite channels. Automatically sets up a list of these settings if ...
.... Menus SETUP Menus SETUP 67 Press to the AUX jack (see "Using Favorite Channels" on the TV for all receivable channels. Select one of these settings if you select one of your TV's channel setting to 2-6 and use the cable box or satellite receiver to the A/V input jacks. ...Off Turns off Channel Fix. 2-6 "Fix" your favorite channels. Automatically sets up a list of these settings if ...

Operating Instructions
Page 70
... Lock Off Turn ratings on page 80. Display Menu 2. To access the Parent Menu, follow these steps: 1. Press to enter a four-digit password. Adult Maximum ratings permitted are: ❏ US: TV-14, PG-13 ❏ Canada: 14+, 13 ans+, TV-14 Custom Select...help simplify the rating selection. Change Password For changing your password for details. Maximum ratings permitted are: ❏ US: TV-Y, TV-G, G ❏ Canada: C, G, TV-Y Youth Maximum ratings permitted are blocked from viewing. SETUP Menus SETUP Menus Setting Parent Menu Options z If you are not...
... Lock Off Turn ratings on page 80. Display Menu 2. To access the Parent Menu, follow these steps: 1. Press to enter a four-digit password. Adult Maximum ratings permitted are: ❏ US: TV-14, PG-13 ❏ Canada: 14+, 13 ans+, TV-14 Custom Select...help simplify the rating selection. Change Password For changing your password for details. Maximum ratings permitted are: ❏ US: TV-Y, TV-G, G ❏ Canada: C, G, TV-Y Youth Maximum ratings permitted are blocked from viewing. SETUP Menus SETUP Menus Setting Parent Menu Options z If you are not...

Operating Instructions
Page 71
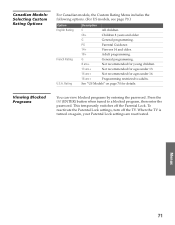
...Based Rating. R Restricted viewing, parental guidance is turned on again, your Parental Lock settings are broadcast without a rating. This temporarily switches off the TV. NC-17 and X No one 17 or under 13. Age-Based Ratings TV-Y All children. TV-Y7 Directed to a blocked program, then enter the... Audience. PG-13 Parental Guidance for children under 17. SETUP Menus SETUP 70 To reactivate the Parental Lock settings, turn off the Parental Lock. When the TV is suggested for children under allowed. Press the ENT (ENTER) button when tuned to children age 7 and older....
...Based Rating. R Restricted viewing, parental guidance is turned on again, your Parental Lock settings are broadcast without a rating. This temporarily switches off the TV. NC-17 and X No one 17 or under 13. Age-Based Ratings TV-Y All children. TV-Y7 Directed to a blocked program, then enter the... Audience. PG-13 Parental Guidance for children under 17. SETUP Menus SETUP 70 To reactivate the Parental Lock settings, turn off the Parental Lock. When the TV is suggested for children under allowed. Press the ENT (ENTER) button when tuned to children age 7 and older....
Operating Instructions
Page 72
...13. 16 ans+ Not recommended for details. To reactivate the Parental Lock settings, turn off the Parental Lock. Press the ENT (ENTER) button when tuned to adults. This temporarily switches off the TV. Viewing Blocked Programs You can view blocked programs by entering the password. When the... TV is turned on page 70 for ages under 16. 18 ans+ Programming restricted to a blocked program, ...
...13. 16 ans+ Not recommended for details. To reactivate the Parental Lock settings, turn off the Parental Lock. Press the ENT (ENTER) button when tuned to adults. This temporarily switches off the TV. Viewing Blocked Programs You can view blocked programs by entering the password. When the... TV is turned on page 70 for ages under 16. 18 ans+ Programming restricted to a blocked program, ...
Operating Instructions
Page 73
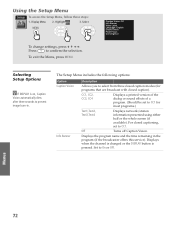
... is changed or the DISPLAY button is on, Caption Vision automatically dims after three seconds to CC1. Set to confirm the selection. Off Turns off Caption Vision. SETUP SETUP Using the Setup Menu To access the Setup Menu, follow these steps: 1. Press to On or Off...from three closed caption modes (for most programs.) Text1,Text2, Text3,Text4 Displays network/station information presented using either half or the whole screen (if available). Highlight 3. The Setup Menu includes the following options: Option Caption Vision Info Banner Description Allows you to CC1 for ...
... is changed or the DISPLAY button is on, Caption Vision automatically dims after three seconds to CC1. Set to confirm the selection. Off Turns off Caption Vision. SETUP SETUP Using the Setup Menu To access the Setup Menu, follow these steps: 1. Press to On or Off...from three closed caption modes (for most programs.) Text1,Text2, Text3,Text4 Displays network/station information presented using either half or the whole screen (if available). Highlight 3. The Setup Menu includes the following options: Option Caption Vision Info Banner Description Allows you to CC1 for ...


