

Operating Instructions
Page 11
...(for playback) AUDIO VIDEO LINE OUT OUT IN Video and audio outputs (Rear of projection TV) CONTROL S OUT IN VIDEO 1 VIDEO 2 S VIDEO OUT MONITOR AUDIO (VAR/FIX) VIDEO L (MONO) AUDIO R AUX TO CONVERTER VHF/UHF AUDIO-R (red) AUDIO-L (white) VIDEO (yellow) VCR (for recording) AUDIO VIDEO LINE IN OUT...should be used only when you can record input images displayed on the screen. Connecting two VCRs for recording. • For models KP-41T35/46C36, you connect from the line input of one VCR, and from the projection TV's VIDEO IN connectors to the VCR's line input, while at the ...
...(for playback) AUDIO VIDEO LINE OUT OUT IN Video and audio outputs (Rear of projection TV) CONTROL S OUT IN VIDEO 1 VIDEO 2 S VIDEO OUT MONITOR AUDIO (VAR/FIX) VIDEO L (MONO) AUDIO R AUX TO CONVERTER VHF/UHF AUDIO-R (red) AUDIO-L (white) VIDEO (yellow) VCR (for recording) AUDIO VIDEO LINE IN OUT...should be used only when you can record input images displayed on the screen. Connecting two VCRs for recording. • For models KP-41T35/46C36, you connect from the line input of one VCR, and from the projection TV's VIDEO IN connectors to the VCR's line input, while at the ...
Operating Instructions
Page 14
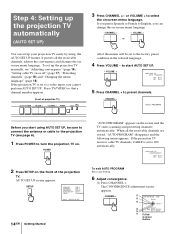
... SET UP. - CHANNEL + R CONVERGENCE : RED G [CH+] B [VOL -] [VOL +] B [CH-] RED / BLUE : [TV/VIDEO] G E x i t : [SET UP] R R=Red G=Green B=Blue If you prefer Spanish or French to English, you can set to preset channels. - YES : [CH+] NO : [CH-] 5 Press CHANNEL + to ON automatically. AUTO SET UP screen appears. VOLUME + or All of projection TV) SETUP TV/VIDEO - When all the...
... SET UP. - CHANNEL + R CONVERGENCE : RED G [CH+] B [VOL -] [VOL +] B [CH-] RED / BLUE : [TV/VIDEO] G E x i t : [SET UP] R R=Red G=Green B=Blue If you prefer Spanish or French to English, you can set to preset channels. - YES : [CH+] NO : [CH-] 5 Press CHANNEL + to ON automatically. AUTO SET UP screen appears. VOLUME + or All of projection TV) SETUP TV/VIDEO - When all the...

Operating Instructions
Page 15
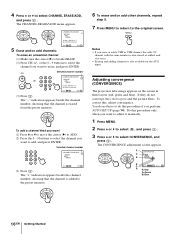
...to 6 above to adjust the other lines until it converges with the center green line. - To preview the main functions (DEMO) Press TV/VIDEO on the screen. The SET UP menu appears. To move vertical line right/left, press VOLUME +/-. (4) Repeat steps (2) and (3) to perform AUTO SET ...BLUE [CH+] [VOL -] [VOL +] White cross [CH-] RED / BLUE : [TV/VIDEO] E x i t : [SET UP] Note • Using the AUX connector, press TV (black button) first and make sure that "AUX" is displayed beside the channel number on the projection TV in step 4. Erasing or adding channels After AUTO SET UP, ...
...to 6 above to adjust the other lines until it converges with the center green line. - To preview the main functions (DEMO) Press TV/VIDEO on the screen. The SET UP menu appears. To move vertical line right/left, press VOLUME +/-. (4) Repeat steps (2) and (3) to perform AUTO SET ...BLUE [CH+] [VOL -] [VOL +] White cross [CH-] RED / BLUE : [TV/VIDEO] E x i t : [SET UP] Note • Using the AUX connector, press TV (black button) first and make sure that "AUX" is displayed beside the channel number on the projection TV in step 4. Erasing or adding channels After AUTO SET UP, ...
Operating Instructions
Page 16
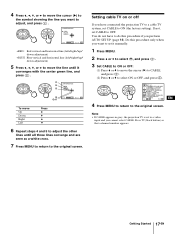
... CHANNEL ERASE/ADD 33 ERASE ADD MENU Use[0 - 9]or [CH+/-] to select CHANNEL ERASE/ADD, and press . Adjusting convergence (CONVERGENCE) The projection tube image appears on the screen in three layers (red, green and blue). 4 Press V or v to select the channel. or the 0 - 9 buttons to select the channel you want to... If you perform AUTO SET UP (page 14). If they do this procedure if you erase or add a VHF or UHF channel, the cable TV channel with the same number is also erased or added, and vice versa. • Erasing and adding channels is erased from the preset memory. ...
... CHANNEL ERASE/ADD 33 ERASE ADD MENU Use[0 - 9]or [CH+/-] to select CHANNEL ERASE/ADD, and press . Adjusting convergence (CONVERGENCE) The projection tube image appears on the screen in three layers (red, green and blue). 4 Press V or v to select the channel. or the 0 - 9 buttons to select the channel you want to... If you perform AUTO SET UP (page 14). If they do this procedure if you erase or add a VHF or UHF channel, the cable TV channel with the same number is also erased or added, and vice versa. • Erasing and adding channels is erased from the preset memory. ...
Operating Instructions
Page 17
... MENU EN 4 Press MENU to return to OFF. Getting Started 17-EN If not, set CABLE to the original screen. Do this procedure if you perform AUTO SET UP (page 14). R CONVERGENCE G +RED B +BLUE MENU B Us e G+R RETURN E x i t MENU To move Up Down Right Left Press V v b B 6 Repeat steps...ON or OFF: (1) Press V or v to move the cursor (z) to CABLE, and press . (2) Press V or v to the original screen. Note • If CABLE appears in gray, the projection TV is set to adjust, and press . 4 Press V, B, v, or b to move the cursor (z) to the symbol showing the line you ...
... MENU EN 4 Press MENU to return to OFF. Getting Started 17-EN If not, set CABLE to the original screen. Do this procedure if you perform AUTO SET UP (page 14). R CONVERGENCE G +RED B +BLUE MENU B Us e G+R RETURN E x i t MENU To move Up Down Right Left Press V v b B 6 Repeat steps...ON or OFF: (1) Press V or v to move the cursor (z) to CABLE, and press . (2) Press V or v to the original screen. Note • If CABLE appears in gray, the projection TV is set to adjust, and press . 4 Press V, B, v, or b to move the cursor (z) to the symbol showing the line you ...


