
Limited Warranty (U.S. Only)
Page 1
... one (1) year (color picture tube - PARTS: In addition, Sony will repair or replace the Product, at its option, at no charge, or pay for 19" (measured diagonally), or larger screen size through a Sony authorized service facility. This warranty gives you specific legal rights, and you may not apply to you . has established telephone numbers for frequently asked questions: To locate the servicer or dealer nearest...
... one (1) year (color picture tube - PARTS: In addition, Sony will repair or replace the Product, at its option, at no charge, or pay for 19" (measured diagonally), or larger screen size through a Sony authorized service facility. This warranty gives you specific legal rights, and you may not apply to you . has established telephone numbers for frequently asked questions: To locate the servicer or dealer nearest...
Operating Instructions
Page 2
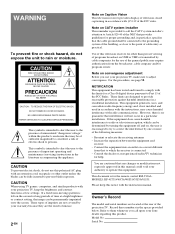
... outlet on Caption Vision This television receiver provides display of television closed captioning in accordance with §15.119 of important operating and maintenance (servicing) instructions in a particular installation. MODELS: KP-41T35/46C36/48S35/53S35/61S35. Owner's Record The model and serial numbers are the result of misuse. 2-EN Note on a circuit different from the broadcaster, cable company and/or program owner. Record these numbers in a residential installation. CAUTION When using TV games, computers...
... outlet on Caption Vision This television receiver provides display of television closed captioning in accordance with §15.119 of important operating and maintenance (servicing) instructions in a particular installation. MODELS: KP-41T35/46C36/48S35/53S35/61S35. Owner's Record The model and serial numbers are the result of misuse. 2-EN Note on a circuit different from the broadcaster, cable company and/or program owner. Record these numbers in a residential installation. CAUTION When using TV games, computers...

Operating Instructions
Page 3
... clock (CURRENT TIME SET) 30 Setting the timer to turn the projection TV on and off (ON/OFF TIMER) 31 Customizing the channel names (CHANNEL CAPTION) 32 Blocking out a channel (CHANNEL BLOCK) 32 Setting your favorite channels (FAVORITE CHANNEL) 33 Setting video labels (VIDEO LABEL) 34 Setting Caption Vision (CAPTION VISION) 35 Operating video equipment 37 Operating a cable box or DBS receiver Additional Information 38 Troubleshooting 39 Specifications 40 Index to parts and controls 42 Index The captions in parentheses indicate menu names. 3-EN
... clock (CURRENT TIME SET) 30 Setting the timer to turn the projection TV on and off (ON/OFF TIMER) 31 Customizing the channel names (CHANNEL CAPTION) 32 Blocking out a channel (CHANNEL BLOCK) 32 Setting your favorite channels (FAVORITE CHANNEL) 33 Setting video labels (VIDEO LABEL) 34 Setting Caption Vision (CAPTION VISION) 35 Operating video equipment 37 Operating a cable box or DBS receiver Additional Information 38 Troubleshooting 39 Specifications 40 Index to parts and controls 42 Index The captions in parentheses indicate menu names. 3-EN
Operating Instructions
Page 4
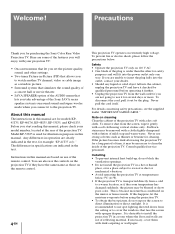
... desirable to install the projection TV in -Picture (PIP) that allows you to watch another TV channel, video or cable image as a window picture. • Surround system that simulates the sound quality of a concert hall or movie theater. • SAVA SPEAKER option of the AUDIO menu that face the screen with a dry soft cloth. You can also use spot lighting directed down from a cold to use the controls on use of...
... desirable to install the projection TV in -Picture (PIP) that allows you to watch another TV channel, video or cable image as a window picture. • Surround system that simulates the sound quality of a concert hall or movie theater. • SAVA SPEAKER option of the AUDIO menu that face the screen with a dry soft cloth. You can also use spot lighting directed down from a cold to use the controls on use of...

Operating Instructions
Page 6
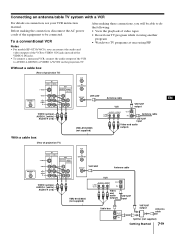
... of the instructions below depending on your cable company requires you to connect a cable box, make the connection as a window picture. Note • You cannot watch the signal through an AUX connector as follows: (Rear of projection TV) VHF/UHF Cable IN OUT Cable box To cable box and cable Cable box (Rear of projection TV) AUX TO CONVERTER 75-ohm coaxial cable (not supplied) CATV cable VHF/UHF Pay cable TV systems use scrambled or encoded signals requiring a cable box* in...
... of the instructions below depending on your cable company requires you to connect a cable box, make the connection as a window picture. Note • You cannot watch the signal through an AUX connector as follows: (Rear of projection TV) VHF/UHF Cable IN OUT Cable box To cable box and cable Cable box (Rear of projection TV) AUX TO CONVERTER 75-ohm coaxial cable (not supplied) CATV cable VHF/UHF Pay cable TV systems use scrambled or encoded signals requiring a cable box* in...
Operating Instructions
Page 7
...one TV program while viewing another program • Watch two TV programs at once using PIP Without a cable box (Rear of projection TV) IN VIDEO 1 VIDEO 2 S VIDEO OUT MONITOR AUDIO (VAR/FIX) AUX TO CONVERTER CONTROL S OUT VIDEO L (MONO) AUDIO R VIDEO (yellow) AUDIO-L (white) AUDIO-R (red) VHF/UHF VHF/UHF Antenna cable VMC-810S/820S (not supplied) VHF/UHF VCR output AUDIO VIDEO LINE OUT OUT IN Antenna cable VHF/UHF input Video and audio outputs EN With a cable box (Rear of VIDEO 1/2/3 IN on connection, see your VCR instruction manual. Connecting an antenna/cable TV system...
...one TV program while viewing another program • Watch two TV programs at once using PIP Without a cable box (Rear of projection TV) IN VIDEO 1 VIDEO 2 S VIDEO OUT MONITOR AUDIO (VAR/FIX) AUX TO CONVERTER CONTROL S OUT VIDEO L (MONO) AUDIO R VIDEO (yellow) AUDIO-L (white) AUDIO-R (red) VHF/UHF VHF/UHF Antenna cable VMC-810S/820S (not supplied) VHF/UHF VCR output AUDIO VIDEO LINE OUT OUT IN Antenna cable VHF/UHF input Video and audio outputs EN With a cable box (Rear of VIDEO 1/2/3 IN on connection, see your VCR instruction manual. Connecting an antenna/cable TV system...
Operating Instructions
Page 9
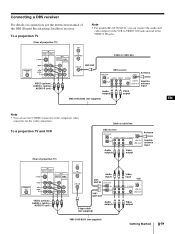
Cable or cable box To a projection TV and VCR DBS receiver VHF/UHF IN AUDIO VIDEO S VIDEO OUT LINE IN LINE OUT Antenna Satellite antenna input Audio outputs Video output (Rear of the DBS (Digital Broadcasting Satellites) receiver. Connecting a DBS receiver For details on connection, see the instruction manual of projection TV) CONTROL S OUT IN VIDEO 1 VIDEO 2 S VIDEO OUT MONITOR AUDIO (VAR/FIX) VIDEO L (MONO) AUDIO R VIDEO (yellow) AUDIO-L (white) AUDIO-R (red) AUX TO CONVERTER VHF/UHF VHF/ UHF IN Audio inputs VHF/UHF Video input VCR VHF/ UHF OUT IN AUDIO VIDEO S VIDEO...
Cable or cable box To a projection TV and VCR DBS receiver VHF/UHF IN AUDIO VIDEO S VIDEO OUT LINE IN LINE OUT Antenna Satellite antenna input Audio outputs Video output (Rear of the DBS (Digital Broadcasting Satellites) receiver. Connecting a DBS receiver For details on connection, see the instruction manual of projection TV) CONTROL S OUT IN VIDEO 1 VIDEO 2 S VIDEO OUT MONITOR AUDIO (VAR/FIX) VIDEO L (MONO) AUDIO R VIDEO (yellow) AUDIO-L (white) AUDIO-R (red) AUX TO CONVERTER VHF/UHF VHF/ UHF IN Audio inputs VHF/UHF Video input VCR VHF/ UHF OUT IN AUDIO VIDEO S VIDEO...

Operating Instructions
Page 10
...Multichannel TV Sound) mode (page 27) with the supplied remote control. Connecting an audio system When connecting audio equipment, see page 28 for more information. (Rear of VIDEO 2 INPUT on the projection TV. Stereo amplifier 10-EN Getting Started Connecting a camcorder p KP-41T35/46C36 only Use this connection to view a camcorder picture. (Front of KP-41T35/46C36) S VIDEO VIDEO 2 INPUT VIDEO L(MONO)-AUDIO-R VIDEO (yellow) Video and audio outputs VMC-810S/820S (not supplied) AUDIO-R (red) AUDIO-L (white) Note • To connect a monaural camcorder, connect the audio output of...
...Multichannel TV Sound) mode (page 27) with the supplied remote control. Connecting an audio system When connecting audio equipment, see page 28 for more information. (Rear of VIDEO 2 INPUT on the projection TV. Stereo amplifier 10-EN Getting Started Connecting a camcorder p KP-41T35/46C36 only Use this connection to view a camcorder picture. (Front of KP-41T35/46C36) S VIDEO VIDEO 2 INPUT VIDEO L(MONO)-AUDIO-R VIDEO (yellow) Video and audio outputs VMC-810S/820S (not supplied) AUDIO-R (red) AUDIO-L (white) Note • To connect a monaural camcorder, connect the audio output of...

Operating Instructions
Page 11
...) AUDIO VIDEO LINE OUT OUT IN Video and audio outputs (Rear of projection TV) CONTROL S OUT IN VIDEO 1 VIDEO 2 S VIDEO OUT MONITOR AUDIO (VAR/FIX) VIDEO L (MONO) AUDIO R AUX TO CONVERTER VHF/UHF AUDIO-R (red) AUDIO-L (white) VIDEO (yellow) VCR (for recording) AUDIO VIDEO LINE IN OUT IN Video and audio inputs VMC-810S/820S (not supplied) VMC-810S/820S (not supplied) EN Notes • Do not change the input signal while editing through MONITOR OUT, or the output signal will also change. • You can use the S video jack to connect a VCR...
...) AUDIO VIDEO LINE OUT OUT IN Video and audio outputs (Rear of projection TV) CONTROL S OUT IN VIDEO 1 VIDEO 2 S VIDEO OUT MONITOR AUDIO (VAR/FIX) VIDEO L (MONO) AUDIO R AUX TO CONVERTER VHF/UHF AUDIO-R (red) AUDIO-L (white) VIDEO (yellow) VCR (for recording) AUDIO VIDEO LINE IN OUT IN Video and audio inputs VMC-810S/820S (not supplied) VMC-810S/820S (not supplied) EN Notes • Do not change the input signal while editing through MONITOR OUT, or the output signal will also change. • You can use the S video jack to connect a VCR...
Operating Instructions
Page 14
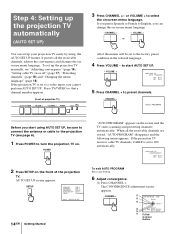
..."Changing the menu language" (page 18). POWER "AUTO PROGRAM" appears on -screen menu language. YES : [CH+] NO : [CH-] 2 Press SETUP on the front of projection TV) SETUP TV/VIDEO - If the projection TV receives cable TV channels, CABLE is set up the projection TV manually, see page 6). 1 Press POWER to exit. 14-EN Getting Started To exit AUTO PROGRAM Press any button. 6 Adjust convergence. (1) Press CHANNEL +. CONT I NUE TO AUTO PROGRAM? CHANNEL + R CONVERGENCE : RED G [CH+] B [VOL -] [VOL +] B [CH-] RED / BLUE : [TV/VIDEO] G E x i t : [SET UP] R R=Red G=Green...
..."Changing the menu language" (page 18). POWER "AUTO PROGRAM" appears on -screen menu language. YES : [CH+] NO : [CH-] 2 Press SETUP on the front of projection TV) SETUP TV/VIDEO - If the projection TV receives cable TV channels, CABLE is set up the projection TV manually, see page 6). 1 Press POWER to exit. 14-EN Getting Started To exit AUTO PROGRAM Press any button. 6 Adjust convergence. (1) Press CHANNEL +. CONT I NUE TO AUTO PROGRAM? CHANNEL + R CONVERGENCE : RED G [CH+] B [VOL -] [VOL +] B [CH-] RED / BLUE : [TV/VIDEO] G E x i t : [SET UP] R R=Red G=Green...

Operating Instructions
Page 15
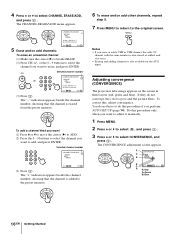
.... SET UP CHANNEL ERASE/ADD CHANNEL CAPTION CHANNEL BLOCK FAVORITE CHANNEL CABLE : ON AUTO PROGRAM VIDEO LABEL LANGUAGE : ENGLISH CC CONVERGENCE MENU Use Exit MENU Getting Started 15-EN Erasing or adding channels After AUTO SET UP, you can erase unnecessary channels or add the channels you want. (2) Press TV/VIDEO to adjust the other lines until it converges with the center green line. - CONVERGENCE : BLUE [CH+] [VOL -] [VOL +] White cross [CH-] RED / BLUE : [TV/VIDEO] E x i t : [SET UP] Note • Using the AUX connector, press TV (black button...
.... SET UP CHANNEL ERASE/ADD CHANNEL CAPTION CHANNEL BLOCK FAVORITE CHANNEL CABLE : ON AUTO PROGRAM VIDEO LABEL LANGUAGE : ENGLISH CC CONVERGENCE MENU Use Exit MENU Getting Started 15-EN Erasing or adding channels After AUTO SET UP, you can erase unnecessary channels or add the channels you want. (2) Press TV/VIDEO to adjust the other lines until it converges with the center green line. - CONVERGENCE : BLUE [CH+] [VOL -] [VOL +] White cross [CH-] RED / BLUE : [TV/VIDEO] E x i t : [SET UP] Note • Using the AUX connector, press TV (black button...
Operating Instructions
Page 16
... picture blurs. 4 Press V or v to erase, and press ENTER. R CONVERGENCE G +RED +BLUE B MENU B G Us e RETURN E x i t MENU R R=Red G=Green B=Blue 16-EN Getting Started Use Exit MENU 5 Erase and/or add channels: To erase an unwanted channel (1) Make sure the cursor (z) is erased from the preset memory. MENU Notes • If you want to select CHANNEL ERASE/ADD, and press . The CONVERGENCE adjustment screen appears. Adjusting convergence (CONVERGENCE) The projection tube image appears on the screen...
... picture blurs. 4 Press V or v to erase, and press ENTER. R CONVERGENCE G +RED +BLUE B MENU B G Us e RETURN E x i t MENU R R=Red G=Green B=Blue 16-EN Getting Started Use Exit MENU 5 Erase and/or add channels: To erase an unwanted channel (1) Make sure the cursor (z) is erased from the preset memory. MENU Notes • If you want to select CHANNEL ERASE/ADD, and press . The CONVERGENCE adjustment screen appears. Adjusting convergence (CONVERGENCE) The projection tube image appears on the screen...
Operating Instructions
Page 17
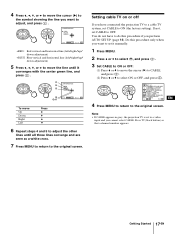
... the line until all three lines converge and are seen as a white cross. 7 Press MENU to return to do not have connected the projection TV to a cable TV system, set to OFF. SET UP CHANNEL ERASE/ADD CHANNEL CAPTION CHANNEL BLOCK FAVORITE CHANNEL CABLE : OFF AUTO PROGRAM VIDEO LABEL LANGUAGE : ENGLISH CC CONVERGENCE MENU Use Exit MENU EN 4 Press MENU to return to adjust, and press . Press TV (black button) so that a channel number appears. If not, set CABLE to a video input and you perform AUTO SET UP...
... the line until all three lines converge and are seen as a white cross. 7 Press MENU to return to do not have connected the projection TV to a cable TV system, set to OFF. SET UP CHANNEL ERASE/ADD CHANNEL CAPTION CHANNEL BLOCK FAVORITE CHANNEL CABLE : OFF AUTO PROGRAM VIDEO LABEL LANGUAGE : ENGLISH CC CONVERGENCE MENU Use Exit MENU EN 4 Press MENU to return to adjust, and press . Press TV (black button) so that a channel number appears. If not, set CABLE to a video input and you perform AUTO SET UP...
Operating Instructions
Page 20
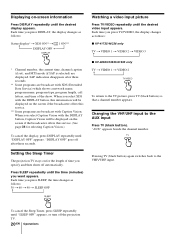
... projection TV. 20-EN Operations "AUX" appears beside the channel number. Each time you press TV/VIDEO, the display changes as follows: Status display* n XDS ON** n cc 1 ON*** DISPLAY OFF N DISPLAY * Channel number, the current time, channel caption (if set), and MTS mode (if SAP is selected) are broadcast with the DISPLAY button, Caption Vision will be displayed on the screen if the broadcaster offers this service. *** Some programs are broadcast with Caption Vision. To cancel the Sleep Timer...
... projection TV. 20-EN Operations "AUX" appears beside the channel number. Each time you press TV/VIDEO, the display changes as follows: Status display* n XDS ON** n cc 1 ON*** DISPLAY OFF N DISPLAY * Channel number, the current time, channel caption (if set), and MTS mode (if SAP is selected) are broadcast with the DISPLAY button, Caption Vision will be displayed on the screen if the broadcaster offers this service. *** Some programs are broadcast with Caption Vision. To cancel the Sleep Timer...

Operating Instructions
Page 23
... BRIGHTNESS When watching TV programs, you want to the original screen. For example: (1) To adjust the brightness, press V or v to move the cursor (z) to select , and press . COLOR Decrease color intensity. To restore the factory settings Press RESET after displaying and selecting the VIDEO menu. RESET 0 V v MENU 1 Press MENU. 2 Press V or v to BRIGHTNESS. (2) Press . VIDEO MODE : STANDARD PICTURE HUE COLOR BRIGHTNESS SHARPNESS TRINITONE : HIGH MENU CC Use Exit MENU For details on each item, see "Description of video input...
... BRIGHTNESS When watching TV programs, you want to the original screen. For example: (1) To adjust the brightness, press V or v to move the cursor (z) to select , and press . COLOR Decrease color intensity. To restore the factory settings Press RESET after displaying and selecting the VIDEO menu. RESET 0 V v MENU 1 Press MENU. 2 Press V or v to BRIGHTNESS. (2) Press . VIDEO MODE : STANDARD PICTURE HUE COLOR BRIGHTNESS SHARPNESS TRINITONE : HIGH MENU CC Use Exit MENU For details on each item, see "Description of video input...
Operating Instructions
Page 28
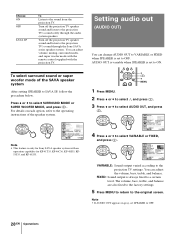
... SUPER WOOFER MODE MENU Use Exit MENU VARIABLE: Sound output varied according to the original screen. Turn off the projection TV speaker sound and listen to OFF. You can adjust volume, muting, surround modes, and super woofer mode with the remote control supplied with an operation capability for Sony SAVA speaker system with the projection TV. AUDIO TREBLE BASS BALANCE EFFECT : SURROUND MTS : STEREO SPEAKER : SAVA SP AUDIO OUT : VARIABLE SURROUND MODE CC SUPER WOOFER MODE MENU Use Exit MENU Note •...
... SUPER WOOFER MODE MENU Use Exit MENU VARIABLE: Sound output varied according to the original screen. Turn off the projection TV speaker sound and listen to OFF. You can adjust volume, muting, surround modes, and super woofer mode with the remote control supplied with an operation capability for Sony SAVA speaker system with the projection TV. AUDIO TREBLE BASS BALANCE EFFECT : SURROUND MTS : STEREO SPEAKER : SAVA SP AUDIO OUT : VARIABLE SURROUND MODE CC SUPER WOOFER MODE MENU Use Exit MENU Note •...

Operating Instructions
Page 37
...supplied remote control. For example, to program your equipment. Operating a cable box or DBS receiver 3 Press DBS/CABLE (POWER) to turn on operating the cable box or DBS receiver Refer to the operating instructions that is not provided with this case, use the equipment's own remote control unit. • Whenever you remove the batteries - DBS/CABLE (POWER) DBS/CABLE (FUNCTION) DISPLAY* JUMP TV/DBS* CODE SET 123 456 789 0 0 - 9 buttons ENTER GUIDE* V/v/B/b/ * MENU* CH +/- * The TV/DBS, GUIDE, DISPLAY, V/v/B/b/ , and MENU buttons can program the supplied remote control to set...
...supplied remote control. For example, to program your equipment. Operating a cable box or DBS receiver 3 Press DBS/CABLE (POWER) to turn on operating the cable box or DBS receiver Refer to the operating instructions that is not provided with this case, use the equipment's own remote control unit. • Whenever you remove the batteries - DBS/CABLE (POWER) DBS/CABLE (FUNCTION) DISPLAY* JUMP TV/DBS* CODE SET 123 456 789 0 0 - 9 buttons ENTER GUIDE* V/v/B/b/ * MENU* CH +/- * The TV/DBS, GUIDE, DISPLAY, V/v/B/b/ , and MENU buttons can program the supplied remote control to set...

Operating Instructions
Page 38
... not presently in projection TV memory. (pages 14, 18) Remote control does not operate / Batteries could be cleaned / Clean the projection TV with the buttons on the screen / Check the CABLE setting in the VIDEO menu. (page 23) / Confirm that black and white program is not being broadcast. / Perform AUTO SET UP again using cable TV / Make sure CABLE is caused by reflections from the projection TV. Move them at the cable box. Additional Information Troubleshooting If the problem persists after...
... not presently in projection TV memory. (pages 14, 18) Remote control does not operate / Batteries could be cleaned / Clean the projection TV with the buttons on the screen / Check the CABLE setting in the VIDEO menu. (page 23) / Confirm that black and white program is not being broadcast. / Perform AUTO SET UP again using cable TV / Make sure CABLE is caused by reflections from the projection TV. Move them at the cable box. Additional Information Troubleshooting If the problem persists after...
Operating Instructions
Page 39
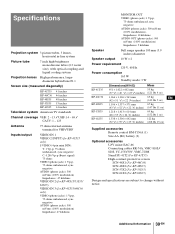
... Projection system 3 picture tubes, 3 lenses, horizontal in-line system Picture tube 7 inch high-brightness monochrome tubes (6.3 raster size), with optical coupling and liquid cooling system Projection lenses High performance, largediameter hybrid lens F1.1 Screen size (measured diagonally) KP-41T35 KP-46C36 KP-48S35 KP-53S35 KP-61S35 41 inches 46 inches 48 inches 53 inches 61 inches Television system American TV standards Channel coverage VHF: 2 - 13 / UHF: 14 - 69 / CATV: 1 - 125 Antenna 75 ohm external antenna terminal for VHF/UHF Inputs/output VIDEO IN 1 VIDEO 2 INPUT (for KP...
... Projection system 3 picture tubes, 3 lenses, horizontal in-line system Picture tube 7 inch high-brightness monochrome tubes (6.3 raster size), with optical coupling and liquid cooling system Projection lenses High performance, largediameter hybrid lens F1.1 Screen size (measured diagonally) KP-41T35 KP-46C36 KP-48S35 KP-53S35 KP-61S35 41 inches 46 inches 48 inches 53 inches 61 inches Television system American TV standards Channel coverage VHF: 2 - 13 / UHF: 14 - 69 / CATV: 1 - 125 Antenna 75 ohm external antenna terminal for VHF/UHF Inputs/output VIDEO IN 1 VIDEO 2 INPUT (for KP...

Operating Instructions
Page 42
... 7 VIDEO 2 IN jacks 7 VIDEO 3 IN jacks 7 VOLUME +/- buttons 14 CH (channel) +/- buttons 16, 19 CONTROL S OUT jack 12 CONVERTER antenna terminal 6 CODE SET button 35 DBS/CABLE (FUNCTION) button 37 DBS/CABLE (POWER) switch 37 DISPLAY button 20 ENTER button 16 FREEZE button 22 JUMP button 19 MENU button 15 MONITOR OUT jacks 11 MTS/GUIDE button 27, 37 MUTING button 19 PIP button 21 POSITION button 22 POWER switch 14 RESET button 23 SETUP button 14 S VIDEO input jack 8 S VIDEO/VIDEO 2 INPUT (VIDEO/AUDIO L (MONO)/R) jacks 10 SLEEP button 20 SWAP button 22 TV button (black button) 20 TV/ DBS button...
... 7 VIDEO 2 IN jacks 7 VIDEO 3 IN jacks 7 VOLUME +/- buttons 14 CH (channel) +/- buttons 16, 19 CONTROL S OUT jack 12 CONVERTER antenna terminal 6 CODE SET button 35 DBS/CABLE (FUNCTION) button 37 DBS/CABLE (POWER) switch 37 DISPLAY button 20 ENTER button 16 FREEZE button 22 JUMP button 19 MENU button 15 MONITOR OUT jacks 11 MTS/GUIDE button 27, 37 MUTING button 19 PIP button 21 POSITION button 22 POWER switch 14 RESET button 23 SETUP button 14 S VIDEO input jack 8 S VIDEO/VIDEO 2 INPUT (VIDEO/AUDIO L (MONO)/R) jacks 10 SLEEP button 20 SWAP button 22 TV button (black button) 20 TV/ DBS button...

