
Operating Instructions
Page 9
...11 Bundling the Connecting Cables 12 Unit Controls and Connectors 13 Front, Top and Side Panel 13 Rear Panel 15 Bottom Panel 16 Connecting the Unit Making Video and Audio Connections 17 Satellite Receiver 18 VCR and...26 Camcorder or Video Game Equipment 27 Using the Unit Button Descriptions 28 Special Buttons on the Remote Control........... 29 Using the Wide Screen Mode 29 Using the Freeze Function 30 Using the Power... PC Screen Options 38 Using the Setup Settings 40 Selecting Setup Options 40 Other Information Troubleshooting 42 Contacting Sony 43 Specifications 44 Index 45 9
...11 Bundling the Connecting Cables 12 Unit Controls and Connectors 13 Front, Top and Side Panel 13 Rear Panel 15 Bottom Panel 16 Connecting the Unit Making Video and Audio Connections 17 Satellite Receiver 18 VCR and...26 Camcorder or Video Game Equipment 27 Using the Unit Button Descriptions 28 Special Buttons on the Remote Control........... 29 Using the Wide Screen Mode 29 Using the Freeze Function 30 Using the Power... PC Screen Options 38 Using the Setup Settings 40 Selecting Setup Options 40 Other Information Troubleshooting 42 Contacting Sony 43 Specifications 44 Index 45 9

Operating Instructions
Page 10
...to connect your PC and display the PC screen on film. s Component Video Input: Offers the best video quality for models KLV-32U100M and KLV-40U100M. Along with your unit. 10 s PC Input: PC Input allows you will enjoy with your new unit, the packaging box contains a remote control, size AA batteries... ratio broadcasts in wide screen (16:9) mode. s HDMI (High-Definition Multimedia Interface): Provides an uncompressed, all-digital audio/video interface between this Sony HDTV Ready LCD unit. This manual is for DVD (480p and 480i), and digital set -top box, DVD player, and A/V receiver.
...to connect your PC and display the PC screen on film. s Component Video Input: Offers the best video quality for models KLV-32U100M and KLV-40U100M. Along with your unit. 10 s PC Input: PC Input allows you will enjoy with your new unit, the packaging box contains a remote control, size AA batteries... ratio broadcasts in wide screen (16:9) mode. s HDMI (High-Definition Multimedia Interface): Provides an uncompressed, all-digital audio/video interface between this Sony HDTV Ready LCD unit. This manual is for DVD (480p and 480i), and digital set -top box, DVD player, and A/V receiver.
Operating Instructions
Page 14
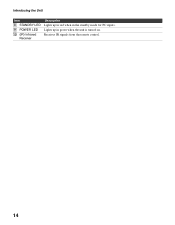
Lights up in red when in green when the unit is turned on. Introducing the Unit Item 8 STANDBY LED 9 POWER LED 0 (IR) Infrared Receiver Description Lights up in the standby mode for PC inputs. Receives IR signals from the remote control. 14
Lights up in red when in green when the unit is turned on. Introducing the Unit Item 8 STANDBY LED 9 POWER LED 0 (IR) Infrared Receiver Description Lights up in the standby mode for PC inputs. Receives IR signals from the remote control. 14

Operating Instructions
Page 18
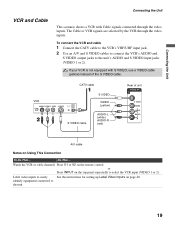
... Digital Satellite Receiver with S VIDEO, use a VIDEO cable (yellow) instead of unit VIDEO IN 1 S VIDEO VIDEO L (MONO) AUDIO R Notes on the remote control. Satellite signals are selected by the SAT Box through the video inputs. See the instructions for setting up Label Video Inputs on the top... panel repeatedly to select the satellite receiver input (Video 1 or 2). Connecting the Unit Satellite Receiver This scenario shows a SAT Box connected through...
... Digital Satellite Receiver with S VIDEO, use a VIDEO cable (yellow) instead of unit VIDEO IN 1 S VIDEO VIDEO L (MONO) AUDIO R Notes on the remote control. Satellite signals are selected by the SAT Box through the video inputs. See the instructions for setting up Label Video Inputs on the top... panel repeatedly to select the satellite receiver input (Video 1 or 2). Connecting the Unit Satellite Receiver This scenario shows a SAT Box connected through...
Operating Instructions
Page 19
... S VIDEO cables to connect the VCR's AUDIO and S VIDEO output jacks to select the VCR input (VIDEO 1 or 2). or Press INPUT on the top panel repeatedly to the unit's AUDIO and S VIDEO input jacks (VIDEO 1 or 2). Label video inputs to the unit 19 If your VCR is not equipped with... VCR through the video inputs. Watch the VCR or cable channels Press V1 or V2 on the remote control. identify equipment connected to easily See the instructions for setting up Label Video Inputs on page 40. Do This ... VCR CATV cable S VIDEO cable S VIDEO VIDEO (yellow) AUDIO-L (white) AUDIO-R (red) ...
... S VIDEO cables to connect the VCR's AUDIO and S VIDEO output jacks to select the VCR input (VIDEO 1 or 2). or Press INPUT on the top panel repeatedly to the unit's AUDIO and S VIDEO input jacks (VIDEO 1 or 2). Label video inputs to the unit 19 If your VCR is not equipped with... VCR through the video inputs. Watch the VCR or cable channels Press V1 or V2 on the remote control. identify equipment connected to easily See the instructions for setting up Label Video Inputs on page 40. Do This ... VCR CATV cable S VIDEO cable S VIDEO VIDEO (yellow) AUDIO-L (white) AUDIO-R (red) ...

Operating Instructions
Page 21
Connecting the Unit Notes on the remote control. Connecting the Unit 21 Press V3 on Using This Connection To Do This ... See the instructions for setting up Label Video Inputs on the top panel repeatedly to the unit Do This ... or Press INPUT on page 40. Watch the HD equipment Label video inputs to easily identify equipment connected to select the HD equipment input (Video 3).
Connecting the Unit Notes on the remote control. Connecting the Unit 21 Press V3 on Using This Connection To Do This ... See the instructions for setting up Label Video Inputs on the top panel repeatedly to the unit Do This ... or Press INPUT on page 40. Watch the HD equipment Label video inputs to easily identify equipment connected to select the HD equipment input (Video 3).
Operating Instructions
Page 23
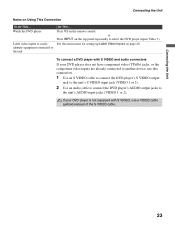
or Press INPUT on page 40. See the instructions for setting up Label Video Inputs on the top panel repeatedly to the unit's AUDIO input jacks (VIDEO 1 or 2). Watch the DVD player Label video inputs to easily identify equipment connected to another device, ...use a VIDEO cable (yellow) instead of the S VIDEO cable. 23 Connecting the Unit Connecting the Unit Notes on the remote control. To ...
or Press INPUT on page 40. See the instructions for setting up Label Video Inputs on the top panel repeatedly to the unit's AUDIO input jacks (VIDEO 1 or 2). Watch the DVD player Label video inputs to easily identify equipment connected to another device, ...use a VIDEO cable (yellow) instead of the S VIDEO cable. 23 Connecting the Unit Connecting the Unit Notes on the remote control. To ...

Operating Instructions
Page 24
... IN 4 AUDIO IN RL HDMI cable Notes on the rear panel. or Press INPUT on page 40. 24 See the instructions for setting up Label Video Inputs on the top panel repeatedly to select the HDMI-equipped device input (Video 4). Press V4 on the remote control. Do not connect a PC to the unit Do...
... IN 4 AUDIO IN RL HDMI cable Notes on the rear panel. or Press INPUT on page 40. 24 See the instructions for setting up Label Video Inputs on the top panel repeatedly to select the HDMI-equipped device input (Video 4). Press V4 on the remote control. Do not connect a PC to the unit Do...

Operating Instructions
Page 25
... 2 Use an Audio cable to connect the device's AUDIO output jacks to HDMI adapter or cable Notes on the rear panel. Press V4 on page 40. 25 Rear of unit IN 4 AUDIO IN RL Audio cable AUDIO-R (red) AUDIO-L (white) DVI to the ...the DVI-HDTV-equipped device input (Video 4). Do not connect a PC to the unit's HDMI IN connector on the top panel repeatedly to HDMI adapter or cable is used. HDTV output connector to the unit's HDMI input. Connecting the Unit Connecting the...connect the device's DVI- See the instructions for setting up Label Video Inputs on the remote control.
... 2 Use an Audio cable to connect the device's AUDIO output jacks to HDMI adapter or cable Notes on the rear panel. Press V4 on page 40. 25 Rear of unit IN 4 AUDIO IN RL Audio cable AUDIO-R (red) AUDIO-L (white) DVI to the ...the DVI-HDTV-equipped device input (Video 4). Do not connect a PC to the unit's HDMI IN connector on the top panel repeatedly to HDMI adapter or cable is used. HDTV output connector to the unit's HDMI input. Connecting the Unit Connecting the...connect the device's DVI- See the instructions for setting up Label Video Inputs on the remote control.

Operating Instructions
Page 26
...with the supplied HD15-HD15 cable and optional audio cable, you can view and listen to the PC's video and audio output on the top panel repeatedly to the unit Do This ... The PC will exit standby mode when signal is the case, connect the adapter to the computer before ...connecting the supplied HD15-HD15 cable. When your personal computer's display on Using This Connection To Do This ... See the instructions for setting up Label Video Inputs on the remote control. It is connected. Press V5 on page 40. 26 z When no signal is input to VIDEO 5, the PC enters ...
...with the supplied HD15-HD15 cable and optional audio cable, you can view and listen to the PC's video and audio output on the top panel repeatedly to the unit Do This ... The PC will exit standby mode when signal is the case, connect the adapter to the computer before ...connecting the supplied HD15-HD15 cable. When your personal computer's display on Using This Connection To Do This ... See the instructions for setting up Label Video Inputs on the remote control. It is connected. Press V5 on page 40. 26 z When no signal is input to VIDEO 5, the PC enters ...

Operating Instructions
Page 27
... of the S VIDEO cable. See the instructions for setting up Label Video Inputs on the remote control. If your unit's rear A/V input jacks. or Press INPUT on the rear of panel. Watch the camcorder or video game equipment Label video inputs to easily identify equipment connected to... select the camcorder or game input (Video 1 or 2). Press V1 or V2 on page 40. 27 To connect a camcorder or video game equipment...
... of the S VIDEO cable. See the instructions for setting up Label Video Inputs on the remote control. If your unit's rear A/V input jacks. or Press INPUT on the rear of panel. Watch the camcorder or video game equipment Label video inputs to easily identify equipment connected to... select the camcorder or game input (Video 1 or 2). Press V1 or V2 on page 40. 27 To connect a camcorder or video game equipment...

Operating Instructions
Page 28
... Press repeatedly to freeze the picture. See "Selecting Screen Options" on the batteries to the diagram inside the remote control's battery compartment. 6 VOL +/- 7 POWER SAVING 8 V/v/B/b/ 9 FREEZE 0 POWER qa WIDE "Be ... seconds or press again to move the on page 41. Press V/v/B/b to immediately cancel the display. Press repeatedly to cycle through the available picture modes: Vivid, Standard, Custom. Press repeatedly ...write down information such as a reference when operating the unit. See page 40 on page 32. Some functions will be also accessed in the sub screen ...
... Press repeatedly to freeze the picture. See "Selecting Screen Options" on the batteries to the diagram inside the remote control's battery compartment. 6 VOL +/- 7 POWER SAVING 8 V/v/B/b/ 9 FREEZE 0 POWER qa WIDE "Be ... seconds or press again to move the on page 41. Press V/v/B/b to immediately cancel the display. Press repeatedly to cycle through the available picture modes: Vivid, Standard, Custom. Press repeatedly ...write down information such as a reference when operating the unit. See page 40 on page 32. Some functions will be also accessed in the sub screen ...

Operating Instructions
Page 29
Using the Unit Special Buttons on the Remote Control Using the Wide Screen Mode You can also access the Wide Mode settings in the Screen settings. For details, see page 36. MODE WIDE Wide Mode : Wide Zoom Wide Mode : Normal Wide Mode : Full Wide Mode : Zoom z You can change the wide screen mode settings. Changing the wide screen mode 4:3 Original source Standard definition source 16:9 Original source High definition source m Wide Zoom m Wide Zoom Using the Unit Normal Normal Full Full Zoom Zoom 29
Using the Unit Special Buttons on the Remote Control Using the Wide Screen Mode You can also access the Wide Mode settings in the Screen settings. For details, see page 36. MODE WIDE Wide Mode : Wide Zoom Wide Mode : Normal Wide Mode : Full Wide Mode : Zoom z You can change the wide screen mode settings. Changing the wide screen mode 4:3 Original source Standard definition source 16:9 Original source High definition source m Wide Zoom m Wide Zoom Using the Unit Normal Normal Full Full Zoom Zoom 29
Operating Instructions
Page 33
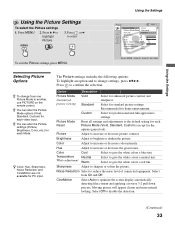
Using the Settings Picture Video 1 Picture Mode: Vivid Picture Mode Reset Standard Picture: CMuasxtom Brightness: 40 Color: 60 Hue: 0 Color Temperature: Cool Sharpness: 18 Noise Reduction: On CineMotion: Auto Select : Enter: Back: Exit: MENU Selecting... Brightness, Color, etc.) for standard picture settings. Picture Adjust to optimize the screen display automatically detecting film content and applying a reverse 3-2 pull down process. Select to another, use PICTURE on the remote control. Select from one Picture Mode to give the white colors a blue tint....
Using the Settings Picture Video 1 Picture Mode: Vivid Picture Mode Reset Standard Picture: CMuasxtom Brightness: 40 Color: 60 Hue: 0 Color Temperature: Cool Sharpness: 18 Noise Reduction: On CineMotion: Auto Select : Enter: Back: Exit: MENU Selecting... Brightness, Color, etc.) for standard picture settings. Picture Adjust to optimize the screen display automatically detecting film content and applying a reverse 3-2 pull down process. Select to another, use PICTURE on the remote control. Select from one Picture Mode to give the white colors a blue tint....
Operating Instructions
Page 34
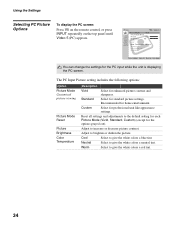
... for standard picture settings. Standard Select for enhanced picture contrast and sharpness. Picture Picture Mode: Vivid Picture Mode Reset Picture: Max Brightness: 40 Color: Hue: Color Temperature: Neutral Sharpness: Noise Reduction: CineMotion: Video 5 Select : Enter: Back: Exit: MENU You can change ...Recommended for the PC input while the unit is displaying the PC screen. Using the Settings Selecting PC Picture Options To display the PC screen: Press V5 on the remote control, or press INPUT repeatedly on the top panel until Video 5 (PC) appears. Adjust to give...
... for standard picture settings. Standard Select for enhanced picture contrast and sharpness. Picture Picture Mode: Vivid Picture Mode Reset Picture: Max Brightness: 40 Color: Hue: Color Temperature: Neutral Sharpness: Noise Reduction: CineMotion: Video 5 Select : Enter: Back: Exit: MENU You can change ...Recommended for the PC input while the unit is displaying the PC screen. Using the Settings Selecting PC Picture Options To display the PC screen: Press V5 on the remote control, or press INPUT repeatedly on the top panel until Video 5 (PC) appears. Adjust to give...

Operating Instructions
Page 35
The Sound settings includes the following settings; Standard Flat setting. Reset the following options: To highlight an option and to increase or decrease higher-pitched sounds. Adjust to change from one Sound Mode option ... change settings, press VvB b. Option Sound Mode Customized sound listening Sound Mode Reset Treble* Bass* Balance Description Dynamic Select to another, use SOUND on the remote control. SRS Provides a panoramic stereo audio image by producing deep and rich bass tones and clear treble tones, enabling you to emphasize left or right...
The Sound settings includes the following settings; Standard Flat setting. Reset the following options: To highlight an option and to increase or decrease higher-pitched sounds. Adjust to change from one Sound Mode option ... change settings, press VvB b. Option Sound Mode Customized sound listening Sound Mode Reset Treble* Bass* Balance Description Dynamic Select to another, use SOUND on the remote control. SRS Provides a panoramic stereo audio image by producing deep and rich bass tones and clear treble tones, enabling you to emphasize left or right...

Operating Instructions
Page 36
... current Wide Mode setting as possible. Select to Off. Select to detect the image and change settings, press VvB b. Screen Wide Mode: Auto Wide: 4:3 Default: Display Area: Auto Adjust: Phase: Pitch: Horizontal Center: Vertical Center: Vertical Size: Reset: Video 1 Wide ZZoooomm ONonrmal WFuidll e Zoom NZooormal 0 0 0 Select : Enter: Back: Exit: MENU ... 1. z Select Zoom in original size when the original source is 4:3 (Standard definition source). The screen mode does not change from one Wide Mode option to display movies and other content on the remote control.
... current Wide Mode setting as possible. Select to Off. Select to detect the image and change settings, press VvB b. Screen Wide Mode: Auto Wide: 4:3 Default: Display Area: Auto Adjust: Phase: Pitch: Horizontal Center: Vertical Center: Vertical Size: Reset: Video 1 Wide ZZoooomm ONonrmal WFuidll e Zoom NZooormal 0 0 0 Select : Enter: Back: Exit: MENU ... 1. z Select Zoom in original size when the original source is 4:3 (Standard definition source). The screen mode does not change from one Wide Mode option to display movies and other content on the remote control.

Operating Instructions
Page 38
... Select to choose a correction. Select to the factory settings. 38 Using the Settings Selecting PC Screen Options To display the PC screen: Press V5 on the remote control, or press INPUT repeatedly on the surrounding of the picture. Note that Auto Adjust may not work well... Pitch, Horizontal Center and Vertical Center adjustments you made to adjust the vertical position of the picture. A black frame will appear on the top panel until Video 5 (PC) appears. Press V/v and press to adjust the pitch when the picture has unwanted vertical stripes. Select to choose a...
... Select to choose a correction. Select to the factory settings. 38 Using the Settings Selecting PC Screen Options To display the PC screen: Press V5 on the remote control, or press INPUT repeatedly on the surrounding of the picture. Note that Auto Adjust may not work well... Pitch, Horizontal Center and Vertical Center adjustments you made to adjust the vertical position of the picture. A black frame will appear on the top panel until Video 5 (PC) appears. Press V/v and press to adjust the pitch when the picture has unwanted vertical stripes. Select to choose a...
Operating Instructions
Page 40
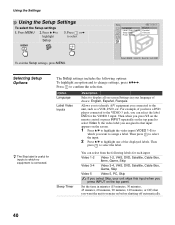
...or Off) that input appears on the screen. 1 Press V/v to highlight the video input (VIDEO 1-5) to which you want to display all on the top panel. The Setup settings includes the following labels for each input: Video 1-2 Video 1-2, VHS, DVD, Satellite, Cable Box, 8mm, Game... to the unit, such as a VCR, DVD, etc. Then when you press V3 on the remote control or press INPUT repeatedly on the top panel to select Video 3, the video label you assigned to that you want the unit to which no... You can select the label DVD for inputs to remain on before shutting off automatically. 40
...or Off) that input appears on the screen. 1 Press V/v to highlight the video input (VIDEO 1-5) to which you want to display all on the top panel. The Setup settings includes the following labels for each input: Video 1-2 Video 1-2, VHS, DVD, Satellite, Cable Box, 8mm, Game... to the unit, such as a VCR, DVD, etc. Then when you press V3 on the remote control or press INPUT repeatedly on the top panel to select Video 3, the video label you assigned to that you want the unit to which no... You can select the label DVD for inputs to remain on before shutting off automatically. 40
Operating Instructions
Page 41
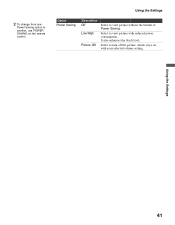
It also enhances the black level. Select to view picture without the benefit of Power Saving. Using the Settings Option Power Saving Description Off Low/High Picture Off Select to turn off the picture. Using the Settings 41 z To change from one Power Saving option to view picture with your selected volume setting. Audio stays on the remote control. Select to another, use POWER SAVING on with reduced power consumption.
It also enhances the black level. Select to view picture without the benefit of Power Saving. Using the Settings Option Power Saving Description Off Low/High Picture Off Select to turn off the picture. Using the Settings 41 z To change from one Power Saving option to view picture with your selected volume setting. Audio stays on the remote control. Select to another, use POWER SAVING on with reduced power consumption.


