

Operating Instructions
Page 4
... fully activated maximizing the sound effect in the United States This product contains mercury. As an ENERGY STAR® Partner, Sony Corporation has determined that produce heat. 9) Do not defeat the safety purpose of Sony Corporation. This unit incorporates High-Definition Multimedia Interface (HDMI™) technology... use attachments/accessories specified by the manufacturer. 12) Use only with dry cloth. 7) Do not block any heat sources such as power-supply cord or plug is a trademark licensed to rain or moisture, does not operate normally, or has been dropped. 4 The wide ...
... fully activated maximizing the sound effect in the United States This product contains mercury. As an ENERGY STAR® Partner, Sony Corporation has determined that produce heat. 9) Do not defeat the safety purpose of Sony Corporation. This unit incorporates High-Definition Multimedia Interface (HDMI™) technology... use attachments/accessories specified by the manufacturer. 12) Use only with dry cloth. 7) Do not block any heat sources such as power-supply cord or plug is a trademark licensed to rain or moisture, does not operate normally, or has been dropped. 4 The wide ...

Operating Instructions
Page 5
...from heat sources. WARNING To guard against the possibility of electrical power supplied to your home, consult your dealer or local power company. 120V AC Grounding or Polarization This unit is left unattended and unused for grounding). For the unit with a dry soft cloth. Wiring For your electrician to ... time, unplug it from the screen, wipe it and ask your dealer or Sony service center to grasp the plug when disconnecting the AC power cord. Wall outlet Do not use and servicing of power source indicated on the information label. Contact your safety, unplug the AC...
...from heat sources. WARNING To guard against the possibility of electrical power supplied to your home, consult your dealer or local power company. 120V AC Grounding or Polarization This unit is left unattended and unused for grounding). For the unit with a dry soft cloth. Wiring For your electrician to ... time, unplug it from the screen, wipe it and ask your dealer or Sony service center to grasp the plug when disconnecting the AC power cord. Wall outlet Do not use and servicing of power source indicated on the information label. Contact your safety, unplug the AC...

Operating Instructions
Page 13
...MENU screen, these buttons serve as up/down buttons. 5 POWER Press to turn on and off the unit. 6 Headphones jack Connects to display MENU. In the MENU screen, these buttons serve as a reference when operating the unit. (Continued) 13 The VOLUME + button has a tactile ...buttons. 4 vV - Unit Controls and Connectors Front, Top and Side Panel MENU INPUT Introducing the Unit VOLUME POWER Introducing the Unit PIC OFF/TIMER STANDBY POWER Item Description 1 MENU Press to your headphones do not match the jack, use a suitable plug adaptor (not supplied). 7 PIC OFF/...
...MENU screen, these buttons serve as up/down buttons. 5 POWER Press to turn on and off the unit. 6 Headphones jack Connects to display MENU. In the MENU screen, these buttons serve as a reference when operating the unit. (Continued) 13 The VOLUME + button has a tactile ...buttons. 4 vV - Unit Controls and Connectors Front, Top and Side Panel MENU INPUT Introducing the Unit VOLUME POWER Introducing the Unit PIC OFF/TIMER STANDBY POWER Item Description 1 MENU Press to your headphones do not match the jack, use a suitable plug adaptor (not supplied). 7 PIC OFF/...
Operating Instructions
Page 16
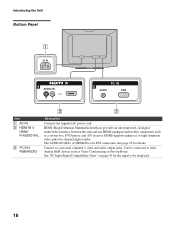
... high-definition video, plus two-channel digital audio. Can be displayed. 16 Introducing the Unit Bottom Panel AC IN IN 4 AUDIO IN RL PC IN 5 AUDIO RGB Jack 1 AC IN 2 HDMI IN 4 HDMI/ R-AUDIO IN-L 3 PC IN 5 RGB/AUDIO Description Connects the supplied AC power cord. HDMI (High-Definition Multimedia Interface) provides an uncompressed, all...
... high-definition video, plus two-channel digital audio. Can be displayed. 16 Introducing the Unit Bottom Panel AC IN IN 4 AUDIO IN RL PC IN 5 AUDIO RGB Jack 1 AC IN 2 HDMI IN 4 HDMI/ R-AUDIO IN-L 3 PC IN 5 RGB/AUDIO Description Connects the supplied AC power cord. HDMI (High-Definition Multimedia Interface) provides an uncompressed, all...

Operating Instructions
Page 26
... 39. Press V5 on page 40. 26 See the instructions for setting up Label Video Inputs on the remote control. z When no PC is connected to the unit with the supplied HD15-HD15 cable and optional audio cable, you press the power button in the Setup settings when... press the power button again. The power turns off when you can watch your PC is connected. Connecting the Unit Personal Computer z When connecting to an Apple Macintosh computer, use an adapter (not supplied). z If the picture is input. When your personal computer's display on the top panel repeatedly to select...
... 39. Press V5 on page 40. 26 See the instructions for setting up Label Video Inputs on the remote control. z When no PC is connected to the unit with the supplied HD15-HD15 cable and optional audio cable, you press the power button in the Setup settings when... press the power button again. The power turns off when you can watch your PC is connected. Connecting the Unit Personal Computer z When connecting to an Apple Macintosh computer, use an adapter (not supplied). z If the picture is input. When your personal computer's display on the top panel repeatedly to select...

Operating Instructions
Page 28
...modes: Vivid, Standard, Custom. Insert two size AA batteries (supplied) by pressing DISPLAY. Press repeatedly to immediately cancel the display. The picture modes can be displayed by matching the e and E on screen display) will not be also accessed in the Sound settings. Press to... the unit. See "Using the Settings" on page 41. Using the Unit Button Descriptions MUTING DISPLAY POWER MODE SOUND PICTURE WIDE Button 1 MUTING 2 DISPLAY INPUT V1 V2 V3 V4 V5 3 SOUND VOL POWER SAVING MENU FREEZE SLEEP 4 PICTURE 5 INPUT V1 to the unit's inputs. See Power Saving on...
...modes: Vivid, Standard, Custom. Insert two size AA batteries (supplied) by pressing DISPLAY. Press repeatedly to immediately cancel the display. The picture modes can be displayed by matching the e and E on screen display) will not be also accessed in the Sound settings. Press to... the unit. See "Using the Settings" on page 41. Using the Unit Button Descriptions MUTING DISPLAY POWER MODE SOUND PICTURE WIDE Button 1 MUTING 2 DISPLAY INPUT V1 V2 V3 V4 V5 3 SOUND VOL POWER SAVING MENU FREEZE SLEEP 4 PICTURE 5 INPUT V1 to the unit's inputs. See Power Saving on...


