Brochure
Page 2
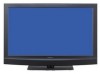
... High Picture Quality The KLH-40X1 incorporates a high-quality 40" LCD panel* with a native resolution of WXGA (1366 x 768) and a high contrast ratio of analog signals such as RGB/component via a D-sub 15-pin connector, S-Video via a mini DIN 4-pin connector, and composite video via two HDMI (High-Definition Multimedia Interface) interfaces. In addition, it supports a variety of the digital signage system. It can also accept digital signals...
... High Picture Quality The KLH-40X1 incorporates a high-quality 40" LCD panel* with a native resolution of WXGA (1366 x 768) and a high contrast ratio of analog signals such as RGB/component via a D-sub 15-pin connector, S-Video via a mini DIN 4-pin connector, and composite video via two HDMI (High-Definition Multimedia Interface) interfaces. In addition, it supports a variety of the digital signage system. It can also accept digital signals...
Brochure
Page 3
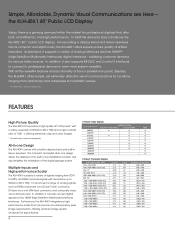
... remote controllers to wirelessly operate the devices. Each picture is equipped with an RS-232C interface, allowing full control of the week. High-quality Sound The built-in speakers of the KLH-40X1 provide high-quality sound, thanks to turn on specified days of the display from separate sources. On/Off Timer The display can disable the control panel to prevent unauthorized changes to simultaneously display...
... remote controllers to wirelessly operate the devices. Each picture is equipped with an RS-232C interface, allowing full control of the week. High-quality Sound The built-in speakers of the KLH-40X1 provide high-quality sound, thanks to turn on specified days of the display from separate sources. On/Off Timer The display can disable the control panel to prevent unauthorized changes to simultaneously display...
Brochure
Page 4
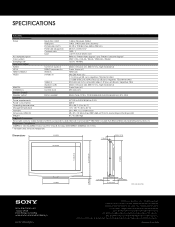
SPECIFICATIONS KLH-40X1 Picture Performance Panel Resolution (H/V) 1,366 x 768 pixels, WXGA Pixel pitch 1/40 x 1/40 inches (0.6 x 0.6 mm) Picture size (H/V) 34 7/8 x 19 5/8 inches (885 x 498 mm) Panel size (diagonal) 40-inch (1,016 mm)* Contrast ratio 1300 : 1 Type a-Si TFT Active Matrix LCD Acceptable signals Refer to "Preset Video Signals" and "Preset Computer Signals" Color system NTSC / PAL / PAL-M / PAL-N / NTSC4.43 / PAL60 Sampling rate 13.5 to 140 MHz Input and Output AUDIO Common audio in Stereo mini...
SPECIFICATIONS KLH-40X1 Picture Performance Panel Resolution (H/V) 1,366 x 768 pixels, WXGA Pixel pitch 1/40 x 1/40 inches (0.6 x 0.6 mm) Picture size (H/V) 34 7/8 x 19 5/8 inches (885 x 498 mm) Panel size (diagonal) 40-inch (1,016 mm)* Contrast ratio 1300 : 1 Type a-Si TFT Active Matrix LCD Acceptable signals Refer to "Preset Video Signals" and "Preset Computer Signals" Color system NTSC / PAL / PAL-M / PAL-N / NTSC4.43 / PAL60 Sampling rate 13.5 to 140 MHz Input and Output AUDIO Common audio in Stereo mini...
Operating Instructions (Large File - 18.98 MB)
Page 36
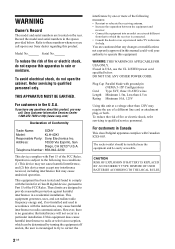
... This class B digital apparatus complies with the instructions, may cause undesired operation. Telephone Number: 858-942-2230 This device complies with Part 15 of Conformity Trade Name: SONY Model: KLH-40X1 Responsible Party: Sony Electronics Inc. If this equipment. WARNING: THIS WARNING IS APPLICABLE FOR USA ONLY. Plug Cap Parallel blade with the limits for help. CAUTION RISK OF...
... This class B digital apparatus complies with the instructions, may cause undesired operation. Telephone Number: 858-942-2230 This device complies with Part 15 of Conformity Trade Name: SONY Model: KLH-40X1 Responsible Party: Sony Electronics Inc. If this equipment. WARNING: THIS WARNING IS APPLICABLE FOR USA ONLY. Plug Cap Parallel blade with the limits for help. CAUTION RISK OF...

Operating Instructions (Large File - 18.98 MB)
Page 37
...) (2) Hot switching inrush current, measured in accordance with these directives implies conformity to the following Electromagnetic Environments: E1 (residential), E2 (commercial and light industrial), E3 (urban outdoors), E4 (controlled EMC environment, ex. The Authorized Representative for use of the above Power Cord / Appliance Connector / Plug, please consult a qualified service personnel. GB 3 GB Use the approved Power Cord (3-core mains lead) / Appliance Connector / Plug with...
...) (2) Hot switching inrush current, measured in accordance with these directives implies conformity to the following Electromagnetic Environments: E1 (residential), E2 (commercial and light industrial), E3 (urban outdoors), E4 (controlled EMC environment, ex. The Authorized Representative for use of the above Power Cord / Appliance Connector / Plug, please consult a qualified service personnel. GB 3 GB Use the approved Power Cord (3-core mains lead) / Appliance Connector / Plug with...

Operating Instructions (Large File - 18.98 MB)
Page 39
... Installation 8 Location and Function of Parts and Controls Front Panel...9 Rear Panel ...10 Remote Control ...12 Button Description...12 Special Buttons on the Remote Control 14 Using the Wide Mode...14 Using the PAP Setting 15 GB Using the ID MODE button 16 Using the ECO Mode function 16 Connections Connecting the AC Power Cord and Arranging the Input Cables 17 Using the Settings Overview of the Menus ...18 Picture Settings ...20 Sound Settings...22 Screen Settings...23 Setup Settings...26 Other Information Troubleshooting ...28 Input Signal Reference Chart 29 Specifications...
... Installation 8 Location and Function of Parts and Controls Front Panel...9 Rear Panel ...10 Remote Control ...12 Button Description...12 Special Buttons on the Remote Control 14 Using the Wide Mode...14 Using the PAP Setting 15 GB Using the ID MODE button 16 Using the ECO Mode function 16 Connections Connecting the AC Power Cord and Arranging the Input Cables 17 Using the Settings Overview of the Menus ...18 Picture Settings ...20 Sound Settings...22 Screen Settings...23 Setup Settings...26 Other Information Troubleshooting ...28 Input Signal Reference Chart 29 Specifications...
Operating Instructions (Large File - 18.98 MB)
Page 40
... or bright pixels. • Keeping the LCD panel facing toward the sun for several days or more. • To disconnect the AC power cord, pull it as an insecticide) or allowing the unit come into account when you install the unit on the position of the panel face. • When using a dry, soft cloth. • Never use the optional display stand. On cleaning the display The panel...
... or bright pixels. • Keeping the LCD panel facing toward the sun for several days or more. • To disconnect the AC power cord, pull it as an insecticide) or allowing the unit come into account when you install the unit on the position of the panel face. • When using a dry, soft cloth. • Never use the optional display stand. On cleaning the display The panel...
Operating Instructions (Large File - 18.98 MB)
Page 44
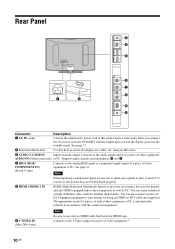
... picture may not be sure not to input sync signals to pins 13 and 14. using an HDMI-to-DVI cable (not supplied). Note When inputting a component signal, be displayed properly. 5 HDMI 1/HDMI 2 IN HDMI (High-Definition Multimedia Interface) provides an interface between the display and any HDMI-equipped audio/video equipment, as well as PC. Supports audio signals corresponding to 4 and 5. 4 HD15 (RGB/ COMPONENT IN) (D-sub 15-pin) Connects to use only an HDMI cable that...
... picture may not be sure not to input sync signals to pins 13 and 14. using an HDMI-to-DVI cable (not supplied). Note When inputting a component signal, be displayed properly. 5 HDMI 1/HDMI 2 IN HDMI (High-Definition Multimedia Interface) provides an interface between the display and any HDMI-equipped audio/video equipment, as well as PC. Supports audio signals corresponding to 4 and 5. 4 HD15 (RGB/ COMPONENT IN) (D-sub 15-pin) Connects to use only an HDMI cable that...

Operating Instructions (Large File - 18.98 MB)
Page 46
... WOW", and "Custom". 8 MENU button Press to change the aspect ratio in "Wide Mode". See page 18. Each press toggles between the two-picture screen and the single-picture screen. Use the tactile dot as a reference when operating the display. • Insert two size AA (R6) batteries (supplied) by matching the 3 and # on . 2 HDMI 1/ HDMI 2 button Press to select the signal input to the HDMI 1 or HDMI 2 connectors. 3 button Press to show...
... WOW", and "Custom". 8 MENU button Press to change the aspect ratio in "Wide Mode". See page 18. Each press toggles between the two-picture screen and the single-picture screen. Use the tactile dot as a reference when operating the display. • Insert two size AA (R6) batteries (supplied) by matching the 3 and # on . 2 HDMI 1/ HDMI 2 button Press to select the signal input to the HDMI 1 or HDMI 2 connectors. 3 button Press to show...

Operating Instructions (Large File - 18.98 MB)
Page 47
... a specific display without affecting other displays installed at the same time. • ON button: Press to show the "Index Number" on the screen. • 0-9 button: Press to enter the "Index Number" of the VIDEO connector. This also enhances the black level. Press again to reduce the power consumption by adjusting the backlight brightness. button Adjusts the picture (contrast) level. qa +/- button Press to mute the sound. qg OPTION 1 button Press to select the input signal...
... a specific display without affecting other displays installed at the same time. • ON button: Press to show the "Index Number" on the screen. • 0-9 button: Press to enter the "Index Number" of the VIDEO connector. This also enhances the black level. Press again to reduce the power consumption by adjusting the backlight brightness. button Adjusts the picture (contrast) level. qa +/- button Press to mute the sound. qg OPTION 1 button Press to select the input signal...

Operating Instructions (Large File - 18.98 MB)
Page 50
... specified display indicated with green characters only. Using the ECO Mode function You can set it to operate using the "Setup" settings. Select "ECO Mode" in black characters on the lower left menu on the selected display change to red. Only the operation of POWER ON switch and STANDBY/ID MODE-OFF button is activated, the mode stays on the remote control. Display's "Index Number" appears in the "Setup" settings, then set the "ECO Mode" using the 0 - 9 buttons on...
... specified display indicated with green characters only. Using the ECO Mode function You can set it to operate using the "Setup" settings. Select "ECO Mode" in black characters on the lower left menu on the selected display change to red. Only the operation of POWER ON switch and STANDBY/ID MODE-OFF button is activated, the mode stays on the remote control. Display's "Index Number" appears in the "Setup" settings, then set the "ECO Mode" using the 0 - 9 buttons on...

Operating Instructions (Large File - 18.98 MB)
Page 55
... default setting (except for video input (page 21). "TC Control": The setting is switched to a PC input source, the "Picture" settings specific to give the white colors a neutral tint. Color Temp. "Warm": Select to increase or decrease picture contrast. True Color Control See "True Color Control" for the options grayed out). In addition, you cannot select this option may not be selected. Picture Adjust to give the white colors a red tint. Notes • This option can use...
... default setting (except for video input (page 21). "TC Control": The setting is switched to a PC input source, the "Picture" settings specific to give the white colors a neutral tint. Color Temp. "Warm": Select to increase or decrease picture contrast. True Color Control See "True Color Control" for the options grayed out). In addition, you cannot select this option may not be selected. Picture Adjust to give the white colors a red tint. Notes • This option can use...

Operating Instructions (Large File - 18.98 MB)
Page 56
...; When using an HDMI cable (not supplied) or an HDMI-to change from the HDMI connectors. Tip You can also use SOUND on the remote control instead. • The proprietary technologies of equipment using an HDMI-to-DVI cable, connect the audio cable to "Custom". 22 GB "Standard": Flat setting. Treble Adjust to the HD15 (RGB/COMPONENT IN) connector and the AUDIO (COMMON AUDIO IN) connector. "HD15": Outputs audio from the display speaker. "HDMI 1"/ "HDMI 2": Select to connect a piece of BBE Sound, Inc. Sound Settings To...
...; When using an HDMI cable (not supplied) or an HDMI-to change from the HDMI connectors. Tip You can also use SOUND on the remote control instead. • The proprietary technologies of equipment using an HDMI-to-DVI cable, connect the audio cable to "Custom". 22 GB "Standard": Flat setting. Treble Adjust to the HD15 (RGB/COMPONENT IN) connector and the AUDIO (COMMON AUDIO IN) connector. "HD15": Outputs audio from the display speaker. "HDMI 1"/ "HDMI 2": Select to connect a piece of BBE Sound, Inc. Sound Settings To...

Operating Instructions (Large File - 18.98 MB)
Page 58
... displayed, the "Picture" settings set "4:3 Default" to continue using the current "Wide Mode" setting when the input is the same (half & half). Allows you to move the position of the picture left picture's width is displayed are applied. • For details on the available combination of an analog signal and a digital signal is changed after the input signal is available. Resets the following settings; "PAP Size": "Large Left": The left and right in the window...
... displayed, the "Picture" settings set "4:3 Default" to continue using the current "Wide Mode" setting when the input is the same (half & half). Allows you to move the position of the picture left picture's width is displayed are applied. • For details on the available combination of an analog signal and a digital signal is changed after the input signal is available. Resets the following settings; "PAP Size": "Large Left": The left and right in the window...

Operating Instructions (Large File - 18.98 MB)
Page 59
... "Auto Adjustment" may not work well with certain input signals. Horizontal Shift Vertical Shift Reset PAP Setting Allows you to automatically adjust the display position and phase of the picture up and down in the window. Press G/g and press to choose a correction. Notes • "Auto Wide", "4:3 Default", "Display Area" and "Vertical Size" are not available for PC input. • When the input is digital signal via HDMI 1/HDMI 2, "Auto Adjustment", "Phase" and "Pitch" are applied. Resets the following options: : : : Wide Mode Auto Adjustment...
... "Auto Adjustment" may not work well with certain input signals. Horizontal Shift Vertical Shift Reset PAP Setting Allows you to automatically adjust the display position and phase of the picture up and down in the window. Press G/g and press to choose a correction. Notes • "Auto Wide", "4:3 Default", "Display Area" and "Vertical Size" are not available for PC input. • When the input is digital signal via HDMI 1/HDMI 2, "Auto Adjustment", "Phase" and "Pitch" are applied. Resets the following options: : : : Wide Mode Auto Adjustment...

Operating Instructions (Large File - 18.98 MB)
Page 60
... your selected volume setting. In the power saving mode, the display is turned on or off automatically even when no signal is input. 26 GB "On/Off Timer": Sets the time at which the power is automatically turned on automatically when a signal is input to turn the display on -screen settings in the standby mode, press the 1 (POWER) button on the display or the POWER ON Switch on the remote control to the other input connectors for more...
... your selected volume setting. In the power saving mode, the display is turned on or off automatically even when no signal is input. 26 GB "On/Off Timer": Sets the time at which the power is automatically turned on automatically when a signal is input to turn the display on -screen settings in the standby mode, press the 1 (POWER) button on the display or the POWER ON Switch on the remote control to the other input connectors for more...

Operating Instructions (Large File - 18.98 MB)
Page 61
... the default settings. You can select only "Display+Remote" or "Remote Only". When setting this item with on the display, you can make settings for about 5 seconds when the input signal is set to confirm the setting. Displays the "Model Name", "Serial Number", "Operation Time" and "Software Version" of the display with the control buttons on the display and the remote control. Resets all the "Setup" settings to "Display+Remote" by using the remote control. "Display Only": Disables the remote control function. You can change the "Index Number...
... the default settings. You can select only "Display+Remote" or "Remote Only". When setting this item with on the display, you can make settings for about 5 seconds when the input signal is set to confirm the setting. Displays the "Model Name", "Serial Number", "Operation Time" and "Software Version" of the display with the control buttons on the display and the remote control. Resets all the "Setup" settings to "Display+Remote" by using the remote control. "Display Only": Disables the remote control function. You can change the "Index Number...

Operating Instructions (Large File - 18.98 MB)
Page 62
... is flashing red. Good picture, no sound. try turning off , and disconnect the power cord. For example, the indicator flashes 3 times, stops flashing for the current input if "Auto Wide" in the "Screen" settings (page 23). • Check the polarity of the batteries or replace the batteries. • Point the remote control at the remote control sensor of light out). Problem No picture. If you want to retain the current "Wide Mode" setting as inputs are changed, set to...
... is flashing red. Good picture, no sound. try turning off , and disconnect the power cord. For example, the indicator flashes 3 times, stops flashing for the current input if "Auto Wide" in the "Screen" settings (page 23). • Check the polarity of the batteries or replace the batteries. • Point the remote control at the remote control sensor of light out). Problem No picture. If you want to retain the current "Wide Mode" setting as inputs are changed, set to...

Operating Instructions (Large File - 18.98 MB)
Page 64
Specifications Video processing Panel system a-Si TFT Active Matrix LCD Panel Display resolution 1,366 dots (horizontal) × 768 lines (vertical) Sampling rate 13.5 MHz to change without notice. Pixel pitch Picture size Panel size 0.648 (horizontal) × 0.648 (vertical) mm (1/32 × 1/32 inches) 885 (horizontal) × 498 (vertical) mm (34 7/8 × 19 5/8 inches) 40-inch (diagonal 1,016 mm) Inputs and Outputs HD15 (RGB/COMPONENT IN) D-sub 15-pin (female) (× 1) (See page 31.) AUDIO (COMMON AUDIO IN) Stereo...
Specifications Video processing Panel system a-Si TFT Active Matrix LCD Panel Display resolution 1,366 dots (horizontal) × 768 lines (vertical) Sampling rate 13.5 MHz to change without notice. Pixel pitch Picture size Panel size 0.648 (horizontal) × 0.648 (vertical) mm (1/32 × 1/32 inches) 885 (horizontal) × 498 (vertical) mm (34 7/8 × 19 5/8 inches) 40-inch (diagonal 1,016 mm) Inputs and Outputs HD15 (RGB/COMPONENT IN) D-sub 15-pin (female) (× 1) (See page 31.) AUDIO (COMMON AUDIO IN) Stereo...
Operating Instructions (Large File - 18.98 MB)
Page 66
..., 23 Default 19, 24 A AC IN socket 10, 17 Advanced Setup 27 All Reset 27 AUDIO (COMMON AUDIO IN) connector 10 AUDIO IN L/R connector 11 Auto Adjustment 25 Auto Shut Off 26 Auto Wide 23 B Balance 22 Bass 22 Brightness 20, 21 C Cable holder 17 CineMotion 20 Clock Display 26 Clock Set 26 Color 20 Color System 27 Color Temp. 20, 21 Common Audio Sel. 22 Contrast button 13 Control Mode 27 CONTROL S OUT connector 11 Control Setting 27...
..., 23 Default 19, 24 A AC IN socket 10, 17 Advanced Setup 27 All Reset 27 AUDIO (COMMON AUDIO IN) connector 10 AUDIO IN L/R connector 11 Auto Adjustment 25 Auto Shut Off 26 Auto Wide 23 B Balance 22 Bass 22 Brightness 20, 21 C Cable holder 17 CineMotion 20 Clock Display 26 Clock Set 26 Color 20 Color System 27 Color Temp. 20, 21 Common Audio Sel. 22 Contrast button 13 Control Mode 27 CONTROL S OUT connector 11 Control Setting 27...


