Operating Instructions
Page 2
...of electric shock to rain or moisture. This symbol is connected. ❑ Consult the dealer or an experienced radio/TV technician for the remote control RM-Y912. This equipment generates, uses, and can be fully inserted to Part 15 of the FCC Rules. MODEL: KF-50XBR800, KF-60XBR800 Please ... of the FCC rules. WARNING To prevent fire or shock hazard, do not use of the general public may be connected to the grounding system of the building, as close to comply with the instruction manual. 2 CAUTION To prevent electric shock, do not expose the LCD Projection TV to persons.
...of electric shock to rain or moisture. This symbol is connected. ❑ Consult the dealer or an experienced radio/TV technician for the remote control RM-Y912. This equipment generates, uses, and can be fully inserted to Part 15 of the FCC Rules. MODEL: KF-50XBR800, KF-60XBR800 Please ... of the FCC rules. WARNING To prevent fire or shock hazard, do not use of the general public may be connected to the grounding system of the building, as close to comply with the instruction manual. 2 CAUTION To prevent electric shock, do not expose the LCD Projection TV to persons.
Operating Instructions
Page 3
...use spot lighting directed down from SRS Labs, Inc. As an ENERGY STAR® Partner, Sony Corporation has determined that face the screen with opaque drapery. Owner's Record The model and serial numbers are not of the LCD Projection TV, below 41°F (5°C). ❑ If the LCD Projection TV... meets the ENERGY STAR® guidelines for safety purposes, to excessive dust or mechanical vibration. ❑ Avoid operating the LCD Projection TV at the rear of a reflective material. It is desirable to them whenever you call upon your dealer. ❑ If any liquid or solid...
...use spot lighting directed down from SRS Labs, Inc. As an ENERGY STAR® Partner, Sony Corporation has determined that face the screen with opaque drapery. Owner's Record The model and serial numbers are not of the LCD Projection TV, below 41°F (5°C). ❑ If the LCD Projection TV... meets the ENERGY STAR® guidelines for safety purposes, to excessive dust or mechanical vibration. ❑ Avoid operating the LCD Projection TV at the rear of a reflective material. It is desirable to them whenever you call upon your dealer. ❑ If any liquid or solid...

Operating Instructions
Page 4
...15) Apparatus shall not be placed on the serial/model plate. Alternate Warning for long periods of time. 14) Refer all instructions. 5) Do not use and servicing of the set with liquids, such as radiators, heat registers, stoves, or other apparatus (including amplifiers) that produce heat. 9) Do not... obsolete outlet. 10) Protect the power cord from being walked on the set should be operated only from the apparatus. 11) Only use caution when moving the cart/apparatus combination to avoid injury from battery power, refer to have fallen into the outlet, contact your electrician ...
...15) Apparatus shall not be placed on the serial/model plate. Alternate Warning for long periods of time. 14) Refer all instructions. 5) Do not use and servicing of the set with liquids, such as radiators, heat registers, stoves, or other apparatus (including amplifiers) that produce heat. 9) Do not... obsolete outlet. 10) Protect the power cord from being walked on the set should be operated only from the apparatus. 11) Only use caution when moving the cart/apparatus combination to avoid injury from battery power, refer to have fallen into the outlet, contact your electrician ...
Operating Instructions
Page 5
...coating to make occasional snapping or popping sounds, particularly when being used. Consult qualified service personnel. for some TV sets to reduce a picture displayed by the manufacturer, as a precaution against the possibility of the LCD Projection TV with a soft cloth. The set is normal for example, ...benzine for a long period of the set off . Attachments Do not use strong solvents such as they may scratch the screen's coating. If the picture becomes dark after using the LCD Projection TV for cleaning. An appliance and cart combination should be removed with a ...
...coating to make occasional snapping or popping sounds, particularly when being used. Consult qualified service personnel. for some TV sets to reduce a picture displayed by the manufacturer, as a precaution against the possibility of the LCD Projection TV with a soft cloth. The set is normal for example, ...benzine for a long period of the set off . Attachments Do not use strong solvents such as they may scratch the screen's coating. If the picture becomes dark after using the LCD Projection TV for cleaning. An appliance and cart combination should be removed with a ...
Operating Instructions
Page 7
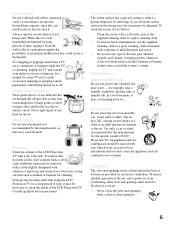
.... When the set . Carry the LCD Projection TV in the specified manner If you carry the LCD Projection TV in a manner other strong illumination shines on the place you install the LCD projection TV. 7 Projection lamp ❑ Your LCD projection TV uses a projection lamp as the original parts. Installation ❑...may be affected by your foot or fingers. For Safety Be careful when moving the LCD Projection TV When you place the LCD Projection TV in writing that he has used replacement parts specified by the manufacturer that the set is a structural property of persons, ...
.... When the set . Carry the LCD Projection TV in the specified manner If you carry the LCD Projection TV in a manner other strong illumination shines on the place you install the LCD projection TV. 7 Projection lamp ❑ Your LCD projection TV uses a projection lamp as the original parts. Installation ❑...may be affected by your foot or fingers. For Safety Be careful when moving the LCD Projection TV When you place the LCD Projection TV in writing that he has used replacement parts specified by the manufacturer that the set is a structural property of persons, ...
Operating Instructions
Page 8
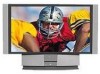
Contents Introducing the Sony LCD Projection TV Presenting the Sony LCD Projection TV 9 Using This Manual 10 Enjoying Your LCD Projection TV 11 Replacing the Lamp 13 Installing and Connecting the LCD Projection TV Contents 17 Inserting Batteries into the Remote Control ..........17 Carrying Your LCD Projection TV 18 To Prevent the LCD Projection TV from Falling Down 19 When Installing Your LCD Projection TV Against a Wall 19...
Contents Introducing the Sony LCD Projection TV Presenting the Sony LCD Projection TV 9 Using This Manual 10 Enjoying Your LCD Projection TV 11 Replacing the Lamp 13 Installing and Connecting the LCD Projection TV Contents 17 Inserting Batteries into the Remote Control ..........17 Carrying Your LCD Projection TV 18 To Prevent the LCD Projection TV from Falling Down 19 When Installing Your LCD Projection TV Against a Wall 19...
Operating Instructions
Page 9
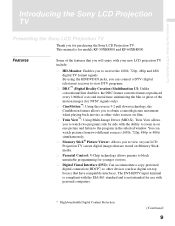
..., you can watch two programs side by side with your LCD Projection TV screen digital images that you will enjoy with the ability to zoom in the selected window. Introducing the Sony LCD Projection TV Introducing the Sony LCD Projection TV Presenting the Sony LCD Projection TV Thank you for use with personal computers. * High-bandwidth Digital Content Protection (Continued) 9 Features Some...
..., you can watch two programs side by side with your LCD Projection TV screen digital images that you will enjoy with the ability to zoom in the selected window. Introducing the Sony LCD Projection TV Introducing the Sony LCD Projection TV Presenting the Sony LCD Projection TV Thank you for use with personal computers. * High-bandwidth Digital Content Protection (Continued) 9 Features Some...
Operating Instructions
Page 10
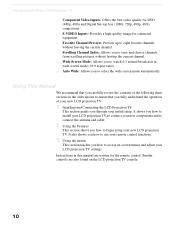
... in the order shown to ensure that you fully understand the operation of your new LCD projection TV. 1 Installing and Connecting the LCD Projection TV This section guides you how to begin using your initial setup. Instructions in this manual are also found on -screen menus and adjust ... 4:3 normal broadcasts in wide screen mode (16:9 aspect ratio). ❑ Auto Wide: Allows you how to access on the LCD projection TV console. 10 Introducing the Sony LCD Projection TV ❑ Component Video Inputs: Offers the best video quality for DVD (480p, 480i) and Digital Set-top box (1080i, 720p...
... in the order shown to ensure that you fully understand the operation of your new LCD projection TV. 1 Installing and Connecting the LCD Projection TV This section guides you how to begin using your initial setup. Instructions in this manual are also found on -screen menus and adjust ... 4:3 normal broadcasts in wide screen mode (16:9 aspect ratio). ❑ Auto Wide: Allows you how to access on the LCD projection TV console. 10 Introducing the Sony LCD Projection TV ❑ Component Video Inputs: Offers the best video quality for DVD (480p, 480i) and Digital Set-top box (1080i, 720p...
Operating Instructions
Page 11
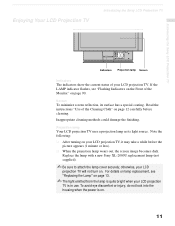
... is quite bright when your LCD projection TV. Projection lamp Your LCD projection TV uses a projection lamp as its surface has a special coating. Enjoying Your LCD Projection TV Introducing the Sony LCD Projection TV Introducing the Sony LCD Projection TV Indicators Projection lamp Screen Indicators The indicators show the current status of your LCD projection TV is on. 11 Read the instructions "Use of the Cleaning Cloth" on page...
... is quite bright when your LCD projection TV. Projection lamp Your LCD projection TV uses a projection lamp as its surface has a special coating. Enjoying Your LCD Projection TV Introducing the Sony LCD Projection TV Introducing the Sony LCD Projection TV Indicators Projection lamp Screen Indicators The indicators show the current status of your LCD projection TV is on. 11 Read the instructions "Use of the Cleaning Cloth" on page...
Operating Instructions
Page 12
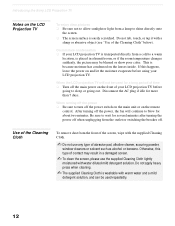
... for more than 7 days. Use of the Cleaning Cloth To remove dust from the outlet or switching the breaker off the power switch on the main unit or on and let the moisture evaporate before going out. Introducing the Sony LCD Projection TV Notes on the lenses inside.... Do not rub, touch, or tap it with a sharp or abrasive object (see "Use of your LCD projection TV before using your LCD projection TV is transported directly from a lamp to a warm location, ...
... for more than 7 days. Use of the Cleaning Cloth To remove dust from the outlet or switching the breaker off the power switch on the main unit or on and let the moisture evaporate before going out. Introducing the Sony LCD Projection TV Notes on the lenses inside.... Do not rub, touch, or tap it with a sharp or abrasive object (see "Use of your LCD projection TV before using your LCD projection TV is transported directly from a lamp to a warm location, ...
Operating Instructions
Page 13
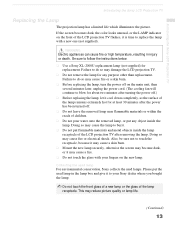
...lamp near flammable materials or within the reach of the lamp receptacle. Introducing the Sony LCD Projection TV Introducing the Sony LCD Projection TV Replacing the Lamp The projection lamp has a limited life which illuminates the picture. WARNING Electric appliances can cause ...fire or high temperature, resulting in the lamp box and give it is time to follow the instructions below. ❑ Use a Sony...
...lamp near flammable materials or within the reach of the lamp receptacle. Introducing the Sony LCD Projection TV Introducing the Sony LCD Projection TV Replacing the Lamp The projection lamp has a limited life which illuminates the picture. WARNING Electric appliances can cause ...fire or high temperature, resulting in the lamp box and give it is time to follow the instructions below. ❑ Use a Sony...
Operating Instructions
Page 15
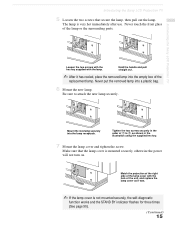
...6 Mount the new lamp. Make sure that secure the lamp, then pull out the lamp. The lamp is very hot immediately after use. Introducing the Sony LCD Projection TV Loosen the two screws with the hex key supplied with the hole of the replacement lamp. Never put the removed lamp into the lamp... receptacle. Introducing the Sony LCD Projection TV 5 Loosen the two screws that the lamp cover is not mounted securely, the self-diagnostic function works and the STAND BY indicator flashes...
...6 Mount the new lamp. Make sure that secure the lamp, then pull out the lamp. The lamp is very hot immediately after use. Introducing the Sony LCD Projection TV Loosen the two screws with the hex key supplied with the hole of the replacement lamp. Never put the removed lamp into the lamp... receptacle. Introducing the Sony LCD Projection TV 5 Loosen the two screws that the lamp cover is not mounted securely, the self-diagnostic function works and the STAND BY indicator flashes...
Operating Instructions
Page 17
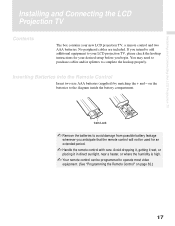
...or placing it in direct sunlight, near a heater, or where the humidity is high. ✍ Your remote control can be used for your new LCD projection TV, a remote control and two AAA batteries. Inserting Batteries into the Remote Control Insert two size AAA batteries (supplied) by matching ...you intend to add additional equipment to the diagram inside the battery compartment. Installing and Connecting the LCD Projection TV Installing and Connecting the LCD Projection TV Contents The box contains your desired setup before you anticipate that the remote control will not be programmed ...
...or placing it in direct sunlight, near a heater, or where the humidity is high. ✍ Your remote control can be used for your new LCD projection TV, a remote control and two AAA batteries. Inserting Batteries into the Remote Control Insert two size AAA batteries (supplied) by matching ...you intend to add additional equipment to the diagram inside the battery compartment. Installing and Connecting the LCD Projection TV Installing and Connecting the LCD Projection TV Contents The box contains your desired setup before you anticipate that the remote control will not be programmed ...

Operating Instructions
Page 19
... onto or push the LCD projection TV or its stand, it to children around the LCD projection TV. Bracket with the screw Using the LCD projection TV stand with support belts ❑ You can also use the LCD projection TV stand SU-GW1 (not supplied) with the screws (supplied) to the upper rear sides of the LCD projection TV (left and right sides...
... onto or push the LCD projection TV or its stand, it to children around the LCD projection TV. Bracket with the screw Using the LCD projection TV stand with support belts ❑ You can also use the LCD projection TV stand SU-GW1 (not supplied) with the screws (supplied) to the upper rear sides of the LCD projection TV (left and right sides...

Operating Instructions
Page 21
Pressing MENU brings up the on -screen cursor in the menus and by pressing the button selects the menu item. Installing and Connecting the LCD Projection TV How to the on-screen menus without the use of a remote control. Installing and Connecting the LCD Projection TV LCD Projection TV Controls and Connectors Front Panel Menu Controls The front panel menu controls allow access to open and close the front panel To open To close OPEN (Continued) 21 The arrow buttons move the on -screen menus.
Pressing MENU brings up the on -screen cursor in the menus and by pressing the button selects the menu item. Installing and Connecting the LCD Projection TV How to the on-screen menus without the use of a remote control. Installing and Connecting the LCD Projection TV LCD Projection TV Controls and Connectors Front Panel Menu Controls The front panel menu controls allow access to open and close the front panel To open To close OPEN (Continued) 21 The arrow buttons move the on -screen menus.
Operating Instructions
Page 23
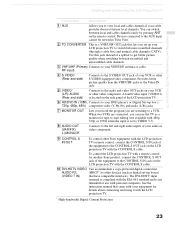
...view local and cable channels if your equipment for details about connecting and using it with the LCD projection TV. * High-bandwidth Digital Content Protection 23 To control the LCD projection TV with a remote control for another Sony product, connect the CONTROL S OUT jack of the equipment to the...interfaces. Provides better picture quality than the VHF/UHF jacks or the Video IN jack. 5 VIDEO/ (L/R) AUDIO (Rear and side) Connects to a VCR. You can use with personal computers. A fourth video input (VIDEO 2) is compliant with your cable provider does not feature local ...
...view local and cable channels if your equipment for details about connecting and using it with the LCD projection TV. * High-bandwidth Digital Content Protection 23 To control the LCD projection TV with a remote control for another Sony product, connect the CONTROL S OUT jack of the equipment to the...interfaces. Provides better picture quality than the VHF/UHF jacks or the Video IN jack. 5 VIDEO/ (L/R) AUDIO (Rear and side) Connects to a VCR. You can use with personal computers. A fourth video input (VIDEO 2) is compliant with your cable provider does not feature local ...
Operating Instructions
Page 24
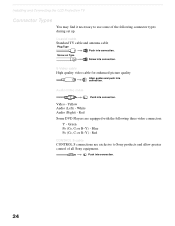
...use some of all Sony equipment. Yellow Audio (Left) - Coaxial cable Standard TV cable and antenna cable Plug Type Push into connection. 24 Green PB (CB, Cb or B-Y) - Red CONTROL S cable CONTROL S connections are equipped with the following connector types during set up. Blue PR (CR, Cr or R-Y) - Installing and Connecting the LCD Projection TV... Connector Types You may find it necessary to Sony products and allow greater control of the following three video connectors: Y - Push into...
...use some of all Sony equipment. Yellow Audio (Left) - Coaxial cable Standard TV cable and antenna cable Plug Type Push into connection. 24 Green PB (CB, Cb or B-Y) - Red CONTROL S cable CONTROL S connections are equipped with the following connector types during set up. Blue PR (CR, Cr or R-Y) - Installing and Connecting the LCD Projection TV... Connector Types You may find it necessary to Sony products and allow greater control of the following three video connectors: Y - Push into...

Operating Instructions
Page 25
... VHF/UHF 300-ohm twin lead cable Rear of LCD projection TV VHF/UHF Antenna connector C VHF and UHF 75-ohm coaxial cable 300-ohm twin lead cable U/V Splitter (not supplied) Rear of LCD projection TV VHF/UHF ✍ It is highly recommended to connect the antenna using a 75-ohm coaxial cable to Cable ...or an Antenna The connection you use a 300-ohm twin lead cable, keep it away as far as ...
... VHF/UHF 300-ohm twin lead cable Rear of LCD projection TV VHF/UHF Antenna connector C VHF and UHF 75-ohm coaxial cable 300-ohm twin lead cable U/V Splitter (not supplied) Rear of LCD projection TV VHF/UHF ✍ It is highly recommended to connect the antenna using a 75-ohm coaxial cable to Cable ...or an Antenna The connection you use a 300-ohm twin lead cable, keep it away as far as ...

Operating Instructions
Page 26
...this setup you can: ❑ Use the LCD projection TV remote control to change channels using your cable box when the signal is scrambled. ❑ Use the LCD projection TV remote control to change channels using your LCD projection TV when the signal is sent to the LCD projection TV, so you may find this ... you need for your cable box.) 1 Connect the Cable TV cable to the LCD projection TV's VHF/UHF jack. 2 Using a coaxial cable, connect the LCD projection TV's TO CONVERTER jack to the cable box's IN jack. The LCD projection TV's internal converter allows you need to turn your Cable to ...
...this setup you can: ❑ Use the LCD projection TV remote control to change channels using your cable box when the signal is scrambled. ❑ Use the LCD projection TV remote control to change channels using your LCD projection TV when the signal is sent to the LCD projection TV, so you may find this ... you need for your cable box.) 1 Connect the Cable TV cable to the LCD projection TV's VHF/UHF jack. 2 Using a coaxial cable, connect the LCD projection TV's TO CONVERTER jack to the cable box's IN jack. The LCD projection TV's internal converter allows you need to turn your Cable to ...
Operating Instructions
Page 27
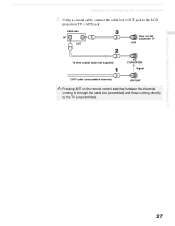
Installing and Connecting the LCD Projection TV Installing and Connecting the LCD Projection TV 3 Using a coaxial cable, connect the cable box's OUT jack to the TV (unscrambled). 27 Cable box IN OUT Rear of LCD projection TV AUX 75-ohm coaxial cable (not supplied) TO CONVERTER Signal CATV cable (unscrambled channels) VHF/UHF ✍ Pressing ANT on the remote control switches between the channels coming in through the cable box (scrambled) and those coming directly to the LCD projection TV's AUX jack.
Installing and Connecting the LCD Projection TV Installing and Connecting the LCD Projection TV 3 Using a coaxial cable, connect the cable box's OUT jack to the TV (unscrambled). 27 Cable box IN OUT Rear of LCD projection TV AUX 75-ohm coaxial cable (not supplied) TO CONVERTER Signal CATV cable (unscrambled channels) VHF/UHF ✍ Pressing ANT on the remote control switches between the channels coming in through the cable box (scrambled) and those coming directly to the LCD projection TV's AUX jack.


