
Operating Instructions
Page 3
...prevent internal heat buildup, do not expose the screen to a warm location, or if the room temperature changes suddenly, the picture may be using the LCD Projection TV for several days, disconnect the power by pulling the plug itself. In this product meets the ENERGY STAR® guidelines for...best picture, do not block the ventilation openings. ❑ Do not install the LCD Projection TV in a hot or humid place, or in a room where the floor and walls are trademarks of a reflective material. Patent No. 4,638,258 and 4,482,866. 3 As an ENERGY STAR® Partner, Sony Corporation...
...prevent internal heat buildup, do not expose the screen to a warm location, or if the room temperature changes suddenly, the picture may be using the LCD Projection TV for several days, disconnect the power by pulling the plug itself. In this product meets the ENERGY STAR® guidelines for...best picture, do not block the ventilation openings. ❑ Do not install the LCD Projection TV in a hot or humid place, or in a room where the floor and walls are trademarks of a reflective material. Patent No. 4,638,258 and 4,482,866. 3 As an ENERGY STAR® Partner, Sony Corporation...
Operating Instructions
Page 5
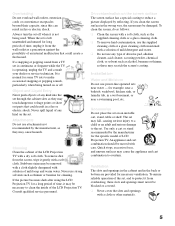
... out parts that could result in a wet basement, or near water - Stubborn stains may be moved with a solution of LCD Projection TV. The set through the cabinet slots as these slots and openings must never be damaged. Object and Liquid Entry Never push objects of...child or an adult and serious damage to make occasional snapping or popping sounds, particularly when being used. If the picture becomes dark after using the LCD Projection TV for cleaning. Consult qualified service personnel. for necessary ventilation. Accessories Do not place the set on the set . ...
... out parts that could result in a wet basement, or near water - Stubborn stains may be moved with a solution of LCD Projection TV. The set through the cabinet slots as these slots and openings must never be damaged. Object and Liquid Entry Never push objects of...child or an adult and serious damage to make occasional snapping or popping sounds, particularly when being used. If the picture becomes dark after using the LCD Projection TV for cleaning. Consult qualified service personnel. for necessary ventilation. Accessories Do not place the set on the set . ...
Operating Instructions
Page 7
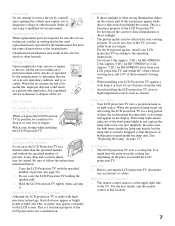
For Safety Be careful when moving the LCD Projection TV When you place the LCD Projection TV in position, be caused. Sit at least 1.8m (approx. 5.9ft.) for KF-42WE610, 2.0m (approx. 6.6ft.) for KF-50WE610 or 2.2m (approx. 7.2ft.) for a long period of time, the screen image...lamp unit noisily, but the lamp unit is in a picture tube implosion. About the LCD Projection TV Although the LCD projection TV is at this location. 7 This is not a malfunction. Projection lamp ❑ Your LCD projection TV uses a projection lamp as its useful life, improper disposal could result in...
For Safety Be careful when moving the LCD Projection TV When you place the LCD Projection TV in position, be caused. Sit at least 1.8m (approx. 5.9ft.) for KF-42WE610, 2.0m (approx. 6.6ft.) for KF-50WE610 or 2.2m (approx. 7.2ft.) for a long period of time, the screen image...lamp unit noisily, but the lamp unit is in a picture tube implosion. About the LCD Projection TV Although the LCD projection TV is at this location. 7 This is not a malfunction. Projection lamp ❑ Your LCD projection TV uses a projection lamp as its useful life, improper disposal could result in...
Operating Instructions
Page 9
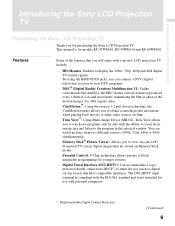
... standard and is for purchasing the Sony LCD Projection TV. Features Some of the motion images (for 480i signals only). ❑ CineMotion™: Using the reverse 3-2 pull down technology, the CineMotion feature allows you to obtain a smooth picture movement when playing back movies or ... connection (HDCP*) to other video sources on one picture and listen to watch pictures from two different sources (1080i, 720p, 480p or 480i) simultaneously. ❑ Memory Stick® Picture Viewer: Allows you for models KF-42WE610, KF-50WE610 and KF-60WE610. By using the HD/DVD IN jacks, ...
... standard and is for purchasing the Sony LCD Projection TV. Features Some of the motion images (for 480i signals only). ❑ CineMotion™: Using the reverse 3-2 pull down technology, the CineMotion feature allows you to obtain a smooth picture movement when playing back movies or ... connection (HDCP*) to other video sources on one picture and listen to watch pictures from two different sources (1080i, 720p, 480p or 480i) simultaneously. ❑ Memory Stick® Picture Viewer: Allows you for models KF-42WE610, KF-50WE610 and KF-60WE610. By using the HD/DVD IN jacks, ...
Operating Instructions
Page 11
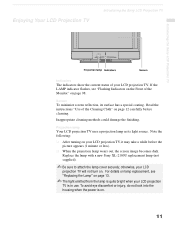
...picture appears (1 minute or less). ❑ When the projection lamp wears out, the screen image becomes dark. Read the instructions "Use of the Cleaning Cloth" on page 13. ✍ The light emitted from the lamp is quite bright when your LCD projection TV. Projection lamp Your LCD projection TV uses a projection... lamp as its surface has a special coating. Enjoying Your LCD Projection TV Introducing the Sony LCD Projection TV Introducing the Sony LCD Projection TV Projection lamp Indicators ...
...picture appears (1 minute or less). ❑ When the projection lamp wears out, the screen image becomes dark. Read the instructions "Use of the Cleaning Cloth" on page 13. ✍ The light emitted from the lamp is quite bright when your LCD projection TV. Projection lamp Your LCD projection TV uses a projection... lamp as its surface has a special coating. Enjoying Your LCD Projection TV Introducing the Sony LCD Projection TV Introducing the Sony LCD Projection TV Projection lamp Indicators ...
Operating Instructions
Page 12
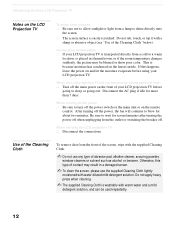
...idle for a long period of time ❑ Turn off the main power on the front of your LCD projection TV is placed in a humid room, or if the room temperature changes suddenly, the picture may result in a damaged screen. ✍ To clean the screen, please use any type of the screen... for about two minutes. Do not rub, touch, or tap it with water diluted mild detergent solution. Introducing the Sony LCD Projection TV Notes on the LCD Projection TV To enjoy clear pictures ❑ Be sure not to allow sunlight or light from the outlet or switching the breaker off. After turning off...
...idle for a long period of time ❑ Turn off the main power on the front of your LCD projection TV is placed in a humid room, or if the room temperature changes suddenly, the picture may result in a damaged screen. ✍ To clean the screen, please use any type of the screen... for about two minutes. Do not rub, touch, or tap it with water diluted mild detergent solution. Introducing the Sony LCD Projection TV Notes on the LCD Projection TV To enjoy clear pictures ❑ Be sure not to allow sunlight or light from the outlet or switching the breaker off. After turning off...
Operating Instructions
Page 13
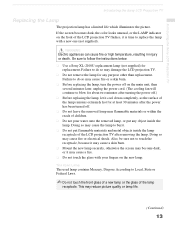
... lamp. Also, be sure not to blow for at least 30 minutes after removing the lamp. Introducing the Sony LCD Projection TV Introducing the Sony LCD Projection TV Replacing the Lamp The projection lamp has a limited life which illuminates the picture. WARNING Electric appliances can cause fire or high temperature, resulting in injury or death. This may cause...
... lamp. Also, be sure not to blow for at least 30 minutes after removing the lamp. Introducing the Sony LCD Projection TV Introducing the Sony LCD Projection TV Replacing the Lamp The projection lamp has a limited life which illuminates the picture. WARNING Electric appliances can cause fire or high temperature, resulting in injury or death. This may cause...
Operating Instructions
Page 14
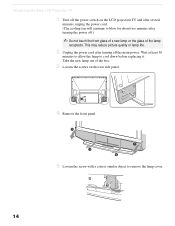
Introducing the Sony LCD Projection TV 1 Turn off the power switch on the rear side panel. 4 Remove the front panel. 5 Loosen the screw with a coin or similar object to remove the lamp cover. 14 Take the new lamp out of the lamp receptacle. This may reduce picture quality or lamp life. 2 Unplug the power cord after... after turning off .) ✍ Do not touch the front glass of a new lamp or the glass of the box. 3 Loosen the screws on the LCD projection TV and after several minutes, unplug the power cord. (The cooling fan will continue to cool down before replacing it.
Introducing the Sony LCD Projection TV 1 Turn off the power switch on the rear side panel. 4 Remove the front panel. 5 Loosen the screw with a coin or similar object to remove the lamp cover. 14 Take the new lamp out of the lamp receptacle. This may reduce picture quality or lamp life. 2 Unplug the power cord after... after turning off .) ✍ Do not touch the front glass of a new lamp or the glass of the box. 3 Loosen the screws on the LCD projection TV and after several minutes, unplug the power cord. (The cooling fan will continue to cool down before replacing it.
Operating Instructions
Page 20
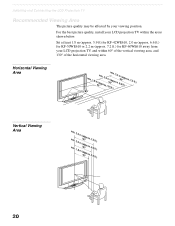
Sit at least 1.8 m (approx. 5.9 ft) for KF-42WE610, 2.0 m (approx. 6.6 ft.) for KF-50WE610 or 2.2 m (approx. 7.2 ft.) for KF-60WE610 away from your LCD projection TV within 60° of the vertical viewing area, and 130° of the horizontal viewing area. Horizontal Viewing Area min....1.8 m m m (6a0p"prox. (5a0p"prox. (4a02p"prox. 7.2 6.6 5.9 ft.) ft.) ft.) 30˚ 30˚ 20 For the best picture quality, install your LCD projection TV, and within the areas shown below. min. 2.2 m50(a"pprox. 5.9 ft.) m60(a"pprox. 6.6 ft.) 7.2 ft.) 65˚ 65˚ Vertical Viewing ...
Sit at least 1.8 m (approx. 5.9 ft) for KF-42WE610, 2.0 m (approx. 6.6 ft.) for KF-50WE610 or 2.2 m (approx. 7.2 ft.) for KF-60WE610 away from your LCD projection TV within 60° of the vertical viewing area, and 130° of the horizontal viewing area. Horizontal Viewing Area min....1.8 m m m (6a0p"prox. (5a0p"prox. (4a02p"prox. 7.2 6.6 5.9 ft.) ft.) ft.) 30˚ 30˚ 20 For the best picture quality, install your LCD projection TV, and within the areas shown below. min. 2.2 m50(a"pprox. 5.9 ft.) m60(a"pprox. 6.6 ft.) 7.2 ft.) 65˚ 65˚ Vertical Viewing ...
Operating Instructions
Page 23
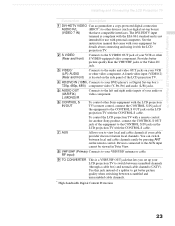
...) L (MONO)/R Connects to the left and right audio inputs of your audio or video component. 6 CONTROL S IN/OUT To control other Sony equipment with the LCD projection TV's remote control, connect the CONTROL S IN jack of the equipment to the S VIDEO OUT jack of your VCR or other S VIDEO-equipped ...channels easily by pressing ANT on the remote control. Provides better picture quality than the VHF/UHF jacks or the Video IN jack. 3 VIDEO/ (L/R) AUDIO (Rear and front) Connects to other devices (such as digital set up your LCD projection TV to your VHF/UHF antenna or cable. To control the LCD...
...) L (MONO)/R Connects to the left and right audio inputs of your audio or video component. 6 CONTROL S IN/OUT To control other Sony equipment with the LCD projection TV's remote control, connect the CONTROL S IN jack of the equipment to the S VIDEO OUT jack of your VCR or other S VIDEO-equipped ...channels easily by pressing ANT on the remote control. Provides better picture quality than the VHF/UHF jacks or the Video IN jack. 3 VIDEO/ (L/R) AUDIO (Rear and front) Connects to other devices (such as digital set up your LCD projection TV to your VHF/UHF antenna or cable. To control the LCD...
Operating Instructions
Page 24
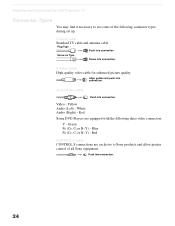
...picture quality Align guides and push into connection. 24 Blue PR (CR, Cr or R-Y) - Red CONTROL S cable CONTROL S connections are equipped with the following connector types during set up. Audio/Video cable Push into connection. Video - Yellow Audio (Left) - Installing and Connecting the LCD Projection TV... Connector Types You may find it necessary to Sony products and allow greater control of the following three video connectors: Y - Red Some DVD Players are ...
...picture quality Align guides and push into connection. 24 Blue PR (CR, Cr or R-Y) - Red CONTROL S cable CONTROL S connections are equipped with the following connector types during set up. Audio/Video cable Push into connection. Video - Yellow Audio (Left) - Installing and Connecting the LCD Projection TV... Connector Types You may find it necessary to Sony products and allow greater control of the following three video connectors: Y - Red Some DVD Players are ...
Operating Instructions
Page 25
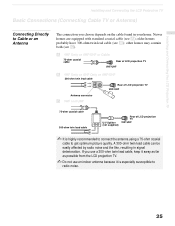
...(see B); If you choose depends on the cable found in signal deterioration. Installing and Connecting the LCD Projection TV Installing and Connecting the LCD Projection TV Basic Connections (Connecting Cable TV or Antenna) Connecting Directly to Cable or an Antenna The connection you use a 300-ohm twin lead cable... C VHF and UHF 75-ohm coaxial cable 300-ohm twin lead cable U/V Splitter (not supplied) Rear of LCD projection TV VHF/UHF ✍ It is especially susceptible to get optimum picture quality. A 300-ohm twin lead cable can be easily affected by radio noise and the like, ...
...(see B); If you choose depends on the cable found in signal deterioration. Installing and Connecting the LCD Projection TV Installing and Connecting the LCD Projection TV Basic Connections (Connecting Cable TV or Antenna) Connecting Directly to Cable or an Antenna The connection you use a 300-ohm twin lead cable... C VHF and UHF 75-ohm coaxial cable 300-ohm twin lead cable U/V Splitter (not supplied) Rear of LCD projection TV VHF/UHF ✍ It is especially susceptible to get optimum picture quality. A 300-ohm twin lead cable can be easily affected by radio noise and the like, ...
Operating Instructions
Page 32
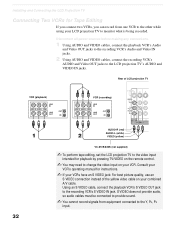
...and VIDEO IN jacks. Consult your VCR's operating manual for instructions. ✍ If your VCRs have an S VIDEO jack: For best picture quality, use an S VIDEO connection instead of LCD projection TV VCR (playback) VCR (recording) AUDIO-R (red) AUDIO-L (white) VIDEO (yellow) VC-810S/820S (not supplied) ✍ To ... on the remote control. ✍ You may need to change the video input on your combined A/V cable. Rear of the yellow video cable on your LCD projection TV to the Y, PB, PR input. 32 S VIDEO does not provide audio, so audio cables must be connected to provide sound. &#...
...and VIDEO IN jacks. Consult your VCR's operating manual for instructions. ✍ If your VCRs have an S VIDEO jack: For best picture quality, use an S VIDEO connection instead of LCD projection TV VCR (playback) VCR (recording) AUDIO-R (red) AUDIO-L (white) VIDEO (yellow) VC-810S/820S (not supplied) ✍ To ... on the remote control. ✍ You may need to change the video input on your combined A/V cable. Rear of the yellow video cable on your LCD projection TV to the Y, PB, PR input. 32 S VIDEO does not provide audio, so audio cables must be connected to provide sound. &#...
Operating Instructions
Page 38
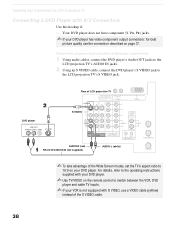
... 37. Disconnect all power sources before making any connections. 1 Using audio cables, connect the DVD player's Audio OUT jacks to the LCD projection TV's AUDIO IN jacks. 2 Using an S VIDEO cable, connect the DVD player's S VIDEO jack to 16:9 on your DVD player. Installing .... ✍ If your DVD player has video component output connectors: for best picture quality use a VIDEO cable (yellow) instead of the Wide Screen modes, set the TV's aspect ratio to the LCD projection TV's S VIDEO jack. Rear of LCD projection TV DVD player S VIDEO AUDIO-R (red) RK-C310/C320/C330 (not supplied) AUDIO...
... 37. Disconnect all power sources before making any connections. 1 Using audio cables, connect the DVD player's Audio OUT jacks to the LCD projection TV's AUDIO IN jacks. 2 Using an S VIDEO cable, connect the DVD player's S VIDEO jack to 16:9 on your DVD player. Installing .... ✍ If your DVD player has video component output connectors: for best picture quality use a VIDEO cable (yellow) instead of the Wide Screen modes, set the TV's aspect ratio to the LCD projection TV's S VIDEO jack. Rear of LCD projection TV DVD player S VIDEO AUDIO-R (red) RK-C310/C320/C330 (not supplied) AUDIO...
Operating Instructions
Page 39
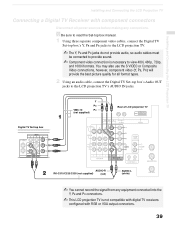
... LCD projection TV is necessary to the LCD projection TV's AUDIO IN jacks. Installing and Connecting the LCD Projection TV Installing and Connecting the LCD Projection TV Connecting a Digital TV Receiver with RGB or VGA output connectors. 39 You may also use the S VIDEO or Composite Video connections, however, component video (Y, PB, PR) will provide the best picture quality for...
... LCD projection TV is necessary to the LCD projection TV's AUDIO IN jacks. Installing and Connecting the LCD Projection TV Installing and Connecting the LCD Projection TV Connecting a Digital TV Receiver with RGB or VGA output connectors. 39 You may also use the S VIDEO or Composite Video connections, however, component video (Y, PB, PR) will provide the best picture quality for...

Operating Instructions
Page 44
... 5 JUMP 6 FAVORITES 7 V/v/B/b 8 FUNCTION 9 X/x/m/B/ M/z q; Also available in the Video menu. When the menu is displayed, move the on page 50. Description Press to operate. Press again or press VOL + to restore the picture. The LCD projection TV alternates between two channels. For details, see "Using Favorite Channels" on /off the VCR or DVD player. Adjusts...
... 5 JUMP 6 FAVORITES 7 V/v/B/b 8 FUNCTION 9 X/x/m/B/ M/z q; Also available in the Video menu. When the menu is displayed, move the on page 50. Description Press to operate. Press again or press VOL + to restore the picture. The LCD projection TV alternates between two channels. For details, see "Using Favorite Channels" on /off the VCR or DVD player. Adjusts...
Operating Instructions
Page 45
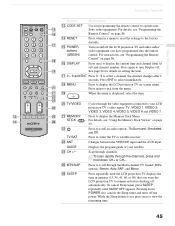
...when in minutes (15, 30, 45, 60, or 90) that you have programmed into the remote control. qk MENU Press to display the LCD projection TV on page 55. For details, see "Using the Memory Stick Viewer" on -screen menu. While the Sleep feature is displayed, select the item.... repeatedly until the LCD projection TV displays the time in a menu to reset the settings to view the remaining time. 45 Using the Features VCR/ MUTING DVD SAT/ CABLE POWER MODE PICTURE WIDE DISPLAY JUMP FAVORITES ENT MENU VCR/DVD SAT/ CABLE TV FUNCTION TV/VIDEO FREEZE /TV/SAT ANT VOL GUIDE CH...
...when in minutes (15, 30, 45, 60, or 90) that you have programmed into the remote control. qk MENU Press to display the LCD projection TV on page 55. For details, see "Using the Memory Stick Viewer" on -screen menu. While the Sleep feature is displayed, select the item.... repeatedly until the LCD projection TV displays the time in a menu to reset the settings to view the remaining time. 45 Using the Features VCR/ MUTING DVD SAT/ CABLE POWER MODE PICTURE WIDE DISPLAY JUMP FAVORITES ENT MENU VCR/DVD SAT/ CABLE TV FUNCTION TV/VIDEO FREEZE /TV/SAT ANT VOL GUIDE CH...
Operating Instructions
Page 46
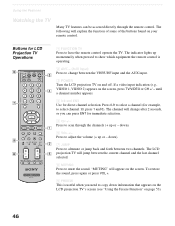
... number appears. 4 0-9 and ENT Use for LCD Projection TV Operations VCR/ MUTING DVD SAT/ CABLE POWER MODE PICTURE WIDE DISPLAY JUMP FAVORITES ENT MENU VCR/DVD SAT/ CABLE TV FUNCTION TV/VIDEO FREEZE /TV/SAT ANT VOL GUIDE CH CODE SET RESET SLEEP MTS/SAP TV RM-Y913 1 FUNCTION TV Press to mute the sound. The channel will...
... number appears. 4 0-9 and ENT Use for LCD Projection TV Operations VCR/ MUTING DVD SAT/ CABLE POWER MODE PICTURE WIDE DISPLAY JUMP FAVORITES ENT MENU VCR/DVD SAT/ CABLE TV FUNCTION TV/VIDEO FREEZE /TV/SAT ANT VOL GUIDE CH CODE SET RESET SLEEP MTS/SAP TV RM-Y913 1 FUNCTION TV Press to mute the sound. The channel will...

Operating Instructions
Page 47
...label (if set). Cancel by pressing SLEEP until the LCD projection TV displays the approximate time in the Setup menu, your taste. If you want the LCD projection TV to display a standard picture for enhanced picture contrast and sharpness. qd MTS/SAP Press to scroll through ...available video inputs: TV, VIDEO 1, VIDEO 2, VIDEO 3, VIDEO 4, VIDEO 5, VIDEO 6 and VIDEO 7. qf PICTURE MODE Press PICTURE MODE repeatedly to directly choose one...
...label (if set). Cancel by pressing SLEEP until the LCD projection TV displays the approximate time in the Setup menu, your taste. If you want the LCD projection TV to display a standard picture for enhanced picture contrast and sharpness. qd MTS/SAP Press to scroll through ...available video inputs: TV, VIDEO 1, VIDEO 2, VIDEO 3, VIDEO 4, VIDEO 5, VIDEO 6 and VIDEO 7. qf PICTURE MODE Press PICTURE MODE repeatedly to directly choose one...
Operating Instructions
Page 50
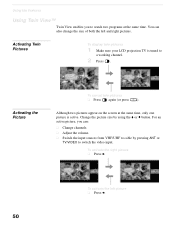
... the left picture ❑ Press B. 50 Activating the Picture To cancel twin pictures ❑ Press again (or press ). To activate the left and right pictures. For an active picture, you to switch the video input. To activate the right picture ❑ Press b. Activating Twin Pictures To display twin pictures 1 Make sure your LCD projection TV is active. Although two pictures appear on...
... the left picture ❑ Press B. 50 Activating the Picture To cancel twin pictures ❑ Press again (or press ). To activate the left and right pictures. For an active picture, you to switch the video input. To activate the right picture ❑ Press b. Activating Twin Pictures To display twin pictures 1 Make sure your LCD projection TV is active. Although two pictures appear on...


