Operating Instructions
Page 2
... extension cord, receptacle or other than private viewing of programs broadcast on UHF, VHF, transmitted by one or more of the following measures: ❑ Reorient or relocate the receiving antennas. ❑ Increase the separation between the equipment and receiver. ❑ Connect the equipment into an outlet on Caption Vision This television receiver provides display of television closed captioning in accordance with the instruction manual. 2 Use of this television receiver...
... extension cord, receptacle or other than private viewing of programs broadcast on UHF, VHF, transmitted by one or more of the following measures: ❑ Reorient or relocate the receiving antennas. ❑ Increase the separation between the equipment and receiver. ❑ Connect the equipment into an outlet on Caption Vision This television receiver provides display of television closed captioning in accordance with the instruction manual. 2 Use of this television receiver...
Operating Instructions
Page 4
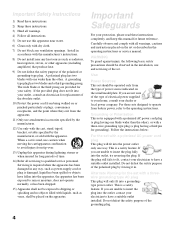
... installed. If you are unable to the operating instructions. Do not defeat the safety purpose of the set with a polarized AC power cord plug This plug will only fit into the outlet, contact your protection, please read these instructions. 3) Heed all warnings. 4) Follow all instructions. 5) Do not use attachments/accessories specified by the manufacturer. 12) Use only with the cart, stand...
... installed. If you are unable to the operating instructions. Do not defeat the safety purpose of the set with a polarized AC power cord plug This plug will only fit into the outlet, contact your protection, please read these instructions. 3) Heed all warnings. 4) Follow all instructions. 5) Do not use attachments/accessories specified by the manufacturer. 12) Use only with the cart, stand...
Operating Instructions
Page 6
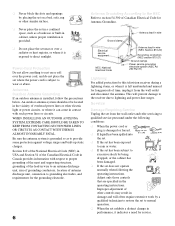
... conditions: ❑ When the power cord or plug is subject to normal operation. ❑ When the set from the wall outlet and disconnect the antenna. Service Damage Requiring Service Unplug the set exhibits a distinct change in the operating instructions. An outdoor antenna system should not be located in the vicinity of other electric light or power circuits, or where it can come in contact with respect...
... conditions: ❑ When the power cord or plug is subject to normal operation. ❑ When the set from the wall outlet and disconnect the antenna. Service Damage Requiring Service Unplug the set exhibits a distinct change in the operating instructions. An outdoor antenna system should not be located in the vicinity of other electric light or power circuits, or where it can come in contact with respect...
Operating Instructions
Page 7
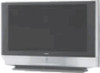
... or cables. Watch your LCD projection TV according to the operating instructions. Sit at least 10 cm (4 inches) from behind the screen. When the set reaches the end of broken glass remain inside the lamp unit noisily, but the lamp unit is at this location. 7 Unauthorized substitutions may result in a picture tube implosion. For the best results, aim the remote control at the upper right side of light (red, blue, or green...
... or cables. Watch your LCD projection TV according to the operating instructions. Sit at least 10 cm (4 inches) from behind the screen. When the set reaches the end of broken glass remain inside the lamp unit noisily, but the lamp unit is at this location. 7 Unauthorized substitutions may result in a picture tube implosion. For the best results, aim the remote control at the upper right side of light (red, blue, or green...
Operating Instructions
Page 8
... Overview 68 Using the Video Menu 69 Using the Audio Menu 72 Using the Screen Menu 74 Using the Channel Menu 76 Using the Parent Menu 78 Using the Setup Menu 82 Other Information Programming the Remote Control 86 Operating Other Components with Your LCD Projection TV Remote Control 88 Notes on Using Memory Stick, Memory Stick PRO Media 90 Notes on Using Memory Stick Duo 91 Contacting Sony 92 Troubleshooting 92 Flashing Indicators on the Front of the Monitor....98 Specifications 99 8
... Overview 68 Using the Video Menu 69 Using the Audio Menu 72 Using the Screen Menu 74 Using the Channel Menu 76 Using the Parent Menu 78 Using the Setup Menu 82 Other Information Programming the Remote Control 86 Operating Other Components with Your LCD Projection TV Remote Control 88 Notes on Using Memory Stick, Memory Stick PRO Media 90 Notes on Using Memory Stick Duo 91 Contacting Sony 92 Troubleshooting 92 Flashing Indicators on the Front of the Monitor....98 Specifications 99 8
Operating Instructions
Page 10
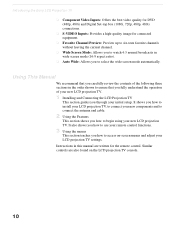
... adjust your initial setup. Using This Manual We recommend that you carefully review the contents of the following three sections in wide screen mode (16:9 aspect ratio). ❑ Auto Wide: Allows you how to use your remote control functions. 3 Using the menus This section teaches you through your LCD projection TV settings. It also shows you how to begin using your new LCD projection TV. Introducing the Sony LCD Projection TV ❑ Component Video Inputs: Offers the best video...
... adjust your initial setup. Using This Manual We recommend that you carefully review the contents of the following three sections in wide screen mode (16:9 aspect ratio). ❑ Auto Wide: Allows you how to use your remote control functions. 3 Using the menus This section teaches you through your LCD projection TV settings. It also shows you how to begin using your new LCD projection TV. Introducing the Sony LCD Projection TV ❑ Component Video Inputs: Offers the best video...
Operating Instructions
Page 14
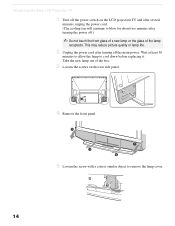
... the Sony LCD Projection TV 1 Turn off the power switch on the rear side panel. 4 Remove the front panel. 5 Loosen the screw with a coin or similar object to remove the lamp cover. 14 Take the new lamp out of the lamp receptacle. This may reduce picture quality or lamp life. 2 Unplug the power cord after turning off .) ✍ Do not touch the front glass of a new lamp or the glass of the box...
... the Sony LCD Projection TV 1 Turn off the power switch on the rear side panel. 4 Remove the front panel. 5 Loosen the screw with a coin or similar object to remove the lamp cover. 14 Take the new lamp out of the lamp receptacle. This may reduce picture quality or lamp life. 2 Unplug the power cord after turning off .) ✍ Do not touch the front glass of a new lamp or the glass of the box...
Operating Instructions
Page 20
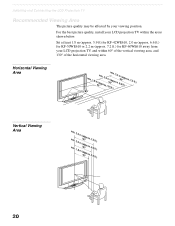
....) 7.2 ft.) 65˚ 65˚ Vertical Viewing Area min. For the best picture quality, install your viewing position. min. 2.2 2.0 1.8 m m m (6a0p"prox. (5a0p"prox. (4a02p"prox. 7.2 6.6 5.9 ft.) ft.) ft.) 30˚ 30˚ 20 Sit at least 1.8 m (approx. 5.9 ft) for KF-42WE610, 2.0 m (approx. 6.6 ft.) for KF-50WE610 or 2.2 m (approx. 7.2 ft.) for KF-60WE610 away from your LCD projection TV, and within the areas shown...
....) 7.2 ft.) 65˚ 65˚ Vertical Viewing Area min. For the best picture quality, install your viewing position. min. 2.2 2.0 1.8 m m m (6a0p"prox. (5a0p"prox. (4a02p"prox. 7.2 6.6 5.9 ft.) ft.) ft.) 30˚ 30˚ 20 Sit at least 1.8 m (approx. 5.9 ft) for KF-42WE610, 2.0 m (approx. 6.6 ft.) for KF-50WE610 or 2.2 m (approx. 7.2 ft.) for KF-60WE610 away from your LCD projection TV, and within the areas shown...
Operating Instructions
Page 23
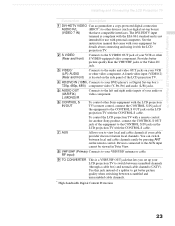
...3 VIDEO/ (L/R) AUDIO (Rear and front) Connects to the audio and video OUT jacks on your VHF/UHF antenna or cable. RF input) 9 TO CONVERTER This is a VHF/UHF OUT jack that have compatible interfaces. Installing and Connecting the LCD Projection TV Installing and Connecting the LCD Projection TV Connection Description 1 DVI-HDTV VIDEO Can accommodate a copy-protected digital connection AUDIO R/L (HDCP*) to other devices (such as digital set up your audio or video component. 6 CONTROL S IN/OUT To control other Sony equipment with the LCD projection TV's remote control, connect...
...3 VIDEO/ (L/R) AUDIO (Rear and front) Connects to the audio and video OUT jacks on your VHF/UHF antenna or cable. RF input) 9 TO CONVERTER This is a VHF/UHF OUT jack that have compatible interfaces. Installing and Connecting the LCD Projection TV Installing and Connecting the LCD Projection TV Connection Description 1 DVI-HDTV VIDEO Can accommodate a copy-protected digital connection AUDIO R/L (HDCP*) to other devices (such as digital set up your audio or video component. 6 CONTROL S IN/OUT To control other Sony equipment with the LCD projection TV's remote control, connect...
Operating Instructions
Page 38
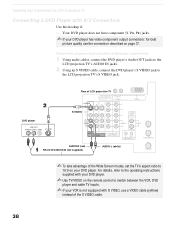
... your DVD player. Rear of LCD projection TV DVD player S VIDEO AUDIO-R (red) RK-C310/C320/C330 (not supplied) AUDIO-L (white) ✍ To take advantage of the S VIDEO cable. 38 Installing and Connecting the LCD Projection TV Connecting a DVD Player with S VIDEO, use a VIDEO cable (yellow) instead of the Wide Screen modes, set the TV's aspect ratio to 16:9 on your DVD player has video component output connectors: for best picture quality use the connection described on the remote control to the LCD projection TV's S VIDEO jack. For details, refer to the operating instructions...
... your DVD player. Rear of LCD projection TV DVD player S VIDEO AUDIO-R (red) RK-C310/C320/C330 (not supplied) AUDIO-L (white) ✍ To take advantage of the S VIDEO cable. 38 Installing and Connecting the LCD Projection TV Connecting a DVD Player with S VIDEO, use a VIDEO cable (yellow) instead of the Wide Screen modes, set the TV's aspect ratio to 16:9 on your DVD player has video component output connectors: for best picture quality use the connection described on the remote control to the LCD projection TV's S VIDEO jack. For details, refer to the operating instructions...
Operating Instructions
Page 45
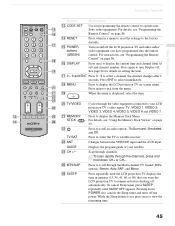
... 84 for programming the remote control to scroll an audio option: TruSurround, Simulated, and Off. Press again to view the remaining time. 45 Using the Features wg MTS/SAP wh SLEEP Cycles through channels. For details, see "Programming the Remote Control" on page 86. Changes between the VHF/UHF input and the AUX input. Displays the program guide of your LCD projection TV's video inputs: TV, VIDEO 1, VIDEO 2, VIDEO 3, VIDEO 4, VIDEO 5, VIDEO 6 and VIDEO 7. Scan through the video equipment connected to the factory defaults...
... 84 for programming the remote control to scroll an audio option: TruSurround, Simulated, and Off. Press again to view the remaining time. 45 Using the Features wg MTS/SAP wh SLEEP Cycles through channels. For details, see "Programming the Remote Control" on page 86. Changes between the VHF/UHF input and the AUX input. Displays the program guide of your LCD projection TV's video inputs: TV, VIDEO 1, VIDEO 2, VIDEO 3, VIDEO 4, VIDEO 5, VIDEO 6 and VIDEO 7. Scan through the video equipment connected to the factory defaults...
Operating Instructions
Page 94
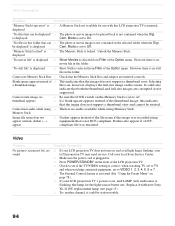
... (See "Using the Parent Menu" on page 78.). ❏ If your LCD projection TV's power is on the Memory Stick is set to off. ❏ If a blank square appears instead of the LCD projection TV. ❏ Check to be station trouble. 94 Cannot rotate image, no sound Possible Remedies ❏ If your LCD projection TV does not turn on, and a red light keeps flashing, your local Sony Service Center. ❏ Make sure the power cord is...
... (See "Using the Parent Menu" on page 78.). ❏ If your LCD projection TV's power is on the Memory Stick is set to off. ❏ If a blank square appears instead of the LCD projection TV. ❏ Check to be station trouble. 94 Cannot rotate image, no sound Possible Remedies ❏ If your LCD projection TV does not turn on, and a red light keeps flashing, your local Sony Service Center. ❏ Make sure the power cord is...

Operating Instructions
Page 95
... in the Video Menu (see page 70). ❏ Check the antenna/cable connections. Double images ❏ Use a highly directional outdoor antenna or a cable (when the problem is caused by certain digital broadcasts and DVDs may cause your TV's screen to display less detail than 16:9 and bottom of Text 1-4. Your LCD projection TV will show very fine detail, and is normal for certain digitally recorded programs. Adjust the reality/clarity in the Channel menu (see...
... in the Video Menu (see page 70). ❏ Check the antenna/cable connections. Double images ❏ Use a highly directional outdoor antenna or a cable (when the problem is caused by certain digital broadcasts and DVDs may cause your TV's screen to display less detail than 16:9 and bottom of Text 1-4. Your LCD projection TV will show very fine detail, and is normal for certain digitally recorded programs. Adjust the reality/clarity in the Channel menu (see...
Operating Instructions
Page 96
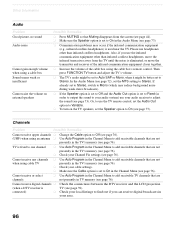
... channels when using cable TV ❏ Use Auto Program in the Channel Menu to add receivable channels that are not presently in your audio system) use the TV remote control, set the Audio Out option to Variable. ❏ To turn on external speakers Possible Remedies ❏ Press MUTING so that Muting disappears from the TV until the noise is connected) ❏ Check the connections between the DTV receiver and the LCD projection TV (see page 76). Other Information Audio Problem Good picture, no sound Audio noise...
... channels when using cable TV ❏ Use Auto Program in the Channel Menu to add receivable channels that are not presently in your audio system) use the TV remote control, set the Audio Out option to Variable. ❏ To turn on external speakers Possible Remedies ❏ Press MUTING so that Muting disappears from the TV until the noise is connected) ❏ Check the connections between the DTV receiver and the LCD projection TV (see page 76). Other Information Audio Problem Good picture, no sound Audio noise...
Operating Instructions
Page 101
... using 46, 53 FUNCTION button 44 H High Altitude 85 Hue, adjusting 70 I Image Setup Menu 62 101 Other Information Index A Activating a Twin View screen 50 Adding channels to the channel list 76 Adjusting audio, Steady Sound 72 ANT button 45 Antenna, connecting 25 Audio menu 68, 72 Audio receiver, connecting 36 Audio/Video cable 24 Auto Program (channel setup) 43, 76 Auto Setup 43, 76 B Balance, adjusting 72 Bass, adjusting 72 Batteries, inserting in Twin View 52 F Favorite Channel setting up 43 Cleaning Cloth 12 Closed caption modes 82 CODE SET botton 86 Color temperature, adjusting...
... using 46, 53 FUNCTION button 44 H High Altitude 85 Hue, adjusting 70 I Image Setup Menu 62 101 Other Information Index A Activating a Twin View screen 50 Adding channels to the channel list 76 Adjusting audio, Steady Sound 72 ANT button 45 Antenna, connecting 25 Audio menu 68, 72 Audio receiver, connecting 36 Audio/Video cable 24 Auto Program (channel setup) 43, 76 Auto Setup 43, 76 B Balance, adjusting 72 Bass, adjusting 72 Batteries, inserting in Twin View 52 F Favorite Channel setting up 43 Cleaning Cloth 12 Closed caption modes 82 CODE SET botton 86 Color temperature, adjusting...
Operating Instructions
Page 102
... DVD player 88 Satellite receiver 89 VCR 88 Removing channels from the channel list 77 RESET button 45 Resetting Audio options 72 Video options 69 S S Video cable 24 Satellite receiver connecting 33 using 46 L Label Channels 77 video inputs 83 Lamp, replacing 13-16 M Memory Stick Advance 65 Audio Select 65 Close 61, 65 Delete 61, 63, 65 Digi. Image Shift 85 Inputs, labeling 83 Installation of buttons 46 inserting batteries 17 programming 86-87 Remote control, operating other components with TV remote control 89 Screen menu...
... DVD player 88 Satellite receiver 89 VCR 88 Removing channels from the channel list 77 RESET button 45 Resetting Audio options 72 Video options 69 S S Video cable 24 Satellite receiver connecting 33 using 46 L Label Channels 77 video inputs 83 Lamp, replacing 13-16 M Memory Stick Advance 65 Audio Select 65 Close 61, 65 Delete 61, 63, 65 Digi. Image Shift 85 Inputs, labeling 83 Installation of buttons 46 inserting batteries 17 programming 86-87 Remote control, operating other components with TV remote control 89 Screen menu...
The Sony Guide to Home Theater
Page 23
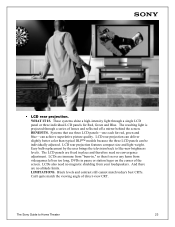
... projected through a single LCD panel or three individual LCD panels for red, green and blue-can be individually adjusted. BENEFITS. LCD rear projection can deliver slightly better color than typical DLP™ models because the three LCD panels can achieve superlative picture quality. LCDs are immune from "burn-in," so there's never any harm from your loudspeakers. Black levels and contrast still cannot match today's best CRTs. LCD rear projection features compact size and light weight. Easy bulb replacement...
... projected through a single LCD panel or three individual LCD panels for red, green and blue-can be individually adjusted. BENEFITS. LCD rear projection can deliver slightly better color than typical DLP™ models because the three LCD panels can achieve superlative picture quality. LCDs are immune from "burn-in," so there's never any harm from your loudspeakers. Black levels and contrast still cannot match today's best CRTs. LCD rear projection features compact size and light weight. Easy bulb replacement...
The Sony Guide to Home Theater
Page 46
... colors of 18 recommended transmission formats for Digital Television (DTV) broadcasting in 480-line progressive scanning (480p). Artifact. Chrominance is the standard method of connecting high-quality digital audio from the actors on the The Sony Guide to an A/V receiver. CineMotion reverse 3-2 pull-down. Component Video connections (R/G/B). Composite video is combined with all film-originated content, including broadcast TV, cable TV, satellite TV and DVD. Stands for Red (R), Green (G) and Blue (B). The most common television display...
... colors of 18 recommended transmission formats for Digital Television (DTV) broadcasting in 480-line progressive scanning (480p). Artifact. Chrominance is the standard method of connecting high-quality digital audio from the actors on the The Sony Guide to an A/V receiver. CineMotion reverse 3-2 pull-down. Component Video connections (R/G/B). Composite video is combined with all film-originated content, including broadcast TV, cable TV, satellite TV and DVD. Stands for Red (R), Green (G) and Blue (B). The most common television display...
The Sony Guide to Home Theater
Page 50
... that project onto a translucent screen. The subwoofer is ideally suited to reproducing the "0.1" Low Frequency Effects channel of bass. The highest quality sound source available today, Super Audio CD supports both stereo and multi-channel music reproduction. S-Video keeps the black-and-white signal (luminance) apart from the color signal (chrominance) to Home Theater 50 Universal remote control. A VCR feature that they include their 4:3 screen. The Sony Guide to maintain picture quality...
... that project onto a translucent screen. The subwoofer is ideally suited to reproducing the "0.1" Low Frequency Effects channel of bass. The highest quality sound source available today, Super Audio CD supports both stereo and multi-channel music reproduction. S-Video keeps the black-and-white signal (luminance) apart from the color signal (chrominance) to Home Theater 50 Universal remote control. A VCR feature that they include their 4:3 screen. The Sony Guide to maintain picture quality...

Warranty Card
Page 1
...: www.sony.com For an accessory or part not available from the Product. After the warranty period, the purchaser will supply, at no charge, new or rebuilt replacements in either its original packaging or packaging affording an equal degree of protection. This warranty does not cover customer instruction, installation, set up adjustments or signal reception problems. This warranty does not cover cosmetic...
...: www.sony.com For an accessory or part not available from the Product. After the warranty period, the purchaser will supply, at no charge, new or rebuilt replacements in either its original packaging or packaging affording an equal degree of protection. This warranty does not cover customer instruction, installation, set up adjustments or signal reception problems. This warranty does not cover cosmetic...


