Operating Instructions
Page 2
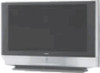
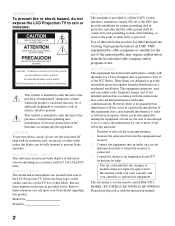
.... 2 CAUTION To prevent electric shock, do not expose the LCD Projection TV to persons. Record these numbers in a particular installation. Use of ... call upon your Sony dealer regarding this notice with §15.119 of the LCD Projection TV, below . If this equipment. MODEL: KF-42WE610, KF-50WE610, KF-60WE610 Please keep... on the TV box (white label). However, there is connected. ❑ Consult the dealer or an experienced radio/TV technician for the... interference will not occur in the spaces provided below the Sony logo, on the sticker, and also on Caption Vision This...
.... 2 CAUTION To prevent electric shock, do not expose the LCD Projection TV to persons. Record these numbers in a particular installation. Use of ... call upon your Sony dealer regarding this notice with §15.119 of the LCD Projection TV, below . If this equipment. MODEL: KF-42WE610, KF-50WE610, KF-60WE610 Please keep... on the TV box (white label). However, there is connected. ❑ Consult the dealer or an experienced radio/TV technician for the... interference will not occur in the spaces provided below the Sony logo, on the sticker, and also on Caption Vision This...
Operating Instructions
Page 14
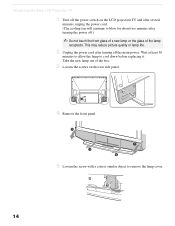
...reduce picture quality or lamp life. 2 Unplug the power cord after turning the power off the main power. Introducing the Sony LCD Projection TV 1 Turn off the power switch on the LCD projection TV and after several minutes, unplug the power cord. (The cooling fan will continue to blow for about two minutes after... turning off .) ✍ Do not touch the front glass of a new lamp or the glass of the box. 3 Loosen the screws on the rear side panel. 4...
...reduce picture quality or lamp life. 2 Unplug the power cord after turning the power off the main power. Introducing the Sony LCD Projection TV 1 Turn off the power switch on the LCD projection TV and after several minutes, unplug the power cord. (The cooling fan will continue to blow for about two minutes after... turning off .) ✍ Do not touch the front glass of a new lamp or the glass of the box. 3 Loosen the screws on the rear side panel. 4...
Operating Instructions
Page 16
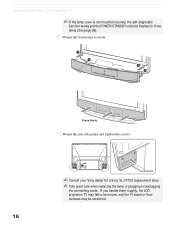
Introducing the Sony LCD Projection TV ✍ If the lamp cover is not mounted securely, the self-diagnostic function works and the POWER/STANDBY indicator flashes for a Sony XL-2100U replacement lamp. ✍ Take great care when replacing the lamp or plugging in/unplugging the connecting cords. If you handle them roughly, the LCD projection TV may fall or be moved, and the TV stand or floor surfaces may be scratched. 16 Press firmly. 10 Mount the rear side panel and tighten the screws. ✍ Consult your Sony dealer for three times (See page 98). 9 Mount the front panel securely.
Introducing the Sony LCD Projection TV ✍ If the lamp cover is not mounted securely, the self-diagnostic function works and the POWER/STANDBY indicator flashes for a Sony XL-2100U replacement lamp. ✍ Take great care when replacing the lamp or plugging in/unplugging the connecting cords. If you handle them roughly, the LCD projection TV may fall or be moved, and the TV stand or floor surfaces may be scratched. 16 Press firmly. 10 Mount the rear side panel and tighten the screws. ✍ Consult your Sony dealer for three times (See page 98). 9 Mount the front panel securely.

Operating Instructions
Page 21
When lit, indicates that the Memory Stick is being read. (Do not remove the Memory Stick when the indicator is lit.) (Continued) 21 For details, see "Inserting and Removing a Memory Stick" on page 57. Item 1 MEMORY STICK 2 MEMORY STICK ACCESS LED Description Memory Stick insertion slot. Installing and Connecting the LCD Projection TV Installing and Connecting the LCD Projection TV LCD Projection TV Connectors LCD Projection TV Front and Rear Side Connectors How to open the front panel To open OPEN OPEN Push up.
When lit, indicates that the Memory Stick is being read. (Do not remove the Memory Stick when the indicator is lit.) (Continued) 21 For details, see "Inserting and Removing a Memory Stick" on page 57. Item 1 MEMORY STICK 2 MEMORY STICK ACCESS LED Description Memory Stick insertion slot. Installing and Connecting the LCD Projection TV Installing and Connecting the LCD Projection TV LCD Projection TV Connectors LCD Projection TV Front and Rear Side Connectors How to open the front panel To open OPEN OPEN Push up.

Operating Instructions
Page 22
Installing and Connecting the LCD Projection TV Rear of LCD projection TV Front left side of LCD projection TV VIDEO 2 INPUT S VIDEO VIDEO L(MONO)-AUDIO-R 22
Installing and Connecting the LCD Projection TV Rear of LCD projection TV Front left side of LCD projection TV VIDEO 2 INPUT S VIDEO VIDEO L(MONO)-AUDIO-R 22
Operating Instructions
Page 23
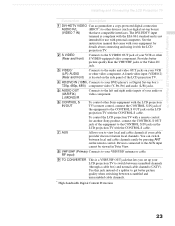
.../UHF antenna or cable. See the instruction manual that came with your equipment for details about connecting and using it with the LCD projection TV. 2 S VIDEO (Rear and front) Connects to the S VIDEO OUT jack of the equipment to the CONTROL S IN jack on the LCD... VHF/UHF OUT jack that have compatible interfaces. A fourth video input (VIDEO 2) is located on the LCD projection TV with personal computers. RF input) 9 TO CONVERTER This is not intended for another Sony product, connect the CONTROL S OUT jack of your cable provider does not feature local channels. The DVI-HDTV ...
.../UHF antenna or cable. See the instruction manual that came with your equipment for details about connecting and using it with the LCD projection TV. 2 S VIDEO (Rear and front) Connects to the S VIDEO OUT jack of the equipment to the CONTROL S IN jack on the LCD... VHF/UHF OUT jack that have compatible interfaces. A fourth video input (VIDEO 2) is located on the LCD projection TV with personal computers. RF input) 9 TO CONVERTER This is not intended for another Sony product, connect the CONTROL S OUT jack of your cable provider does not feature local channels. The DVI-HDTV ...
Operating Instructions
Page 25
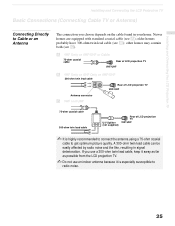
...twin lead cable (see C). A VHF Only or VHF/UHF or Cable 75-ohm coaxial cable Rear of LCD projection TV VHF/UHF B VHF Only or UHF Only or VHF/UHF 300-ohm twin lead cable Rear of LCD projection TV VHF/UHF Antenna connector C VHF and UHF 75-ohm coaxial cable 300-ohm twin lead cable... U/V Splitter (not supplied) Rear of LCD projection TV VHF/UHF ✍ It is especially susceptible to get optimum picture quality. Newer...
...twin lead cable (see C). A VHF Only or VHF/UHF or Cable 75-ohm coaxial cable Rear of LCD projection TV VHF/UHF B VHF Only or UHF Only or VHF/UHF 300-ohm twin lead cable Rear of LCD projection TV VHF/UHF Antenna connector C VHF and UHF 75-ohm coaxial cable 300-ohm twin lead cable... U/V Splitter (not supplied) Rear of LCD projection TV VHF/UHF ✍ It is especially susceptible to get optimum picture quality. Newer...

Operating Instructions
Page 26
... not scrambled. (Your LCD projection TV's tuner provides a better signal than the cable box.) ❑ Use the Twin View feature. (When all channels are routed through the cable box, eliminating the need to turn your Cable to TO CONVERTER) Antenna cable AUX Rear of them (pay channels vs.... Cable Box Connections Cable Box and Cable This is sent to the LCD projection TV, so you to switch between unscrambled signals coming straight into the LCD projection TV and scrambled signals coming in through your cable box...
... not scrambled. (Your LCD projection TV's tuner provides a better signal than the cable box.) ❑ Use the Twin View feature. (When all channels are routed through the cable box, eliminating the need to turn your Cable to TO CONVERTER) Antenna cable AUX Rear of them (pay channels vs.... Cable Box Connections Cable Box and Cable This is sent to the LCD projection TV, so you to switch between unscrambled signals coming straight into the LCD projection TV and scrambled signals coming in through your cable box...
Operating Instructions
Page 27
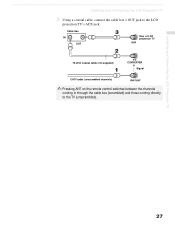
Installing and Connecting the LCD Projection TV Installing and Connecting the LCD Projection TV 3 Using a coaxial cable, connect the cable box's OUT jack to the TV (unscrambled). 27 Cable box IN OUT Rear of LCD projection TV AUX 75-ohm coaxial cable (not supplied) TO CONVERTER Signal CATV cable (unscrambled channels) VHF/UHF ✍ Pressing ANT on the remote control switches between the channels coming in through the cable box (scrambled) and those coming directly to the LCD projection TV's AUX jack.
Installing and Connecting the LCD Projection TV Installing and Connecting the LCD Projection TV 3 Using a coaxial cable, connect the cable box's OUT jack to the TV (unscrambled). 27 Cable box IN OUT Rear of LCD projection TV AUX 75-ohm coaxial cable (not supplied) TO CONVERTER Signal CATV cable (unscrambled channels) VHF/UHF ✍ Pressing ANT on the remote control switches between the channels coming in through the cable box (scrambled) and those coming directly to the LCD projection TV's AUX jack.
Operating Instructions
Page 28
Cable Rear of LCD projection TV VHF/UHF IN OUT Cable box Also, set Cable to On in the Channel menu (see "Using the Channel Menu" on the cable box channel output. Installing and Connecting the LCD Projection TV Cable Box Only Use this hookup if: ❑ You subscribe to a cable TV system ...cable box's OUT jack to operate your cable box (see page 76). If you will be programmed to the LCD projection TV's VHF/UHF jack. z Setting the Channel Fix feature in the Channel menu (see page 76). ✍ Your Sony remote control can be controlling all channel selection through your LCD...
Cable Rear of LCD projection TV VHF/UHF IN OUT Cable box Also, set Cable to On in the Channel menu (see "Using the Channel Menu" on the cable box channel output. Installing and Connecting the LCD Projection TV Cable Box Only Use this hookup if: ❑ You subscribe to a cable TV system ...cable box's OUT jack to operate your cable box (see page 76). If you will be programmed to the LCD projection TV's VHF/UHF jack. z Setting the Channel Fix feature in the Channel menu (see page 76). ✍ Your Sony remote control can be controlling all channel selection through your LCD...
Operating Instructions
Page 29
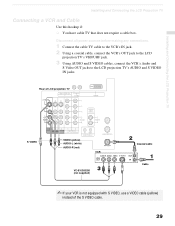
Installing and Connecting the LCD Projection TV Installing and Connecting the LCD Projection TV Connecting a VCR and Cable Use this hookup if: ❑ You have cable TV that does not require a cable box. Rear of LCD projection TV S VIDEO VIDEO (yellow) AUDIO-L (white) AUDIO-R (red) VCR VC-810S/820S (not supplied) Coaxial cable Cable ✍ If your VCR is...
Installing and Connecting the LCD Projection TV Installing and Connecting the LCD Projection TV Connecting a VCR and Cable Use this hookup if: ❑ You have cable TV that does not require a cable box. Rear of LCD projection TV S VIDEO VIDEO (yellow) AUDIO-L (white) AUDIO-R (red) VCR VC-810S/820S (not supplied) Coaxial cable Cable ✍ If your VCR is...

Operating Instructions
Page 31
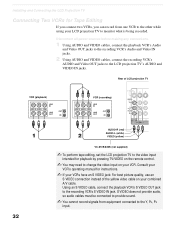
...) AUDIO-L (white) VIDEO (yellow) VIDEO (yellow) AUDIO-L (white) AUDIO-R (red) VC-810S/820S (not supplied) S VIDEO Installing and Connecting the LCD Projection TV S VIDEO Coaxial cable Cable box Rear of LCD projection TV Coaxial cable ✍ If your VCR is not equipped with S VIDEO, use a VIDEO cable (yellow) instead of the S VIDEO cable. ✍ You... the remote control switches between the channels coming in through the cable box (scrambled) and those coming directly to channel 3 or 4, depending on your LCD projection TV and VCR to the LCD projection TV (unscrambled). 31
...) AUDIO-L (white) VIDEO (yellow) VIDEO (yellow) AUDIO-L (white) AUDIO-R (red) VC-810S/820S (not supplied) S VIDEO Installing and Connecting the LCD Projection TV S VIDEO Coaxial cable Cable box Rear of LCD projection TV Coaxial cable ✍ If your VCR is not equipped with S VIDEO, use a VIDEO cable (yellow) instead of the S VIDEO cable. ✍ You... the remote control switches between the channels coming in through the cable box (scrambled) and those coming directly to channel 3 or 4, depending on your LCD projection TV and VCR to the LCD projection TV (unscrambled). 31
Operating Instructions
Page 32
... so audio cables must be connected to provide sound. ✍ You cannot record signals from one VCR to the other while using your LCD projection TV to monitor what is being recorded. Consult your VCR's operating manual for Tape Editing If you connect two VCRs, you can record from equipment ...the recording VCR's S VIDEO IN jack. Using an S VIDEO cable, connect the playback VCR's S VIDEO OUT jack to the Y, PB, PR input. 32 Rear of the yellow video cable on your combined A/V cable. Disconnect all power sources before making any connections. 1 Using AUDIO and VIDEO cables, connect the playback...
... so audio cables must be connected to provide sound. ✍ You cannot record signals from one VCR to the other while using your LCD projection TV to monitor what is being recorded. Consult your VCR's operating manual for Tape Editing If you connect two VCRs, you can record from equipment ...the recording VCR's S VIDEO IN jack. Using an S VIDEO cable, connect the playback VCR's S VIDEO OUT jack to the Y, PB, PR input. 32 Rear of the yellow video cable on your combined A/V cable. Disconnect all power sources before making any connections. 1 Using AUDIO and VIDEO cables, connect the playback...
Operating Instructions
Page 33
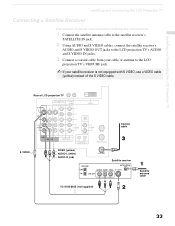
Rear of the S VIDEO cable. Installing and Connecting the LCD Projection TV Installing and Connecting the LCD Projection TV Connecting a Satellite Receiver Disconnect all power sources before making any connections. 1 Connect the satellite antenna cable to the satellite receiver's SATELLITE ...AUDIO and S VIDEO cables, connect the satellite receiver's AUDIO and S VIDEO OUT jacks to the LCD projection TV's AUDIO and S VIDEO IN jacks. 3 Connect a coaxial cable from your cable or antenna to the LCD projection TV's VHF/UHF jack. ✍ If your satellite receiver is not equipped with S VIDEO, use a ...
Rear of the S VIDEO cable. Installing and Connecting the LCD Projection TV Installing and Connecting the LCD Projection TV Connecting a Satellite Receiver Disconnect all power sources before making any connections. 1 Connect the satellite antenna cable to the satellite receiver's SATELLITE ...AUDIO and S VIDEO cables, connect the satellite receiver's AUDIO and S VIDEO OUT jacks to the LCD projection TV's AUDIO and S VIDEO IN jacks. 3 Connect a coaxial cable from your cable or antenna to the LCD projection TV's VHF/UHF jack. ✍ If your satellite receiver is not equipped with S VIDEO, use a ...
Operating Instructions
Page 34
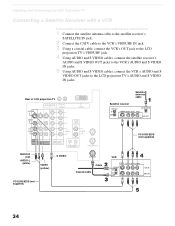
...jack. 2 Connect the CATV cable to the VCR's VHF/UHF IN jack. 3 Using a coaxial cable, connect the VCR's OUT jack to the LCD projection TV's VHF/UHF jack. 4 Using AUDIO and S VIDEO cables, connect the satellite receiver's AUDIO and S VIDEO OUT jacks to the VCR's AUDIO and S ...VIDEO IN jacks. 5 Using AUDIO and S VIDEO cables, connect the VCR's AUDIO and S VIDEO OUT jacks to the LCD projection TV's AUDIO and S VIDEO IN jacks. Rear of LCD projection TV Satellite receiver Satellite antenna cable AUDIO-R (red) AUDIO-L (white) S VIDEO VIDEO (yellow) VC-810S/820S (not supplied) Cable Coaxial...
...jack. 2 Connect the CATV cable to the VCR's VHF/UHF IN jack. 3 Using a coaxial cable, connect the VCR's OUT jack to the LCD projection TV's VHF/UHF jack. 4 Using AUDIO and S VIDEO cables, connect the satellite receiver's AUDIO and S VIDEO OUT jacks to the VCR's AUDIO and S ...VIDEO IN jacks. 5 Using AUDIO and S VIDEO cables, connect the VCR's AUDIO and S VIDEO OUT jacks to the LCD projection TV's AUDIO and S VIDEO IN jacks. Rear of LCD projection TV Satellite receiver Satellite antenna cable AUDIO-R (red) AUDIO-L (white) S VIDEO VIDEO (yellow) VC-810S/820S (not supplied) Cable Coaxial...
Operating Instructions
Page 36
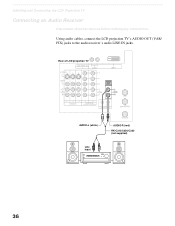
Rear of LCD projection TV AUDIO-L (white) Line input AUDIO-R (red) RK-C310/C320/C330 (not supplied) 36 Using audio cables, connect the LCD projection TV's AUDIO OUT (VAR/ FIX) jacks to the audio receiver's audio LINE IN jacks. Installing and Connecting the LCD Projection TV Connecting an Audio Receiver Disconnect all power sources before making any connections.
Rear of LCD projection TV AUDIO-L (white) Line input AUDIO-R (red) RK-C310/C320/C330 (not supplied) 36 Using audio cables, connect the LCD projection TV's AUDIO OUT (VAR/ FIX) jacks to the audio receiver's audio LINE IN jacks. Installing and Connecting the LCD Projection TV Connecting an Audio Receiver Disconnect all power sources before making any connections.
Operating Instructions
Page 37
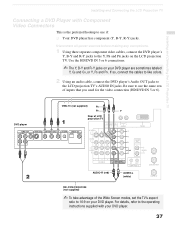
... ratio to the Y, PB and PR jacks on your DVD player. DVD player VMC-10 (not supplied) PB PR Y Rear of LCD projection TV AUDIO-R (red) AUDIO-L (white) RK-C310/C320/C330 (not supplied) ✍ To take advantage of inputs that you used for the ...video connection (HD/DVD IN 5 or 6). Be sure to the LCD projection TV's AUDIO IN jacks. Use the HD/DVD IN 5 or 6 connections. ✍ The Y, B-Y and R-Y jacks on the LCD projection TV. Installing and Connecting the LCD Projection TV Installing and Connecting the LCD Projection TV Connecting a DVD Player with your DVD player. 37
... ratio to the Y, PB and PR jacks on your DVD player. DVD player VMC-10 (not supplied) PB PR Y Rear of LCD projection TV AUDIO-R (red) AUDIO-L (white) RK-C310/C320/C330 (not supplied) ✍ To take advantage of inputs that you used for the ...video connection (HD/DVD IN 5 or 6). Be sure to the LCD projection TV's AUDIO IN jacks. Use the HD/DVD IN 5 or 6 connections. ✍ The Y, B-Y and R-Y jacks on the LCD projection TV. Installing and Connecting the LCD Projection TV Installing and Connecting the LCD Projection TV Connecting a DVD Player with your DVD player. 37
Operating Instructions
Page 38
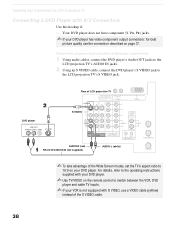
..., refer to the operating instructions supplied with S VIDEO, use the connection described on your DVD player. Installing and Connecting the LCD Projection TV Connecting a DVD Player with A/V Connectors Use this hookup if: ❑ Your DVD player does not have component (Y, PB, PR... Using audio cables, connect the DVD player's Audio OUT jacks to the LCD projection TV's AUDIO IN jacks. 2 Using an S VIDEO cable, connect the DVD player's S VIDEO jack to the LCD projection TV's S VIDEO jack. Rear of LCD projection TV DVD player S VIDEO AUDIO-R (red) RK-C310/C320/C330 (not supplied) ...
..., refer to the operating instructions supplied with S VIDEO, use the connection described on your DVD player. Installing and Connecting the LCD Projection TV Connecting a DVD Player with A/V Connectors Use this hookup if: ❑ Your DVD player does not have component (Y, PB, PR... Using audio cables, connect the DVD player's Audio OUT jacks to the LCD projection TV's AUDIO IN jacks. 2 Using an S VIDEO cable, connect the DVD player's S VIDEO jack to the LCD projection TV's S VIDEO jack. Rear of LCD projection TV DVD player S VIDEO AUDIO-R (red) RK-C310/C320/C330 (not supplied) ...
Operating Instructions
Page 39
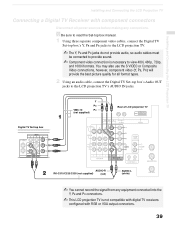
...format types. 2 Using an audio cable, connect the Digital TV Set-top box's Audio OUT jacks to view 480i, 480p, 720p, and 1080i formats. Y PB VMC-10 PR (not supplied) Rear of LCD projection TV Digital TV Set-top box AUDIO-R RK-C310/C320/C330 (not supplied...) (red) AUDIO-L (white) ✍ You cannot record the signal from any connections. Installing and Connecting the LCD Projection TV Installing and Connecting the LCD Projection TV Connecting a Digital TV Receiver with ...
...format types. 2 Using an audio cable, connect the Digital TV Set-top box's Audio OUT jacks to view 480i, 480p, 720p, and 1080i formats. Y PB VMC-10 PR (not supplied) Rear of LCD projection TV Digital TV Set-top box AUDIO-R RK-C310/C320/C330 (not supplied...) (red) AUDIO-L (white) ✍ You cannot record the signal from any connections. Installing and Connecting the LCD Projection TV Installing and Connecting the LCD Projection TV Connecting a Digital TV Receiver with ...

The Sony Guide to Home Theater
Page 20
...'s never any harm from videogames left on too long, DVDs in pause or station logos on the corner of viscous liquid sandwiched in plastic. The Sony Guide to filter light generated by a network of transistors that control individual pixels. Like a laptop computer screen, a flat panel direct view LCD consists of a panel... sizes are no convergence. The liquid is used in the early 1970's. WHAT IT IS. LIMITATIONS. Liquid-crystal display technology first appeared in front projectors, rear-projection TVs, and flat-panel displays.
...'s never any harm from videogames left on too long, DVDs in pause or station logos on the corner of viscous liquid sandwiched in plastic. The Sony Guide to filter light generated by a network of transistors that control individual pixels. Like a laptop computer screen, a flat panel direct view LCD consists of a panel... sizes are no convergence. The liquid is used in the early 1970's. WHAT IT IS. LIMITATIONS. Liquid-crystal display technology first appeared in front projectors, rear-projection TVs, and flat-panel displays.


