Operating Instructions
Page 5
...mild detergent and water. ❑ Do not use attachments not recommended by the manufacturer for the specific model of LCD Projection TV. To remove dust from a TV set , and to clean the inside of abrasive pad, alkaline cleaner, acid cleaner, scouring powder, chemical cloth, or solvent... shock. Never use power-line operated sets near a swimming pool, etc. for some TV sets to the set on or off when it gently with a soft cloth. Consult qualified service personnel. If the picture becomes dark after using the LCD Projection TV for necessary ventilation. If you clean ...
...mild detergent and water. ❑ Do not use attachments not recommended by the manufacturer for the specific model of LCD Projection TV. To remove dust from a TV set , and to clean the inside of abrasive pad, alkaline cleaner, acid cleaner, scouring powder, chemical cloth, or solvent... shock. Never use power-line operated sets near a swimming pool, etc. for some TV sets to the set on or off when it gently with a soft cloth. Consult qualified service personnel. If the picture becomes dark after using the LCD Projection TV for necessary ventilation. If you clean ...
Operating Instructions
Page 7
...approx. 5.9ft.) for KF-42WE610, 2.0m (approx. 6.6ft.) for KF-50WE610 or 2.2m (approx. 7.2ft.) for a long period of the TV. If you sit too close to the TV, you may appear white due to reflections from the wall. ❑ Avoid installing the LCD projection TV close to high temperature ...not attempt to service the set by yourself since opening the cabinet may be affected by your viewing position. Refer all servicing to the operating instructions. Carry the LCD Projection TV in the specified manner If you install the LCD projection TV. For the best picture quality, install your footing...
...approx. 5.9ft.) for KF-42WE610, 2.0m (approx. 6.6ft.) for KF-50WE610 or 2.2m (approx. 7.2ft.) for a long period of the TV. If you sit too close to the TV, you may appear white due to reflections from the wall. ❑ Avoid installing the LCD projection TV close to high temperature ...not attempt to service the set by yourself since opening the cabinet may be affected by your viewing position. Refer all servicing to the operating instructions. Carry the LCD Projection TV in the specified manner If you install the LCD projection TV. For the best picture quality, install your footing...
Operating Instructions
Page 9
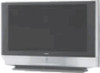
... (HDCP*) to other devices (such as digital set-top boxes) that you will enjoy with your new LCD projection TV include: ❑ HD-Monitor: Enables to display the 1080i, 720p, 480p and 480i digital TV format signals. The DVI-HDTV input terminal is ...Sony LCD Projection TV Introducing the Sony LCD Projection TV Presenting the Sony LCD Projection TV Thank you for models KF-42WE610, KF-50WE610 and KF-60WE610. This manual is not intended for 480i signals only). ❑ CineMotion™: Using the reverse 3-2 pull down technology, the CineMotion feature allows you to obtain a smooth picture...
... (HDCP*) to other devices (such as digital set-top boxes) that you will enjoy with your new LCD projection TV include: ❑ HD-Monitor: Enables to display the 1080i, 720p, 480p and 480i digital TV format signals. The DVI-HDTV input terminal is ...Sony LCD Projection TV Introducing the Sony LCD Projection TV Presenting the Sony LCD Projection TV Thank you for models KF-42WE610, KF-50WE610 and KF-60WE610. This manual is not intended for 480i signals only). ❑ CineMotion™: Using the reverse 3-2 pull down technology, the CineMotion feature allows you to obtain a smooth picture...
Operating Instructions
Page 23
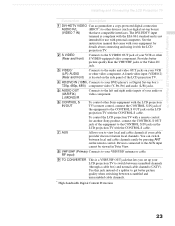
Provides better picture quality than the VHF/UHF jacks or the Video IN jack. 3 VIDEO/ (L/R) AUDIO (Rear and front) Connects to the audio and video OUT jacks on the LCD projection TV with your equipment for another Sony product, connect the CONTROL S OUT jack of the equipment to the CONTROL S IN jack on ... Twin View. 8 VHF/UHF (Primary Connects to your VCR or other Sony equipment with the EIA-861 standard and is located on the side panel of the LCD projection TV. 4 HD/DVD IN (1080i, Connects to your DVD player's or Digital Set-top box's 720p, 480p, 480i) component video (Y, PB, PR) ...
Provides better picture quality than the VHF/UHF jacks or the Video IN jack. 3 VIDEO/ (L/R) AUDIO (Rear and front) Connects to the audio and video OUT jacks on the LCD projection TV with your equipment for another Sony product, connect the CONTROL S OUT jack of the equipment to the CONTROL S IN jack on ... Twin View. 8 VHF/UHF (Primary Connects to your VCR or other Sony equipment with the EIA-861 standard and is located on the side panel of the LCD projection TV. 4 HD/DVD IN (1080i, Connects to your DVD player's or Digital Set-top box's 720p, 480p, 480i) component video (Y, PB, PR) ...
Operating Instructions
Page 24
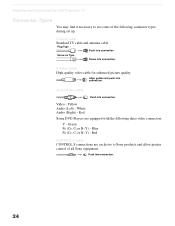
...picture quality Align guides and push into connection. 24 Green PB (CB, Cb or B-Y) - Audio/Video cable Push into connection. White Audio (Right) - Yellow Audio (Left) - Video - Red CONTROL S cable CONTROL S connections are equipped with the following connector types during set... up. Blue PR (CR, Cr or R-Y) - Screw-on Type Screw into connection. Installing and Connecting the LCD Projection TV Connector Types You may find it necessary to Sony products and allow greater control of the following three ...
...picture quality Align guides and push into connection. 24 Green PB (CB, Cb or B-Y) - Audio/Video cable Push into connection. White Audio (Right) - Yellow Audio (Left) - Video - Red CONTROL S cable CONTROL S connections are equipped with the following connector types during set... up. Blue PR (CR, Cr or R-Y) - Screw-on Type Screw into connection. Installing and Connecting the LCD Projection TV Connector Types You may find it necessary to Sony products and allow greater control of the following three ...
Operating Instructions
Page 32
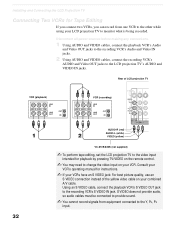
... AUDIO and Video OUT jacks to change the video input on your VCR. Rear of the yellow video cable on your combined A/V cable. Consult your VCR's operating manual for instructions. ✍ If your LCD projection TV to the recording VCR's S VIDEO IN jack. S VIDEO does not provide...have an S VIDEO jack: For best picture quality, use an S VIDEO connection instead of LCD projection TV VCR (playback) VCR (recording) AUDIO-R (red) AUDIO-L (white) VIDEO (yellow) VC-810S/820S (not supplied) ✍ To perform tape editing, set the LCD projection TV to the video input intended for Tape ...
... AUDIO and Video OUT jacks to change the video input on your VCR. Rear of the yellow video cable on your combined A/V cable. Consult your VCR's operating manual for instructions. ✍ If your LCD projection TV to the recording VCR's S VIDEO IN jack. S VIDEO does not provide...have an S VIDEO jack: For best picture quality, use an S VIDEO connection instead of LCD projection TV VCR (playback) VCR (recording) AUDIO-R (red) AUDIO-L (white) VIDEO (yellow) VC-810S/820S (not supplied) ✍ To perform tape editing, set the LCD projection TV to the video input intended for Tape ...
Operating Instructions
Page 38
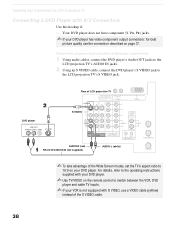
Rear of LCD projection TV DVD player S VIDEO AUDIO-R (red) RK-C310/C320/C330 (not supplied) AUDIO-L (white) ✍ To take advantage of the S VIDEO cable. 38 For details, refer ..., PR) jacks. ✍ If your DVD player has video component output connectors: for best picture quality use a VIDEO cable (yellow) instead of the Wide Screen modes, set the TV's aspect ratio to 16:9 on the remote control to the LCD projection TV's S VIDEO jack. Disconnect all power sources before making any connections. 1 Using audio cables...
Rear of LCD projection TV DVD player S VIDEO AUDIO-R (red) RK-C310/C320/C330 (not supplied) AUDIO-L (white) ✍ To take advantage of the S VIDEO cable. 38 For details, refer ..., PR) jacks. ✍ If your DVD player has video component output connectors: for best picture quality use a VIDEO cable (yellow) instead of the Wide Screen modes, set the TV's aspect ratio to 16:9 on the remote control to the LCD projection TV's S VIDEO jack. Disconnect all power sources before making any connections. 1 Using audio cables...
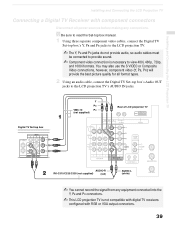
Operating Instructions
Page 39
... Disconnect all format types. 2 Using an audio cable, connect the Digital TV Set-top box's Audio OUT jacks to view 480i, 480p, 720p, and 1080i formats. Y PB VMC-10 PR (not supplied) Rear of LCD projection TV Digital TV Set-top box AUDIO-R RK-C310/C320/C330 (not supplied) (red) AUDIO...-L (white) ✍ You cannot record the signal from any connections. You may also use the S VIDEO or Composite Video connections, however, component video (Y, PB, PR) will provide the best picture...
... Disconnect all format types. 2 Using an audio cable, connect the Digital TV Set-top box's Audio OUT jacks to view 480i, 480p, 720p, and 1080i formats. Y PB VMC-10 PR (not supplied) Rear of LCD projection TV Digital TV Set-top box AUDIO-R RK-C310/C320/C330 (not supplied) (red) AUDIO...-L (white) ✍ You cannot record the signal from any connections. You may also use the S VIDEO or Composite Video connections, however, component video (Y, PB, PR) will provide the best picture...

Operating Instructions
Page 44
...details, see "Using Favorite Channels" on page 50. Adjusts the volume. 44 Press to operate. The LCD projection TV alternates between two channels. For details, see "Using Twin View™" on page 49. Freezes the window picture. qa FREEZE qs VOL +/- When the ... VCR/ MUTING DVD SAT/ CABLE POWER MODE PICTURE WIDE DISPLAY JUMP FAVORITES ENT MENU VCR/DVD SAT/ CABLE TV FUNCTION TV/VIDEO FREEZE /TV/SAT ANT VOL GUIDE CH CODE SET RESET SLEEP MTS/SAP TV RM-Y913 Button 1 VCR/DVD 2 MUTING 3 WIDE MODE 4 PICTURE MODE 5 JUMP 6 FAVORITES 7 V/v/B/b 8 FUNCTION...
...details, see "Using Favorite Channels" on page 50. Adjusts the volume. 44 Press to operate. The LCD projection TV alternates between two channels. For details, see "Using Twin View™" on page 49. Freezes the window picture. qa FREEZE qs VOL +/- When the ... VCR/ MUTING DVD SAT/ CABLE POWER MODE PICTURE WIDE DISPLAY JUMP FAVORITES ENT MENU VCR/DVD SAT/ CABLE TV FUNCTION TV/VIDEO FREEZE /TV/SAT ANT VOL GUIDE CH CODE SET RESET SLEEP MTS/SAP TV RM-Y913 Button 1 VCR/DVD 2 MUTING 3 WIDE MODE 4 PICTURE MODE 5 JUMP 6 FAVORITES 7 V/v/B/b 8 FUNCTION...
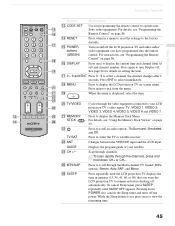
Operating Instructions
Page 45
... DVD SAT/ CABLE POWER MODE PICTURE WIDE DISPLAY JUMP FAVORITES ENT MENU VCR/DVD SAT/ CABLE TV FUNCTION TV/VIDEO FREEZE /TV/SAT ANT VOL GUIDE CH CODE SET RESET SLEEP MTS/SAP TV RM-Y913 Using the Features Button Description qd CODE SET Use for details on and off the LCD projection TV and other audio/ video equipment...
... DVD SAT/ CABLE POWER MODE PICTURE WIDE DISPLAY JUMP FAVORITES ENT MENU VCR/DVD SAT/ CABLE TV FUNCTION TV/VIDEO FREEZE /TV/SAT ANT VOL GUIDE CH CODE SET RESET SLEEP MTS/SAP TV RM-Y913 Using the Features Button Description qd CODE SET Use for details on and off the LCD projection TV and other audio/ video equipment...
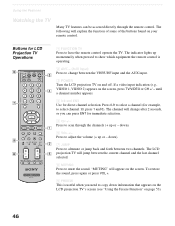
Operating Instructions
Page 46
... (+ up or - Press 0-9 to select a channel (for LCD Projection TV Operations VCR/ MUTING DVD SAT/ CABLE POWER MODE PICTURE WIDE DISPLAY JUMP FAVORITES ENT MENU VCR/DVD SAT/ CABLE TV FUNCTION TV/VIDEO FREEZE /TV/SAT ANT VOL GUIDE CH CODE SET RESET SLEEP MTS/SAP TV RM-Y913 1 FUNCTION TV Press to copy down information that appears on...
... (+ up or - Press 0-9 to select a channel (for LCD Projection TV Operations VCR/ MUTING DVD SAT/ CABLE POWER MODE PICTURE WIDE DISPLAY JUMP FAVORITES ENT MENU VCR/DVD SAT/ CABLE TV FUNCTION TV/VIDEO FREEZE /TV/SAT ANT VOL GUIDE CH CODE SET RESET SLEEP MTS/SAP TV RM-Y913 1 FUNCTION TV Press to copy down information that appears on...

Operating Instructions
Page 47
...press DISPLAY again. Standard: Select to display a picture with minimum enhancements. Pro: Select to display a standard picture for enhanced picture contrast and sharpness. To turn the display off automatically. Cancel by pressing SLEEP until the LCD projection TV displays the approximate time in the Setup menu, ... channel label (if set). Using the Features VCR/ MUTING DVD SAT/ CABLE POWER MODE PICTURE WIDE DISPLAY JUMP FAVORITES ENT MENU VCR/DVD SAT/ CABLE TV FUNCTION TV/VIDEO FREEZE /TV/SAT ANT VOL GUIDE CH CODE SET RESET SLEEP MTS/SAP TV RM-Y913 Using the...
...press DISPLAY again. Standard: Select to display a picture with minimum enhancements. Pro: Select to display a standard picture for enhanced picture contrast and sharpness. To turn the display off automatically. Cancel by pressing SLEEP until the LCD projection TV displays the approximate time in the Setup menu, ... channel label (if set). Using the Features VCR/ MUTING DVD SAT/ CABLE POWER MODE PICTURE WIDE DISPLAY JUMP FAVORITES ENT MENU VCR/DVD SAT/ CABLE TV FUNCTION TV/VIDEO FREEZE /TV/SAT ANT VOL GUIDE CH CODE SET RESET SLEEP MTS/SAP TV RM-Y913 Using the...

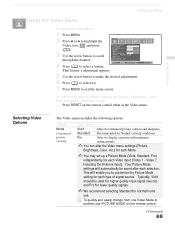
Operating Instructions
Page 51
... of the VIDEO IN 1-7 and AUX inputs on the rear of the LCD projection TV. Be sure your ability to use a cable box to view all channels through the cable box, the Twin View feature will only appear in the left picture, not in the left picture. - You can view the cable box output in... one window and view a different source (such as a VCR or DVD player) in the second window by parental settings (see page 78). 51 Factors Affecting Twin View ❑ If...
... of the VIDEO IN 1-7 and AUX inputs on the rear of the LCD projection TV. Be sure your ability to use a cable box to view all channels through the cable box, the Twin View feature will only appear in the left picture, not in the left picture. - You can view the cable box output in... one window and view a different source (such as a VCR or DVD player) in the second window by parental settings (see page 78). 51 Factors Affecting Twin View ❑ If...
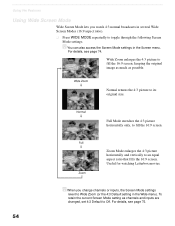
Operating Instructions
Page 54
... 4:3 normal broadcasts in several Wide Screen Modes (16:9 aspect ratio). ❑ Press WIDE MODE repeatedly to toggle through the following Screen Mode settings. Wide Zoom enlarges the 4:3 picture to fill the 16:9 screen, keeping the original image as much as channels and inputs are changed... Mode Wide Screen Mode lets you change channels or inputs, the Screen Mode settings revert to Wide Zoom (or the 4:3 Default setting in the Screen menu. For details, see page 75. Zoom Mode enlarges the 4:3 picture horizontally and vertically to an equal aspect ratio that fills the 16:9 screen....
... 4:3 normal broadcasts in several Wide Screen Modes (16:9 aspect ratio). ❑ Press WIDE MODE repeatedly to toggle through the following Screen Mode settings. Wide Zoom enlarges the 4:3 picture to fill the 16:9 screen, keeping the original image as much as channels and inputs are changed... Mode Wide Screen Mode lets you change channels or inputs, the Screen Mode settings revert to Wide Zoom (or the 4:3 Default setting in the Screen menu. For details, see page 75. Zoom Mode enlarges the 4:3 picture horizontally and vertically to an equal aspect ratio that fills the 16:9 screen....
Operating Instructions
Page 68
... allows you to customize the Picture Mode based on -screen menus. 68 Allows you control the viewing of the on the type of program you to set the wide screen mode, adjust the vertical 74 center in wide mode, and set up your channels, 82 labeling your LCD projection TV. Offers enhanced audio options such...
... allows you to customize the Picture Mode based on -screen menus. 68 Allows you control the viewing of the on the type of program you to set the wide screen mode, adjust the vertical 74 center in wide mode, and set up your channels, 82 labeling your LCD projection TV. Offers enhanced audio options such...
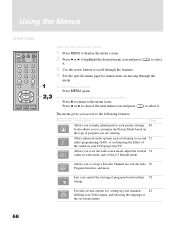
Operating Instructions
Page 69
...desired adjustments. 6 Press to select/set. 7 Press MENU to display a picture with minimum enhancements. ✍ You can alter the Video menu settings (Picture, Brightness, Color, etc.) for each Mode. ✍ You may set up a Picture Mode (Vivid, Standard, Pro) independently for Picture, Brightness, Color, Hue, Sharpness ...screen. Typically, Vivid should be saved after each type of signal source. Your Picture Mode settings will enable you to customize the Picture Mode setting for normal home use PICTURE MODE on the remote control when in the Video menu. To restore the factory...
...desired adjustments. 6 Press to select/set. 7 Press MENU to display a picture with minimum enhancements. ✍ You can alter the Video menu settings (Picture, Brightness, Color, etc.) for each Mode. ✍ You may set up a Picture Mode (Vivid, Standard, Pro) independently for Picture, Brightness, Color, Hue, Sharpness ...screen. Typically, Vivid should be saved after each type of signal source. Your Picture Mode settings will enable you to customize the Picture Mode setting for normal home use PICTURE MODE on the remote control when in the Video menu. To restore the factory...
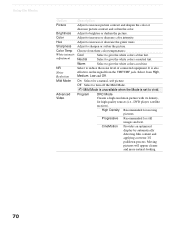
Operating Instructions
Page 70
... tint. Color Temp Choose from three color temperatures: White intensity Cool adjustment Neutral Select to sharpen or soften the picture. Progressive Recommended for high quality sources (i.e., DVD player, satellite receiver). It is set to give the white colors a red tint. Color Adjust to give the white colors a blue tint. Select to increase...
... tint. Color Temp Choose from three color temperatures: White intensity Cool adjustment Neutral Select to sharpen or soften the picture. Progressive Recommended for high quality sources (i.e., DVD player, satellite receiver). It is set to give the white colors a red tint. Color Adjust to give the white colors a blue tint. Select to increase...

Operating Instructions
Page 71
You can create one Custom setting to optimize your cable input's picture, and create another to optimize your DVD player's picture. As you can switch among the three Custom settings. 1 Press the arrow button to the right along the Reality axis, the picture becomes more detailed. For example, you move the... z higher along the Clarity axis, the picture becomes smoother. 3 To save the setting, press . Custom 1 [25] Reality Clarity [ 1] 2 Press the arrow button to reduce noise caused by video encoding and decoding process. To ...
You can create one Custom setting to optimize your cable input's picture, and create another to optimize your DVD player's picture. As you can switch among the three Custom settings. 1 Press the arrow button to the right along the Reality axis, the picture becomes more detailed. For example, you move the... z higher along the Clarity axis, the picture becomes smoother. 3 To save the setting, press . Custom 1 [25] Reality Clarity [ 1] 2 Press the arrow button to reduce noise caused by video encoding and decoding process. To ...
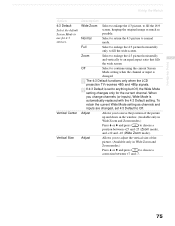
Operating Instructions
Page 75
... replaced with the 4:3 Default setting. When you to move the position of the picture. (Available only in Wide Zoom and Zoom modes.) Press V or v and press to choose a position between +7 and -7. 75 z The 4:3 Default functions only when the LCD projection TV receives 480i and 480p signals.... Using the Menus Using the Menus Option 4:3 Default Select the default Screen Mode to use for the current channel. Adjust Allows you to adjust the vertical size of the picture up and down in the window...
... replaced with the 4:3 Default setting. When you to move the position of the picture. (Available only in Wide Zoom and Zoom modes.) Press V or v and press to choose a position between +7 and -7. 75 z The 4:3 Default functions only when the LCD projection TV receives 480i and 480p signals.... Using the Menus Using the Menus Option 4:3 Default Select the default Screen Mode to use for the current channel. Adjust Allows you to adjust the vertical size of the picture up and down in the window...
Operating Instructions
Page 83
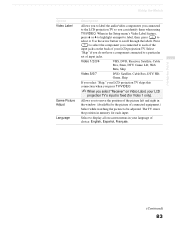
... the picture left and right in the Setup menu's Video Label feature, press V or v to highlight an input to label, then press to a particular set of choice: English, Español, Français. (Continued) 83 Select to be adjusted. Use the arrow button to the LCD projection TV so... Allows you to label the audio/video components you connected to scroll through the labels. When in the window. (Available for the picture of your LCD projection TV. Press to select the component you do not have a component connected to select it. Select "Skip" if you connected to each...
... the picture left and right in the Setup menu's Video Label feature, press V or v to highlight an input to label, then press to a particular set of choice: English, Español, Français. (Continued) 83 Select to be adjusted. Use the arrow button to the LCD projection TV so... Allows you to label the audio/video components you connected to scroll through the labels. When in the window. (Available for the picture of your LCD projection TV. Press to select the component you do not have a component connected to select it. Select "Skip" if you connected to each...


