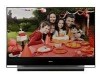

Operating Instructions
Page 3
....sony.com Canada http://www.SonyStyle.ca/registration 3 Contents Important Safety Instructions 4 Welcome to Full HD Experience: Set, Sound, Source, and Setup 6 Picture Quality and Aspect Ratio 6 TV Home Menu: XMB™ (XrossMediaBar)..........7 Getting Started 1. Installing the TV 8 Carrying Your TV 8 Preventing the TV from Toppling Over ...........8 When Installing Your TV against a Wall .........9 Recommended Viewing Area 9 Screen 10 Projection...
....sony.com Canada http://www.SonyStyle.ca/registration 3 Contents Important Safety Instructions 4 Welcome to Full HD Experience: Set, Sound, Source, and Setup 6 Picture Quality and Aspect Ratio 6 TV Home Menu: XMB™ (XrossMediaBar)..........7 Getting Started 1. Installing the TV 8 Carrying Your TV 8 Preventing the TV from Toppling Over ...........8 When Installing Your TV against a Wall .........9 Recommended Viewing Area 9 Screen 10 Projection...
Operating Instructions
Page 5
... cleaning solution directly onto the TV. See "Replacing the Lamp" on page 9. s Hold the TV tightly when carrying it. s The picture quality may result in a... detergent and water. Unplug the set from the wall. Installation s If direct sunlight or other hazards. Projection Lamp s Your TV uses a projection lamp as the original parts. ...TV regularly. KDS-50A3000 KDS-55A3000/ KDS-60A3000 Cleaning s Clean the rear cover area of your foot or fingers. For Safety Be Careful When Moving the TV When you to environmental considerations. You may expose you place the TV in the rear...
... cleaning solution directly onto the TV. See "Replacing the Lamp" on page 9. s Hold the TV tightly when carrying it. s The picture quality may result in a... detergent and water. Unplug the set from the wall. Installation s If direct sunlight or other hazards. Projection Lamp s Your TV uses a projection lamp as the original parts. ...TV regularly. KDS-50A3000 KDS-55A3000/ KDS-60A3000 Cleaning s Clean the rear cover area of your foot or fingers. For Safety Be Careful When Moving the TV When you to environmental considerations. You may expose you place the TV in the rear...
Operating Instructions
Page 6
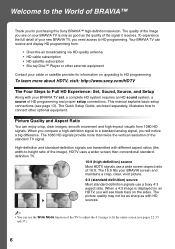
... signal, you need access to HD programming. The 1080 HD signals provide more about HDTV, visit: http://www.sony.com/HDTV The Four Steps to Full HD Experience: Set, Sound, Source, and Setup Along with different aspect ratios (the width-to-height ratio of the image). High...-definition signals are transmitted with your BRAVIA screen and maintains a crisp, clear, vivid picture. 4:3 (standard-definition) source Most standard-definition signals use a wide screen aspect ratio of 16:9. The 16:9 fills your BRAVIA TV set, a complete HD system requires an HD sound system, a source of HD programming ...
... signal, you need access to HD programming. The 1080 HD signals provide more about HDTV, visit: http://www.sony.com/HDTV The Four Steps to Full HD Experience: Set, Sound, Source, and Setup Along with different aspect ratios (the width-to-height ratio of the image). High...-definition signals are transmitted with your BRAVIA screen and maintains a crisp, clear, vivid picture. 4:3 (standard-definition) source Most standard-definition signals use a wide screen aspect ratio of 16:9. The 16:9 fills your BRAVIA TV set, a complete HD system requires an HD sound system, a source of HD programming ...
Operating Instructions
Page 7
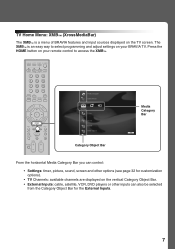
...features and input sources displayed on the TV screen. TV Home Menu: XMB™ (XrossMediaBar) The XMB™ is an easy way to access the XMB™. Press the HOME button on your remote control to select programming and adjust settings on the vertical Category Object Bar.... • External Inputs: cable, satellite, VCR, DVD players or other inputs can control: • Settings: timer, picture, sound, screen and other options (see page 32 for customization options). • TV Channels: available channels are...
...features and input sources displayed on the TV screen. TV Home Menu: XMB™ (XrossMediaBar) The XMB™ is an easy way to access the XMB™. Press the HOME button on your remote control to select programming and adjust settings on the vertical Category Object Bar.... • External Inputs: cable, satellite, VCR, DVD players or other inputs can control: • Settings: timer, picture, sound, screen and other options (see page 32 for customization options). • TV Channels: available channels are...
Operating Instructions
Page 10
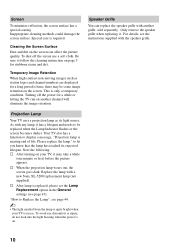
... lifespan. Please replace the lamp." Screen To minimize reflection, the screen surface has a special coating. Your TV also has a function to display a message, "Projection lamp is replaced, please set the Lamp Replacement option in use a soft cloth. Special care is only a temporary condition. Be sure ...for a long period of life. For details, see page 43). As with a new Sony XL-5200 replacement lamp (not supplied). Replace the lamp with any lamp, it . s After lamp is nearing end of time, there may take a while (one minute or less) before the picture appears.
... lifespan. Please replace the lamp." Screen To minimize reflection, the screen surface has a special coating. Your TV also has a function to display a message, "Projection lamp is replaced, please set the Lamp Replacement option in use a soft cloth. Special care is only a temporary condition. Be sure ...for a long period of life. For details, see page 43). As with a new Sony XL-5200 replacement lamp (not supplied). Replace the lamp with any lamp, it . s After lamp is nearing end of time, there may take a while (one minute or less) before the picture appears.
Operating Instructions
Page 12
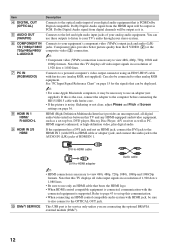
... × 1,080 lines. • Be sure to use only an HDMI cable that can use an adapter (not supplied). Component video provides better picture quality than the S VIDEO (2) or the composite video (3) connection. ~ • Component video (YPBPR) connection is necessary to view 480i, 480p,...DMex). 12 HDMI (High-Definition Multimedia Interface) provides an uncompressed, all-digital audio/video interface between this TV and any HDMI-equipped audio/video equipment, such as a set up this communication. • When connecting an HDMI control compatible audio system with DVI-to-HDMI cable ...
... × 1,080 lines. • Be sure to use only an HDMI cable that can use an adapter (not supplied). Component video provides better picture quality than the S VIDEO (2) or the composite video (3) connection. ~ • Component video (YPBPR) connection is necessary to view 480i, 480p,...DMex). 12 HDMI (High-Definition Multimedia Interface) provides an uncompressed, all-digital audio/video interface between this TV and any HDMI-equipped audio/video equipment, such as a set up this communication. • When connecting an HDMI control compatible audio system with DVI-to-HDMI cable ...
Operating Instructions
Page 13
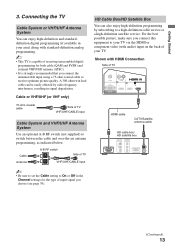
... standard-definition analog programming. ~ • This TV is capable of TV B VHF/UHF/CABLE input ~ • Be sure to set the Cable setting to receive optimum picture quality. For the best possible picture, make sure you connect this equipment to your TV via the HDMI or component video (with audio)...Getting Started 3. A 300-ohm twin lead cable can enjoy high-definition and standarddefinition digital programming (if available in the Channel settings for the type of TV AUDIO L R AUDIO 1 2 3 RGB PC IN HDMI cable CATV/Satellite antenna cable HD cable box/ HD satellite box (Continued)...
... standard-definition analog programming. ~ • This TV is capable of TV B VHF/UHF/CABLE input ~ • Be sure to set the Cable setting to receive optimum picture quality. For the best possible picture, make sure you connect this equipment to your TV via the HDMI or component video (with audio)...Getting Started 3. A 300-ohm twin lead cable can enjoy high-definition and standarddefinition digital programming (if available in the Channel settings for the type of TV AUDIO L R AUDIO 1 2 3 RGB PC IN HDMI cable CATV/Satellite antenna cable HD cable box/ HD satellite box (Continued)...
Operating Instructions
Page 15
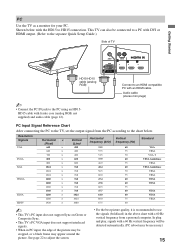
... the separate Quick Setup Guide.) Side of TV Getting Started AUDIO L R AUDIO 1 2 3 RGB HD15-HD15 cable (analog RGB) PC IN Connect to the TV, set the output signal from a personal computer. See page 22 to adjust the screen. • For the best picture quality, it is recommended to use the ... 1024 1024 1080 Horizontal frequency (kHz) 31.5 37.5 31.5 37.9 46.9 48.4 56.5 60.0 47.4 47.8 60.3 47.7 64.0 80.0 67.5 Vertical frequency (Hz) 60 75 70 60 75 60 70 75 60 60 75 60 60 75 60 Standard VGA VESA VGA-T VESA Guidelines VESA VESA Guidelines VESA VESA VESA VESA VESA VESA VESA ~ ...
... the separate Quick Setup Guide.) Side of TV Getting Started AUDIO L R AUDIO 1 2 3 RGB HD15-HD15 cable (analog RGB) PC IN Connect to the TV, set the output signal from a personal computer. See page 22 to adjust the screen. • For the best picture quality, it is recommended to use the ... 1024 1024 1080 Horizontal frequency (kHz) 31.5 37.5 31.5 37.9 46.9 48.4 56.5 60.0 47.4 47.8 60.3 47.7 64.0 80.0 67.5 Vertical frequency (Hz) 60 75 70 60 75 60 70 75 60 60 75 60 60 75 60 Standard VGA VESA VGA-T VESA Guidelines VESA VESA Guidelines VESA VESA VESA VESA VESA VESA VESA ~ ...
Operating Instructions
Page 18
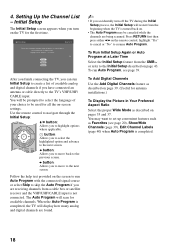
...channels. You will apply to create a list of 5 Please select a language. To run Initial Setup to on the TV for antenna installations.) To Display the Picture in Your Preferred Aspect Ratio Select the proper Wide Mode as Favorites (see page 39. You may be used for available...Auto Program. Initial Setup Step 1 of available analog and digital channels if you to the next screen. Follow the help text provided on -screen settings. B button: Allows you are found. ~ • If you to select the highlighted option and advance to highlight options where applicable. The...
...channels. You will apply to create a list of 5 Please select a language. To run Initial Setup to on the TV for antenna installations.) To Display the Picture in Your Preferred Aspect Ratio Select the proper Wide Mode as Favorites (see page 39. You may be used for available...Auto Program. Initial Setup Step 1 of available analog and digital channels if you to the next screen. Follow the help text provided on -screen settings. B button: Allows you are found. ~ • If you to select the highlighted option and advance to highlight options where applicable. The...
Operating Instructions
Page 20
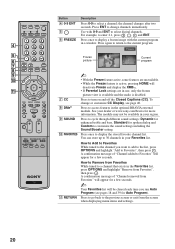
...FREEZE Press once to the previous screen or exit from the screen when displaying menu items and settings. 20 Press again to return to 30 channels in use, only the frozen picture view is available and the audio is active, pressing HOME will be available in your region. ... setting. 0 FAVORITES Press once to turn on and off the Closed Captions (CC). the channel changes after two seconds. You can store up to the current program. 4 Freeze 5 Frozen Current 6 picture program 7 8 9 ~ 0 • With the Freeze feature active, some features are in your dealer or www.sony...
...FREEZE Press once to the previous screen or exit from the screen when displaying menu items and settings. 20 Press again to return to 30 channels in use, only the frozen picture view is available and the audio is active, pressing HOME will be available in your region. ... setting. 0 FAVORITES Press once to turn on and off the Closed Captions (CC). the channel changes after two seconds. You can store up to the current program. 4 Freeze 5 Frozen Current 6 picture program 7 8 9 ~ 0 • With the Freeze feature active, some features are in your dealer or www.sony...
Operating Instructions
Page 21
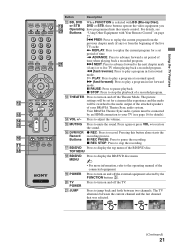
...; For more information, refer to the operating manual of the BD/DVD disc. ql POWER Press to turn on and off the TV. w; For details, see page 16 for a set period of a recorded program. m (fast reverse): Press to play a program at a normal speed. H PLAY: Press to play a program in...control. M (fast forward): Press to jump back and forth between the current channel and the last channel that was selected. The picture settings will be set period of your TV (see Buttons "Using Other Equipment with BD (Blu-ray Disc), ql or STB DVD or STB, these buttons operate the video ...
...; For more information, refer to the operating manual of the BD/DVD disc. ql POWER Press to turn on and off the TV. w; For details, see page 16 for a set period of a recorded program. m (fast reverse): Press to play a program at a normal speed. H PLAY: Press to play a program in...control. M (fast forward): Press to jump back and forth between the current channel and the last channel that was selected. The picture settings will be set period of your TV (see Buttons "Using Other Equipment with BD (Blu-ray Disc), ql or STB DVD or STB, these buttons operate the video ...
Operating Instructions
Page 22
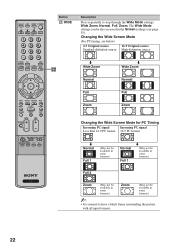
... be available in the Screen settings (see below) 4:3 Original source 16:9 Original source Standard-definition source High-definition source m m Wide Zoom Wide Zoom ws Normal Normal Full Full Zoom Zoom Changing ... not be also accessed in some formats.) ~ • It is normal to step through the Wide Mode settings: Wide Zoom, Normal, Full, Zoom. Button ws WIDE Description Press repeatedly to have a black frame surrounding the picture with all input formats. 22 Changing the Wide Screen Mode (For PC timing, see page 35).
... be available in the Screen settings (see below) 4:3 Original source 16:9 Original source Standard-definition source High-definition source m m Wide Zoom Wide Zoom ws Normal Normal Full Full Zoom Zoom Changing ... not be also accessed in some formats.) ~ • It is normal to step through the Wide Mode settings: Wide Zoom, Normal, Full, Zoom. Button ws WIDE Description Press repeatedly to have a black frame surrounding the picture with all input formats. 22 Changing the Wide Screen Mode (For PC timing, see page 35).

Operating Instructions
Page 23
... and menu wf shortcuts. To scan quickly through the inputs. ~ • Inputs can be accessed in the Picture settings. For details, see pages 7 and 30). Using the TV Features Button Description wd PICTURE Press repeatedly to cycle through the available picture modes: Vivid, Standard, Cinema, Photo, Custom. (Available options depend on the current mode.) The...
... and menu wf shortcuts. To scan quickly through the inputs. ~ • Inputs can be accessed in the Picture settings. For details, see pages 7 and 30). Using the TV Features Button Description wd PICTURE Press repeatedly to cycle through the available picture modes: Vivid, Standard, Cinema, Photo, Custom. (Available options depend on the current mode.) The...
Operating Instructions
Page 28
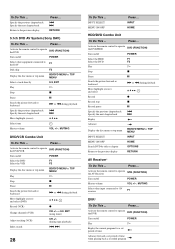
...OPTIONS Return to the previous display Press ... . > RETURN 5.1ch DVD AV System (Sony DAV) To Do This ... Press ... Activate the remote control to the DAV F1 Disk... menu BD/DVD MENU or TOP MENU Select a track directly 0-9, ENT Play H Stop x Pause X Search the picture forward or backward M or m during playback Move highlight (cursor) and select (DVD) V v B b, Record ...) Turn on/off POWER Play H Replay the current program for a set period of time Advance forward a set period of time when playing back a recorded program Specify the previous chapter...
...OPTIONS Return to the previous display Press ... . > RETURN 5.1ch DVD AV System (Sony DAV) To Do This ... Press ... Activate the remote control to the DAV F1 Disk... menu BD/DVD MENU or TOP MENU Select a track directly 0-9, ENT Play H Stop x Pause X Search the picture forward or backward M or m during playback Move highlight (cursor) and select (DVD) V v B b, Record ...) Turn on/off POWER Play H Replay the current program for a set period of time Advance forward a set period of time when playing back a recorded program Specify the previous chapter...
Operating Instructions
Page 31
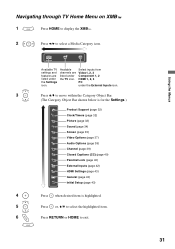
...31 Settings Available TV settings and features are listed under the TV icon. Available channels are listed under the External Inputs icon. 3 Press V/v to move within the Category Object Bar. (The Category Object Bar shown below is for the Settings.) Product Support (page 32) Clock/Timers (page 32) Picture (page... 32) Sound (page 34) Screen (page 35) Video Options (page 37) Audio Options (page 38) Channel (page 39) CC Closed Captions (CC) (page 40) Parental Lock (page 40) External Inputs (page 42) HDMI Settings (page 43) General (...
...31 Settings Available TV settings and features are listed under the TV icon. Available channels are listed under the External Inputs icon. 3 Press V/v to move within the Category Object Bar. (The Category Object Bar shown below is for the Settings.) Product Support (page 32) Clock/Timers (page 32) Picture (page... 32) Sound (page 34) Screen (page 35) Video Options (page 37) Audio Options (page 38) Channel (page 39) CC Closed Captions (CC) (page 40) Parental Lock (page 40) External Inputs (page 42) HDMI Settings (page 43) General (...
Operating Instructions
Page 32
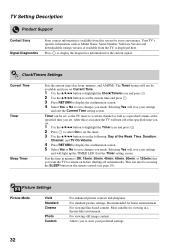
... you made . Picture Settings Picture Mode Vivid Standard Cinema Photo Custom For enhanced picture contrast and sharpness. Clock/Timers Settings Current Time Timer Sleep Timer Sets the current time (day, hour, minutes, and AM/PM). For viewing film-based content. Timer can also be set the following: Day of the Week, Time, Duration, Channel, and TV On Volume...
... you made . Picture Settings Picture Mode Vivid Standard Cinema Photo Custom For enhanced picture contrast and sharpness. Clock/Timers Settings Current Time Timer Sleep Timer Sets the current time (day, hour, minutes, and AM/PM). For viewing film-based content. Timer can also be set the following: Day of the Week, Time, Duration, Channel, and TV On Volume...

Operating Instructions
Page 33
..., the brightness is at a maximum. High With this option, the brightness has reached the maximum level. Useful for still pictures. Resets the current Picture Mode setting to On. (Continued) 33 Auto 1:Recommended option for TV viewing in MPEG-compressed video. Medium With this option, the brightness is about the standard level. It is suitable...
..., the brightness is at a maximum. High With this option, the brightness has reached the maximum level. Useful for still pictures. Resets the current Picture Mode setting to On. (Continued) 33 Auto 1:Recommended option for TV viewing in MPEG-compressed video. Medium With this option, the brightness is about the standard level. It is suitable...
Operating Instructions
Page 34
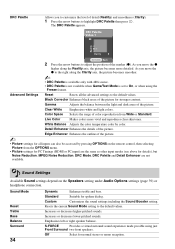
... arrow buttons to highlight DRC Palette then press . Custom Customizes the sound settings including the Sound Booster setting. As you to customize the level of color reproduction from the OPTIONS menu. • Picture settings for PC Timings (HDMI or PC input) are the same as other input...and light colors. Resets the current Sound Mode setting to adjust the position of the picture. ~ • Picture settings for normal stereo or mono reception. As you move the z to the right along the Reality axis, the picture becomes more vivid and reproduces clear skin tones....
... arrow buttons to highlight DRC Palette then press . Custom Customizes the sound settings including the Sound Booster setting. As you to customize the level of color reproduction from the OPTIONS menu. • Picture settings for PC Timings (HDMI or PC input) are the same as other input...and light colors. Resets the current Sound Mode setting to adjust the position of the picture. ~ • Picture settings for normal stereo or mono reception. As you move the z to the right along the Reality axis, the picture becomes more vivid and reproduces clear skin tones....
Operating Instructions
Page 35
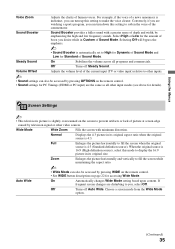
... input (TV or video input) relative to you desire while in Custom of Sound Mode. Screen Settings ~ • This television's picture is indistinct, you can turn down this mode to fill the screen when the original source is 16:9 (High-definition source), select this setting to High... fuller sound with minimum distortion. Off Turns off Auto Wide. Normal Displays the 4:3 picture in its original aspect ratio when the original source is automatically set to soften the voice of picture at screen edge caused by emphasizing the high and low frequency sounds. Auto Wide On...
... input (TV or video input) relative to you desire while in Custom of Sound Mode. Screen Settings ~ • This television's picture is indistinct, you can turn down this mode to fill the screen when the original source is 16:9 (High-definition source), select this setting to High... fuller sound with minimum distortion. Off Turns off Auto Wide. Normal Displays the 4:3 picture in its original aspect ratio when the original source is automatically set to soften the voice of picture at screen edge caused by emphasizing the high and low frequency sounds. Auto Wide On...
Operating Instructions
Page 47
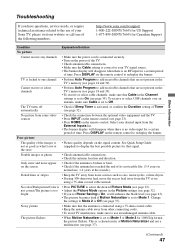
...sony.com/tvsupport 1-800-222-SONY(7669) for US Support 1-877-899-SONY(7669) for Canadian Support Condition Explanation/Solution No picture Cannot receive any channels • Make sure the power cord is connected securely. • Turn on the power of the TV. • Check antenna/cable connections. • Make sure the Cable setting... the Picture settings (see page 32). The picture flickers • When Motion Naturalizer is • Press PICTURE to select the desired Picture Mode (see page 23). This is activated, or confirm the Duration setting of Timer (see page 32). The TV turns ...
...sony.com/tvsupport 1-800-222-SONY(7669) for US Support 1-877-899-SONY(7669) for Canadian Support Condition Explanation/Solution No picture Cannot receive any channels • Make sure the power cord is connected securely. • Turn on the power of the TV. • Check antenna/cable connections. • Make sure the Cable setting... the Picture settings (see page 32). The picture flickers • When Motion Naturalizer is • Press PICTURE to select the desired Picture Mode (see page 23). This is activated, or confirm the Duration setting of Timer (see page 32). The TV turns ...


