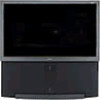
Primary User Manual (Large File - 14.16 MB)
Page 4
... dust or mechanical vibration. ❑ Avoid operating the projection TV at the rear of the projection TV, below . Trademark Information Manufactured under license from a cold to a warm location, or if the room temperature changes suddenly, the picture may not communicate with opaque drapery. i.LINK is a trademark of Sony used only to designate that a product contains an...
... dust or mechanical vibration. ❑ Avoid operating the projection TV at the rear of the projection TV, below . Trademark Information Manufactured under license from a cold to a warm location, or if the room temperature changes suddenly, the picture may not communicate with opaque drapery. i.LINK is a trademark of Sony used only to designate that a product contains an...

Primary User Manual (Large File - 14.16 MB)
Page 5
...plug by the manufacturer, as they may touch dangerous voltage points or short out parts that could result in . If the picture becomes dark after using the projection TV for example, near a bathtub, washbowl, kitchen sink, or laundry tub, in the operating instructions or service manual. Consult...near a swimming pool, etc. The set may be observed in fire or electric shock. Use only a cart or stand recommended by Sony for cleaning. An appliance and cart combination should be removed with a cloth slightly dampened with all warnings, cautions and instructions placed on...
...plug by the manufacturer, as they may touch dangerous voltage points or short out parts that could result in . If the picture becomes dark after using the projection TV for example, near a bathtub, washbowl, kitchen sink, or laundry tub, in the operating instructions or service manual. Consult...near a swimming pool, etc. The set may be observed in fire or electric shock. Use only a cart or stand recommended by Sony for cleaning. An appliance and cart combination should be removed with a cloth slightly dampened with all warnings, cautions and instructions placed on...

Primary User Manual (Large File - 14.16 MB)
Page 7
... to drop it on your footing while installing the projection TV. For Safety Be careful when moving the projection TV When you carry the projection TV in a picture tube implosion. When the set . Watch your foot or fingers. Carry the projection TV in the specified manner If you place the projection TV in safe operating condition, and to so certify. Be...
... to drop it on your footing while installing the projection TV. For Safety Be careful when moving the projection TV When you carry the projection TV in a picture tube implosion. When the set . Watch your foot or fingers. Carry the projection TV in the specified manner If you place the projection TV in safe operating condition, and to so certify. Be...
Primary User Manual (Large File - 14.16 MB)
Page 12
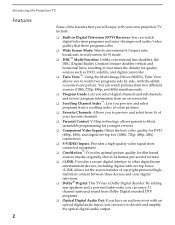
... optical digital audio input, you can use it to other digital home entertainment devices, including digital cable set -top box (1080i, 720p, 480p, 480i) connections. ❑ S-VIDEO Inputs: Provides a high-quality video signal from connected equipment. ❑ CineMotion™: Provides optimal picture quality ... scrolling index of video pictures. ❑ Favorite Channels: Allows you to preview and select from 16 of the features that you will enjoy with your new projection TV include: ❑ Built-in Digital Television (DTV) Receiver: You can watch digital television programs and enjoy...
... optical digital audio input, you can use it to other digital home entertainment devices, including digital cable set -top box (1080i, 720p, 480p, 480i) connections. ❑ S-VIDEO Inputs: Provides a high-quality video signal from connected equipment. ❑ CineMotion™: Provides optimal picture quality ... scrolling index of video pictures. ❑ Favorite Channels: Allows you to preview and select from 16 of the features that you will enjoy with your new projection TV include: ❑ Built-in Digital Television (DTV) Receiver: You can watch digital television programs and enjoy...
Primary User Manual (Large File - 14.16 MB)
Page 14
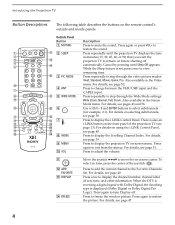
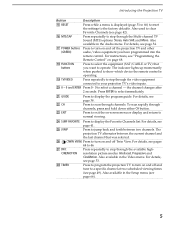
... sound. Outside Panel Button Description 1 MUTING Press to freeze the window picture. Also available in the Screen Mode menu. Also available in the Video 6 menu. For details on -screen cursor. There is displayed (Dolby Digital or Dolby Digital Pro Logic). Introducing the Projection TV Button Descriptions The following table describes the buttons on the front...
... sound. Outside Panel Button Description 1 MUTING Press to freeze the window picture. Also available in the Screen Mode menu. Also available in the Video 6 menu. For details on -screen cursor. There is displayed (Dolby Digital or Dolby Digital Pro Logic). Introducing the Projection TV Button Descriptions The following table describes the buttons on the front...
Primary User Manual (Large File - 14.16 MB)
Page 15
... Also available in the Audio menu. Introducing the Projection TV Button Description qg RESET Press while a menu is operating. For instructions, see page 41. ql TV/VIDEO Press repeatedly to step through the available high- Press to exit the on and off and tune... - 9 and ENTER Press 0 - 9 to operate. Also available in the Setup menu (see page 66). 5 The projection TV alternates between two channels. CINEMOTION resolution picture modes: Interlaced, Progressive and CineMotion. To scan rapidly through channels. the channel changes after 2 seconds.
... Also available in the Audio menu. Introducing the Projection TV Button Description qg RESET Press while a menu is operating. For instructions, see page 41. ql TV/VIDEO Press repeatedly to step through the available high- Press to exit the on and off and tune... - 9 and ENTER Press 0 - 9 to operate. Also available in the Setup menu (see page 66). 5 The projection TV alternates between two channels. CINEMOTION resolution picture modes: Interlaced, Progressive and CineMotion. To scan rapidly through channels. the channel changes after 2 seconds.
Primary User Manual (Large File - 14.16 MB)
Page 17
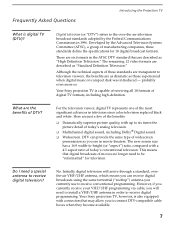
... Systems Committee (ATSC), a group of digital TV formats, including high-definition. Your Sony projection TV, however, is also equipped with up to be "reformatted" for 18 digital broadcast formats. There are six formats in the ATSC DTV standard that are described as you to receive digital television? Do I need to six times the picture detail of widescreen presentation as "Standard...
... Systems Committee (ATSC), a group of digital TV formats, including high-definition. Your Sony projection TV, however, is also equipped with up to be "reformatted" for 18 digital broadcast formats. There are six formats in the ATSC DTV standard that are described as you to receive digital television? Do I need to six times the picture detail of widescreen presentation as "Standard...

Primary User Manual (Large File - 14.16 MB)
Page 24
Setting Up the Projection TV Side of Front Panel MENU - + - + FLASH TV/VIDEO FOCUS VOLUME CHANNEL qs qd S VIDEO VIDEO 2 INPUT VIDEO L(MONO) AUDIO R qs S VIDEO 2 INPUT qd VIDEO 2 INPUT VIDEO/L(MONO)-AUDIO-R Connects to the audio and video OUT jacks on your camcorder or other video component. 14 Provides better picture quality than the VHF/UHF jacks or the Video IN jack. Connect to the S VIDEO OUT jack of your camcorder or other S VIDEO equipped video component.
Setting Up the Projection TV Side of Front Panel MENU - + - + FLASH TV/VIDEO FOCUS VOLUME CHANNEL qs qd S VIDEO VIDEO 2 INPUT VIDEO L(MONO) AUDIO R qs S VIDEO 2 INPUT qd VIDEO 2 INPUT VIDEO/L(MONO)-AUDIO-R Connects to the audio and video OUT jacks on your camcorder or other video component. 14 Provides better picture quality than the VHF/UHF jacks or the Video IN jack. Connect to the S VIDEO OUT jack of your camcorder or other S VIDEO equipped video component.

Primary User Manual (Large File - 14.16 MB)
Page 25
Provides better picture quality than the VHF/UHF IN jack. A 6th video input (VIDEO 2) is determined by the SELECT OUT setting in the Setup menu (see page 65). Connects to the S VIDEO OUT jack of your VCR or other S VIDEO-equipped video component. ... signals to the optical audio input of the projection TV. Connects to your VCR or other Sony infrared-controlled audio or video components. The output signal is located on your cable source. Rear Panel 1 2 6 3 4 5 Setting Up the Projection TV 8 1 9 2 DIGITAL AUDIO (OPTICAL) OUT PCM/DOLBY DIGITAL q; 7 L L qa R R SUB ...
Provides better picture quality than the VHF/UHF IN jack. A 6th video input (VIDEO 2) is determined by the SELECT OUT setting in the Setup menu (see page 65). Connects to the S VIDEO OUT jack of your VCR or other S VIDEO-equipped video component. ... signals to the optical audio input of the projection TV. Connects to your VCR or other Sony infrared-controlled audio or video components. The output signal is located on your cable source. Rear Panel 1 2 6 3 4 5 Setting Up the Projection TV 8 1 9 2 DIGITAL AUDIO (OPTICAL) OUT PCM/DOLBY DIGITAL q; 7 L L qa R R SUB ...

Primary User Manual (Large File - 14.16 MB)
Page 27
...and 300-ohm twin lead cables (C): C VHF and UHF 75-ohm coaxial cable U/V Splitter (not supplied) VHF/UHF Rear of TV Antenna connector Some homes may have in the best picture quality. 17 Newer homes are usually equipped with 75-ohm coaxial cable (A): A VHF Only or VHF/UHF 75-ohm coaxial cable... Only or UHF Only or VHF/UHF 300-ohm twin lead cable VHF/UHF Rear of TV 300-ohm twin lead cable ✍ Of the three methods shown, connection A results in your home. Setting Up the Projection TV Basic Connections This section describes how to connect a VHF/UHF antenna, CATV cable, and CATV...
...and 300-ohm twin lead cables (C): C VHF and UHF 75-ohm coaxial cable U/V Splitter (not supplied) VHF/UHF Rear of TV Antenna connector Some homes may have in the best picture quality. 17 Newer homes are usually equipped with 75-ohm coaxial cable (A): A VHF Only or VHF/UHF 75-ohm coaxial cable... Only or UHF Only or VHF/UHF 300-ohm twin lead cable VHF/UHF Rear of TV 300-ohm twin lead cable ✍ Of the three methods shown, connection A results in your home. Setting Up the Projection TV Basic Connections This section describes how to connect a VHF/UHF antenna, CATV cable, and CATV...

Primary User Manual (Large File - 14.16 MB)
Page 29
...OUT jack to the projection TV's CABLE jack. 3 Using an A/V cable, connect the VCR's Audio and Video OUT jacks to the projection TV's Audio and Video IN jacks. ✍ If the VCR you are connecting has an S VIDEO jack, you will also need audio cables for improved picture quality (compared to... a combination audio/video cable). Coaxial cable TV AUDIO-R (red) AUDIO-L (white) VIDEO...
...OUT jack to the projection TV's CABLE jack. 3 Using an A/V cable, connect the VCR's Audio and Video OUT jacks to the projection TV's Audio and Video IN jacks. ✍ If the VCR you are connecting has an S VIDEO jack, you will also need audio cables for improved picture quality (compared to... a combination audio/video cable). Coaxial cable TV AUDIO-R (red) AUDIO-L (white) VIDEO...

Primary User Manual (Large File - 14.16 MB)
Page 33
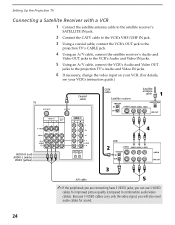
...jacks. 3 Connect a coaxial cable from your cable or antenna to the projection TV's CABLE jack. ✍ If the receiver you are connecting has an S VIDEO jack, you will also need audio cables for improved picture quality (compared to a combination audio/video cable). Because S VIDEO cables carry... only the video signal, you can use an S VIDEO cable for sound. Coaxial cable TV AUDIO-R (red) AUDIO-L (white) VIDEO (yellow) Satellite receiver...
...jacks. 3 Connect a coaxial cable from your cable or antenna to the projection TV's CABLE jack. ✍ If the receiver you are connecting has an S VIDEO jack, you will also need audio cables for improved picture quality (compared to a combination audio/video cable). Because S VIDEO cables carry... only the video signal, you can use an S VIDEO cable for sound. Coaxial cable TV AUDIO-R (red) AUDIO-L (white) VIDEO (yellow) Satellite receiver...
Primary User Manual (Large File - 14.16 MB)
Page 34
... the VCR's VHF/UHF IN jack. 3 Using a coaxial cable, connect the VCR's OUT jack to the projection TV's CABLE jack. 4 Using an A/V cable, connect the satellite receiver's Audio and Video OUT jacks to the...IN jacks. 5 Using an A/V cable, connect the VCR's Audio and Video OUT jacks to the projection TV's Audio and Video IN jacks. 6 If necessary, change the video input on your VCR. (...For details, see your VCR's instruction guide.) Coaxial cable CATV cable Satellite receiver Satellite antenna cable TV AUDIO-R (red) AUDIO-L (white) VIDEO (yellow) 24 VCR A/V cable ✍ If the peripherals ...
... the VCR's VHF/UHF IN jack. 3 Using a coaxial cable, connect the VCR's OUT jack to the projection TV's CABLE jack. 4 Using an A/V cable, connect the satellite receiver's Audio and Video OUT jacks to the...IN jacks. 5 Using an A/V cable, connect the VCR's Audio and Video OUT jacks to the projection TV's Audio and Video IN jacks. 6 If necessary, change the video input on your VCR. (...For details, see your VCR's instruction guide.) Coaxial cable CATV cable Satellite receiver Satellite antenna cable TV AUDIO-R (red) AUDIO-L (white) VIDEO (yellow) 24 VCR A/V cable ✍ If the peripherals ...

Primary User Manual (Large File - 14.16 MB)
Page 38
... open Camcorder If you have a mono camcorder, connect its audio output to the projection TV's AUDIO L jack. ✍ If the camcorder you are connecting has an S VIDEO jack, you can connect the camcorder to the projection TV's rear Audio and Video IN jacks. ❑ Using A/V cables, connect the ... Audio and Video OUT jacks to a combination audio/video cable). If you prefer, you will also need audio cables for improved picture quality (compared to the projection TV's Audio and Video IN jacks. Because S VIDEO cables carry only the video signal, you can use an S VIDEO cable for ...
... open Camcorder If you have a mono camcorder, connect its audio output to the projection TV's AUDIO L jack. ✍ If the camcorder you are connecting has an S VIDEO jack, you can connect the camcorder to the projection TV's rear Audio and Video IN jacks. ❑ Using A/V cables, connect the ... Audio and Video OUT jacks to a combination audio/video cable). If you prefer, you will also need audio cables for improved picture quality (compared to the projection TV's Audio and Video IN jacks. Because S VIDEO cables carry only the video signal, you can use an S VIDEO cable for ...
Primary User Manual (Large File - 14.16 MB)
Page 46
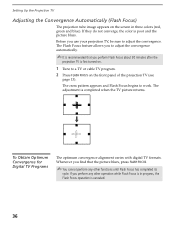
If they do not converge, the color is completed when the TV picture returns. , To Obtain Optimum Convergence for Digital TV Programs The optimum convergence alignment varies with digital TV formats. If you find that you use your projection TV, be sure to adjust the convergence. The Flash Focus feature allows you to adjust the convergence automatically. ✍ It...
If they do not converge, the color is completed when the TV picture returns. , To Obtain Optimum Convergence for Digital TV Programs The optimum convergence alignment varies with digital TV formats. If you find that you use your projection TV, be sure to adjust the convergence. The Flash Focus feature allows you to adjust the convergence automatically. ✍ It...

Primary User Manual (Large File - 14.16 MB)
Page 49
... V or v to highlight the picture, then press . 5 To move the live video (from step 4) from the right to a live preview window, it changes briefly from a scrolling index of the Scrolling Channel Index, press again. Using the Projection TV Features Using the Scrolling Channel Index The... Scrolling Channel Index lets you select programs from a frozen video picture to the main (left ) window, and four scrolling video pictures in the main (left ) window of video pictures. 1 Press INDEX. Live preview window As each picture on...
... V or v to highlight the picture, then press . 5 To move the live video (from step 4) from the right to a live preview window, it changes briefly from a scrolling index of the Scrolling Channel Index, press again. Using the Projection TV Features Using the Scrolling Channel Index The... Scrolling Channel Index lets you select programs from a frozen video picture to the main (left ) window, and four scrolling video pictures in the main (left ) window of video pictures. 1 Press INDEX. Live preview window As each picture on...

Primary User Manual (Large File - 14.16 MB)
Page 53
...to its original size. Full m Zoom Mode enlarges the 4:3 picture horizontally and vertically to fill the 16:9 screen. z When you watch 4:3 normal broadcasts in several Wide Screen modes (16:9 aspect ratio). Using the Projection TV Features Using Wide Screen Mode Wide Screen mode lets you change ...channels or inputs, the Wide Mode settings revert to Wide Zoom (or the 4:3 Default setting in the Screen Mode menu). Wide Zoom m Normal returns the 4:3 picture to toggle through the...
...to its original size. Full m Zoom Mode enlarges the 4:3 picture horizontally and vertically to fill the 16:9 screen. z When you watch 4:3 normal broadcasts in several Wide Screen modes (16:9 aspect ratio). Using the Projection TV Features Using Wide Screen Mode Wide Screen mode lets you change ...channels or inputs, the Wide Mode settings revert to Wide Zoom (or the 4:3 Default setting in the Screen Mode menu). Wide Zoom m Normal returns the 4:3 picture to toggle through the...
Primary User Manual (Large File - 14.16 MB)
Page 54
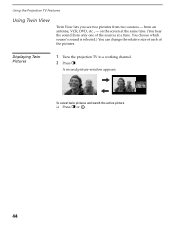
You choose which source's sound is selected.) You can change the relative size of each of the sources at the same time. (You hear the sound from only one of the pictures. from two sources - Displaying Twin Pictures 1 Tune the projection TV to a working channel. 2 Press . on the screen at a time. A second picture-window appears. , , To cancel twin pictures and watch the active picture ❑ Press or . 44 Using the Projection TV Features Using Twin View Twin View lets you see two pictures from an antenna, VCR, DVD, etc., -
You choose which source's sound is selected.) You can change the relative size of each of the sources at the same time. (You hear the sound from only one of the pictures. from two sources - Displaying Twin Pictures 1 Tune the projection TV to a working channel. 2 Press . on the screen at a time. A second picture-window appears. , , To cancel twin pictures and watch the active picture ❑ Press or . 44 Using the Projection TV Features Using Twin View Twin View lets you see two pictures from an antenna, VCR, DVD, etc., -

Primary User Manual (Large File - 14.16 MB)
Page 55
... source and a 16:9 enhanced source (such as a VCR or DVD player) in the second window. ❑ Digital channels and equipment connected to VIDEO 5 or VIDEO 6 inputs display in the left picture ❑ Move the joystick B. , , Factors affecting Twin View include ❑ If you use a cable box...to cable, for example, press ANT or TV/VIDEO on the remote control). ❑ Change the picture size by side in blue is not available while viewing i.LINK devices. 45 Activating the Picture Using the Projection TV Features With Twin View, the picture highlighted in Twin View, the 4:3 source ...
... source and a 16:9 enhanced source (such as a VCR or DVD player) in the second window. ❑ Digital channels and equipment connected to VIDEO 5 or VIDEO 6 inputs display in the left picture ❑ Move the joystick B. , , Factors affecting Twin View include ❑ If you use a cable box...to cable, for example, press ANT or TV/VIDEO on the remote control). ❑ Change the picture size by side in blue is not available while viewing i.LINK devices. 45 Activating the Picture Using the Projection TV Features With Twin View, the picture highlighted in Twin View, the 4:3 source ...

Primary User Manual (Large File - 14.16 MB)
Page 56
The next time you use the Twin View function, the memorized sizes appear. 46 When you adjust the twin screen sizes, the projection TV memorizes the change . 2 Move the joystick V to enlarge the picture. 3 Move the joystick v to change . Using the Projection TV Features Changing the Picture Size The zoom feature lets you vary the relative size of the left and right pictures. 1 Activate the picture whose size you want to make the picture smaller.
The next time you use the Twin View function, the memorized sizes appear. 46 When you adjust the twin screen sizes, the projection TV memorizes the change . 2 Move the joystick V to enlarge the picture. 3 Move the joystick v to change . Using the Projection TV Features Changing the Picture Size The zoom feature lets you vary the relative size of the left and right pictures. 1 Activate the picture whose size you want to make the picture smaller.


