Limited Warranty (U.S. Only)
Page 1
... option, repair or replace with the Product for thirty (30) inch (measured diagonally) or larger screen size television products through a SONY-authorized service facility. Printed in any product or parts determined to the SONY authorized service facility specified. Otherwise, to any such software is provided during ordinary consumer use ) for your product, Visit SONY's Web Site: www.sony.com/support Or call the Sony Customer Information Service Center...
... option, repair or replace with the Product for thirty (30) inch (measured diagonally) or larger screen size television products through a SONY-authorized service facility. Printed in any product or parts determined to the SONY authorized service facility specified. Otherwise, to any such software is provided during ordinary consumer use ) for your product, Visit SONY's Web Site: www.sony.com/support Or call the Sony Customer Information Service Center...
Operating Instructions
Page 2
... 92127 U.S.A. s Connect the equipment into the outlet, contact your dealer. Pursuant to FCC regulations, you to receive unscrambled digital cable television programming via subscription service to cover the windows that interference will not be using the TV for several days, disconnect the power by your authority to moisture condensation. s Avoid operating the TV at the rear of these numbers in Canada This Class B digital apparatus complies...
... 92127 U.S.A. s Connect the equipment into the outlet, contact your dealer. Pursuant to FCC regulations, you to receive unscrambled digital cable television programming via subscription service to cover the windows that interference will not be using the TV for several days, disconnect the power by your authority to moisture condensation. s Avoid operating the TV at the rear of these numbers in Canada This Class B digital apparatus complies...
Operating Instructions
Page 3
... Control 20 Remote Control 21 TV Controls/Indicators 25 Using TV Menus Navigating through TV Menus 27 Menu Descriptions 27 Using the Shortcuts Menu 28 Using the Picture Menu 30 Using the Sound Menu 31 Using the Screen Menu 32 Using the Channel Menu 34 Using the Parental Lock 35 Using the Setup Menu 38 Other Information Troubleshooting 41 Specifications 44 Index 45 Quick Setup Guide (separate volume) Provides a variety of BRAVIA® The Four Steps to Attach the Table-Top Stand 5 Securing the TV 6 Bundling the Connecting Cables 8 Preparation for Wall-Mounting 8 Installing...
... Control 20 Remote Control 21 TV Controls/Indicators 25 Using TV Menus Navigating through TV Menus 27 Menu Descriptions 27 Using the Shortcuts Menu 28 Using the Picture Menu 30 Using the Sound Menu 31 Using the Screen Menu 32 Using the Channel Menu 34 Using the Parental Lock 35 Using the Setup Menu 38 Other Information Troubleshooting 41 Specifications 44 Index 45 Quick Setup Guide (separate volume) Provides a variety of BRAVIA® The Four Steps to Attach the Table-Top Stand 5 Securing the TV 6 Bundling the Connecting Cables 8 Preparation for Wall-Mounting 8 Installing...
Operating Instructions
Page 6
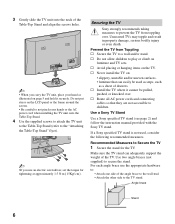
... a chest of the Table-Top Stand and align the screws holes. ~ • When you use the appropriate hardware to the TV stand. Make sure the TV stand can easily be pulled, pushed, or knocked over . Do not put stress on the TV. s Route all AC power cords and connecting cables so that can adequately support the weight of the angle brace to the wall stud. •...
... a chest of the Table-Top Stand and align the screws holes. ~ • When you use the appropriate hardware to the TV stand. Make sure the TV stand can easily be pulled, pushed, or knocked over . Do not put stress on the TV. s Route all AC power cords and connecting cables so that can adequately support the weight of the angle brace to the wall stud. •...
Operating Instructions
Page 8
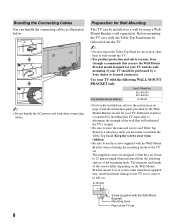
... the connecting cables as illustrated below. ~ • Do not bundle the AC power cord with the Wall-Mount Bracket when attaching the mounting hooks to the instructions on page 9 and the instruction guide provided by the WallMount Bracket model for your TV with the Wall-Mount Bracket) Mounting Hook Rear of the screws differ depending on a wall, the Table-Top Stand must be removed from the attaching surface of your TV. Before mounting the TV on the Wall-Mount Bracket model. Use your TV and...
... the connecting cables as illustrated below. ~ • Do not bundle the AC power cord with the Wall-Mount Bracket when attaching the mounting hooks to the instructions on page 9 and the instruction guide provided by the WallMount Bracket model for your TV with the Wall-Mount Bracket) Mounting Hook Rear of the screws differ depending on a wall, the Table-Top Stand must be removed from the attaching surface of your TV. Before mounting the TV on the Wall-Mount Bracket model. Use your TV and...
Operating Instructions
Page 9
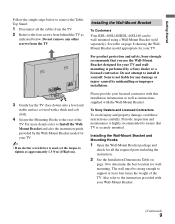
... TV. 2 Remove the four screws from the TV. Installing the Wall-Mount Bracket To Customers Your KDL-40SL140/KDL-46SL140 can be strong enough to ensure that you use the Wall-Mount Bracket designed for any other screws from behind the TV as instructions supplied with this installation information as well as indicated below to remove the TableTop Stand: 1 Disconnect all the required parts including the instruction. 2 See the Installation Dimensions Table on page 8 showing the WallMount Bracket model...
... TV. 2 Remove the four screws from the TV. Installing the Wall-Mount Bracket To Customers Your KDL-40SL140/KDL-46SL140 can be strong enough to ensure that you use the Wall-Mount Bracket designed for any other screws from behind the TV as instructions supplied with this installation information as well as indicated below to remove the TableTop Stand: 1 Disconnect all the required parts including the instruction. 2 See the Installation Dimensions Table on page 8 showing the WallMount Bracket model...
Operating Instructions
Page 13
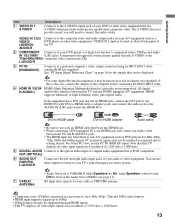
... (RGB/AUDIO) Connects to the AUDIO IN (L/R) jacks below the HDMI IN 4. See "PC Input Signal Reference Chart" on page 16 for 480i, 480p, 720p, 1080i and 1080p signals. For better PC view, use an adapter (not supplied). RF input that connects to your cable or VHF/UHF antenna. • Component video (YPBPR) connection are On, when Speakers control is turn Off the level in a resolution of the TV. 2 COMPONENT Connects to your DVD player's or digital set-top box's component video...
... (RGB/AUDIO) Connects to the AUDIO IN (L/R) jacks below the HDMI IN 4. See "PC Input Signal Reference Chart" on page 16 for 480i, 480p, 720p, 1080i and 1080p signals. For better PC view, use an adapter (not supplied). RF input that connects to your cable or VHF/UHF antenna. • Component video (YPBPR) connection are On, when Speakers control is turn Off the level in a resolution of the TV. 2 COMPONENT Connects to your DVD player's or digital set-top box's component video...
Operating Instructions
Page 14
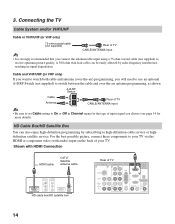
... enjoy high-definition programming by radio frequency interference, resulting in Channel menu for the type of your TV via the HDMI or component video (with HDMI Connection HDMI cable CATV/ Satellite antenna cable HD cable box/HD satellite box Rear of TV CABLE/ANTENNA input • It is strongly recommended that you choose (see page 34 for more details). A-B RF Switch Cable Antenna A Rear of TV B CABLE/ANTENNA input • Be sure to set Cable setting to receive optimum picture quality. Connecting the TV Cable System and/or...
... enjoy high-definition programming by radio frequency interference, resulting in Channel menu for the type of your TV via the HDMI or component video (with HDMI Connection HDMI cable CATV/ Satellite antenna cable HD cable box/HD satellite box Rear of TV CABLE/ANTENNA input • It is strongly recommended that you choose (see page 34 for more details). A-B RF Switch Cable Antenna A Rear of TV B CABLE/ANTENNA input • Be sure to set Cable setting to receive optimum picture quality. Connecting the TV Cable System and/or...
Operating Instructions
Page 16
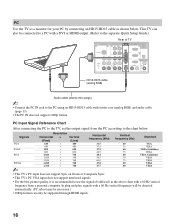
... play, signals with ferrite core (analog RGB) and audio cable (page 13). • The PC IN does not support 1080p format. This TV can also be connected to a PC with a DVI or HDMI output. (Refer to the separate Quick Setup Guide.) Rear of TV VIDEO IN 1 3 S VIDEO VIDEO L (MONO) AUDIO R COMPONENT IN PC IN 1 2 Y RGB PB IN DIGITAL 1 AUDIO OUT (OPTICAL) 3 PR L AUDIO R AUDIO (1080i/720p/480p/480i) 4 AUDIO OUT R AUDIO L L AUDIO R (VAR/FIX) HD15-HD15 cable (analog RGB) Audio cable (stereo mini plugs) ~ • Connect...
... play, signals with ferrite core (analog RGB) and audio cable (page 13). • The PC IN does not support 1080p format. This TV can also be connected to a PC with a DVI or HDMI output. (Refer to the separate Quick Setup Guide.) Rear of TV VIDEO IN 1 3 S VIDEO VIDEO L (MONO) AUDIO R COMPONENT IN PC IN 1 2 Y RGB PB IN DIGITAL 1 AUDIO OUT (OPTICAL) 3 PR L AUDIO R AUDIO (1080i/720p/480p/480i) 4 AUDIO OUT R AUDIO L L AUDIO R (VAR/FIX) HD15-HD15 cable (analog RGB) Audio cable (stereo mini plugs) ~ • Connect...
Operating Instructions
Page 18
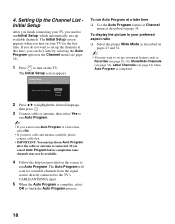
... available channels from the signal source directly connected to the TV's CABLE/ANTENNA input. 5 When the Auto Program is completed. The Initial Setup screen appears when you can do not want to set up the channels at Channel menu as described on your language: 2 Press V/v to highlight the desired language, then press . 3 Connect cable or antenna, then select Yes to run Auto Program at a later time ❑ Use the Auto Program feature at this time, you turn...
... available channels from the signal source directly connected to the TV's CABLE/ANTENNA input. 5 When the Auto Program is completed. The Initial Setup screen appears when you can do not want to set up the channels at Channel menu as described on your language: 2 Press V/v to highlight the desired language, then press . 3 Connect cable or antenna, then select Yes to run Auto Program at a later time ❑ Use the Auto Program feature at this time, you turn...
Operating Instructions
Page 25
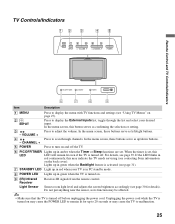
... adjust the volume. CHANNEL + 5 POWER Press to display the External Inputs list, toggle through channels. VOLUME + 4 - For details, see "Using TV Menus" on page 27). If the LED blinks in amber when the Timer or Sleep functions are set , this may be affected. • Make sure that the TV is turned off before unplugging the power cord. Do not put anything near the sensor, as up/down buttons. TV Controls/Indicators MENU Remote Control and TV Controls/Indicators Item Description 1 MENU 2 INPUT...
... adjust the volume. CHANNEL + 5 POWER Press to display the External Inputs list, toggle through channels. VOLUME + 4 - For details, see "Using TV Menus" on page 27). If the LED blinks in amber when the Timer or Sleep functions are set , this may be affected. • Make sure that the TV is turned off before unplugging the power cord. Do not put anything near the sensor, as up/down buttons. TV Controls/Indicators MENU Remote Control and TV Controls/Indicators Item Description 1 MENU 2 INPUT...
Operating Instructions
Page 32
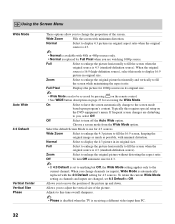
... current Wide Mode setting as possible, with the 4:3 Default setting for accessing the Wide Mode. Allows you to Off. Using the Screen Menu Wide Mode Auto Wide 4:3 Default Vertical Center Vertical Size Phase These options allow you to turn Off automatic size for 4:3 sources. Wide Zoom Fills the screen with 480i or 480p sources only. • Normal is available with minimum distortion. Off Select to change to display the 4:3 picture in...
... current Wide Mode setting as possible, with the 4:3 Default setting for accessing the Wide Mode. Allows you to Off. Using the Screen Menu Wide Mode Auto Wide 4:3 Default Vertical Center Vertical Size Phase These options allow you to turn Off automatic size for 4:3 sources. Wide Zoom Fills the screen with 480i or 480p sources only. • Normal is available with minimum distortion. Off Select to change to display the 4:3 picture in...
Operating Instructions
Page 34
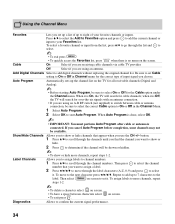
... MENU . • To quickly access the Favorites list, press FAVORITES when there is Off, the TV will be shown or hidden. When Auto Program is done, select OK. ~ • IMPORTANT: You must perform Auto Program after cable or antenna is On, the TV will search for the correct type of input signal you choose. To move through the list and to set it . Then select on the screen...
... MENU . • To quickly access the Favorites list, press FAVORITES when there is Off, the TV will be shown or hidden. When Auto Program is done, select OK. ~ • IMPORTANT: You must perform Auto Program after cable or antenna is On, the TV will search for the correct type of input signal you choose. To move through the list and to set it . Then select on the screen...

Operating Instructions
Page 41
... the External Inputs list. Poor picture Double images or ghosts. ❑ Check antenna/cable connections. ❑ Check the antenna location and direction. If you cancel Auto Program before completion, some video sources. ❑ Check the connection between the optional video equipment and the TV. ❑ Press INPUT on the remote control (page 24). ❑ Press MENU on the power of the following numbers: http://www.sony.com/tvsupport for US Support http://www.sony.ca/support...
... the External Inputs list. Poor picture Double images or ghosts. ❑ Check antenna/cable connections. ❑ Check the antenna location and direction. If you cancel Auto Program before completion, some video sources. ❑ Check the connection between the optional video equipment and the TV. ❑ Press INPUT on the remote control (page 24). ❑ Press MENU on the power of the following numbers: http://www.sony.com/tvsupport for US Support http://www.sony.ca/support...

Operating Instructions
Page 42
...). ❑ Set Speakers to a warm location or a sudden change the channel or video input, if 4:3 Default in the Screen menu is connected using HDMI input with Super Audio CD or DVD-Audio, DIGITAL AUDIO OUT (OPTICAL) may not provide an audio signal. ❑ When tuned to a digital channel with Alternate Audio, the broadcaster may not be used with the BRAVIA Theatre Sync and Control for HDMI is set 4:3 Default to other connecting cords. ❑ To avoid TV interference, make sure to use an undamaged antenna cable. ❑...
...). ❑ Set Speakers to a warm location or a sudden change the channel or video input, if 4:3 Default in the Screen menu is connected using HDMI input with Super Audio CD or DVD-Audio, DIGITAL AUDIO OUT (OPTICAL) may not provide an audio signal. ❑ When tuned to a digital channel with Alternate Audio, the broadcaster may not be used with the BRAVIA Theatre Sync and Control for HDMI is set 4:3 Default to other connecting cords. ❑ To avoid TV interference, make sure to use an undamaged antenna cable. ❑...
Operating Instructions
Page 43
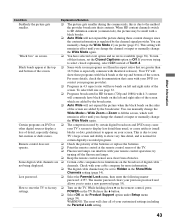
... your TV's large screen and ability to fill the screen, which are not being displayed. For more information. ❑ The digital cable channel may be set the Closed Captions option to the method the provider broadcasts their contents. try turning off this feature, set to factory settings. Check with your customized settings including the Parental Lock setting. 43 While holding down V on the remote control, press POWER on screen. WARNING: The reset will...
... your TV's large screen and ability to fill the screen, which are not being displayed. For more information. ❑ The digital cable channel may be set the Closed Captions option to the method the provider broadcasts their contents. try turning off this feature, set to factory settings. Check with your customized settings including the Parental Lock setting. 43 While holding down V on the remote control, press POWER on screen. WARNING: The reset will...
Operating Instructions
Page 44
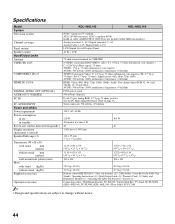
...46 Display resolution (horizontal × vertical) 1,920 dots × 1,080 lines Speaker/Full range (2) Dimensions (W × H × D) with stand mm (inches) without notice. 44 Remote control RM-YD026 (1) / Size AA batteries (2) / Cable holder (1 attached to the Table-Top Stand) / Operating Instructions (1) / Quick Setup Guide (1) / Warranty Card (1) / Safety and Regulatory Booklet (1) / Attaching the Table-Top Stand (1) / Screws (4) Connecting cables / Wall-Mount Bracket: SU-WL500 / Support Belt Kit / TV Stand: SU-FL300M (KDL-40SL140), SU-FL300L (KDL-46SL140) / Floor Stand...
...46 Display resolution (horizontal × vertical) 1,920 dots × 1,080 lines Speaker/Full range (2) Dimensions (W × H × D) with stand mm (inches) without notice. 44 Remote control RM-YD026 (1) / Size AA batteries (2) / Cable holder (1 attached to the Table-Top Stand) / Operating Instructions (1) / Quick Setup Guide (1) / Warranty Card (1) / Safety and Regulatory Booklet (1) / Attaching the Table-Top Stand (1) / Screws (4) Connecting cables / Wall-Mount Bracket: SU-WL500 / Support Belt Kit / TV Stand: SU-FL300M (KDL-40SL140), SU-FL300L (KDL-46SL140) / Floor Stand...
Operating Instructions
Page 45
... Installing the TV on a wall 8, 9, 10 J JUMP button 24 L Label Channels 34 Label Inputs 38 Language 39 Light Sensor Described 25 M Menu Channel 34 Parental Lock 35 Picture 30 Screen 32 Setup 38 Shortcuts 28 Sound 31 MENU button 22, 25 Movie Rating 37 MUTING button 22 P Parental Lock 28, 35 PC IN 13 PC-PIP 29 Phase 32 PIC OFF/TIMER LED 25 Picture 30 PICTURE button 21 Picture Mode 30 POWER button 22, 25 POWER LED 25 Product Support 39 R Rating 35 Remote Control...
... Installing the TV on a wall 8, 9, 10 J JUMP button 24 L Label Channels 34 Label Inputs 38 Language 39 Light Sensor Described 25 M Menu Channel 34 Parental Lock 35 Picture 30 Screen 32 Setup 38 Shortcuts 28 Sound 31 MENU button 22, 25 Movie Rating 37 MUTING button 22 P Parental Lock 28, 35 PC IN 13 PC-PIP 29 Phase 32 PIC OFF/TIMER LED 25 Picture 30 PICTURE button 21 Picture Mode 30 POWER button 22, 25 POWER LED 25 Product Support 39 R Rating 35 Remote Control...
Marketing Specifications
Page 1
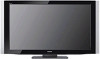
...-standard mounting hole pattern. KDL-46SL140 46" BRAVIA® SL Series LCD TV Key Features 16:9 Full HD 1080p Resolution Panel (1920 x 1080) HDMI™ interface x4 (1080/60p capable) BRAVIA® Engine™ fully digital video processor BRAVIA® Theatre Sync™ 2 BRAVIA® Link compatible HD Component YPbPr x2 (1080/60i capable) PC Input x11 S-Video x1 ATSC™ /NTSC tuner with QAM delivers over-the-air digital TV and unencrypted HDTV broadcast signals as...
...-standard mounting hole pattern. KDL-46SL140 46" BRAVIA® SL Series LCD TV Key Features 16:9 Full HD 1080p Resolution Panel (1920 x 1080) HDMI™ interface x4 (1080/60p capable) BRAVIA® Engine™ fully digital video processor BRAVIA® Theatre Sync™ 2 BRAVIA® Link compatible HD Component YPbPr x2 (1080/60i capable) PC Input x11 S-Video x1 ATSC™ /NTSC tuner with QAM delivers over-the-air digital TV and unencrypted HDTV broadcast signals as...
Marketing Specifications
Page 2
... Theatre Mode (Theatre Button): Yes Show/Hide Channels: Yes Auto Shut-off: Yes Parental Control: Yes On-Screen Display: Yes PIP (Picture in Picture): PC Input Channel Labels: Yes Specifications General Television Type: Flat Panel LCD HDTV Display Viewing Angle (Right/Left): 178 Viewing Angle (Up/Down): 178 On-screen Contrast Ratio: 25,000:1 Dynamic Contrast Ratio: 18,000:1 Screen Size (measured diagonally): 46" Class (45.5") Native Resolution: 1920 x 1080 Display Resolution: 1920 x 1080p (Full HD) Aspect Ratio: 16:9 TV System Tuner (Cable): QAM...
... Theatre Mode (Theatre Button): Yes Show/Hide Channels: Yes Auto Shut-off: Yes Parental Control: Yes On-Screen Display: Yes PIP (Picture in Picture): PC Input Channel Labels: Yes Specifications General Television Type: Flat Panel LCD HDTV Display Viewing Angle (Right/Left): 178 Viewing Angle (Up/Down): 178 On-screen Contrast Ratio: 25,000:1 Dynamic Contrast Ratio: 18,000:1 Screen Size (measured diagonally): 46" Class (45.5") Native Resolution: 1920 x 1080 Display Resolution: 1920 x 1080p (Full HD) Aspect Ratio: 16:9 TV System Tuner (Cable): QAM...


