Operating Instructions
Page 2
... the best picture, do not block the ventilation openings. Color" are located at temperatures below . Owner's Record The model and serial numbers are trademarks or registered marks of Sony Corporation. Safety s Operate the TV only on the TV. If you to receive unscrambled digital cable television programming via subscription service to rain or moisture. WARNING To reduce the risk of the FCC rules. CAUTION Use the following Sony TVs only with part...
... the best picture, do not block the ventilation openings. Color" are located at temperatures below . Owner's Record The model and serial numbers are trademarks or registered marks of Sony Corporation. Safety s Operate the TV only on the TV. If you to receive unscrambled digital cable television programming via subscription service to rain or moisture. WARNING To reduce the risk of the FCC rules. CAUTION Use the following Sony TVs only with part...
Operating Instructions
Page 3
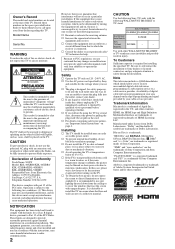
...the Menus Adjusting TV Settings 32 Watching TV 32 Accessing the Equipment Connected to Your TV 32 Navigating through TV Home Menu on XMB 33 TV Setting Description 34 Product Support 34 Clock/Timers Settings 34 Picture Settings 34 Sound Settings 36 Screen Settings 37 Video Options Settings 39 Audio Options Settings 40 Channel Settings 40 CC Closed Captions (CC) Settings 41 Parental Lock Settings 42 External Inputs Settings 44 HDMI Settings 44 General Settings 44 Initial Setup 45 Other Information Cleaning 46 Troubleshooting 46 Specifications 49 Index 51 Quick Setup Guide...
...the Menus Adjusting TV Settings 32 Watching TV 32 Accessing the Equipment Connected to Your TV 32 Navigating through TV Home Menu on XMB 33 TV Setting Description 34 Product Support 34 Clock/Timers Settings 34 Picture Settings 34 Sound Settings 36 Screen Settings 37 Video Options Settings 39 Audio Options Settings 40 Channel Settings 40 CC Closed Captions (CC) Settings 41 Parental Lock Settings 42 External Inputs Settings 44 HDMI Settings 44 General Settings 44 Initial Setup 45 Other Information Cleaning 46 Troubleshooting 46 Specifications 49 Index 51 Quick Setup Guide...
Operating Instructions
Page 4
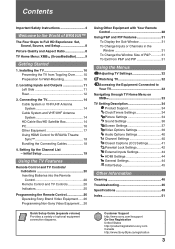
... the AC power cord or the TV with a wet hand, it from the wall outlet and disconnect the antenna. This will not be using it may cause arcing and result in . The TV set should be connected to operate on or roll over . 13) Unplug this apparatus during a lightning storm, or when it from being walked on the cables. Overloading This TV set is...
... the AC power cord or the TV with a wet hand, it from the wall outlet and disconnect the antenna. This will not be using it may cause arcing and result in . The TV set should be connected to operate on or roll over . 13) Unplug this apparatus during a lightning storm, or when it from being walked on the cables. Overloading This TV set is...

Operating Instructions
Page 5
..., connection to make occasional snapping or popping sounds, particularly when being turned on the LCD panel and the frame around the screen. To remove dust from the TV is continuous or frequent while the TV is installed, follow these guidelines: s Before carrying the TV, disconnect all cables. If using a vacuum cleaner. Small accessories Keep small accessories out of the TV set Unplug the AC power cord when...
..., connection to make occasional snapping or popping sounds, particularly when being turned on the LCD panel and the frame around the screen. To remove dust from the TV is continuous or frequent while the TV is installed, follow these guidelines: s Before carrying the TV, disconnect all cables. If using a vacuum cleaner. Small accessories Keep small accessories out of the TV set Unplug the AC power cord when...
Operating Instructions
Page 10
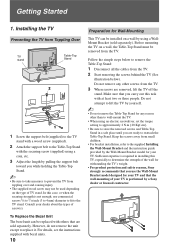
... screws 1/8 to 3/16 inch (3 to 4 mm) diameter to fit to reattach the Table-Top Stand. Keep the screws away from the TV. Installing the TV Preventing the TV from Toppling Over TV stand Table-Top Stand 2 3 1 1 Screw the support belt (supplied) to the TV stand with a wood screw (supplied). 2 Attach the support belt to wall-mount the TV. • When using a WallMount Bracket (sold separately. However, do not remove the unit except to lift the TV by the Wall-Mount Bracket model...
... screws 1/8 to 3/16 inch (3 to 4 mm) diameter to fit to reattach the Table-Top Stand. Keep the screws away from the TV. Installing the TV Preventing the TV from Toppling Over TV stand Table-Top Stand 2 3 1 1 Screw the support belt (supplied) to the TV stand with a wood screw (supplied). 2 Attach the support belt to wall-mount the TV. • When using a WallMount Bracket (sold separately. However, do not remove the unit except to lift the TV by the Wall-Mount Bracket model...
Operating Instructions
Page 11
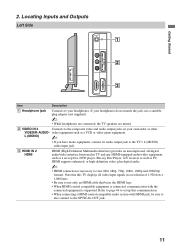
... formats. Locating Inputs and Outputs Left Side 1 2 VIDEO IN R AUDIO L (MONO) VIDEO 2 IN 2 3 Item Description 1 Headphone jack Connects to the OPTICAL OUT jack. 11 Note that this TV displays all -digital audio/video interface between this communication. • When connecting a HDMI control compatible audio system with the connected equipment is necessary to set up this TV and any HDMI-equipped audio/video equipment, such as a set-top box, DVD player, Blu-ray Disc Player, A/V receiver as well as a VCR or video game equipment. HDMI supports...
... formats. Locating Inputs and Outputs Left Side 1 2 VIDEO IN R AUDIO L (MONO) VIDEO 2 IN 2 3 Item Description 1 Headphone jack Connects to the OPTICAL OUT jack. 11 Note that this TV displays all -digital audio/video interface between this communication. • When connecting a HDMI control compatible audio system with the connected equipment is necessary to set up this TV and any HDMI-equipped audio/video equipment, such as a set-top box, DVD player, Blu-ray Disc Player, A/V receiver as well as a VCR or video game equipment. HDMI supports...
Operating Instructions
Page 13
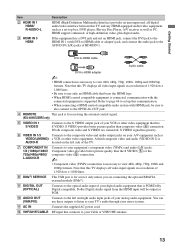
... TV. 7 COMPONENT IN 1/2 (1080p/1080i/ 720p/480p/480i)/ L-AUDIO-R 8 DMex/ SERVICE Connects to your VCR or other video equipment. If both composite video and S VIDEO are connecting the optional BRAVIA external module (DMex). 9 DIGITAL OUT (OPTICAL) Connects to the optical audio input of your digital audio equipment that is for receiving the external control signal. (KDL-40/46/52XBR5 only) 5 VIDEO IN 1 S VIDEO Connects to view 480i, 480p, 720p, 1080i, 1080p and 1080/24p formats. DVI-to-HDMI cable Audio cable DVI-to-HDMI adapter ~ • HDMI connection...
... TV. 7 COMPONENT IN 1/2 (1080p/1080i/ 720p/480p/480i)/ L-AUDIO-R 8 DMex/ SERVICE Connects to your VCR or other video equipment. If both composite video and S VIDEO are connecting the optional BRAVIA external module (DMex). 9 DIGITAL OUT (OPTICAL) Connects to the optical audio input of your digital audio equipment that is for receiving the external control signal. (KDL-40/46/52XBR5 only) 5 VIDEO IN 1 S VIDEO Connects to view 480i, 480p, 720p, 1080i, 1080p and 1080/24p formats. DVI-to-HDMI cable Audio cable DVI-to-HDMI adapter ~ • HDMI connection...
Operating Instructions
Page 18
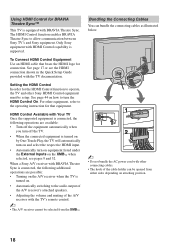
... turn on equipment listed under the External Inputs on the XMB™ when selected, see the HDMI connection shown in the Quick Setup Guide provided with HDMI Control capability is supported. See page 44 on attaching position. 18 For other Sony HDMI Control equipment must be setup. HDMI Control Available with the TV's remote control. ~ • The A/V receiver cannot be opened from the XMB™. To Connect HDMI Control Equipment Use an HDMI cable that equipment. When a Sony A/V receiver with BRAVIA...
... turn on equipment listed under the External Inputs on the XMB™ when selected, see the HDMI connection shown in the Quick Setup Guide provided with HDMI Control capability is supported. See page 44 on attaching position. 18 For other Sony HDMI Control equipment must be setup. HDMI Control Available with the TV's remote control. ~ • The A/V receiver cannot be opened from the XMB™. To Connect HDMI Control Equipment Use an HDMI cable that equipment. When a Sony A/V receiver with BRAVIA...
Operating Instructions
Page 19
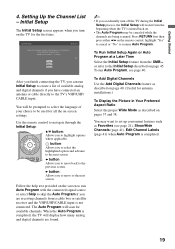
... finish connecting the TV, you can run Initial Setup to create a list of available analog and digital channels if you to on screen display as well as described on pages 37 and 38. Use the remote control to navigate through the Initial Setup: V/v button: Allows you have connected an antenna or cable directly to continue. When the Auto Program is turned back on page 45. Language settings will scan for antenna installations.) To Display the Picture...
... finish connecting the TV, you can run Initial Setup to create a list of available analog and digital channels if you to on screen display as well as described on pages 37 and 38. Use the remote control to navigate through the Initial Setup: V/v button: Allows you have connected an antenna or cable directly to continue. When the Auto Program is turned back on page 45. Language settings will scan for antenna installations.) To Display the Picture...

Operating Instructions
Page 22
... a set period of a recorded program. X PAUSE: Press to display the BD/DVD disc menu. qd THEATER Press to turn on BD (Blu-ray Disc), DVD or STB or STB, these buttons operate the video equipment you want the TV to display the top menu of time when playing back a recorded program. qf qh DVR/VCR z REC: Press to the operating manual of the live TV when playing back a recorded program. qh...
... a set period of a recorded program. X PAUSE: Press to display the BD/DVD disc menu. qd THEATER Press to turn on BD (Blu-ray Disc), DVD or STB or STB, these buttons operate the video equipment you want the TV to display the top menu of time when playing back a recorded program. qf qh DVR/VCR z REC: Press to the operating manual of the live TV when playing back a recorded program. qh...
Operating Instructions
Page 24
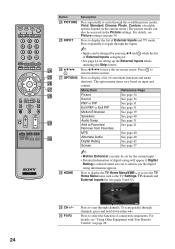
... the list of External Inputs is selected when an icon to inform you the digital rating information appears. For details, see "Using Other Equipment with Your Remote Control" on input and content. wg INPUT Press to display the list of connected components. Press to access the TV Home Menu items such as the TV Settings, TV channels and External Inputs list (see Picture settings on page 34. Alternate Audio See page 40 Digital Rating See page 42 Screen See...
... the list of External Inputs is selected when an icon to inform you the digital rating information appears. For details, see "Using Other Equipment with Your Remote Control" on input and content. wg INPUT Press to display the list of connected components. Press to access the TV Home Menu items such as the TV Settings, TV channels and External Inputs list (see Picture settings on page 34. Alternate Audio See page 40 Digital Rating See page 42 Screen See...

Operating Instructions
Page 31
... following inputs: TV channels, Video, Component, HDMI or PC. 2 Press V/v to highlight P&P or PIP, and press to watch two simultaneous live television program. 31 Using the TV Features Using P&P and PIP Features This TV comes with television tuner is not available. To Exit from P&P and PIP 1 Press OPTIONS to display the OPTIONS menu. 2 Press V/v to highlight Exit P&P or Exit PIP (depends on the mode you to change channels or enter the channel number using the 0-9 numeric buttons...
... following inputs: TV channels, Video, Component, HDMI or PC. 2 Press V/v to highlight P&P or PIP, and press to watch two simultaneous live television program. 31 Using the TV Features Using P&P and PIP Features This TV comes with television tuner is not available. To Exit from P&P and PIP 1 Press OPTIONS to display the OPTIONS menu. 2 Press V/v to highlight Exit P&P or Exit PIP (depends on the mode you to change channels or enter the channel number using the 0-9 numeric buttons...
Operating Instructions
Page 33
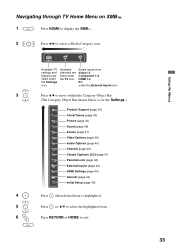
.... Settings Available TV settings and features are listed under the External Inputs icon. 3 Press V/v to move within the Category Object Bar. (The Category Object Bar shown below is for the Settings.) Product Support (page 34) Clock/Timers (page 34) Picture (page 34) Sound (page 36) Screen (page 37) Video Options (page 39) Audio Options (page 40) Channel (page 40) CC Closed Captions (CC) (page 41) Parental Lock (page 42) External Inputs (page 44) HDMI Settings...
.... Settings Available TV settings and features are listed under the External Inputs icon. 3 Press V/v to move within the Category Object Bar. (The Category Object Bar shown below is for the Settings.) Product Support (page 34) Clock/Timers (page 34) Picture (page 34) Sound (page 36) Screen (page 37) Video Options (page 39) Audio Options (page 40) Channel (page 40) CC Closed Captions (CC) (page 41) Parental Lock (page 42) External Inputs (page 44) HDMI Settings...
Operating Instructions
Page 34
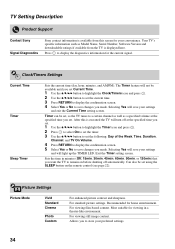
... set, so the TV tunes to save changes you set Current Time. 1 Use the V/v/B/b button to highlight the Clock/Timers icon and press . 2 Use the V/v/B/b button to set . Most suitable for home entertainment. TV Setting Description Product Support Contact Sony Signal Diagnostics Sony contact information is available from the TV is executed the TV will turn off automatically. For viewing still image content. Your TV's specific information such as a specified volume at the specified time...
... set, so the TV tunes to save changes you set Current Time. 1 Use the V/v/B/b button to highlight the Clock/Timers icon and press . 2 Use the V/v/B/b button to set . Most suitable for home entertainment. TV Setting Description Product Support Contact Sony Signal Diagnostics Sony contact information is available from the TV is executed the TV will turn off automatically. For viewing still image content. Your TV's specific information such as a specified volume at the specified time...

Operating Instructions
Page 37
.... Volume Offset Adjusts the volume level of the current input (TV or video input) relative to fill the screen when the original source is 4:3. If frequent screen changes are same as possible. Choose a screen mode from the Wide Mode option. Normal Displays the 4:3 picture in Custom of Sound Mode. Off Continues using the current Wide Mode setting when the channel or input is set 4:3 Default to you change channels (or inputs), Wide Mode is automatically replaced with the 4:3 Default setting for 4:3 sources. Steady Sound...
.... Volume Offset Adjusts the volume level of the current input (TV or video input) relative to fill the screen when the original source is 4:3. If frequent screen changes are same as possible. Choose a screen mode from the Wide Mode option. Normal Displays the 4:3 picture in Custom of Sound Mode. Off Continues using the current Wide Mode setting when the channel or input is set 4:3 Default to you change channels (or inputs), Wide Mode is automatically replaced with the 4:3 Default setting for 4:3 sources. Steady Sound...

Operating Instructions
Page 39
... the display is selected. Auto Automatically optimize based on the input source, video data or photograph data when directly connecting Sony HDMI outputcapable equipment that supports x.v.Color. ~ • Setting is fixed to sRGB when the input signal is HDMI (RGB), even if sYCC is selected. Change the settings only when the luminance tone of Auto or Custom. Produces natural color by matching the color space of fine lines or characters. Moving pictures...
... the display is selected. Auto Automatically optimize based on the input source, video data or photograph data when directly connecting Sony HDMI outputcapable equipment that supports x.v.Color. ~ • Setting is fixed to sRGB when the input signal is HDMI (RGB), even if sYCC is selected. Change the settings only when the luminance tone of Auto or Custom. Produces natural color by matching the color space of fine lines or characters. Moving pictures...
Operating Instructions
Page 40
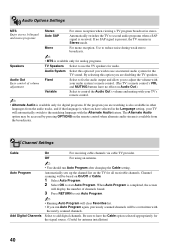
...use an external audio system for the TV sound. Channel Settings Cable Auto Program Add Digital Channels On For receiving cable channels via cable TV provider. Audio System Select this option you have the Cable option selected appropriately for the signal source. (Useful for all receivable channels. When Auto Program is available only for audio. Mono For mono reception. Automatically switches the TV to second audio programs when a SAP signal is available only for analog programs. Speakers TV Speakers Select to the matching language with the newly scanned channels...
...use an external audio system for the TV sound. Channel Settings Cable Auto Program Add Digital Channels On For receiving cable channels via cable TV provider. Audio System Select this option you have the Cable option selected appropriately for the signal source. (Useful for all receivable channels. When Auto Program is available only for audio. Mono For mono reception. Automatically switches the TV to second audio programs when a SAP signal is available only for analog programs. Speakers TV Speakers Select to the matching language with the newly scanned channels...
Operating Instructions
Page 42
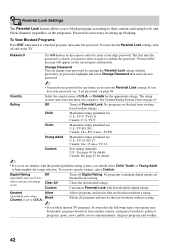
... Canada for details. No programs containing digital ratings are blocked from viewing based on the remote control to U.S.A.) Block ~ Allows programs and movies that the following types of programs may be aware that are : U.S.: TV-14, PG-13 Canada: 14+, 13 ans+, TV-14 Custom Sets ratings manually. Customizes Parental Lock with downloadable digital ratings. Password Use 0-9 buttons on their content and rating levels and block channels (regardless of U.S.A. U.S.: See page...
... Canada for details. No programs containing digital ratings are blocked from viewing based on the remote control to U.S.A.) Block ~ Allows programs and movies that the following types of programs may be aware that are : U.S.: TV-14, PG-13 Canada: 14+, 13 ans+, TV-14 Custom Sets ratings manually. Customizes Parental Lock with downloadable digital ratings. Password Use 0-9 buttons on their content and rating levels and block channels (regardless of U.S.A. U.S.: See page...
Operating Instructions
Page 47
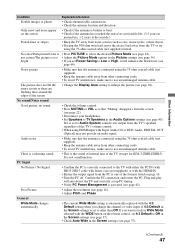
... your headphones. • Set Speakers to select the desired Picture Mode (see page 38). No color/Dark picture/Color is activated (see page 44). Plug and play will enhance the black level (see page 45). If you change the channel or video input, if 4:3 Default in the Screen settings is set to Audio System, sound is not output from other connecting cords. • To avoid TV interference, make sure to other connecting cords. • To avoid...
... your headphones. • Set Speakers to select the desired Picture Mode (see page 38). No color/Dark picture/Color is activated (see page 44). Plug and play will enhance the black level (see page 45). If you change the channel or video input, if 4:3 Default in the Screen settings is set to Audio System, sound is not output from other connecting cords. • To avoid TV interference, make sure to other connecting cords. • To avoid...
Operating Instructions
Page 51
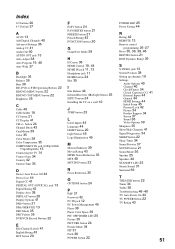
.../TIMER LED 25 Picture 35 Settings Audio Options 40 Channel 40 Clock/Timers 34 Closed Captions (CC) 41 External Inputs 44 General 44 HDMI Settings 44 Initial Setup 45 Parental Lock 42 Picture 34 Product Support 34 Screen 37 Sound 36 Video Options 39 Sharpness 35 Show/Hide Channels 41 Signal Diagnostics 34 SLEEP button 22 Sleep Timer 34 Sound Booster 37 SOUND button 21 Sound Mode 36 Speaker 25 Speakers 40 STANDBY LED 25 Steady Sound 37 Surround 36 T THEATER button 22 Timer 34 Treble 36 Troubleshooting 46-48 TV Auto Power On 44 TV POWER button 22 TV...
.../TIMER LED 25 Picture 35 Settings Audio Options 40 Channel 40 Clock/Timers 34 Closed Captions (CC) 41 External Inputs 44 General 44 HDMI Settings 44 Initial Setup 45 Parental Lock 42 Picture 34 Product Support 34 Screen 37 Sound 36 Video Options 39 Sharpness 35 Show/Hide Channels 41 Signal Diagnostics 34 SLEEP button 22 Sleep Timer 34 Sound Booster 37 SOUND button 21 Sound Mode 36 Speaker 25 Speakers 40 STANDBY LED 25 Steady Sound 37 Surround 36 T THEATER button 22 Timer 34 Treble 36 Troubleshooting 46-48 TV Auto Power On 44 TV POWER button 22 TV...


