Operating Instuctions
Page 9
... Using the Analog Setup Settings 37 Using the Digital Setup Settings 38 Other Information Troubleshooting...41 Preparation for Wall Mounting the KDL-32S2400 43 Preparation for Wall Mounting the KDL-40S2400 44 PC Input Signal Reference Chart 45 Specifications...46 Index...47 9 Initial Setup 18 Basic Operations Remote Control ...19 TV Controls...22 Using...
... Using the Analog Setup Settings 37 Using the Digital Setup Settings 38 Other Information Troubleshooting...41 Preparation for Wall Mounting the KDL-32S2400 43 Preparation for Wall Mounting the KDL-40S2400 44 PC Input Signal Reference Chart 45 Specifications...46 Index...47 9 Initial Setup 18 Basic Operations Remote Control ...19 TV Controls...22 Using...
Operating Instuctions
Page 11
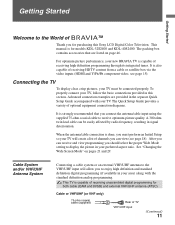
... section. See "Changing the Wide Screen Mode" on page 46. Connecting the TV To display clear, crisp pictures, your new BRAVIA TV is capable of channels you to display the picture in your TV, follow the basic connections provided in the separate Quick Setup... for models KDL-32S2400 and KDL-40S2400. When the antenna/cable connection is also capable of TV VHF/UHF input (Continued) 11 Getting Started Getting Started Welcome to receive optimum picture quality. see page 18). This manual is strongly recommended that are provided in this Sony LCD Digital Color ...
... section. See "Changing the Wide Screen Mode" on page 46. Connecting the TV To display clear, crisp pictures, your new BRAVIA TV is capable of channels you to display the picture in your TV, follow the basic connections provided in the separate Quick Setup... for models KDL-32S2400 and KDL-40S2400. When the antenna/cable connection is also capable of TV VHF/UHF input (Continued) 11 Getting Started Getting Started Welcome to receive optimum picture quality. see page 18). This manual is strongly recommended that are provided in this Sony LCD Digital Color ...

Operating Instuctions
Page 12
Cable A/B RF Switch A Rear of TV VHF/UHF input B Antenna Be sure to set Cable setting option to your TV. Make sure you connect these components to Cable On or Cable Off in its .../FIX) HDMI Connection Cable/ Satellite High Definition Cable Box/ High Definition Satellite Box IN OUT Or connection with audio) input on the back of 1,366 dots × 768 lines. 12 Rear of input signal you will need to use an optional A-B RF Switch (not supplied) to switch between the cable and over...
Cable A/B RF Switch A Rear of TV VHF/UHF input B Antenna Be sure to set Cable setting option to your TV. Make sure you connect these components to Cable On or Cable Off in its .../FIX) HDMI Connection Cable/ Satellite High Definition Cable Box/ High Definition Satellite Box IN OUT Or connection with audio) input on the back of 1,366 dots × 768 lines. 12 Rear of input signal you will need to use an optional A-B RF Switch (not supplied) to switch between the cable and over...

Operating Instuctions
Page 14
... be displayed. Connect to the composite video and audio output jacks on page 33.) Connect to a personal computer's video output connector using headphones. See "PC Input Signal Reference Chart" on page 28, have mono equipment, connect its audio output jack to the computer before connecting the HD15-HD15 cable. While headphones... headphones do not match the jack, use an adapter (not supplied). If the picture is the case, connect the adapter to the TV's L (MONO) audio input jack.
... be displayed. Connect to the composite video and audio output jacks on page 33.) Connect to a personal computer's video output connector using headphones. See "PC Input Signal Reference Chart" on page 28, have mono equipment, connect its audio output jack to the computer before connecting the HD15-HD15 cable. While headphones... headphones do not match the jack, use an adapter (not supplied). If the picture is the case, connect the adapter to the TV's L (MONO) audio input jack.
Operating Instuctions
Page 15
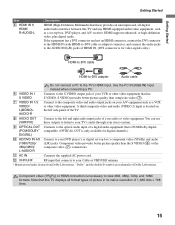
... connections. You can use these outputs to listen to your TV's audio through your stereo system. 9 OPTICAL OUT Connects to the TV's HDMI input. Note that is PCM/Dolby digital (PCM/DOLBY* compatible. (OPTICAL OUT is only available for video signals only.) HDMI-to-DVI cable HDMI...and the double-D symbol are trademarks of your Cable or VHF/UHF antenna. * Manufactured under license from Dolby Laboratories. Use the PC IN (RGB IN) input instead when connecting a PC. 6 VIDEO IN 1 S VIDEO Connects to view 480i, 480p, 720p, and 1080i formats. HDMI supports enhanced, or high-...
... connections. You can use these outputs to listen to your TV's audio through your stereo system. 9 OPTICAL OUT Connects to the TV's HDMI input. Note that is PCM/Dolby digital (PCM/DOLBY* compatible. (OPTICAL OUT is only available for video signals only.) HDMI-to-DVI cable HDMI...and the double-D symbol are trademarks of your Cable or VHF/UHF antenna. * Manufactured under license from Dolby Laboratories. Use the PC IN (RGB IN) input instead when connecting a PC. 6 VIDEO IN 1 S VIDEO Connects to view 480i, 480p, 720p, and 1080i formats. HDMI supports enhanced, or high-...
Operating Instuctions
Page 19
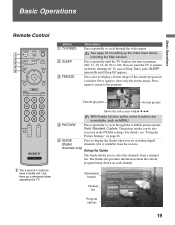
... the TV displays the time in the Picture settings. Press once to remain on before shutting off. Press again to cycle through the video inputs. Use them as MENU. 4 PICTURE Press repeatedly to show only the frozen image. Audio 19 Press again to return to cycle through the... Press to select the channels from the station). The Guide also provides information about the current program being shown on setting up the video input labels, including the Skip function. See page 32 on each channel. Move the sub screen with V v B b. Press repeatedly until Sleep Off appears.
... the TV displays the time in the Picture settings. Press once to remain on before shutting off. Press again to cycle through the video inputs. Use them as MENU. 4 PICTURE Press repeatedly to show only the frozen image. Audio 19 Press again to return to cycle through the... Press to select the channels from the station). The Guide also provides information about the current program being shown on setting up the video input labels, including the Skip function. See page 32 on each channel. Move the sub screen with V v B b. Press repeatedly until Sleep Off appears.
Operating Instuctions
Page 21
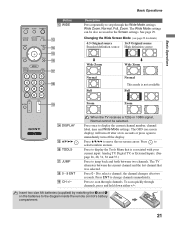
...:9 Original source Standard definition source High definition source m Wide Zoom Normal Full m Wide Zoom Normal This mode is associated with your current input: Analog TV, Digital TV, or External Inputs. (See page 26, 28, 31, 36 and 37.) Press to display the Tools Menu that was selected. The OSD (on screen display...
...:9 Original source Standard definition source High definition source m Wide Zoom Normal Full m Wide Zoom Normal This mode is associated with your current input: Analog TV, Digital TV, or External Inputs. (See page 26, 28, 31, 36 and 37.) Press to display the Tools Menu that was selected. The OSD (on screen display...
Operating Instuctions
Page 22
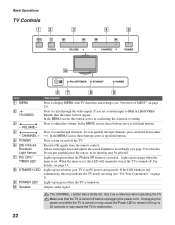
Basic Operations TV Controls Item 1 MENU 2 TV/VIDEO 3 - If you set a certain input to Skip in Label Video Inputs, then the input will remain lit even if the TV is turned off. Press to display MENU with TV functions and settings (see page 33 for up in ... the LED blinks in orange when the timer is activated. Make sure that the TV is turned on page 2). Press to cycle through the video inputs. In the MENU screen, these buttons serve as left/right buttons. To scan quickly through channels. In the MENU screen, these buttons serve as up...
Basic Operations TV Controls Item 1 MENU 2 TV/VIDEO 3 - If you set a certain input to Skip in Label Video Inputs, then the input will remain lit even if the TV is turned off. Press to display MENU with TV functions and settings (see page 33 for up in ... the LED blinks in orange when the timer is activated. Make sure that the TV is turned on page 2). Press to cycle through the video inputs. In the MENU screen, these buttons serve as left/right buttons. To scan quickly through channels. In the MENU screen, these buttons serve as up...
Operating Instuctions
Page 23
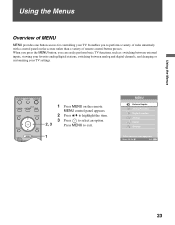
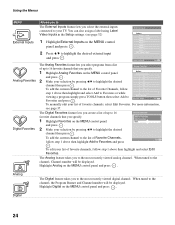
When you press the MENU button, you to exit. 1 MENU External Inputs Analog Favorites Digital Favorites Analog Digital Settings Select from connected equipment Select: Set: Exit: MENU 23 MENU control panel appears. 2 Press V/v to highlight the item.... a variety of tasks intuitively with a control panel on the remote. It enables you can easily perform basic TV functions such as: switching between external inputs, viewing your favorite analog/digital stations, switching between analog and digital channels, and changing or customizing your TV settings. 1 Press MENU on the screen ...
When you press the MENU button, you to exit. 1 MENU External Inputs Analog Favorites Digital Favorites Analog Digital Settings Select from connected equipment Select: Set: Exit: MENU 23 MENU control panel appears. 2 Press V/v to highlight the item.... a variety of tasks intuitively with a control panel on the remote. It enables you can easily perform basic TV functions such as: switching between external inputs, viewing your favorite analog/digital stations, switching between analog and digital channels, and changing or customizing your TV settings. 1 Press MENU on the screen ...
Operating Instuctions
Page 24
... a list of up to 16 favorite channels that you to highlight the desired channel then press . For more information, see page 32) 1 Highlight External Inputs on the MENU control panel and press . To edit your list of favorite channels, follow step 1 above then highlight and select...channel, the Program Banner and Channel number will be displayed. Using the Menus MENU External Inputs Analog Favorites Digital Favorites Allows you to The External Inputs feature lets you select the external inputs connected to your list of favorite channels, select Edit Favorites. You can also assign a...
... a list of up to 16 favorite channels that you to highlight the desired channel then press . For more information, see page 32) 1 Highlight External Inputs on the MENU control panel and press . To edit your list of favorite channels, follow step 1 above then highlight and select...channel, the Program Banner and Channel number will be displayed. Using the Menus MENU External Inputs Analog Favorites Digital Favorites Allows you to The External Inputs feature lets you select the external inputs connected to your list of favorite channels, select Edit Favorites. You can also assign a...

Operating Instuctions
Page 26
... picture. Adjust to the default values. Adjust to the picture settings affect TV, Video1 - It is not available when Target Input is showing Video 1. Changes to sharpen or soften the picture. Standard Select for home entertainment. Cool Select to give the white... Backlight Picture Brightness Color Hue Color Temperature White adjustment Sharpness Noise Reduction Description Determines whether to apply Picture Settings to current input only, or to increase or decrease color intensity. Warm 1,2 Select to picture settings affect only Video 1) Vivid Select for...
... picture. Adjust to the default values. Adjust to the picture settings affect TV, Video1 - It is not available when Target Input is showing Video 1. Changes to sharpen or soften the picture. Standard Select for home entertainment. Cool Select to give the white... Backlight Picture Brightness Color Hue Color Temperature White adjustment Sharpness Noise Reduction Description Determines whether to apply Picture Settings to current input only, or to increase or decrease color intensity. Warm 1,2 Select to picture settings affect only Video 1) Vivid Select for...
Operating Instuctions
Page 28
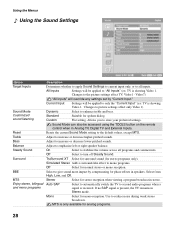
...a program broadcast in speakers. TruSurround XT Select for surround sound (for spoken dialog. Use to store your preferred settings. Video7) "All Inputs" will be accessed using the TOOLS button on the remote control when in Stereo mode. Allows you to reduce noise during weak stereo broadcasts... High, Low, and Off. Changes to picture settings affect only Video 1) Dynamic Select to stabilize the volume across all inputs. On Select to enhance treble and bass. Adjust to all programs and commercials. Using the Menus Using the Sound Settings Option Target...
...a program broadcast in speakers. TruSurround XT Select for surround sound (for spoken dialog. Use to store your preferred settings. Video7) "All Inputs" will be accessed using the TOOLS button on the remote control when in Stereo mode. Allows you to reduce noise during weak stereo broadcasts... High, Low, and Off. Changes to picture settings affect only Video 1) Dynamic Select to stabilize the volume across all inputs. On Select to enhance treble and bass. Adjust to all programs and commercials. Using the Menus Using the Sound Settings Option Target...
Operating Instuctions
Page 29
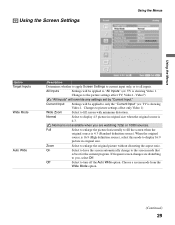
... to the screen mode that is showing Video 1. Zoom Select to the picture settings affect TV, Video1 - Video7) "All Inputs" will be applied to only the "Current Input" (ex: TV is 4:3. Normal is 4:3 (Standard definition source). Choose a screen mode from the Wide Mode option. (Continued... Using the Menus Using the Menus Option Target Inputs Wide Mode Auto Wide Description Determines whether to apply Screen Settings to current input only, or to you are disturbing to all inputs. All Inputs Settings will be applied to "All Inputs" (ex: TV is best for the current...
... to the screen mode that is showing Video 1. Zoom Select to the picture settings affect TV, Video1 - Video7) "All Inputs" will be applied to only the "Current Input" (ex: TV is 4:3. Normal is 4:3 (Standard definition source). Choose a screen mode from the Wide Mode option. (Continued... Using the Menus Using the Menus Option Target Inputs Wide Mode Auto Wide Description Determines whether to apply Screen Settings to current input only, or to you are disturbing to all inputs. All Inputs Settings will be applied to "All Inputs" (ex: TV is best for the current...
Operating Instuctions
Page 30
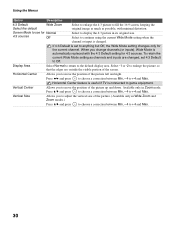
...possible, with the 4:3 Default setting for 4:3 sources. Display Area Select Normal to return to game equipment. Vertical Center Allows you change channels (or inputs), Wide Mode is changed , set to anything but Off, the Wide Mode setting changes only for Normal 4:3 sources Off Select to enlarge the 4:3... are changed . Select to + 4 and Max. 30 Select to continue using the current Wide Mode setting when the channel or input is automatically replaced with minimal distortion. Select -1 or -2 to fill the 16:9 screen, keeping the original image as much as channels and...
...possible, with the 4:3 Default setting for 4:3 sources. Display Area Select Normal to return to game equipment. Vertical Center Allows you change channels (or inputs), Wide Mode is changed , set to anything but Off, the Wide Mode setting changes only for Normal 4:3 sources Off Select to enlarge the 4:3... are changed . Select to + 4 and Max. 30 Select to continue using the current Wide Mode setting when the channel or input is automatically replaced with minimal distortion. Select -1 or -2 to fill the 16:9 screen, keeping the original image as much as channels and...
Operating Instuctions
Page 31
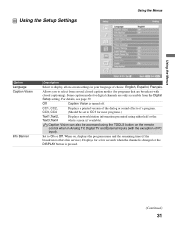
...see page 39. Off Caption Vision is pressed. (Continued) 31 Set to display all on-screen settings in Analog TV, Digital TV and External Inputs (with closed caption modes (for most programs.) Text1,Text2, Text3,Text4 Displays network/station information presented using the TOOLS button on , displays the...Caption Vision can also be set to select from the Digital Setup setting. When on the remote control when in your language of PC input). Some caption modes for digital channels are broadcast with the exception of choice: English, Español, Français. Allows you ...
...see page 39. Off Caption Vision is pressed. (Continued) 31 Set to display all on-screen settings in Analog TV, Digital TV and External Inputs (with closed caption modes (for most programs.) Text1,Text2, Text3,Text4 Displays network/station information presented using the TOOLS button on , displays the...Caption Vision can also be set to select from the Digital Setup setting. When on the remote control when in your language of PC input). Some caption modes for digital channels are broadcast with the exception of choice: English, Español, Français. Allows you ...

Operating Instuctions
Page 32
...connected to the VIDEO 4 jack, you to their content and rating levels. Then press to select the input. 2 Press V/v to which you want to select the label. The Skip label is connected. 32 You can select from viewing. Use 0-9 on page 42. Select to enter a four-digit password.... Label Video Inputs You need your TV skips this input when you connected to identify A/V equipment you press the TV/VIDEO button...
...connected to the VIDEO 4 jack, you to their content and rating levels. Then press to select the input. 2 Press V/v to which you want to select the label. The Skip label is connected. 32 You can select from viewing. Use 0-9 on page 42. Select to enter a four-digit password.... Label Video Inputs You need your TV skips this input when you connected to identify A/V equipment you press the TV/VIDEO button...
Operating Instuctions
Page 33
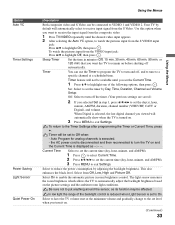
...disconnected and then reconnected to turn and off, and to tune to a specific channel at the minimum volume and gradually change to receive input signal from Off, Low, High and Picture Off. To return to automatically adjust the backlight brightness based on the picture settings and the...set the timer by adjusting the backlight brightness. In low light the range of the following options, then press . To watch the pictures input from the VIDEO input jack: Press V/v to exit Settings. Timer will automatically show when the TV is set the current time (day, hour, minute, and...
...disconnected and then reconnected to turn and off, and to tune to a specific channel at the minimum volume and gradually change to receive input signal from Off, Low, High and Picture Off. To return to automatically adjust the backlight brightness based on the picture settings and the...set the timer by adjusting the backlight brightness. In low light the range of the following options, then press . To watch the pictures input from the VIDEO input jack: Press V/v to exit Settings. Timer will automatically show when the TV is set the current time (day, hour, minute, and...
Operating Instuctions
Page 36
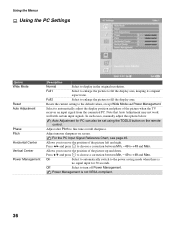
...there is not VESA-compliant. 36 Off Select to automatically adjust the display position and phase of the picture when the TV receives an input signal from the connected PC. Resets the current setting to display in the original resolution. Using the Menus Using the PC Settings Option ... Full2 Select to enlarge the picture to fine tune overall sharpness. Note that Auto Adjustment may not work well with certain input signals. Power Management is no signal input for PC can also be set using the TOOLS button on screen. In such cases, manually adjust the options below. ...
...there is not VESA-compliant. 36 Off Select to automatically adjust the display position and phase of the picture when the TV receives an input signal from the connected PC. Resets the current setting to display in the original resolution. Using the Menus Using the PC Settings Option ... Full2 Select to enlarge the picture to fine tune overall sharpness. Note that Auto Adjustment may not work well with certain input signals. Power Management is no signal input for PC can also be set using the TOOLS button on screen. In such cases, manually adjust the options below. ...
Operating Instuctions
Page 41
...undamaged antenna cable. (Continued) 41 No color/Dark picture/Color is not ❑ correct/The picture is set to On (page 34). Select your Sony TV, please visit our website or call one channel. ❑ Perform Auto Program to add receivable channels that are not presently in the TV's ... equipment and the TV. ❑ Press TV/VIDEO on the remote control (page 19). ❑ If you connect video equipment to the S VIDEO input of the TV, set the Power Saving mode to Low or High, it will enhance the black level. Cannot receive any channels. ❑ Make sure...
...undamaged antenna cable. (Continued) 41 No color/Dark picture/Color is not ❑ correct/The picture is set to On (page 34). Select your Sony TV, please visit our website or call one channel. ❑ Perform Auto Program to add receivable channels that are not presently in the TV's ... equipment and the TV. ❑ Press TV/VIDEO on the remote control (page 19). ❑ If you connect video equipment to the S VIDEO input of the TV, set the Power Saving mode to Low or High, it will enhance the black level. Cannot receive any channels. ❑ Make sure...
Operating Instuctions
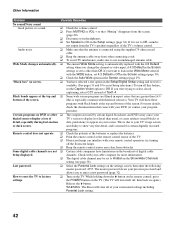
Page 42
...30). ❑ Check the Auto Wide option in the Show/Hide Channels setting (see page 38). If you to enter a new password (page 32). This is due to your remote control operation; channels. Lost password. ❑ Select the Parental Lock settings on again.) Release the V button.... If you change the channel or video input, if 4:3 Default in the Setup/Digital Setup setting and no sound. ❑ Check the volume control. ❑ Press MUTING or VOL + so ...
...30). ❑ Check the Auto Wide option in the Show/Hide Channels setting (see page 38). If you to enter a new password (page 32). This is due to your remote control operation; channels. Lost password. ❑ Select the Parental Lock settings on again.) Release the V button.... If you change the channel or video input, if 4:3 Default in the Setup/Digital Setup setting and no sound. ❑ Check the volume control. ❑ Press MUTING or VOL + so ...


