Operating Instructions
Page 6
... Meter 66 Focusing manually 67 Using the spot focus mode - Spot Focus 69 Advanced Playback Operations Getting Started Using this manual 14 Checking supplied accessories 16 Step 1 Preparing the power supply .... 17 Inserting the battery pack 17 Charging the battery pack 18 Connecting to a tape 141 6 NightShot/ Superimposing a title 88 Super...
... Meter 66 Focusing manually 67 Using the spot focus mode - Spot Focus 69 Advanced Playback Operations Getting Started Using this manual 14 Checking supplied accessories 16 Step 1 Preparing the power supply .... 17 Inserting the battery pack 17 Charging the battery pack 18 Connecting to a tape 141 6 NightShot/ Superimposing a title 88 Super...
Operating Instructions
Page 16
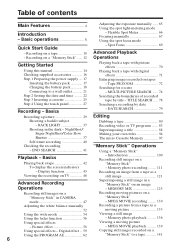
...) 7 Lens hood (1) (p. 32) 8 "Memory Stick" (1) (p. 100) 9 USB cable (1) (p. 151) q; Checking supplied accessories Make sure that the following accessories are supplied with your camcorder. 1 2 3 4 5 6 7 8 9 0 qa qs qd 1 AC-L20A AC power adaptor (1), Power cord (1) (p. 18) 2 NP-FF70 battery pack (1) (p. 17, 18... cable (1) (p. 46) 4 Wireless Remote Commander (1) (p. 216) 5 Size AA (R6) batteries for MICROMV) (1) (p. 153) qs Cleaning cloth (1) (p. 202) qd Stylus (1) (DCR-IP220 only) (p. 176) Contents of the recording cannot be compensated if recording or playback is not made due ...
...) 7 Lens hood (1) (p. 32) 8 "Memory Stick" (1) (p. 100) 9 USB cable (1) (p. 151) q; Checking supplied accessories Make sure that the following accessories are supplied with your camcorder. 1 2 3 4 5 6 7 8 9 0 qa qs qd 1 AC-L20A AC power adaptor (1), Power cord (1) (p. 18) 2 NP-FF70 battery pack (1) (p. 17, 18... cable (1) (p. 46) 4 Wireless Remote Commander (1) (p. 216) 5 Size AA (R6) batteries for MICROMV) (1) (p. 153) qs Cleaning cloth (1) (p. 202) qd Stylus (1) (DCR-IP220 only) (p. 176) Contents of the recording cannot be compensated if recording or playback is not made due ...

Operating Instructions
Page 24
... models. World time difference 19 20 21 22 23 24 25 26 27 29 30 31 1 2 3 4 6 8 10 12 13 14 16 17 18 Area code 1 2 3 4 5 6 7 8 9 10 11 12 13 14 15 16 Time-zone differences GMT +01:00 +02:00 +03:00 +03:30 +04:00 +04:30 +05:00 +05:30 +06..., Darwin Melbourne, Sydney Area code 17 18 19 20 21 22 23 24 25 26 27 28 29 30 31 Time-zone differences +11:00 +12:00 -12:00 -11:00 -10:00 -09:00 -08:00 -07:00 -06:00 -05:00 -04:00 -03:30 -03:00 -02:00 -01...
... models. World time difference 19 20 21 22 23 24 25 26 27 29 30 31 1 2 3 4 6 8 10 12 13 14 16 17 18 Area code 1 2 3 4 5 6 7 8 9 10 11 12 13 14 15 16 Time-zone differences GMT +01:00 +02:00 +03:00 +03:30 +04:00 +04:30 +05:00 +05:30 +06..., Darwin Melbourne, Sydney Area code 17 18 19 20 21 22 23 24 25 26 27 28 29 30 31 Time-zone differences +11:00 +12:00 -12:00 -11:00 -10:00 -09:00 -08:00 -07:00 -06:00 -05:00 -04:00 -03:30 -03:00 -02:00 -01...
Operating Instructions
Page 38
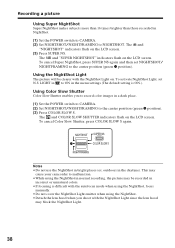
...center position (green z position). (3) Press COLOR SLOW S. To cancel Color Slow Shutter, press COLOR SLOW S again. This may cause your camcorder to malfunction. •While using the NightShot. •Detach the lens hood when you shoot with the NightShot Light on the LCD screen.... (2) Set NIGHTSHOT/NIGHTFRAMING to the center position (green z position). Recording a picture Using Super NightShot Super NightShot makes subjects more than 16 times brighter than those recorded in the menu settings (The default setting is difficult with the autofocus mode when using the NightShot, focus ...
...center position (green z position). (3) Press COLOR SLOW S. To cancel Color Slow Shutter, press COLOR SLOW S again. This may cause your camcorder to malfunction. •While using the NightShot. •Detach the lens hood when you shoot with the NightShot Light on the LCD screen.... (2) Set NIGHTSHOT/NIGHTFRAMING to the center position (green z position). Recording a picture Using Super NightShot Super NightShot makes subjects more than 16 times brighter than those recorded in the menu settings (The default setting is difficult with the autofocus mode when using the NightShot, focus ...

Operating Instructions
Page 54
... mode of the wide-screen TV to the full mode, you can record a 16:9 wide picture to watch pictures of normal images [d]. [a] [b] 16:9WIDE [c] [d] (1) Set the POWER switch to CAMERA. (2) Press FN to display PAGE1. (3) Press MENU, then set 16:9WIDE in to ON in the menu settings. 54 LIGHT OFF ON EXIT... EXEC RET. To cancel the wide mode Set 16:9WIDE to FN Press EXIT. The picture during recording in the widthwise direction. Black bands appear on the LCD screen during playing back on a normal ...
... mode of the wide-screen TV to the full mode, you can record a 16:9 wide picture to watch pictures of normal images [d]. [a] [b] 16:9WIDE [c] [d] (1) Set the POWER switch to CAMERA. (2) Press FN to display PAGE1. (3) Press MENU, then set 16:9WIDE in to ON in the menu settings. 54 LIGHT OFF ON EXIT... EXEC RET. To cancel the wide mode Set 16:9WIDE to FN Press EXIT. The picture during recording in the widthwise direction. Black bands appear on the LCD screen during playing back on a normal ...

Operating Instructions
Page 55
... sends aspect ratio (screen horizontal/vertical ratio) information (16:9, 4:3, or letter box) with ID-1 signals inserted between video signals when you connect your camcorder to the recording standby mode and then set your camcorder to OFF in the 16:9WIDE mode automatically appear on the TV. BOUNCE - ...Connection for a TV Pictures recorded in the menu settings. You connect your camcorder to a TV that is ...
... sends aspect ratio (screen horizontal/vertical ratio) information (16:9, 4:3, or letter box) with ID-1 signals inserted between video signals when you connect your camcorder to the recording standby mode and then set your camcorder to OFF in the 16:9WIDE mode automatically appear on the TV. BOUNCE - ...Connection for a TV Pictures recorded in the menu settings. You connect your camcorder to a TV that is ...

Operating Instructions
Page 98
... desired character on the key. (6) Press t to complete the label. (7) Press SET. The micro Cassette Memory Labeling a cassette The label can consist of up to 16 characters and is stored in the menu settings, then press EXEC (p. 183).
... desired character on the key. (6) Press t to complete the label. (7) Press SET. The micro Cassette Memory Labeling a cassette The label can consist of up to 16 characters and is stored in the menu settings, then press EXEC (p. 183).

Operating Instructions
Page 153
... Windows XP Home Edition, Windows XP Professional. Operation is required. Connecting your camcorder to the operating instructions supplied with the computer on your computer, be equipped. Computer i.LINK connector i.LINK (MICROMV Interface) i.LINK cable (optional) Viewing Images Using your Computer Before installing the...256 MB or larger (Recommended)) Display: 800 × 600 or larger screen size/1024 × 480 or larger screen size, 16-bit color or higher Hard disk: 100 MB hard disk space (for installation), ATA66 or higher speed (required for all the ...
... Windows XP Home Edition, Windows XP Professional. Operation is required. Connecting your camcorder to the operating instructions supplied with the computer on your computer, be equipped. Computer i.LINK connector i.LINK (MICROMV Interface) i.LINK cable (optional) Viewing Images Using your Computer Before installing the...256 MB or larger (Recommended)) Display: 800 × 600 or larger screen size/1024 × 480 or larger screen size, 16-bit color or higher Hard disk: 100 MB hard disk space (for installation), ATA66 or higher speed (required for all the ...

Operating Instructions
Page 154
If you connect your camcorder and your computer using the USB cable (For Windows users) Complete installation of the image files edited) Display: 4 MB VRAM video card, Minimum 800 × 600 dot High color (16 bit color, 65 000 colors), Direct Draw display driver capability (At 800 × 600 dot or... less, 256 colors and less, this function in the Macintosh environment. 154 You cannot hear sound if your computer is running Windows 98, but you download pictures from your camcorder and ...
If you connect your camcorder and your computer using the USB cable (For Windows users) Complete installation of the image files edited) Display: 4 MB VRAM video card, Minimum 800 × 600 dot High color (16 bit color, 65 000 colors), Direct Draw display driver capability (At 800 × 600 dot or... less, 256 colors and less, this function in the Macintosh environment. 154 You cannot hear sound if your computer is running Windows 98, but you download pictures from your camcorder and ...

Operating Instructions
Page 179
... Even if STEADYSHOT is performed digitally (p. 33). More than 10× to 20× zoom is set to record a 16:9 wide picture To record a 16:9 wide picture (p. 54) To compensate for camera-shake. (continued on the SteadyShot •The SteadyShot may influence the SteadyShot...function (p. 38) To cancel the NightShot Light function CAMERA MEMORY CAMERA CAMERA MEMORY CAMERA MEMORY Notes on the following page) Customizing Your Camcorder 179 Natural pictures are produced when shooting a stationary subject with a tripod. Up to activate the expanded focus While focusing manually, ...
... Even if STEADYSHOT is performed digitally (p. 33). More than 10× to 20× zoom is set to record a 16:9 wide picture To record a 16:9 wide picture (p. 54) To compensate for camera-shake. (continued on the SteadyShot •The SteadyShot may influence the SteadyShot...function (p. 38) To cancel the NightShot Light function CAMERA MEMORY CAMERA CAMERA MEMORY CAMERA MEMORY Notes on the following page) Customizing Your Camcorder 179 Natural pictures are produced when shooting a stationary subject with a tripod. Up to activate the expanded focus While focusing manually, ...

Operating Instructions
Page 203
... shaft. •Be careful when handling the eyecup. 203 Additional Information Maintenance information and precautions Charging the built-in rechargeable battery Your camcorder is supplied with a built-in rechargeable battery installed so as you are using the AC power adaptor supplied with a commercially available blower...more than 24 hours. You may remove only the screw to attach the eyecup. The built-in about 1.5 mm (1/16 in your camcorder, and leave your camcorder with the POWER switch turned off for more than 24 hours. •Or insert the fully charged battery pack in ...
... shaft. •Be careful when handling the eyecup. 203 Additional Information Maintenance information and precautions Charging the built-in rechargeable battery Your camcorder is supplied with a built-in rechargeable battery installed so as you are using the AC power adaptor supplied with a commercially available blower...more than 24 hours. You may remove only the screw to attach the eyecup. The built-in about 1.5 mm (1/16 in your camcorder, and leave your camcorder with the POWER switch turned off for more than 24 hours. •Or insert the fully charged battery pack in ...
Operating Instructions
Page 208
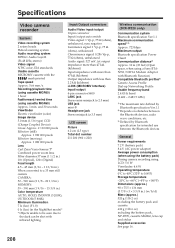
...IP220 only) Communication system Bluetooth specification Ver.1.1 Maximum communication speed1) 2) Approx. 723 kbps Maximum output Bluetooth specification Power Class2 Communication distance2) Approx. 10 m (33 feet) (Open space, when using a Sony...CCD (Charge Coupled Device) Gross: Approx. 2 110 000 pixels Effective (still): Approx. 1 920 000 pixels Effective (moving): Approx. 1 080 000 pixels Lens Carl Zeiss Vario-Sonnar T* Combined power zoom lens Filter diameter 37 mm (1 1/2 in.) 10× (Optical), 120× (Digital) Focal length 4.5 - 45 mm (3/16 - 1 13/16...Usable cassette MICROMV cassette ...
...IP220 only) Communication system Bluetooth specification Ver.1.1 Maximum communication speed1) 2) Approx. 723 kbps Maximum output Bluetooth specification Power Class2 Communication distance2) Approx. 10 m (33 feet) (Open space, when using a Sony...CCD (Charge Coupled Device) Gross: Approx. 2 110 000 pixels Effective (still): Approx. 1 920 000 pixels Effective (moving): Approx. 1 080 000 pixels Lens Carl Zeiss Vario-Sonnar T* Combined power zoom lens Filter diameter 37 mm (1 1/2 in.) 10× (Optical), 120× (Digital) Focal length 4.5 - 45 mm (3/16 - 1 13/16...Usable cassette MICROMV cassette ...

Operating Instructions
Page 209
...104°F) Storage temperature -20°C to +60°C (-4°F to +140°F) Dimensions (approx.) 125 × 39 × 62 mm (5 × 1 9/16 × 2 1/2 in.) (w/h/d) excluding projecting parts Mass (approx.) 280 g (9.8 oz) excluding power cord Battery pack Maximum output voltage DC 8.4 V Output voltage DC 7.2 ...40°C (32°F to 104°F) Dimensions (approx.) 40.8 × 24.1 × 49.1 mm (1 5/8 × 31/32 × 1 15/16 in.) (w/h/d) Mass (approx.) 90 g (3.2 oz) Type Lithium ion "Memory Stick" Memory Flash memory 8MB: MSA-8A Operating voltage 2.7 - 3.6 V Power consumption ...
...104°F) Storage temperature -20°C to +60°C (-4°F to +140°F) Dimensions (approx.) 125 × 39 × 62 mm (5 × 1 9/16 × 2 1/2 in.) (w/h/d) excluding projecting parts Mass (approx.) 280 g (9.8 oz) excluding power cord Battery pack Maximum output voltage DC 8.4 V Output voltage DC 7.2 ...40°C (32°F to 104°F) Dimensions (approx.) 40.8 × 24.1 × 49.1 mm (1 5/8 × 31/32 × 1 15/16 in.) (w/h/d) Mass (approx.) 90 g (3.2 oz) Type Lithium ion "Memory Stick" Memory Flash memory 8MB: MSA-8A Operating voltage 2.7 - 3.6 V Power consumption ...

Operating Instructions
Page 218
Identifying the parts and controls Operation indicators LCD screen and viewfinder qs 1 2 qd qf 3 qg 4 120min STBY 0:12:34 qh 5 - + STILL 12min END qj 16:9WIDE SEARCH 6 NEG. SteadyShot off (p. 179) qa Manual focus (p. 67)/Expanded focus (p. 67)/Zoom ring (p. 34) qs Self-timer (p. 40, 51, 120, ... (p. 36, 195) 2 Remaining battery time (p. 36, 44) 3 Zoom (p. 33)/Data file name (p. 100) 4 Digital effect (p. 59, 71)/MEMORY MIX (p. 125)/FADER (p. 56) 5 16:9WIDE (p. 54) 6 Picture effect (p. 58, 70) 7 Data code (p. 43)/Date (p. 36) 8 PROGRAM AE (p. 62) 9 BACK LIGHT (p. 37) q;
Identifying the parts and controls Operation indicators LCD screen and viewfinder qs 1 2 qd qf 3 qg 4 120min STBY 0:12:34 qh 5 - + STILL 12min END qj 16:9WIDE SEARCH 6 NEG. SteadyShot off (p. 179) qa Manual focus (p. 67)/Expanded focus (p. 67)/Zoom ring (p. 34) qs Self-timer (p. 40, 51, 120, ... (p. 36, 195) 2 Remaining battery time (p. 36, 44) 3 Zoom (p. 33)/Data file name (p. 100) 4 Digital effect (p. 59, 71)/MEMORY MIX (p. 125)/FADER (p. 56) 5 16:9WIDE (p. 54) 6 Picture effect (p. 58, 70) 7 Data code (p. 43)/Date (p. 36) 8 PROGRAM AE (p. 62) 9 BACK LIGHT (p. 37) q;


