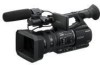

Operation Guide
Page 3
...in its bag when not in color) that appear constantly on the viewfinder or lens and damage the internal parts of your camcorder or battery Continued , 3 These points are operational for extended periods. • Intense light sources, especially the sun will converge on the... LCD screen and the viewfinder. About temperature of your camcorder. Avoid sunlight or other strong light sources when storing your camcorder and battery pack • Your camcorder has a protective function that is grayed out is not dustproof, dripproof or waterproof.
...in its bag when not in color) that appear constantly on the viewfinder or lens and damage the internal parts of your camcorder or battery Continued , 3 These points are operational for extended periods. • Intense light sources, especially the sun will converge on the... LCD screen and the viewfinder. About temperature of your camcorder. Avoid sunlight or other strong light sources when storing your camcorder and battery pack • Your camcorder has a protective function that is grayed out is not dustproof, dripproof or waterproof.

Operation Guide
Page 4
...are captured using your recordings on other accessories are used when i.LINK cable is beyond the safely operable range. Unauthorized recording of battery packs in this manual show the NP-F770 unless otherwise specified. This phenomenon may be played back on the icons used in ... the viewfinder used in the viewfinder (p. 116). Read this first (Continued) pack is connected. In this manual • The images of the camcorder, storage media, etc. • TV color systems differ depending on the recording conditions. Change the screen language before using a digital still camera,...
...are captured using your recordings on other accessories are used when i.LINK cable is beyond the safely operable range. Unauthorized recording of battery packs in this manual show the NP-F770 unless otherwise specified. This phenomenon may be played back on the icons used in ... the viewfinder used in the viewfinder (p. 116). Read this first (Continued) pack is connected. In this manual • The images of the camcorder, storage media, etc. • TV color systems differ depending on the recording conditions. Change the screen language before using a digital still camera,...
Operation Guide
Page 5
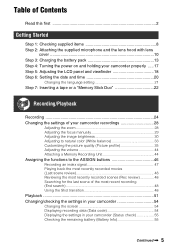
... items 8 Step 2: Attaching the supplied microphone and the lens hood with lens cover 10 Step 3: Charging the battery pack 13 Step 4: Turning the power on and holding your camcorder properly .....17 Step 5: Adjusting the LCD panel and viewfinder 18 Step 6: Setting the date and time 20 Changing...the language setting 21 Step 7: Inserting a tape or a "Memory Stick Duo 22 Recording/Playback Recording 24 Changing the settings of your camcorder recordings 28 Adjusting the zoom 28 Adjusting the focus manually 29 Adjusting the image brightness 30 Adjusting to natural color (White balance 33 ...
... items 8 Step 2: Attaching the supplied microphone and the lens hood with lens cover 10 Step 3: Charging the battery pack 13 Step 4: Turning the power on and holding your camcorder properly .....17 Step 5: Adjusting the LCD panel and viewfinder 18 Step 6: Setting the date and time 20 Changing...the language setting 21 Step 7: Inserting a tape or a "Memory Stick Duo 22 Recording/Playback Recording 24 Changing the settings of your camcorder recordings 28 Adjusting the zoom 28 Adjusting the focus manually 29 Adjusting the image brightness 30 Adjusting to natural color (White balance 33 ...

Operation Guide
Page 7
Additional Information Using your camcorder abroad 118 Maintenance and precautions 119 HDV format and recording/playback 119 Compatibility of the DVCAM/DV formats 120 About the "Memory Stick 122 About the "InfoLITHIUM" battery pack 123 About i.LINK 124 About x.v.Color 125 About handling of your camcorder 125 Specifications 129 Quick Reference Identifying parts and controls 134 Indicators for the LCD screen and viewfinder 140 Index ...143 7
Additional Information Using your camcorder abroad 118 Maintenance and precautions 119 HDV format and recording/playback 119 Compatibility of the DVCAM/DV formats 120 About the "Memory Stick 122 About the "InfoLITHIUM" battery pack 123 About i.LINK 124 About x.v.Color 125 About handling of your camcorder 125 Specifications 129 Quick Reference Identifying parts and controls 134 Indicators for the LCD screen and viewfinder 140 Index ...143 7
Operation Guide
Page 8
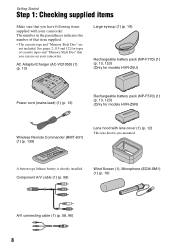
...) Wireless Remote Commander (RMT-831) (1) (p. 139) Lens hood with your camcorder. AC Adaptor/Charger (AC-VQ1050) (1) (p. 13) Large eyecup (1) (p. 19) Rechargeable battery pack (NP-F770) (1) (p. 13, 123) (Only for models HVR-Z5U) Power cord (mains lead) (1) (p. 13) Rechargeable battery pack (NP-F570) (1) (p. 13, 123) (Only for types of that item supplied. • The cassette tape...
...) Wireless Remote Commander (RMT-831) (1) (p. 139) Lens hood with your camcorder. AC Adaptor/Charger (AC-VQ1050) (1) (p. 13) Large eyecup (1) (p. 19) Rechargeable battery pack (NP-F770) (1) (p. 13, 123) (Only for models HVR-Z5U) Power cord (mains lead) (1) (p. 13) Rechargeable battery pack (NP-F570) (1) (p. 13, 123) (Only for types of that item supplied. • The cassette tape...

Operation Guide
Page 13
... power cord (mains lead) to the AC Adaptor/Charger. 3 Connect the power cord (mains lead) to the wall outlet (wall socket). 4 Place the battery pack in the slot of the AC Adaptor/Charger, press it down, and slide it in the display window when the normal charge of your... camcorder and slide it down. To attach the battery pack Press the battery pack against the back of the battery is completed. After charging the battery All segments of the battery mark ( ) appear in the direction of the normally charged battery. The charge lamp turns on and ...
... power cord (mains lead) to the AC Adaptor/Charger. 3 Connect the power cord (mains lead) to the wall outlet (wall socket). 4 Place the battery pack in the slot of the AC Adaptor/Charger, press it down, and slide it in the display window when the normal charge of your... camcorder and slide it down. To attach the battery pack Press the battery pack against the back of the battery is completed. After charging the battery All segments of the battery mark ( ) appear in the direction of the normally charged battery. The charge lamp turns on and ...
Operation Guide
Page 14
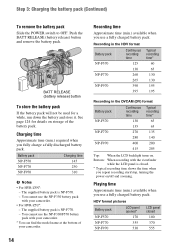
... shows the time when you fully charge a fully discharged battery pack. Battery pack NP-F570 NP-F770 NP-F970 Charging time 145 230 310 b Notes • For HVR-Z5N*: - You cannot use the NP-F330/F570 battery pack with your camcorder. * You can find the model name at the bottom... battery pack (Continued) To remove the battery pack Slide the POWER switch to OFF. See page 124 for a while, run down the battery and store it. BATT RELEASE (battery release) button To store the battery pack If the battery pack will not be used for details on storage of your camcorder. • For HVR-Z5U*:...
... shows the time when you fully charge a fully discharged battery pack. Battery pack NP-F570 NP-F770 NP-F970 Charging time 145 230 310 b Notes • For HVR-Z5N*: - You cannot use the NP-F330/F570 battery pack with your camcorder. * You can find the model name at the bottom... battery pack (Continued) To remove the battery pack Slide the POWER switch to OFF. See page 124 for a while, run down the battery and store it. BATT RELEASE (battery release) button To store the battery pack If the battery pack will not be used for details on storage of your camcorder. • For HVR-Z5U*:...

Operation Guide
Page 15
... you use your camcorder. On the charging/recording/playback time • Times measured with the Memory Recording Unit (optional). Using an outside power source You can use the AC Adaptor/Charger to 86 °F) is worn-out. • Sony recommends that you use an NP-F970 battery pack when you... use your camcorder in a narrow space, such as between a wall and furniture. Disconnect the AC Adaptor/ Charger from the wall ...
... you use your camcorder. On the charging/recording/playback time • Times measured with the Memory Recording Unit (optional). Using an outside power source You can use the AC Adaptor/Charger to 86 °F) is worn-out. • Sony recommends that you use an NP-F970 battery pack when you... use your camcorder in a narrow space, such as between a wall and furniture. Disconnect the AC Adaptor/ Charger from the wall ...

Operation Guide
Page 16
This may cause a malfunction. • Even if your camcorder is turned off, AC power (house current) is still supplied to it while connected to the wall outlet (wall socket) via the AC Adaptor/Charger. 16 Step 3: Charging the battery pack (Continued) • Do not short-circuit the DC plug of the AC Adaptor/Charger or battery terminal with any metallic objects.
This may cause a malfunction. • Even if your camcorder is turned off, AC power (house current) is still supplied to it while connected to the wall outlet (wall socket) via the AC Adaptor/Charger. 16 Step 3: Charging the battery pack (Continued) • Do not short-circuit the DC plug of the AC Adaptor/Charger or battery terminal with any metallic objects.

Operation Guide
Page 18
The recorded picture will be recorded in bright conditions or when you use your camcorder in a normal image. z Tips • You can adjust the brightness of the ...will not be recorded on the LCD display and in the viewfinder, set [VF COLOR] to make the battery last longer Press and hold the DISPLAY/BATT INFO button for a few seconds until appears. To turn off...viewfinder The LCD panel Open the LCD panel 180 degrees (1), then rotate it to the best angle to save battery power. This is practical when you want to record or play back (2). 1Open 180 degrees. 290 degrees (...
The recorded picture will be recorded in bright conditions or when you use your camcorder in a normal image. z Tips • You can adjust the brightness of the ...will not be recorded on the LCD display and in the viewfinder, set [VF COLOR] to make the battery last longer Press and hold the DISPLAY/BATT INFO button for a few seconds until appears. To turn off...viewfinder The LCD panel Open the LCD panel 180 degrees (1), then rotate it to the best angle to save battery power. This is practical when you want to record or play back (2). 1Open 180 degrees. 290 degrees (...

Operation Guide
Page 20
... and the date and time settings may be cleared from the memory. In that case, charge the rechargeable battery and then set any year up to step 4 when you turn on your camcorder or change the POWER switch positions. You can set the date and time again (p. 128). The clock... first time. 1 Press the MENU button. 2 Select (OTHERS) by turning the SEL/PUSH EXEC dial, then press the dial. If you do not use your camcorder for the first time. JAN - 1 12 : 00 AM [ MENU ] : CANCEL 5 Set [M] (month), [D] (day), hour and minute, then press the dial. CLOCK SET --:--:--:-- Y M D 2008 ...
... and the date and time settings may be cleared from the memory. In that case, charge the rechargeable battery and then set any year up to step 4 when you turn on your camcorder or change the POWER switch positions. You can set the date and time again (p. 128). The clock... first time. 1 Press the MENU button. 2 Select (OTHERS) by turning the SEL/PUSH EXEC dial, then press the dial. If you do not use your camcorder for the first time. JAN - 1 12 : 00 AM [ MENU ] : CANCEL 5 Set [M] (month), [D] (day), hour and minute, then press the dial. CLOCK SET --:--:--:-- Y M D 2008 ...

Operation Guide
Page 23
Do not shake or knock your camcorder is lit or flashing, your camcorder, turn the power off, eject the "Memory Stick Duo," or remove the battery pack. To eject a "Memory Stick Duo" Lightly push the "Memory Stick Duo" once. Getting Started 2 Insert the "Memory Stick Duo" into the slot in the ...
Do not shake or knock your camcorder is lit or flashing, your camcorder, turn the power off, eject the "Memory Stick Duo," or remove the battery pack. To eject a "Memory Stick Duo" Lightly push the "Memory Stick Duo" once. Getting Started 2 Insert the "Memory Stick Duo" into the slot in the ...

Operation Guide
Page 55
...will be displayed in the same area when you select the date and time display. Displaying the settings in your camcorder (Status check) You can view the battery information for up on another device. The approximate recordable time in the following sequence: AUDIO t OUTPUT t ASSIGN ...HVR-MRC1 or HVR-DR60 1 Press the STATUS CHECK button C. 2 Turn the SEL/PUSH EXEC dial D until a desired display shows up to VCR, the display changes in the selected format and battery information appear for the accurate shutter speed. You can check the settings of the movie recorded with your camcorder...
...will be displayed in the same area when you select the date and time display. Displaying the settings in your camcorder (Status check) You can view the battery information for up on another device. The approximate recordable time in the following sequence: AUDIO t OUTPUT t ASSIGN ...HVR-MRC1 or HVR-DR60 1 Press the STATUS CHECK button C. 2 Turn the SEL/PUSH EXEC dial D until a desired display shows up to VCR, the display changes in the selected format and battery information appear for the accurate shutter speed. You can check the settings of the movie recorded with your camcorder...

Operation Guide
Page 83
When [SCAN TYPE] is set to the period that your camcorder reads image data from the image sensor is defined as 360 degrees. b Notes • When you select [BRIGHT], the recordable time with the battery is slightly reduced. B NORMAL Standard brightness. Continued , 83 Using ... calculated based on [SCAN TYPE], see [HDV PROGRE.] (p. 85) or [DV PROGRE.] (p. 86). b Notes • When you connect your camcorder to outside power sources, [BRIGHT] is automatically selected for the setting. LCD BRIGHT You can adjust the brightness of this definition and displayed. - Changes...
When [SCAN TYPE] is set to the period that your camcorder reads image data from the image sensor is defined as 360 degrees. b Notes • When you select [BRIGHT], the recordable time with the battery is slightly reduced. B NORMAL Standard brightness. Continued , 83 Using ... calculated based on [SCAN TYPE], see [HDV PROGRE.] (p. 85) or [DV PROGRE.] (p. 86). b Notes • When you connect your camcorder to outside power sources, [BRIGHT] is automatically selected for the setting. LCD BRIGHT You can adjust the brightness of this definition and displayed. - Changes...

Operation Guide
Page 84
... LCD screen, viewfinder, HDMI output, component output and composite output. ON Always turns on the viewfinder while you select [BRIGHT], the recordable time with the battery is displayed when you press N (Play) or the DISPLAY/BATT INFO button. B LCD PANEL Outputs the information to VCR or CAMERA with a cassette inserted. •...
... LCD screen, viewfinder, HDMI output, component output and composite output. ON Always turns on the viewfinder while you select [BRIGHT], the recordable time with the battery is displayed when you press N (Play) or the DISPLAY/BATT INFO button. B LCD PANEL Outputs the information to VCR or CAMERA with a cassette inserted. •...

Operation Guide
Page 94
...turn off, you can use the supplied Remote Commander (p. 139). The default setting is [ON]. z Tips • Set to [OFF] to prevent your camcorder from standby (the drum stops rotating) to miss a recording chance. z Tips • When this when you can restart recording by another VCR remote control... on images. REC LAMP[R] (Recording lamp [rear]) When you set this function to [ON], you do not want to prevent tape wear and battery loss. The default setting is [ON]. ON ( ) The time shortens slightly until it stops. HOURS METER You can turn off the front camera...
...turn off, you can use the supplied Remote Commander (p. 139). The default setting is [ON]. z Tips • Set to [OFF] to prevent your camcorder from standby (the drum stops rotating) to miss a recording chance. z Tips • When this when you can restart recording by another VCR remote control... on images. REC LAMP[R] (Recording lamp [rear]) When you set this function to [ON], you do not want to prevent tape wear and battery loss. The default setting is [ON]. ON ( ) The time shortens slightly until it stops. HOURS METER You can turn off the front camera...

Operation Guide
Page 106
...is set to on the LCD screen. • This occurs if you disconnect the DK-415 cable or remove the battery pack without turning off . • Attach a charged battery pack to the camcorder (p. 13). • Use the AC Adaptor/Charger to connect to a wall outlet (wall socket) (p. 13)....8226; The indicated time may be correct in certain circumstances. If the problem persists, the battery may not be worn-out. Replace it takes about 1 minute. • Press the RESET button (p. 138) using your Sony dealer. • Power sources/LCD screen/Remote Commander···p. 106 • ...
...is set to on the LCD screen. • This occurs if you disconnect the DK-415 cable or remove the battery pack without turning off . • Attach a charged battery pack to the camcorder (p. 13). • Use the AC Adaptor/Charger to connect to a wall outlet (wall socket) (p. 13)....8226; The indicated time may be correct in certain circumstances. If the problem persists, the battery may not be worn-out. Replace it takes about 1 minute. • Press the RESET button (p. 138) using your Sony dealer. • Power sources/LCD screen/Remote Commander···p. 106 • ...

Operation Guide
Page 107
...cannot be ejected from the remote sensor, otherwise the Remote Commander may not function properly. • Insert a fresh battery in the compartment with battery operation) and therefore increases noise. Continued , 107 Troubleshooting The picture in the viewfinder has disappeared. • If...rewind/fast forward speed increases (compared with its +/- This is connected correctly (p. 13). • Moisture condensation has occurred inside the camcorder (p. 126). Another VCR malfunctions when you change [VF POWERMODE] to [AUTO], the finder light remains off while the LCD panel...
...cannot be ejected from the remote sensor, otherwise the Remote Commander may not function properly. • Insert a fresh battery in the compartment with battery operation) and therefore increases noise. Continued , 107 Troubleshooting The picture in the viewfinder has disappeared. • If...rewind/fast forward speed increases (compared with its +/- This is connected correctly (p. 13). • Moisture condensation has occurred inside the camcorder (p. 126). Another VCR malfunctions when you change [VF POWERMODE] to [AUTO], the finder light remains off while the LCD panel...
Operation Guide
Page 116
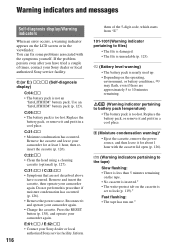
...battery pack, or remove it and put it in the viewfinder. C:22:ss • Clean the head using a cleaning cassette (optional) (p. 127). Inform 116 them of times, contact your camcorder again. • Change the cassette. If the problem persists even after you have occurred. Remove the cassette and leave your Sony... dealer or local authorized Sony service facility. E:61:ss / E:62:ss • Contact your camcorder for about 1 hour with the symptoms yourself. Do not perform this procedure if...
...battery pack, or remove it and put it in the viewfinder. C:22:ss • Clean the head using a cleaning cassette (optional) (p. 127). Inform 116 them of times, contact your camcorder again. • Change the cassette. If the problem persists even after you have occurred. Remove the cassette and leave your Sony... dealer or local authorized Sony service facility. E:61:ss / E:62:ss • Contact your camcorder for about 1 hour with the symptoms yourself. Do not perform this procedure if...

Operation Guide
Page 122
...file extension is ".JPG." • A "Memory Stick Duo" formatted by a computer (Windows OS/Mac OS) does not have guaranteed compatibility with your camcorder. • Data read/write speed may vary depending on the combination of the "Memory Stick Duo" and "Memory Stick Duo" compliant product you use... and precautions (Continued) b Notes • If you eject the "Memory Stick Duo," turn the power off on your camcorder, or remove the battery pack for replacement while your camcorder is reading or writing image files on the "Memory Stick Duo" (while the access lamp is lit or flashing). - You...
...file extension is ".JPG." • A "Memory Stick Duo" formatted by a computer (Windows OS/Mac OS) does not have guaranteed compatibility with your camcorder. • Data read/write speed may vary depending on the combination of the "Memory Stick Duo" and "Memory Stick Duo" compliant product you use... and precautions (Continued) b Notes • If you eject the "Memory Stick Duo," turn the power off on your camcorder, or remove the battery pack for replacement while your camcorder is reading or writing image files on the "Memory Stick Duo" (while the access lamp is lit or flashing). - You...


