Operating Instructions
Page 1
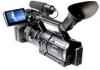
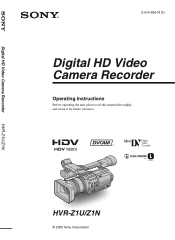
Digital HD Video Camera Recorder 2-514-606-11(1) Digital HD Video Camera Recorder Operating Instructions Before operating the unit, please read this manual thoroughly, and retain it for future reference. HVR-Z1U/Z1N © 2005 Sony Corporation HVR-Z1U/Z1N
Digital HD Video Camera Recorder 2-514-606-11(1) Digital HD Video Camera Recorder Operating Instructions Before operating the unit, please read this manual thoroughly, and retain it for future reference. HVR-Z1U/Z1N © 2005 Sony Corporation HVR-Z1U/Z1N
Operating Instructions
Page 6
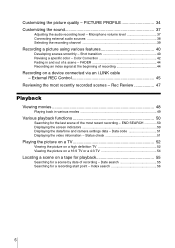
... 50 Displaying the date/time and camera settings data - Shot transition 40 Revising a specific color - Rec Review 47 Playback Viewing movies 48 Playing back in and out of recording 44 Recording on a tape for playback 55 Searching for a recording start point - Status check 51 ... of the most recently recorded scenes - Color Correction 42 Fading in various modes 49 Various playback functions 50 Searching for the last scene of recording - Data code 51 Displaying the video information - External REC Control 45 Reviewing the most recent recording - PICTURE PROFILE 34 ...
... 50 Displaying the date/time and camera settings data - Shot transition 40 Revising a specific color - Rec Review 47 Playback Viewing movies 48 Playing back in and out of recording 44 Recording on a tape for playback 55 Searching for a recording start point - Status check 51 ... of the most recently recorded scenes - Color Correction 42 Fading in various modes 49 Various playback functions 50 Searching for the last scene of recording - Data code 51 Displaying the video information - External REC Control 45 Reviewing the most recent recording - PICTURE PROFILE 34 ...
Operating Instructions
Page 27
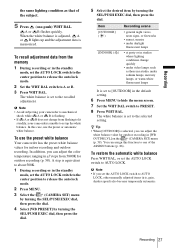
...; Avoid subjecting your camcorder to mechanical shock while A or B is flashing. • If A or B does not change quickly • under video lamps such as that of the ASSIGN buttons (p. 86). In this function to release the auto lock mode. 2 Press MENU. 3 Select the (CAMERA SET) menu by ... where lighting conditions change from flashing to lit steadily, your camcorder is unable to PRESET. 8 Press WHT BAL. Recording 27 In addition, you can adjust the white balance value for outdoor recording in [WB OUTDR LVL] on the (CAMERA SET) menu (p. 58). A step is set to [OUTDOOR...
...; Avoid subjecting your camcorder to mechanical shock while A or B is flashing. • If A or B does not change quickly • under video lamps such as that of the ASSIGN buttons (p. 86). In this function to release the auto lock mode. 2 Press MENU. 3 Select the (CAMERA SET) menu by ... where lighting conditions change from flashing to lit steadily, your camcorder is unable to PRESET. 8 Press WHT BAL. Recording 27 In addition, you can adjust the white balance value for outdoor recording in [WB OUTDR LVL] on the (CAMERA SET) menu (p. 58). A step is set to [OUTDOOR...
Operating Instructions
Page 31
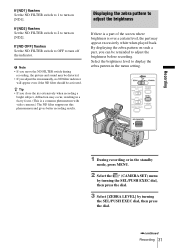
... to adjust the brightness If there is a part of the screen where brightness is a common phenomenon with video cameras.) The ND filter suppresses this phenomenon and gives better recording results. Displaying the zebra pattern to display the zebra pattern in the standby mode, press MENU. 2 Select... the (CAMERA SET) menu by turning the SEL/PUSH EXEC dial, then press the dial. 3 Select [ZEBRA LEVEL] by turning the SEL/PUSH EXEC dial, then press the dial. ,continued Recording 31 Recording 1 During recording or in the menu setting.
... to adjust the brightness If there is a part of the screen where brightness is a common phenomenon with video cameras.) The ND filter suppresses this phenomenon and gives better recording results. Displaying the zebra pattern to display the zebra pattern in the standby mode, press MENU. 2 Select... the (CAMERA SET) menu by turning the SEL/PUSH EXEC dial, then press the dial. 3 Select [ZEBRA LEVEL] by turning the SEL/PUSH EXEC dial, then press the dial. ,continued Recording 31 Recording 1 During recording or in the menu setting.
Operating Instructions
Page 45
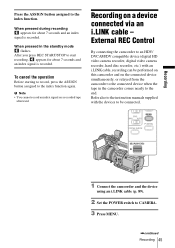
... the standby mode flashes. External REC Control By connecting the camcorder to an HDV/ DVCAM/DV compatible device (digital HD video camera recorder, digital video camera recorder, hard disc recorder, etc.) with the devices to be performed on this camcorder and on the connected device simultaneously, or relayed from the camcorder to the instruction manuals supplied with an i.LINK cable...
... the standby mode flashes. External REC Control By connecting the camcorder to an HDV/ DVCAM/DV compatible device (digital HD video camera recorder, digital video camera recorder, hard disc recorder, etc.) with the devices to be performed on this camcorder and on the connected device simultaneously, or relayed from the camcorder to the instruction manuals supplied with an i.LINK cable...
Operating Instructions
Page 49
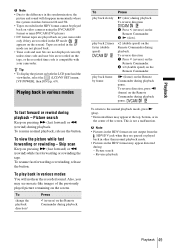
...button. To play back 2 times faster (double speed) ×2 (double speed) on the Remote Commander during playback - This is compatible with your camcorder. Picture search Keep on the Remote Commander. 2 y (slow). To view the picture while fast forwarding or rewinding - To resume fast forwarding or rewinding...and 50i. • Tapes recorded in the HDV format cannot be played back on video cameras using the DVCAM/DV format or mini-DVCAM (DV) players. • DV format tapes are played back on your camcorder only if they are recorded on the tape, or the recorded time code is not a...
...button. To play back 2 times faster (double speed) ×2 (double speed) on the Remote Commander during playback - This is compatible with your camcorder. Picture search Keep on the Remote Commander. 2 y (slow). To view the picture while fast forwarding or rewinding - To resume fast forwarding or rewinding...and 50i. • Tapes recorded in the HDV format cannot be played back on video cameras using the DVCAM/DV format or mini-DVCAM (DV) players. • DV format tapes are played back on your camcorder only if they are recorded on the tape, or the recorded time code is not a...
Operating Instructions
Page 51
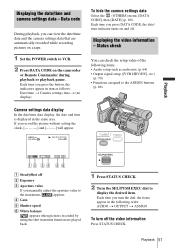
... and camera settings data - Each time you turn the dial, the items appear in turn off . Displaying the video information - Each time you press DATA CODE, the date/ time indicator turns on the camcorder or Remote Commander during playback or playback pause. Playback 51 D Gain E Shutter speed F White balance appears when pictures recorded by...
... and camera settings data - Each time you turn the dial, the items appear in turn off . Displaying the video information - Each time you press DATA CODE, the date/ time indicator turns on the camcorder or Remote Commander during playback or playback pause. Playback 51 D Gain E Shutter speed F White balance appears when pictures recorded by...

Operating Instructions
Page 91
...plug of the A/V connecting cable (supplied). z Tip • To record the date/time and camera settings data, first have an S video jack on your camcorder to a VCR using the yellow video plug of the A/V connecting cable to the video jack, and the red or the white plug to the audio jack ... To dub to an AV device Connect your VCR * S video cable (optional) VCRs AUDIO/VIDEO jack Signal flow A/V connecting cable (supplied) * When there is an S video jack on the device to be output if you connect with the S video cable alone. This connection produces higher quality DVCAM (DV) format ...
...plug of the A/V connecting cable (supplied). z Tip • To record the date/time and camera settings data, first have an S video jack on your camcorder to a VCR using the yellow video plug of the A/V connecting cable to the video jack, and the red or the white plug to the audio jack ... To dub to an AV device Connect your VCR * S video cable (optional) VCRs AUDIO/VIDEO jack Signal flow A/V connecting cable (supplied) * When there is an S video jack on the device to be output if you connect with the S video cable alone. This connection produces higher quality DVCAM (DV) format ...

Operating Instructions
Page 96
...camcorder. • Be sure to CAMERA. Connecting in the opposite order may cause static electricity to [ON] and 96 Dubbing/Editing Otherwise, the computer may cause a malfunction of the format indicated by connecting it to a computer using an i.LINK cable, the computer must have an i.LINK interface, and application software to read video...an i.LINK cable, be installed on the tape in the proper direction. To import pictures on a tape to the computer • To scan pictures recorded in the HDV format on the tape in the HDV format, set [VCR HDV/DV] to [HDV] (p. 70) and [HDVtDV CONV] to ...
...camcorder. • Be sure to CAMERA. Connecting in the opposite order may cause static electricity to [ON] and 96 Dubbing/Editing Otherwise, the computer may cause a malfunction of the format indicated by connecting it to a computer using an i.LINK cable, the computer must have an i.LINK interface, and application software to read video...an i.LINK cable, be installed on the tape in the proper direction. To import pictures on a tape to the computer • To scan pictures recorded in the HDV format on the tape in the HDV format, set [VCR HDV/DV] to [HDV] (p. 70) and [HDVtDV CONV] to ...
Operating Instructions
Page 102
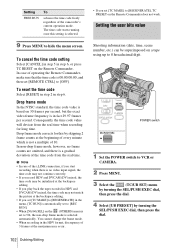
... omitted, and there is a gradual deviation of 10. In case of the camcorder's current operation mode. In non-drop frame mode, however, no video input signal, the time code may not continue correctly. • If you record HDV and DVCAM (DV) mixed, the time code may be superimposed on the... Remote Commander. POWER switch 1 Set the POWER switch to VCR or CAMERA. 2 Press MENU. 3 Select the (...
... omitted, and there is a gradual deviation of 10. In case of the camcorder's current operation mode. In non-drop frame mode, however, no video input signal, the time code may not continue correctly. • If you record HDV and DVCAM (DV) mixed, the time code may be superimposed on the... Remote Commander. POWER switch 1 Set the POWER switch to VCR or CAMERA. 2 Press MENU. 3 Select the (...

Operating Instructions
Page 103
...ON]. b Note • User-bit values appear at every 3 frames for the tape recorded in the HDV format. • When you input HDV format signal via i.LINK connection, the user-bits of the input video are written on this camera, however, they are not displayed during dubbing. Press TC/U-BIT. 5 Select [PRESET]...8226; The time code and user bits cannot be displayed properly if the tape does not have time code and/or user bits recordings or if the time code was recorded using a non-compatible method. • When you press the button, the time value changes between the time code and user...
...ON]. b Note • User-bit values appear at every 3 frames for the tape recorded in the HDV format. • When you input HDV format signal via i.LINK connection, the user-bits of the input video are written on this camera, however, they are not displayed during dubbing. Press TC/U-BIT. 5 Select [PRESET]...8226; The time code and user bits cannot be displayed properly if the tape does not have time code and/or user bits recordings or if the time code was recorded using a non-compatible method. • When you press the button, the time value changes between the time code and user...
Operating Instructions
Page 109
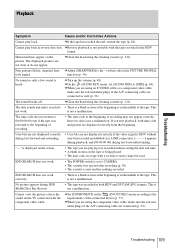
...as well (p. 52). Fine patterns flicker, diagonal lines cAdjust [SHARPNESS] to CAMERA. • The cassette was rewound to [MIX] (p. 64). cTurn up the volume (p. 48). cWhen you are not displayed correctly if the video signal is not a malfunction. The date search and index search do not ...or Corrective Actions Cannot play back in reverse direction. function (p. 34). cClean the head using an S VIDEO cable or a component video cable, make sure the red and white plugs of recording may not appear correctly, however, this is not a malfunction. The time code does not return to ...
...as well (p. 52). Fine patterns flicker, diagonal lines cAdjust [SHARPNESS] to CAMERA. • The cassette was rewound to [MIX] (p. 64). cTurn up the volume (p. 48). cWhen you are not displayed correctly if the video signal is not a malfunction. The date search and index search do not ...or Corrective Actions Cannot play back in reverse direction. function (p. 34). cClean the head using an S VIDEO cable or a component video cable, make sure the red and white plugs of recording may not appear correctly, however, this is not a malfunction. The time code does not return to ...

Operating Instructions
Page 112
... References Use the "InfoLITHIUM" battery pack. cSee page 120. Cannot add audio. HDV recorded tape. See the page in parentheses for 1H. Battery level is locked - Cannot add audio. Not recorded in A (p. 40). cSee page 98. No output image in SHOT-B. cSee page ...new one. cThe pictures cannot be damaged, etc. cSee page 18. Change to CAMERA mode's P-MENU. - cStop inputting the playback signal, or reset [VCR HDV/DV] (p. 70). Eject the cassette. x Dirty video head. cSee page 117. Z Reinsert the cassette. Warning messages If messages appear...
... References Use the "InfoLITHIUM" battery pack. cSee page 120. Cannot add audio. HDV recorded tape. See the page in parentheses for 1H. Battery level is locked - Cannot add audio. Not recorded in A (p. 40). cSee page 98. No output image in SHOT-B. cSee page ...new one. cThe pictures cannot be damaged, etc. cSee page 18. Change to CAMERA mode's P-MENU. - cStop inputting the playback signal, or reset [VCR HDV/DV] (p. 70). Eject the cassette. x Dirty video head. cSee page 117. Z Reinsert the cassette. Warning messages If messages appear...
Operating Instructions
Page 123
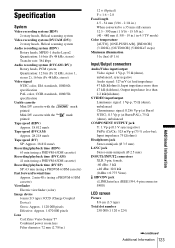
...16 bits (Fs 48 kHz, stereo) Transfer rate: 384 kbps Audio recording system (DVCAM (DV)) Rotary heads, PCM system Quantization: 12 bits (Fs 32 kHz, stereo 1, stereo 2), 16 bits (Fs 48 kHz, stereo) Video signal NTSC color, EIA standards, 1080/60i specification PAL color, CCIR... zoom lens Filter diameter: 72 mm (2 7/8 in.) 12 × (Optical) F = 1.6 ~ 2.8 Focal length 4.5 - 54 mm (3/16 - 2 1/4 in.) When converted to a 35 mm still camera 32.5 - 390 mm (1 5/16 - 15 3/8 in.) (40 - 480 mm (1 5/8 - 19 in.) in 4:3 TV mode) Color temperature [AUTO], [ONE-PUSH A/B], [INDOOR] (3 200 K), [OUTDOOR...
...16 bits (Fs 48 kHz, stereo) Transfer rate: 384 kbps Audio recording system (DVCAM (DV)) Rotary heads, PCM system Quantization: 12 bits (Fs 32 kHz, stereo 1, stereo 2), 16 bits (Fs 48 kHz, stereo) Video signal NTSC color, EIA standards, 1080/60i specification PAL color, CCIR... zoom lens Filter diameter: 72 mm (2 7/8 in.) 12 × (Optical) F = 1.6 ~ 2.8 Focal length 4.5 - 54 mm (3/16 - 2 1/4 in.) When converted to a 35 mm still camera 32.5 - 390 mm (1 5/16 - 15 3/8 in.) (40 - 480 mm (1 5/8 - 19 in.) in 4:3 TV mode) Color temperature [AUTO], [ONE-PUSH A/B], [INDOOR] (3 200 K), [OUTDOOR...

Operating Instructions
Page 128
...) D HDV/DV jack (p. 52, 89, 90, 93, 94, 96) E Microphone (p. 98) F Front camera recording lamp (p. 20) G Front remote sensor H Speaker I Lens (Carl Zeiss Lens) Your camcorder is equipped with a Carl Zeiss lens which can reproduce fine images. C Hook for video cameras and offers a quality as fine as a Carl Zeiss lens. MTF stands for Modulation... tape transport of light from a subject coming into the lens. 128 Quick Reference B i (headphones) jack When you use headphones, the speaker on your camcorder was developed jointly by Carl Zeiss, in Germany, and Sony Corporation. The lens for your...
...) D HDV/DV jack (p. 52, 89, 90, 93, 94, 96) E Microphone (p. 98) F Front camera recording lamp (p. 20) G Front remote sensor H Speaker I Lens (Carl Zeiss Lens) Your camcorder is equipped with a Carl Zeiss lens which can reproduce fine images. C Hook for video cameras and offers a quality as fine as a Carl Zeiss lens. MTF stands for Modulation... tape transport of light from a subject coming into the lens. 128 Quick Reference B i (headphones) jack When you use headphones, the speaker on your camcorder was developed jointly by Carl Zeiss, in Germany, and Sony Corporation. The lens for your...
Operating Instructions
Page 133
...21, 118 Remote Commander..131 BEEP 79 BLACK FADER 44 BLACK STRTCH (stretch 35 C Camera settings data display 51 Cassette 18 Charging the battery Battery pack 11 Pre-installed battery ..122...Color bar 22 Color Correction (COLOR CORRCT 42 COLOR LEVEL 35 COLOR PHASE 35 COMPONENT 73 Component video cable 52, 54 Computer connection ........ 96 Customizing Personal Menu 83 D Data code (DATA CODE...CTRL 45 F FADER 44 Flickering (FLCKR REDUCE 62 Focus 32 FORMAT LAMP 79 Frame playback 49 Frame recording (FRAME REC 63 Full charge 11 G Gain 29 GAIN SETUP 58 Grip belt 4 H HANDLE ZOOM ...
...21, 118 Remote Commander..131 BEEP 79 BLACK FADER 44 BLACK STRTCH (stretch 35 C Camera settings data display 51 Cassette 18 Charging the battery Battery pack 11 Pre-installed battery ..122...Color bar 22 Color Correction (COLOR CORRCT 42 COLOR LEVEL 35 COLOR PHASE 35 COMPONENT 73 Component video cable 52, 54 Computer connection ........ 96 Customizing Personal Menu 83 D Data code (DATA CODE...CTRL 45 F FADER 44 Flickering (FLCKR REDUCE 62 Focus 32 FORMAT LAMP 79 Frame playback 49 Frame recording (FRAME REC 63 Full charge 11 G Gain 29 GAIN SETUP 58 Grip belt 4 H HANDLE ZOOM ...
Operating Instructions
Page 134
Lens hood 130 LETTER BOX 74 Low-angle recording ......... 21 M Manual focus 32 MARKER 61 MARKER SEL 61 Menu AUDIO SET 64 CAMERA SET 58 IN/OUT REC 70 LCD/VF SET 68 OTHERS 78 Selecting items 57 TC/UB SET 76 Menu letter size (... battery ........ 122 Q QUICK REC 78 R Rec review 47 Recording capacity Display 21 REMAINING 80 Recording format (REC FORMAT 71 Recording lamp (REC LAMP 79 Recording mode (REC MODE 71 Recording time 12 Remote Commander ........131 REMOTE CTRL .........81 Remote sensor..........125, 128 RESET 127 S S video .....53, 54, 91, 94, 104 Self-diagnosis display ...
Lens hood 130 LETTER BOX 74 Low-angle recording ......... 21 M Manual focus 32 MARKER 61 MARKER SEL 61 Menu AUDIO SET 64 CAMERA SET 58 IN/OUT REC 70 LCD/VF SET 68 OTHERS 78 Selecting items 57 TC/UB SET 76 Menu letter size (... battery ........ 122 Q QUICK REC 78 R Rec review 47 Recording capacity Display 21 REMAINING 80 Recording format (REC FORMAT 71 Recording lamp (REC LAMP 79 Recording mode (REC MODE 71 Recording time 12 Remote Commander ........131 REMOTE CTRL .........81 Remote sensor..........125, 128 RESET 127 S S video .....53, 54, 91, 94, 104 Self-diagnosis display ...


