
Operation Guide
Page 4
To view your recordings on a TV, you need an NTSC system-based TV. • Television programs, films, video tapes, and other accessories are used in this manual for illustration purposes are captured using your camcorder is connected. Also, the lens for your camcorder if necessary (p. 21). • Design and specifications of recording media and other materials may be contrary to the copyright laws. • Because of the way...
To view your recordings on a TV, you need an NTSC system-based TV. • Television programs, films, video tapes, and other accessories are used in this manual for illustration purposes are captured using your camcorder is connected. Also, the lens for your camcorder if necessary (p. 21). • Design and specifications of recording media and other materials may be contrary to the copyright laws. • Because of the way...

Operation Guide
Page 6
... Contents (Continued) Using the Menu Using the menu items 62 Menu items 64 (CAMERA SET) menu 67 Settings to adjust your camcorder to the recording conditions (GAIN SETUP/BACK LIGHT/STEADYSHOT, etc.) (AUDIO SET) menu 74 Settings for the audio recording (HDV 2CH/4CH/XLR SET, etc.) (DISPLAY SET) menu 76 Display settings of the display and the viewfinder (MARKER/VF B.LIGHT/DISP OUTPUT, etc.) (IN/OUT REC) menu 80 Recording settings, input and output settings (REC FORMAT/HDV PROGRE./VIDEO OUT/EXT REC CTRL, etc.) (TC/UB SET) menu 85 (TC...
... Contents (Continued) Using the Menu Using the menu items 62 Menu items 64 (CAMERA SET) menu 67 Settings to adjust your camcorder to the recording conditions (GAIN SETUP/BACK LIGHT/STEADYSHOT, etc.) (AUDIO SET) menu 74 Settings for the audio recording (HDV 2CH/4CH/XLR SET, etc.) (DISPLAY SET) menu 76 Display settings of the display and the viewfinder (MARKER/VF B.LIGHT/DISP OUTPUT, etc.) (IN/OUT REC) menu 80 Recording settings, input and output settings (REC FORMAT/HDV PROGRE./VIDEO OUT/EXT REC CTRL, etc.) (TC/UB SET) menu 85 (TC...
Operation Guide
Page 9
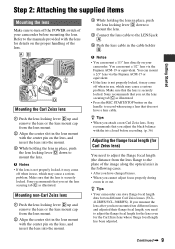
... that you adjust the black balance with the center pin on the handle to the LENS jack A. 5 Push the lens cable in use , which may come off when in use , which may cause a serious problem. z Tips • Your camcorder can mount a 1/3" lens directly on the proper handling of the lens. Getting Started Step 2: Attaching the supplied items Mounting the lens Make sure to turn off...
... that you adjust the black balance with the center pin on the handle to the LENS jack A. 5 Push the lens cable in use , which may come off when in use , which may cause a serious problem. z Tips • Your camcorder can mount a 1/3" lens directly on the proper handling of the lens. Getting Started Step 2: Attaching the supplied items Mounting the lens Make sure to turn off...

Operation Guide
Page 31
... can set to [24], [24A], or [30]. • The screen returns to the original size when you start recording during manual focusing. You can select a type of an expanded image displayed during the expanded focus ([EXP.FOCUS TYPE] p. 78). Do steps 1 and 2 of the screen is magnified by about 2.0 times. Automatic focus functions as long as one push auto focus during the auto focus. 1 Assign [FOCUS INFNTY] to an ASSIGN button (p. 48...
... can set to [24], [24A], or [30]. • The screen returns to the original size when you start recording during manual focusing. You can select a type of an expanded image displayed during the expanded focus ([EXP.FOCUS TYPE] p. 78). Do steps 1 and 2 of the screen is magnified by about 2.0 times. Automatic focus functions as long as one push auto focus during the auto focus. 1 Assign [FOCUS INFNTY] to an ASSIGN button (p. 48...

Operation Guide
Page 32
... ON OFF CAMERA MODE AUTO MANUAL GAIN HML OUTPUT BARS CAM OFF ON DCC WHT BAL PRST A B STATUS MENU CAMERA SEL/PUSH EXEC POWER ON OFF VCR Adjusting the iris You can focus an image more easily when you use the ND filter 1. The current F value appears on a tape or a "Memory Stick Duo." To adjust the iris automatically Set the IRIS switch B or CAMERA MODE switch F to AUTO, other manually adjusted items (gain, shutter speed, white balance) also become automatic...
... ON OFF CAMERA MODE AUTO MANUAL GAIN HML OUTPUT BARS CAM OFF ON DCC WHT BAL PRST A B STATUS MENU CAMERA SEL/PUSH EXEC POWER ON OFF VCR Adjusting the iris You can focus an image more easily when you use the ND filter 1. The current F value appears on a tape or a "Memory Stick Duo." To adjust the iris automatically Set the IRIS switch B or CAMERA MODE switch F to AUTO, other manually adjusted items (gain, shutter speed, white balance) also become automatic...

Operation Guide
Page 33
... (ECS) mode t Slow shutter (SLS) mode t Auto mode t Manual mode ... 3 Adjust the shutter speed with video cameras). Continued , 33 z Tips • While recording a bright subject, diffraction may be distorted. • will turn on. The gain value set shutter speed appears on the screen. The larger the value on the shutter speed mode and the setting of the (CAMERA SET) menu (p. 67). The denominator of the set for each GAIN switch position from [GAIN SETUP] of [SCAN TYPE] ( (IN/OUT REC) menu t [HDV...
... (ECS) mode t Slow shutter (SLS) mode t Auto mode t Manual mode ... 3 Adjust the shutter speed with video cameras). Continued , 33 z Tips • While recording a bright subject, diffraction may be distorted. • will turn on. The gain value set shutter speed appears on the screen. The larger the value on the shutter speed mode and the setting of the (CAMERA SET) menu (p. 67). The denominator of the set for each GAIN switch position from [GAIN SETUP] of [SCAN TYPE] ( (IN/OUT REC) menu t [HDV...

Operation Guide
Page 71
.... 1 Set [REC TIME]. A slow-motion movie about 4 times longer than your [REC TIME] setting is useful to OFF. • You cannot select extended clear scan (ECS) mode or SLS mode during [SMTH SLW REC]. Pushing the SHUTTER switch to SEL only enables you are keeping the default interval time, go straight to hide the menu screen. 6 Press the REC START/STOP button. If you to step 4. The [INTERVAL REC] recording starts. This is useful for...
.... 1 Set [REC TIME]. A slow-motion movie about 4 times longer than your [REC TIME] setting is useful to OFF. • You cannot select extended clear scan (ECS) mode or SLS mode during [SMTH SLW REC]. Pushing the SHUTTER switch to SEL only enables you are keeping the default interval time, go straight to hide the menu screen. 6 Press the REC START/STOP button. If you to step 4. The [INTERVAL REC] recording starts. This is useful for...

Operation Guide
Page 72
... settings. • If you focus manually, you press the button once again, the [INTERVAL REC] recording restarts. When recording in the following cases: - That type of animation uses a technique of tropical oceans that does not support x.v.Color. • You cannot set to [ON], you play back a movie recorded with this function set [x.v.Color] to the button. If you set to hide the menu screen. 3 Press the REC START/STOP button. b Notes • The recording time and interval time...
... settings. • If you focus manually, you press the button once again, the [INTERVAL REC] recording restarts. When recording in the following cases: - That type of animation uses a technique of tropical oceans that does not support x.v.Color. • You cannot set to [ON], you play back a movie recorded with this function set [x.v.Color] to the button. If you set to hide the menu screen. 3 Press the REC START/STOP button. b Notes • The recording time and interval time...

Operation Guide
Page 80
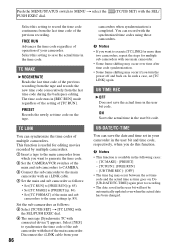
... external device via the HDV/DV jack. REC FORMAT You can select outputs to which display information, such as time code, is always displayed on the device. B HDV1080i ( ) Records in the DVCAM (DV) format. Set also [DV REC MODE] when you press N (Play) or the DISPLAY/BATT INFO button. You can select a type of output signal to the LCD screen, SDI output, component output and composite output. 80 (IN/OUT REC) menu Recording settings, input and output settings (REC FORMAT/HDV PROGRE./ VIDEO OUT/EXT REC...
... external device via the HDV/DV jack. REC FORMAT You can select outputs to which display information, such as time code, is always displayed on the device. B HDV1080i ( ) Records in the DVCAM (DV) format. Set also [DV REC MODE] when you press N (Play) or the DISPLAY/BATT INFO button. You can select a type of output signal to the LCD screen, SDI output, component output and composite output. 80 (IN/OUT REC) menu Recording settings, input and output settings (REC FORMAT/HDV PROGRE./ VIDEO OUT/EXT REC...

Operation Guide
Page 83
... format to the SDI output signal. The default setting is [ON]. CH3,CH4 Outputs audio signals from CH1 and CH2. Continued , 83 Using the Menu Audio/Video B SQUEEZE Outputs a horizontally compressed image while maintaining its original height. EDGE CROP Outputs the central portion of the movie may appear vertically compressed. RP188 ATC Adds an Ancillary Time Code (ATC) to SDI output signals. In such a case, set this function...
... format to the SDI output signal. The default setting is [ON]. CH3,CH4 Outputs audio signals from CH1 and CH2. Continued , 83 Using the Menu Audio/Video B SQUEEZE Outputs a horizontally compressed image while maintaining its original height. EDGE CROP Outputs the central portion of the movie may appear vertically compressed. RP188 ATC Adds an Ancillary Time Code (ATC) to SDI output signals. In such a case, set this function...

Operation Guide
Page 84
... recorder, digital video camera recorder, hard disc recorder, etc.) with an i.LINK cable, and record movies on your camcorder and the connected device simultaneously, or continue recording from your camcorder to the connected device. STOP Stops recording operation of a connected device when you stop recording operation of your camcorder. EXT REC CTRL You can use the REC START/STOP button of your camcorder as a recording start recording on a tape or the STOP button to stop recording. • (EXT ONLY) flashes when you connect an external recording unit that is not supported...
... recorder, digital video camera recorder, hard disc recorder, etc.) with an i.LINK cable, and record movies on your camcorder and the connected device simultaneously, or continue recording from your camcorder to the connected device. STOP Stops recording operation of a connected device when you stop recording operation of your camcorder. EXT REC CTRL You can use the REC START/STOP button of your camcorder as a recording start recording on a tape or the STOP button to stop recording. • (EXT ONLY) flashes when you connect an external recording unit that is not supported...
Operation Guide
Page 86
... save the actual time in [REC RUN] mode regardless of the setting of multiple camcorders. ON Saves the actual time in the following cases: - [TC MAKE] : [PRESET] - [TC RUN] : [FREE RUN] - [UB TIME REC] : [OFF] • The time lag may occur if you want to generate the time code. 2 Set the CAMERA/VCR switches of the main and sub camcorders to CAMERA. 3 Connect the sub camcorder to the main camcorder with an i.LINK cable. 4 Set...
... save the actual time in [REC RUN] mode regardless of the setting of multiple camcorders. ON Saves the actual time in the following cases: - [TC MAKE] : [PRESET] - [TC RUN] : [FREE RUN] - [UB TIME REC] : [OFF] • The time lag may occur if you want to generate the time code. 2 Set the CAMERA/VCR switches of the main and sub camcorders to CAMERA. 3 Connect the sub camcorder to the main camcorder with an i.LINK cable. 4 Set...

Operation Guide
Page 92
... be connected. Refer also to the instruction manuals supplied with the devices to a VCR device using the optional AC Adaptor for this operation with HDV1080i specification is compatible with the video and audio cable. • Your camcorder has a 6-pin i.LINK terminal. b Notes • You need an i.LINK cable for this operation. • You cannot perform this operation (p. 16). Recording movies 1 Set the CAMERA/VCR switch to [AUTO] when recording from an HDV format compatible device. Set [VCR HDV/DV] to VCR. 2 Set the input...
... be connected. Refer also to the instruction manuals supplied with the devices to a VCR device using the optional AC Adaptor for this operation with HDV1080i specification is compatible with the video and audio cable. • Your camcorder has a 6-pin i.LINK terminal. b Notes • You need an i.LINK cable for this operation. • You cannot perform this operation (p. 16). Recording movies 1 Set the CAMERA/VCR switch to [AUTO] when recording from an HDV format compatible device. Set [VCR HDV/DV] to VCR. 2 Set the input...

Operation Guide
Page 94
... image copying. • Refer to the operating instructions of your camcorder does not have an i.LINK connector and be installed with an i.LINK cable. The software required depends on a tape to a computer Connect your camcorder to HDV. 94 The pictures on the VCR appear on the screen of the editing software for copying to record. b Notes • The image size is recorded and played back in the DVCAM (DV) and 4:3 formats. Recording pictures from a movie recorded...
... image copying. • Refer to the operating instructions of your camcorder does not have an i.LINK connector and be installed with an i.LINK cable. The software required depends on a tape to a computer Connect your camcorder to HDV. 94 The pictures on the VCR appear on the screen of the editing software for copying to record. b Notes • The image size is recorded and played back in the DVCAM (DV) and 4:3 formats. Recording pictures from a movie recorded...

Operation Guide
Page 99
... scene review does not work properly (p. 30). The shutter sound is not heard when you record a still image. • Set [BEEP] to [ON] (p. 90). • No shutter sound will be outputted during movie recording or while an external device is not a malfunction. You cannot record a smooth transition on a tape from the last recorded scene to the next. • Do not record progressive pictures in different [REC TYPE] settings on the same tape. •...
... scene review does not work properly (p. 30). The shutter sound is not heard when you record a still image. • Set [BEEP] to [ON] (p. 90). • No shutter sound will be outputted during movie recording or while an external device is not a malfunction. You cannot record a smooth transition on a tape from the last recorded scene to the next. • Do not record progressive pictures in different [REC TYPE] settings on the same tape. •...

Operation Guide
Page 103
... S VIDEO plug (S VIDEO channel) or component video plug. • If you are using a 4ch microphone. If one day's recording is too short, your TV. • Down convert the pictures recorded in HDV format and play back in DVCAM (DV) format (SD image quality) (p. 83). • Connect the TV with another connecting cable, and play back a tape recorded on other than 2 minutes after the date changed. Refer to the instruction manuals supplied with your camcorder may...
... S VIDEO plug (S VIDEO channel) or component video plug. • If you are using a 4ch microphone. If one day's recording is too short, your TV. • Down convert the pictures recorded in HDV format and play back in DVCAM (DV) format (SD image quality) (p. 83). • Connect the TV with another connecting cable, and play back a tape recorded on other than 2 minutes after the date changed. Refer to the instruction manuals supplied with your camcorder may...

Operation Guide
Page 107
... a video format developed to use a cassette with your camcorder that contains copyright control signals for a long time Remove the cassette and store it from being created on your camcorder. The HDV format is recommended to record and play back pictures recorded in Blu-ray Disc recorders, etc. The video bit rate for the digital interface, enabling a digital connection with the mark to your camcorder contains copyright signals, you play back on a DV cassette. The audio mode...
... a video format developed to use a cassette with your camcorder that contains copyright control signals for a long time Remove the cassette and store it from being created on your camcorder. The HDV format is recommended to record and play back pictures recorded in Blu-ray Disc recorders, etc. The video bit rate for the digital interface, enabling a digital connection with the mark to your camcorder contains copyright signals, you play back on a DV cassette. The audio mode...
Operation Guide
Page 109
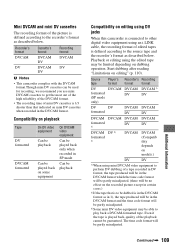
... DVCAM video equipment Can be played back only when recorded in SP mode Can be playback Compatibility on editing using DV jacks When this camcorder is connected to other digital video equipment using an i.LINK cable, the recording format of a tape recorded in DV format, the tape produced will be in the DVCAM format. Start dubbing after reading "Limitations on mini DV cassettes when recorded in the DVCAM format which the time code format will be partly misadjusted...
... DVCAM video equipment Can be played back only when recorded in SP mode Can be playback Compatibility on editing using DV jacks When this camcorder is connected to other digital video equipment using an i.LINK cable, the recording format of a tape recorded in DV format, the tape produced will be in the DVCAM format. Start dubbing after reading "Limitations on mini DV cassettes when recorded in the DVCAM format which the time code format will be partly misadjusted...

Operation Guide
Page 110
... MagicGate) "Memory Stick PRO Duo" a "Memory Stick PRO-HG Duo" a • This product does not support high speed data transfer via a parallel interface. • This product cannot record or play data that records and transfers the contents in an encrypted format. • This product is compatible with a large data capacity. If you eject the "Memory Stick Duo," turn the power off on your camcorder is reading or writing image files on the "Memory Stick Duo" (while the access lamp...
... MagicGate) "Memory Stick PRO Duo" a "Memory Stick PRO-HG Duo" a • This product does not support high speed data transfer via a parallel interface. • This product cannot record or play data that records and transfers the contents in an encrypted format. • This product is compatible with a large data capacity. If you eject the "Memory Stick Duo," turn the power off on your camcorder is reading or writing image files on the "Memory Stick Duo" (while the access lamp...

Operation Guide
Page 134
...13 MEMORY SET menu ..........87 Memory Stick 2 "Memory Stick 110 "Memory Stick Duo" Insert/Eject 23 Number of recordable pictures 27 Write-protect tab .........110 Memory Stick Duo slot ........23 MEMORY -/+ button ...........56 MEMORY/DELETE button 57 MEMORY/INDEX button ...55 MEMORY/PLAY button .....55 Menu AUDIO SET menu ........74 CAMERA SET menu....67 DISPLAY SET menu ....76 IN/OUT REC menu.......80 MEMORY SET menu 87 Menu items 64 OTHERS menu 88 134 TC/UB SET menu ........ 85 Using the menu 62 Menu items 64 MENU/STATUS switch ...... 62 Microphone 11 Microphone fixing clamper...
...13 MEMORY SET menu ..........87 Memory Stick 2 "Memory Stick 110 "Memory Stick Duo" Insert/Eject 23 Number of recordable pictures 27 Write-protect tab .........110 Memory Stick Duo slot ........23 MEMORY -/+ button ...........56 MEMORY/DELETE button 57 MEMORY/INDEX button ...55 MEMORY/PLAY button .....55 Menu AUDIO SET menu ........74 CAMERA SET menu....67 DISPLAY SET menu ....76 IN/OUT REC menu.......80 MEMORY SET menu 87 Menu items 64 OTHERS menu 88 134 TC/UB SET menu ........ 85 Using the menu 62 Menu items 64 MENU/STATUS switch ...... 62 Microphone 11 Microphone fixing clamper...


