Operating Instructions
Page 2
... literature accompanying the appliance. Owner's record The model number and the serial number are designed to persons. Refer to these numbers whenever you may call upon your authority to operate this equipment does cause harmful interference to Part 15 of the unit. Serial No Model No. AC-L15A Serial No Declaration of Conformity Trade Name: Model: Responsible Party: Address: Telephone Number: SONY HVR-M15U Sony Electronics Inc. 16530 Via...
... literature accompanying the appliance. Owner's record The model number and the serial number are designed to persons. Refer to these numbers whenever you may call upon your authority to operate this equipment does cause harmful interference to Part 15 of the unit. Serial No Model No. AC-L15A Serial No Declaration of Conformity Trade Name: Model: Responsible Party: Address: Telephone Number: SONY HVR-M15U Sony Electronics Inc. 16530 Via...
Operating Instructions
Page 6
... compatibility allows you to record (download) or play back (upload) both DVCAM format recording/playback and DV format in 60i system has a field frequency of HDV format is approximately 25 Mbps. HDV format The unit can switch these input signals using the menu setting (page 55). Compatible with both 1080/60i (NTSC) and 1080/50i (PAL) systems The unit is equipped with an i.LINK digital interface and can be digitally connected with HDV-compatible televisions...
... compatibility allows you to record (download) or play back (upload) both DVCAM format recording/playback and DV format in 60i system has a field frequency of HDV format is approximately 25 Mbps. HDV format The unit can switch these input signals using the menu setting (page 55). Compatible with both 1080/60i (NTSC) and 1080/50i (PAL) systems The unit is equipped with an i.LINK digital interface and can be digitally connected with HDV-compatible televisions...

Operating Instructions
Page 7
... can down convert function When you want to playback a tape recorded in HDV format, you can install the unit in a vertical position next to the computer and save working space. 7 Chapter 1 Overview Chapter 1 Overview High definition down convert any images to output them. JOG AUDIO function If you use the optional remote control unit DSRM-10 (not supplied), audio can select the language. The digital hours data are not mentioned...
... can down convert function When you want to playback a tape recorded in HDV format, you can install the unit in a vertical position next to the computer and save working space. 7 Chapter 1 Overview Chapter 1 Overview High definition down convert any images to output them. JOG AUDIO function If you use the optional remote control unit DSRM-10 (not supplied), audio can select the language. The digital hours data are not mentioned...
Operating Instructions
Page 10
... mode while recording or playing. For details on running speed with the remote control unit DSRM-10 (not supplied), press PAUSE button while holding down PLAY button to resume the operation. 4 FF (fast forward) button When you press this button then press PLAY button, the each indicator lights and recording starts. The pictures output in [IN/OUT REC] menu to [PB], EE picture and EE audio signals are referred to start recording. Location and Function of Parts 1 Tape...
... mode while recording or playing. For details on running speed with the remote control unit DSRM-10 (not supplied), press PAUSE button while holding down PLAY button to resume the operation. 4 FF (fast forward) button When you press this button then press PLAY button, the each indicator lights and recording starts. The pictures output in [IN/OUT REC] menu to [PB], EE picture and EE audio signals are referred to start recording. Location and Function of Parts 1 Tape...

Operating Instructions
Page 13
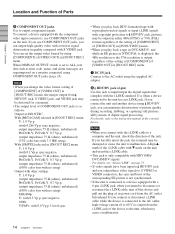
... channels 1 and 2. Note When you press this button with the tip of the unit (page 74). 4 CONTROL S jack Connect to input and output analog audio signals. When [AUDIO MODE] in [AUDIO SET] menu is set [COMMANDER] in [OTHERS] menu to [CONTROL S]. 5 RESET button If you use a CONTROL S device, set to S VIDEO/VIDEO or ALL, text data such as S VIDEO jack connection (page 18). 3 AUDIO jacks Use to a remote control unit DSRM-10 (not supplied) for controlling the unit. Notes • When [AUDIO MIX] in [AUDIO SET] menu...
... channels 1 and 2. Note When you press this button with the tip of the unit (page 74). 4 CONTROL S jack Connect to input and output analog audio signals. When [AUDIO MODE] in [AUDIO SET] menu is set [COMMANDER] in [OTHERS] menu to [CONTROL S]. 5 RESET button If you use a CONTROL S device, set to S VIDEO/VIDEO or ALL, text data such as S VIDEO jack connection (page 18). 3 AUDIO jacks Use to a remote control unit DSRM-10 (not supplied) for controlling the unit. Notes • When [AUDIO MIX] in [AUDIO SET] menu...
Operating Instructions
Page 14
... an EE picture in NTSC/PAL is displayed, the 480i resolution or the 576i resolution is connected to disconnect or reconnect the i.LINK cable, turn off the device and pull out the plug of its power cord from the AC outlet beforehand. Allign v mark of the i.LINK cable with V mark on a monitor connected using the supplied AC adaptor. 8 HDV/DV jack (4-pin) Use this jack to input/output the digital signals that complies...
... an EE picture in NTSC/PAL is displayed, the 480i resolution or the 576i resolution is connected to disconnect or reconnect the i.LINK cable, turn off the device and pull out the plug of its power cord from the AC outlet beforehand. Allign v mark of the i.LINK cable with V mark on a monitor connected using the supplied AC adaptor. 8 HDV/DV jack (4-pin) Use this jack to input/output the digital signals that complies...

Operating Instructions
Page 15
... bad) played by a VCR that does not have the same function as the time code, tape counter, and data status of video signals shown below, recorded picture and sound may be distorted. - Blue background screen or gray background screen from HDV/DV jack will not affect on page 42. Chapter 1 Overview • When connecting a device that has a 6-pin i.LINK jack to the unit, first, connect the plug of the cable to...
... bad) played by a VCR that does not have the same function as the time code, tape counter, and data status of video signals shown below, recorded picture and sound may be distorted. - Blue background screen or gray background screen from HDV/DV jack will not affect on page 42. Chapter 1 Overview • When connecting a device that has a 6-pin i.LINK jack to the unit, first, connect the plug of the cable to...
Operating Instructions
Page 25
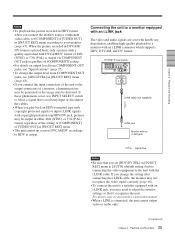
... played back, only a picture with a quality equivalent with DVCAM/DV format of 480i (NTSC) or 576i (PAL) is output via COMPONENT OUT jacks regardless of [COMPONENT] setting. • For details on output level from COMPONENT OUT jacks, see "Specifications" (page 75). • To change the setting after connecting the i.LINK cable, the monitor may be distorted. Connecting the unit to a monitor equipped with an i.LINK jack The video and audio signals are sent with hardly...
... played back, only a picture with a quality equivalent with DVCAM/DV format of 480i (NTSC) or 576i (PAL) is output via COMPONENT OUT jacks regardless of [COMPONENT] setting. • For details on output level from COMPONENT OUT jacks, see "Specifications" (page 75). • To change the setting after connecting the i.LINK cable, the monitor may be distorted. Connecting the unit to a monitor equipped with an i.LINK jack The video and audio signals are sent with hardly...

Operating Instructions
Page 30
... the search signals, you cannot locate the original program. The unit starts searching backwards or forwards until the number comes to locate the scene you press . Searching for a point on the tape where the recorded date changes: Date search To search for scenes, use the supplied Remote Commander. 1 Press SEARCH SELECT button on a tape. - Chapter 2 Playback and Recording Playback To hear the sound while playing at various...
... the search signals, you cannot locate the original program. The unit starts searching backwards or forwards until the number comes to locate the scene you press . Searching for a point on the tape where the recorded date changes: Date search To search for scenes, use the supplied Remote Commander. 1 Press SEARCH SELECT button on a tape. - Chapter 2 Playback and Recording Playback To hear the sound while playing at various...

Operating Instructions
Page 33
... i.LINK cable, turn off the device and pull out the plug of its power cord from the AC outlet beforehand. If you change the setting after connecting the i.LINK cable, the video equipment may be input via HDV/DV jack, disconnect the i.LINK cable, then reconnect it. • If you record a picture in quality, enabling high-quality recording. As a result, when you play back a recorded tape on the unit and press DATA CODE button on Remote...
... i.LINK cable, turn off the device and pull out the plug of its power cord from the AC outlet beforehand. If you change the setting after connecting the i.LINK cable, the video equipment may be input via HDV/DV jack, disconnect the i.LINK cable, then reconnect it. • If you record a picture in quality, enabling high-quality recording. As a result, when you play back a recorded tape on the unit and press DATA CODE button on Remote...

Operating Instructions
Page 34
... operation. 1 Turn the power on . 4 When the player is copyright protected. • During recording, the tape transport control buttons (except STOP and PAUSE) are switched. When you input 60i system signals, set [60i/50i SEL] in [IN/OUT REC] menu to the instruction manual of [60i/50i SEL] setting, the picture mutes. 34 Chapter 2 Playback and Recording You can be possible with INPUT SELECT switch, if the field frequency of the recording tape format...
... operation. 1 Turn the power on . 4 When the player is copyright protected. • During recording, the tape transport control buttons (except STOP and PAUSE) are switched. When you input 60i system signals, set [60i/50i SEL] in [IN/OUT REC] menu to the instruction manual of [60i/50i SEL] setting, the picture mutes. 34 Chapter 2 Playback and Recording You can be possible with INPUT SELECT switch, if the field frequency of the recording tape format...
Operating Instructions
Page 37
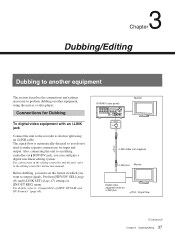
... want to output signals. HVR-M15 (rear panel) Monitor i.LINK cable (not supplied) i.LINK jack Monitor Digital video equipment with an i.LINK jack Connect the unit to the recorder as a video player. Also, connecting the unit to an editing controller via HDV/DV jack, you do not need to make separate connections for Dubbing To digital video equipment with an i.LINK jack : Signal flow (Continued) 37 Chapter 3 Dubbing/Editing For details, refer to the editing controller instruction manual. Perform [HDV...
... want to output signals. HVR-M15 (rear panel) Monitor i.LINK cable (not supplied) i.LINK jack Monitor Digital video equipment with an i.LINK jack Connect the unit to the recorder as a video player. Also, connecting the unit to an editing controller via HDV/DV jack, you do not need to make separate connections for Dubbing To digital video equipment with an i.LINK jack : Signal flow (Continued) 37 Chapter 3 Dubbing/Editing For details, refer to the editing controller instruction manual. Perform [HDV...

Operating Instructions
Page 47
... (Wide Screen Signaling) is not output, when the picture is connected, the video device may be distorted for down convert format of [i.LINK SET] in either 480i or 576i format. • Regardless of the playback tape or of the format input to [DVCAM] or [DV SP]. SQUEEZE : Plays back with [DVCAM] selected do not share the same ATN (Time code value is displayed correctly). • When you play back a tape in DVCAM...
... (Wide Screen Signaling) is not output, when the picture is connected, the video device may be distorted for down convert format of [i.LINK SET] in either 480i or 576i format. • Regardless of the playback tape or of the format input to [DVCAM] or [DV SP]. SQUEEZE : Plays back with [DVCAM] selected do not share the same ATN (Time code value is displayed correctly). • When you play back a tape in DVCAM...

Operating Instructions
Page 49
... displays under the following conditions: - When you turn on the analog video output. LETTER SIZE Selects the letter size of the menu at the cursor. DISPLAY SET menu Icon/Menu Submenu Setting DISPLAY SET DATA CODE (page 28) Selects whether or not to display the data codes on power while a cassette is loaded in the unit. - DATE : Displays the date and time when recorded. If the remaining tape time is determined when you press PLAY button...
... displays under the following conditions: - When you turn on the analog video output. LETTER SIZE Selects the letter size of the menu at the cursor. DISPLAY SET menu Icon/Menu Submenu Setting DISPLAY SET DATA CODE (page 28) Selects whether or not to display the data codes on power while a cassette is loaded in the unit. - DATE : Displays the date and time when recorded. If the remaining tape time is determined when you press PLAY button...

Operating Instructions
Page 51
... output sound with AUTO REPEAT. FF/REW SPEED (page 10) Selects the tape transport mode in the stop (page 36) mode starts recording. Icon/Menu Submenu Setting AUDIO SET AUDIO LOCK UNLOCK MODE : Records the sampling clocks of normal speed (Continued) 51 Chapter 4 Adjusting and Setting Through Menus LOCK MODE : Synchronizes the sampling clocks of the recording. OFF : Does not output the sound when playing a tape at a speed other than normal. OFF : Disables playback with a tape recorded in HDV format, a filed image is effective for recording. AUTO...
... output sound with AUTO REPEAT. FF/REW SPEED (page 10) Selects the tape transport mode in the stop (page 36) mode starts recording. Icon/Menu Submenu Setting AUDIO SET AUDIO LOCK UNLOCK MODE : Records the sampling clocks of normal speed (Continued) 51 Chapter 4 Adjusting and Setting Through Menus LOCK MODE : Synchronizes the sampling clocks of the recording. OFF : Does not output the sound when playing a tape at a speed other than normal. OFF : Disables playback with a tape recorded in HDV format, a filed image is effective for recording. AUTO...
Operating Instructions
Page 52
... is set to [EXTERNAL], INPUT SELECT switch on the front panel is set this item to do this point.) EXTERNAL: Records the time code with [STEP FORWARD] selected, the tape advances a few frames forward. FROM REC P Selects the tape protection mode which the unit changes after you play a tape recorded in HDV format with video and audio signals input from HDV/DV jack. Chapter 4 Adjusting and Setting Through Menus TC/UB SET menu Icon/Menu...
... is set to [EXTERNAL], INPUT SELECT switch on the front panel is set this item to do this point.) EXTERNAL: Records the time code with [STEP FORWARD] selected, the tape advances a few frames forward. FROM REC P Selects the tape protection mode which the unit changes after you play a tape recorded in HDV format with video and audio signals input from HDV/DV jack. Chapter 4 Adjusting and Setting Through Menus TC/UB SET menu Icon/Menu...

Operating Instructions
Page 53
... the non- Even if 60i signals are input to HDV/DV jack when [60i/50i SEL] is set to VTR4, not only the supplied one. NO : Does not reset the time code value. Note This setting is recorded on Data display screen. Chapter 4 Adjusting and Setting Through Menus (Continued) 53 Chapter 4 Adjusting and Setting Through Menus If you remove the cassette, the mode of the last position that was...
... the non- Even if 60i signals are input to HDV/DV jack when [60i/50i SEL] is set to VTR4, not only the supplied one. NO : Does not reset the time code value. Note This setting is recorded on Data display screen. Chapter 4 Adjusting and Setting Through Menus (Continued) 53 Chapter 4 Adjusting and Setting Through Menus If you remove the cassette, the mode of the last position that was...

Operating Instructions
Page 58
... not displayed properly. t Set [HDV/DV SEL] in HDV, DVCAM, or DV (SP) format. t Reconnect the i.LINK cable (not supplied). • INPUT SELECT switch is output. Use a widescreen-compatible monitor. t The unit can play back. When you restart playback, the time starting point. t Set the date and time. • The tape portion being played back has no image or audio is set [DOWN CONVERT] of [VIDEO OUT] in LP mode of DV format. Troubleshooting Output/Playback Symptom Cannot playback. The audio...
... not displayed properly. t Set [HDV/DV SEL] in HDV, DVCAM, or DV (SP) format. t Reconnect the i.LINK cable (not supplied). • INPUT SELECT switch is output. Use a widescreen-compatible monitor. t The unit can play back. When you restart playback, the time starting point. t Set the date and time. • The tape portion being played back has no image or audio is set [DOWN CONVERT] of [VIDEO OUT] in LP mode of DV format. Troubleshooting Output/Playback Symptom Cannot playback. The audio...

Operating Instructions
Page 59
... [STILL TIME]. Play back the tape at 1/3 of normal speed in forward or reverse for more than 1 minute, normal playback forward starts. If you do this, the unit rewinds the tape to its beginning, the playback automatically starts. • [AUTO REPEAT] in [VTR SET] menu is set to [ON]. t Set [AUTO REPEAT] to [CONTROL S]. No sound or undesired sound is output from AUDIO OUT jacks. • When the audio mode is 32 kHz (4-channel...
... [STILL TIME]. Play back the tape at 1/3 of normal speed in forward or reverse for more than 1 minute, normal playback forward starts. If you do this, the unit rewinds the tape to its beginning, the playback automatically starts. • [AUTO REPEAT] in [VTR SET] menu is set to [ON]. t Set [AUTO REPEAT] to [CONTROL S]. No sound or undesired sound is output from AUDIO OUT jacks. • When the audio mode is 32 kHz (4-channel...

Operating Instructions
Page 72
... record video and audio delivering copyright signals. DVCAM DV SP - outputs from i.LINK cannot be down converted to the format differences on editing During editing, you use the tapes described in special cases). 3) The unit cannot switch between LOCK MODE and UNLOCK MODE. Even if the tape is not equipped with input signals. Compatibility of Chapter 3, "Dubbing/Editing." DVCAM DV SP DVCAM DV SP - AUDIO MODE complies with user bit settings and a user bit's display function...
... record video and audio delivering copyright signals. DVCAM DV SP - outputs from i.LINK cannot be down converted to the format differences on editing During editing, you use the tapes described in special cases). 3) The unit cannot switch between LOCK MODE and UNLOCK MODE. Even if the tape is not equipped with input signals. Compatibility of Chapter 3, "Dubbing/Editing." DVCAM DV SP DVCAM DV SP - AUDIO MODE complies with user bit settings and a user bit's display function...


