Operating Instructions
Page 3
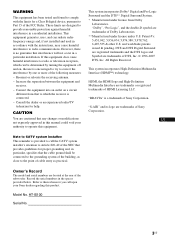
...and Symbol are trademarks or registered trademarks of DTS, Inc. © 1996-2007 DTS, Inc. UGSB Note to CATV system installer: This reminder is provided to call upon your authority to provide reasonable protection against harmful interference in a residential installation. ... the separation between the equipment and receiver. - Owner's Record The model and serial numbers are trademarks of the subwoofer. Record the serial numbers in a particular installation. "S-AIR" and its logo are located at the rear of Sony Corporation. "BRAVIA" is a trademark of the building...
...and Symbol are trademarks or registered trademarks of DTS, Inc. © 1996-2007 DTS, Inc. UGSB Note to CATV system installer: This reminder is provided to call upon your authority to provide reasonable protection against harmful interference in a residential installation. ... the separation between the equipment and receiver. - Owner's Record The model and serial numbers are trademarks of the subwoofer. Record the serial numbers in a particular installation. "S-AIR" and its logo are located at the rear of Sony Corporation. "BRAVIA" is a trademark of the building...
Operating Instructions
Page 6
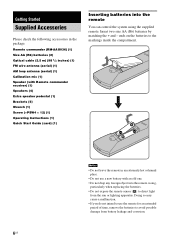
... not leave the remote in the package. Doing so may cause a malfunction. • If you do not intend to use a new battery with Remote commander receiver) (1) Speakers (4) Extra speaker pedestal (1) Brackets (5) Wrench (1) Screw (+PSW4 × 12) (1) Operating Instructions (1) Quick Start Guide (card) (1) Inserting batteries into the remote casing, particularly when replacing...) (1) AM loop antenna (aerial) (1) Calibration mic (1) Speaker (with an old one. • Do not drop any foreign object into the remote You can control the system using the supplied remote.
... not leave the remote in the package. Doing so may cause a malfunction. • If you do not intend to use a new battery with Remote commander receiver) (1) Speakers (4) Extra speaker pedestal (1) Brackets (5) Wrench (1) Screw (+PSW4 × 12) (1) Operating Instructions (1) Quick Start Guide (card) (1) Inserting batteries into the remote casing, particularly when replacing...) (1) AM loop antenna (aerial) (1) Calibration mic (1) Speaker (with an old one. • Do not drop any foreign object into the remote You can control the system using the supplied remote.
Operating Instructions
Page 13
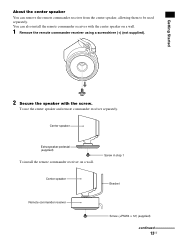
... screw. Screw in step 1 Center speaker Bracket Remote commander receiver Screw (+PSW4 × 12) (supplied) continued 13US You can remove the remote commander receiver from the center speaker, allowing them to be used separately. To use the center speaker and remote commander receiver separately. Getting Started About the center speaker You can also...
... screw. Screw in step 1 Center speaker Bracket Remote commander receiver Screw (+PSW4 × 12) (supplied) continued 13US You can remove the remote commander receiver from the center speaker, allowing them to be used separately. To use the center speaker and remote commander receiver separately. Getting Started About the center speaker You can also...
Operating Instructions
Page 15
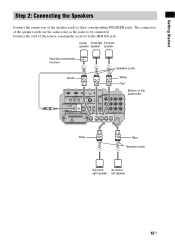
Getting Started Step 2: Connecting the Speakers Connect the connectors of the remote commander receiver to the IR-R100 jack. Connect the cord of the speaker cords to be connected. Center Front right Front left speaker 15US The connectors of ...the subwoofer CENTER FRONT R FRONT L SUR R SUR L Gray Blue Speaker cords Surround Surround right speaker left speaker speaker speaker Remote commander receiver Speaker cords Green White Red BD IN DVD IN IR REMOTE SAT IN ANTENNA FM TV OUT HDMI AM VIDEO VIDEO IN DVD IN SAT...
Getting Started Step 2: Connecting the Speakers Connect the connectors of the remote commander receiver to the IR-R100 jack. Connect the cord of the speaker cords to be connected. Center Front right Front left speaker 15US The connectors of ...the subwoofer CENTER FRONT R FRONT L SUR R SUR L Gray Blue Speaker cords Surround Surround right speaker left speaker speaker speaker Remote commander receiver Speaker cords Green White Red BD IN DVD IN IR REMOTE SAT IN ANTENNA FM TV OUT HDMI AM VIDEO VIDEO IN DVD IN SAT...
Operating Instructions
Page 22
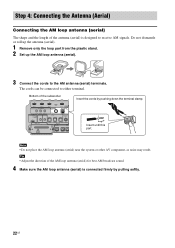
...SPEAKER SAT IN A ONLY F CENTER FRONT R FRONT L Insert until this part. Note • Do not place the AM loop antenna (aerial) near the system or other AV component, as noise may result. Tip • Adjust the direction of the AM loop antenna (aerial) for best AM broadcast sound. 4 ...Make sure the AM loop antenna (aerial) is designed to either terminal. The cords can be connected to receive AM signals. Step 4: Connecting the Antenna (Aerial) Connecting the AM loop antenna (aerial) The shape and the length of the antenna (aerial) is ...
...SPEAKER SAT IN A ONLY F CENTER FRONT R FRONT L Insert until this part. Note • Do not place the AM loop antenna (aerial) near the system or other AV component, as noise may result. Tip • Adjust the direction of the AM loop antenna (aerial) for best AM broadcast sound. 4 ...Make sure the AM loop antenna (aerial) is designed to either terminal. The cords can be connected to receive AM signals. Step 4: Connecting the Antenna (Aerial) Connecting the AM loop antenna (aerial) The shape and the length of the antenna (aerial) is ...
Operating Instructions
Page 26
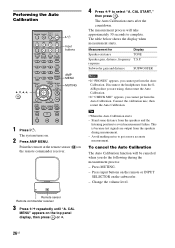
...approximately 30 seconds to avoid measurement failure. Performing the Auto Calibration C, X, x, c, TV ?/1 THEATER TV INPUT AV ?/1 ?/1 SYSTEM STANDBY TV BD DVD SAT SOUND FIELD VIDEO TUNER/BAND DMPORT BD/DVD TOP MENU MENU F1 ...HOME TV CH - REPLAY ADVANCE PRESET + .< > < TUNING m TUNING + H M TV X x 1 Press ?/1. CAL START," then press . Tip • When the Auto Calibration starts: - Stand some distance from the speakers during the measurement process: - Press MUTING. - Press input buttons on the remote or INPUT SELECTOR on the remote commander receiver...
...approximately 30 seconds to avoid measurement failure. Performing the Auto Calibration C, X, x, c, TV ?/1 THEATER TV INPUT AV ?/1 ?/1 SYSTEM STANDBY TV BD DVD SAT SOUND FIELD VIDEO TUNER/BAND DMPORT BD/DVD TOP MENU MENU F1 ...HOME TV CH - REPLAY ADVANCE PRESET + .< > < TUNING m TUNING + H M TV X x 1 Press ?/1. CAL START," then press . Tip • When the Auto Calibration starts: - Stand some distance from the speakers during the measurement process: - Press MUTING. - Press input buttons on the remote or INPUT SELECTOR on the remote commander receiver...

Operating Instructions
Page 33
... or optical signal being used. Playback Options About the indications in the top panel display A Lights up when a radio station is received. C NIGHT (40) Lights up when an HDMI component is being input. Radio frequency, sound field, etc. G Displays system's status. H HDMI (16, 74) Lights up when the night mode is active.
... or optical signal being used. Playback Options About the indications in the top panel display A Lights up when a radio station is received. C NIGHT (40) Lights up when an HDMI component is being input. Radio frequency, sound field, etc. G Displays system's status. H HDMI (16, 74) Lights up when the night mode is active.

Operating Instructions
Page 34
...standby mode Press ?/1 while the system turns on the remote commander receiver. To cancel standby mode, press ?/1 once. The buttons are factory assigned to enjoy sound effects for watching movies at the remote sensor ( ) on . D NIGHT MODE Press to control Sony components. Press to select the ...THEATER TV INPUT AV ?/1 ?/1 SYSTEM STANDBY TV BD DVD SAT SOUND FIELD VIDEO TUNER/BAND DMPORT BD/DVD TOP MENU MENU F1 F2 JUMP PICTURE WIDE FAVORITE GUIDE 123 TONE 456 NIGHT MODE 789 CLEAR DISPLAY AMP MENU 0 ENTER TOOLS/ OPTIONS MUTING F TV VOL MASTER VOL G g f RETURN/EXIT MENU/HOME...
...standby mode Press ?/1 while the system turns on the remote commander receiver. To cancel standby mode, press ?/1 once. The buttons are factory assigned to enjoy sound effects for watching movies at the remote sensor ( ) on . D NIGHT MODE Press to control Sony components. Press to select the ...THEATER TV INPUT AV ?/1 ?/1 SYSTEM STANDBY TV BD DVD SAT SOUND FIELD VIDEO TUNER/BAND DMPORT BD/DVD TOP MENU MENU F1 F2 JUMP PICTURE WIDE FAVORITE GUIDE 123 TONE 456 NIGHT MODE 789 CLEAR DISPLAY AMP MENU 0 ENTER TOOLS/ OPTIONS MUTING F TV VOL MASTER VOL G g f RETURN/EXIT MENU/HOME...
Operating Instructions
Page 47
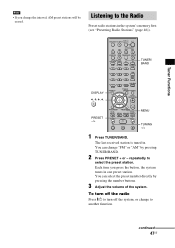
... received station is tuned in. You can select the preset number directly by pressing TUNER/BAND. 2 Press PRESET + or - Each time you change the interval, AM preset stations will be erased. continued 47US repeatedly to the Radio Preset radio stations in the system's...THEATER TV INPUT AV ?/1 ?/1 SYSTEM STANDBY TV BD DVD SAT SOUND FIELD VIDEO TUNER/BAND DMPORT BD/DVD TOP MENU MENU F1 F2 JUMP PICTURE WIDE FAVORITE GUIDE 123 TONE 456 NIGHT MODE 789 CLEAR DISPLAY AMP MENU 0 ENTER TOOLS/ OPTIONS MUTING F TV VOL MASTER VOL G g TUNER/ BAND f RETURN/EXIT MENU/HOME...
... received station is tuned in. You can select the preset number directly by pressing TUNER/BAND. 2 Press PRESET + or - Each time you change the interval, AM preset stations will be erased. continued 47US repeatedly to the Radio Preset radio stations in the system's...THEATER TV INPUT AV ?/1 ?/1 SYSTEM STANDBY TV BD DVD SAT SOUND FIELD VIDEO TUNER/BAND DMPORT BD/DVD TOP MENU MENU F1 F2 JUMP PICTURE WIDE FAVORITE GUIDE 123 TONE 456 NIGHT MODE 789 CLEAR DISPLAY AMP MENU 0 ENTER TOOLS/ OPTIONS MUTING F TV VOL MASTER VOL G g TUNER/ BAND f RETURN/EXIT MENU/HOME...

Operating Instructions
Page 48
... is noisy, you can select monaural reception. Naming preset stations You can change "FM" or "AM" by using C/X/x/c. The last received station is tuned in step 2. repeatedly to select the preset station you enter a wrong character Press C/c repeatedly until the character to ... want to select the desired character. To erase the character, press C/c repeatedly until "FM Mode?" The automatic tuning stops automatically when the system receives a radio station. Tip • To improve reception, reorient the supplied antennas (aerials). You can enter a name for a radio station...
... is noisy, you can select monaural reception. Naming preset stations You can change "FM" or "AM" by using C/X/x/c. The last received station is tuned in step 2. repeatedly to select the preset station you enter a wrong character Press C/c repeatedly until the character to ... want to select the desired character. To erase the character, press C/c repeatedly until "FM Mode?" The automatic tuning stops automatically when the system receives a radio station. Tip • To improve reception, reorient the supplied antennas (aerials). You can enter a name for a radio station...
Operating Instructions
Page 53
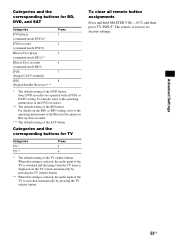
... recorder (command mode DVD3) Blu-ray Disc player (command mode BD1)** Blu-ray Disc recorder (command mode BD3) DVR (Digital CATV terminal) DSS (Digital Satellite Receiver)*** Press 1 2 3 4 7 8 * The default setting of the TV (white) button. The remote is reset to the operating instructions of the DVD recorders.... TV is selected, the audio input of the SAT button. When this setting is switched automatically by pressing the TV (white) button. Sony DVD recorders are operated with a DVD1 or DVD3 setting. For details, refer to its factory settings. 53US To clear all remote button ...
... recorder (command mode DVD3) Blu-ray Disc player (command mode BD1)** Blu-ray Disc recorder (command mode BD3) DVR (Digital CATV terminal) DSS (Digital Satellite Receiver)*** Press 1 2 3 4 7 8 * The default setting of the TV (white) button. The remote is reset to the operating instructions of the DVD recorders.... TV is selected, the audio input of the SAT button. When this setting is switched automatically by pressing the TV (white) button. Sony DVD recorders are operated with a DVD1 or DVD3 setting. For details, refer to its factory settings. 53US To clear all remote button ...

Operating Instructions
Page 58
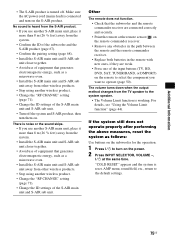
... sound is output from the left speaker and sub sound is output from the right speaker. 5 Press AMP MENU. C, X, x, c, TV ?/1 THEATER TV INPUT AV ?/1 ?/1 SYSTEM STANDBY TV BD DVD SAT SOUND FIELD VIDEO TUNER/BAND DMPORT BD/DVD TOP MENU MENU F1 F2 JUMP PICTURE WIDE FAVORITE GUIDE 123... TONE 456 NIGHT MODE 789 CLEAR DISPLAY AMP MENU 0 ENTER TOOLS/ OPTIONS MUTING F TV VOL MASTER VOL G g f RETURN/EXIT MENU/HOME TV CH - Note • To receive...
... sound is output from the left speaker and sub sound is output from the right speaker. 5 Press AMP MENU. C, X, x, c, TV ?/1 THEATER TV INPUT AV ?/1 ?/1 SYSTEM STANDBY TV BD DVD SAT SOUND FIELD VIDEO TUNER/BAND DMPORT BD/DVD TOP MENU MENU F1 F2 JUMP PICTURE WIDE FAVORITE GUIDE 123... TONE 456 NIGHT MODE 789 CLEAR DISPLAY AMP MENU 0 ENTER TOOLS/ OPTIONS MUTING F TV VOL MASTER VOL G g f RETURN/EXIT MENU/HOME TV CH - Note • To receive...

Operating Instructions
Page 65
Using an S-AIR Product About S-AIR products The system is for transmitting sound. Advanced Settings 4 Press x/X to select the audio input you need to perform the following settings to establish the sound transmission. Notes &#... cannot reassign the digital audio input to three S-AIR main units. (The number of S-AIR product. • S-AIR main unit (this subwoofer): This is for receiving sound. When you purchase the S-AIR product, you want to reassign. • COAX SAT: reassigns the coaxial audio input to the "SAT" function. • COAX...
Using an S-AIR Product About S-AIR products The system is for transmitting sound. Advanced Settings 4 Press x/X to select the audio input you need to perform the following settings to establish the sound transmission. Notes &#... cannot reassign the digital audio input to three S-AIR main units. (The number of S-AIR product. • S-AIR main unit (this subwoofer): This is for receiving sound. When you purchase the S-AIR product, you want to reassign. • COAX SAT: reassigns the coaxial audio input to the "SAT" function. • COAX...

Operating Instructions
Page 68
... For details on setting the ID of the S-AIR product, refer to the operating instructions of the S-AIR product. However, neighbors may receive sound from neighbors. To prevent this subwoofer) ID A To perform the pairing operation It is easy to set the ID of the S-...transmission is established by performing the pairing operation. ID A S-AIR product A ID A S-AIR product B Pairing 1 Place the S-AIR product that you may also receive your system's sound if IDs are the same, or you want to select the desired ID (A, B, or C). 6 Press AMP MENU. 4 Press x/X repeatedly until "S-AIR...
... For details on setting the ID of the S-AIR product, refer to the operating instructions of the S-AIR product. However, neighbors may receive sound from neighbors. To prevent this subwoofer) ID A To perform the pairing operation It is easy to set the ID of the S-...transmission is established by performing the pairing operation. ID A S-AIR product A ID A S-AIR product B Pairing 1 Place the S-AIR product that you may also receive your system's sound if IDs are the same, or you want to select the desired ID (A, B, or C). 6 Press AMP MENU. 4 Press x/X repeatedly until "S-AIR...
Operating Instructions
Page 72
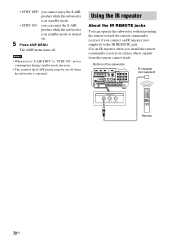
Notes • When you can operate the subwoofer without pointing the remote toward the remote commander receiver if you install the remote commander receiver in a place where signals from the remote cannot reach. Bottom of the S-AIR product may be cut off . The AMP menu turns off when the ...
Notes • When you can operate the subwoofer without pointing the remote toward the remote commander receiver if you install the remote commander receiver in a place where signals from the remote cannot reach. Bottom of the S-AIR product may be cut off . The AMP menu turns off when the ...
Operating Instructions
Page 75
... between the remote and the remote commander receiver. • Replace both batteries in the remote with new ones, if they are connected correctly and securely. • Point the remote at the same time. For details, see "Using the Volume Limit function" (page 44). If the system still does not operate properly after...
... between the remote and the remote commander receiver. • Replace both batteries in the remote with new ones, if they are connected correctly and securely. • Point the remote at the same time. For details, see "Using the Volume Limit function" (page 44). If the system still does not operate properly after...

Operating Instructions
Page 77
...4.5 m × 2, 3 m × 1, 12 m × 2 (14.7 ft. × 2, 9.8 ft. × 1, 39.3 ft. × 2) Subwoofer (SA-WIS100) Speaker system 2 Way 2 Drivers Subwoofer speaker system Speaker unit 120 mm + 160 mm (4 3/4 inches + 6 3/8 inches) Rated impedance 4 ohms Dimensions (approx.) 238 × 441 × 434 mm (9 3/8 × 17 3/8 × 17... (when "CTRL: HDMI" and "S-AIR STBY" are set to "OFF.") Power output (DIGITAL MEDIA PORT)DC OUT: 5 V, 700 mA Remote commander receiver (IR-R100) Dimensions (approx.) Mass (approx.) 46 × 19 × 45 mm (1 13/16 × 3/4 × 1 13/16 ...
...4.5 m × 2, 3 m × 1, 12 m × 2 (14.7 ft. × 2, 9.8 ft. × 1, 39.3 ft. × 2) Subwoofer (SA-WIS100) Speaker system 2 Way 2 Drivers Subwoofer speaker system Speaker unit 120 mm + 160 mm (4 3/4 inches + 6 3/8 inches) Rated impedance 4 ohms Dimensions (approx.) 238 × 441 × 434 mm (9 3/8 × 17 3/8 × 17... (when "CTRL: HDMI" and "S-AIR STBY" are set to "OFF.") Power output (DIGITAL MEDIA PORT)DC OUT: 5 V, 700 mA Remote commander receiver (IR-R100) Dimensions (approx.) Mass (approx.) 46 × 19 × 45 mm (1 13/16 × 3/4 × 1 13/16 ...


