
Operating Instructions
Page 4
... fields 35 Adjusting the tone 37 Advanced settings 37 Other Operations Naming preset stations and inputs ........ 39 Using the Sleep Timer 40 Selecting the speaker system 40 Recording 41 Operations Using the Remote RM-AAP001 Before you use your components 5 1a: Connecting components with digital audio output jacks 7 1b: Connecting components with only analog audio jacks 10 2: Connecting the antennas 12 3: Connecting speakers 13 4: Connecting the AC power cord ........ 17 5: Setting up the speakers 18 6: Setting up the sub woofer 21 7: Adjusting the speaker levels and balance 21...
... fields 35 Adjusting the tone 37 Advanced settings 37 Other Operations Naming preset stations and inputs ........ 39 Using the Sleep Timer 40 Selecting the speaker system 40 Recording 41 Operations Using the Remote RM-AAP001 Before you use your components 5 1a: Connecting components with digital audio output jacks 7 1b: Connecting components with only analog audio jacks 10 2: Connecting the antennas 12 3: Connecting speakers 13 4: Connecting the AC power cord ........ 17 5: Setting up the speakers 18 6: Setting up the sub woofer 21 7: Adjusting the speaker levels and balance 21...
Operating Instructions
Page 13
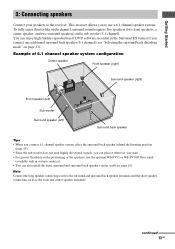
...). • Since the sub woofer does not emit highly directional signals, you can place it wherever you connect one additional surround back speaker (6.1 channel) (see "Selecting the surround back decoding mode" on the wall (see page 16). Getting Started 3: Connecting speakers Connect your speakers to the front and center speaker terminals. You can also install the front, surround and surround back speakers on page 33). This receiver allows you to use the optional WS...
...). • Since the sub woofer does not emit highly directional signals, you can place it wherever you connect one additional surround back speaker (6.1 channel) (see "Selecting the surround back decoding mode" on the wall (see page 16). Getting Started 3: Connecting speakers Connect your speakers to the front and center speaker terminals. You can also install the front, surround and surround back speakers on page 33). This receiver allows you to use the optional WS...
Operating Instructions
Page 18
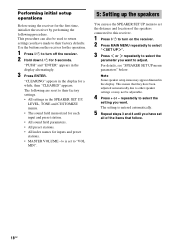
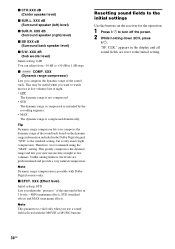
... can use the SPEAKER SET UP menu to set the distance and location of the speakers connected to this receiver. 1 Press ?/1 to turn off the receiver. 2 Hold down ?/1 for 5 seconds. "PUSH" and "ENTER" appears in the SPEAKER SET UP, LEVEL, TONE and CUSTOMIZE menus. • The sound field memorized for each input and preset station. • All sound field parameters. • All preset stations. • All index names for inputs and preset stations. • MASTER VOLUME...
... can use the SPEAKER SET UP menu to set the distance and location of the speakers connected to this receiver. 1 Press ?/1 to turn off the receiver. 2 Hold down ?/1 for 5 seconds. "PUSH" and "ENTER" appears in the SPEAKER SET UP, LEVEL, TONE and CUSTOMIZE menus. • The sound field memorized for each input and preset station. • All sound field parameters. • All preset stations. • All index names for inputs and preset stations. • MASTER VOLUME...
Operating Instructions
Page 21
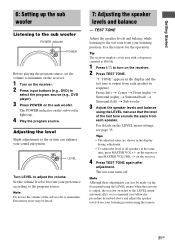
... to adjust the volume. The POWER indicator on the sub woofer lights up the sub woofer Listening to the sub woofer POWER indicator POWER Before playing the program source, set the volume of all speakers at 800 Hz. 1 Press ?/1 to turn MASTER VOLUME -/+ on the receiver. 2 Press input buttons (e.g., DVD) to maximum. "T. Tips • The adjusted value are shown in the display during adjustment. • To adjust the level of the sub woofer to select the program source (e.g., DVD player). 3 Press POWER on the LEVEL menu settings, see page 35. TEST TONE Adjust the speaker levels...
... to adjust the volume. The POWER indicator on the sub woofer lights up the sub woofer Listening to the sub woofer POWER indicator POWER Before playing the program source, set the volume of all speakers at 800 Hz. 1 Press ?/1 to turn MASTER VOLUME -/+ on the receiver. 2 Press input buttons (e.g., DVD) to maximum. "T. Tips • The adjusted value are shown in the display during adjustment. • To adjust the level of the sub woofer to select the program source (e.g., DVD player). 3 Press POWER on the LEVEL menu settings, see page 35. TEST TONE Adjust the speaker levels...
Operating Instructions
Page 22
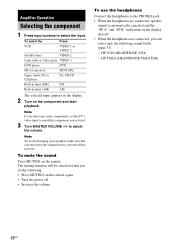
... your speakers, make sure that you turn down the volume before you selected. 3 Turn MASTER VOLUME -/+ to the PHONES jack. • When the headphones are connected, you do the following sound fields (page 33). - The muting function will be canceled when you can select only the following . • Press MUTING on the remote. Note If you select any video components, set the TV's video input to select the input. Amplifier Operation Selecting the component 1 Press input buttons to...
... your speakers, make sure that you turn down the volume before you selected. 3 Turn MASTER VOLUME -/+ to the PHONES jack. • When the headphones are connected, you do the following sound fields (page 33). - The muting function will be canceled when you can select only the following . • Press MUTING on the remote. Note If you select any video components, set the TV's video input to select the input. Amplifier Operation Selecting the component 1 Press input buttons to...
Operating Instructions
Page 24
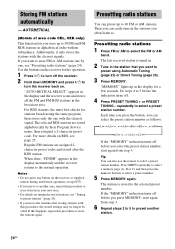
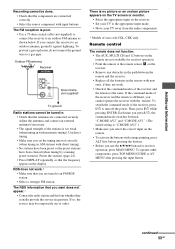
... receiver for stations broadcasting the same program, then stores only the one , see page 25. If the "MEMORY" indication turns off the receiver. 2 Hold down MEMORY and press ?/1 to the selected preset number. If you select the preset station number, start again from step 3. Presetting radio stations You can also use the remote to preset using Automatic Tuning (page 23) or Direct Tuning (page 23). 3 Press MEMORY. The station is tuned in. 2 Tune in the stations...
... receiver for stations broadcasting the same program, then stores only the one , see page 25. If the "MEMORY" indication turns off the receiver. 2 Hold down MEMORY and press ?/1 to the selected preset number. If you select the preset station number, start again from step 3. Presetting radio stations You can also use the remote to preset using Automatic Tuning (page 23) or Direct Tuning (page 23). 3 Press MEMORY. The station is tuned in. 2 Tune in the stations...
Operating Instructions
Page 25
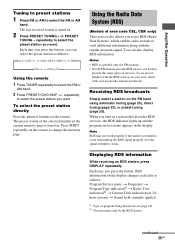
... lights up and the program service name appears in the current memory page is operable only for details. The preset station of area code CEL, CEK only) This receiver also allows you to use RDS (Radio Data System), which enables radio stations to select the preset station you press the button, RDS information on the remote. Displaying RDS information While receiving an RDS station, press DISPLAY repeatedly. The last received station is weak. Amplifier Operation Tuning...
... lights up and the program service name appears in the current memory page is operable only for details. The preset station of area code CEL, CEK only) This receiver also allows you to use RDS (Radio Data System), which enables radio stations to select the preset station you press the button, RDS information on the remote. Displaying RDS information While receiving an RDS station, press DISPLAY repeatedly. The last received station is weak. Amplifier Operation Tuning...
Operating Instructions
Page 28
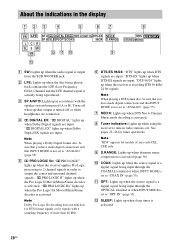
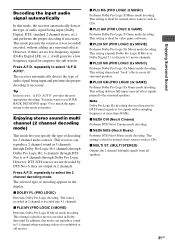
... 2 channel signals in accordance with a sampling frequency of area code CEL, CEK only. PRO LOGIC" lights up when Dolby Digital signals are input. Note Dolby Pro Logic IIx decoding does not function for DTS format signals or for signals with the speaker system being input through the COAXIAL terminal or when INPUT MODE is a digital signal being used (A or B). "DTS-ES" lights up when DTS Neo:6 Cinema/ Music mode decoding is set to output the center and surround channel signals. G NEO:6: Lights...
... 2 channel signals in accordance with a sampling frequency of area code CEL, CEK only. PRO LOGIC" lights up when Dolby Digital signals are input. Note Dolby Pro Logic IIx decoding does not function for DTS format signals or for signals with the speaker system being input through the COAXIAL terminal or when INPUT MODE is a digital signal being used (A or B). "DTS-ES" lights up when DTS Neo:6 Cinema/ Music mode decoding is set to output the center and surround channel signals. G NEO:6: Lights...
Operating Instructions
Page 31
... setting shares hard "back" effects across all speakers. 31GB Enjoying Surround Sound x PLIIX GM (PRO LOGIC IIx GAME) Performs Dolby Pro Logic IIx Game mode decoding. This setting is ideal for signals with a sampling frequency of decoding appears in multi channel (2 channel decoding mode) This mode lets you prefer. x MULTI ST. (MULTI STEREO) Outputs the 2 channel left/right signals from all surround speakers. Press A.F.D. The receiver automatically detects the type of audio signal being input (Dolby Digital, DTS, standard 2 channel stereo...
... setting shares hard "back" effects across all speakers. 31GB Enjoying Surround Sound x PLIIX GM (PRO LOGIC IIx GAME) Performs Dolby Pro Logic IIx Game mode decoding. This setting is ideal for signals with a sampling frequency of decoding appears in multi channel (2 channel decoding mode) This mode lets you prefer. x MULTI ST. (MULTI STEREO) Outputs the 2 channel left/right signals from all surround speakers. Press A.F.D. The receiver automatically detects the type of audio signal being input (Dolby Digital, DTS, standard 2 channel stereo...
Operating Instructions
Page 35
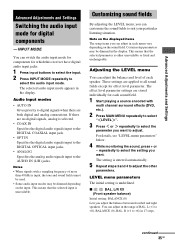
...digital audio input jacks. 1 Press input buttons to select the input. 2 Press INPUT MODE repeatedly to adjust the other parameters. INPUT MODE You can customize the sound fields to digital signals when there are stored individually for digital components - Advanced Adjustments and Settings Advanced Adjustments and Settings Switching the audio input mode for each speaker. Audio input modes • AUTO IN Gives priority to suit your particular listening situation. The effect level parameter settings are both digital and analog connections. The setting is input, the tone and sound...
...digital audio input jacks. 1 Press input buttons to select the input. 2 Press INPUT MODE repeatedly to adjust the other parameters. INPUT MODE You can customize the sound fields to digital signals when there are stored individually for digital components - Advanced Adjustments and Settings Advanced Adjustments and Settings Switching the audio input mode for each speaker. Audio input modes • AUTO IN Gives priority to suit your particular listening situation. The effect level parameter settings are both digital and analog connections. The setting is input, the tone and sound...
Operating Instructions
Page 36
... range of the surround effect in the Dolby Digital signal. x CTR XXX dB (Center speaker level) x SUR.L. XXX (Effect level) Initial setting: STD Lets you compress the dynamic range of the sound track. "SF. XXX (Dynamic range compressor) Lets you adjust the "presence" of the soundtrack based on the receiver for the operation. 1 Press ?/1 to +10 dB in the display and all sound fields are...
... range of the surround effect in the Dolby Digital signal. x CTR XXX dB (Center speaker level) x SUR.L. XXX (Effect level) Initial setting: STD Lets you compress the dynamic range of the sound track. "SF. XXX (Dynamic range compressor) Lets you adjust the "presence" of the soundtrack based on the receiver for the operation. 1 Press ?/1 to +10 dB in the display and all sound fields are...
Operating Instructions
Page 41
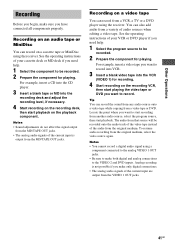
... you need help . 1 Select the program source to record. You can record the sound from any audio source onto a video tape while copying from the original medium. To resume audio recording from a VCR, a TV or a DVD player using the receiver. Recording on the playback component. See the operating instructions of your VCR or DVD player if you need help . 1 Select the component to be recorded. 2 Prepare the component for playing. Other Operations Recording Before you begin, make...
... you need help . 1 Select the program source to record. You can record the sound from any audio source onto a video tape while copying from the original medium. To resume audio recording from a VCR, a TV or a DVD player using the receiver. Recording on the playback component. See the operating instructions of your VCR or DVD player if you need help . 1 Select the component to be recorded. 2 Prepare the component for playing. Other Operations Recording Before you begin, make...
Operating Instructions
Page 44
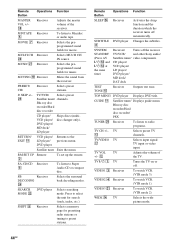
... DVD player Changes the subtitles. 8 SYSTEM STANDBY (Press AV ?/1 ed and ?/1 ef at the same time) Receiver/ Turns off automatically. GUIDE qa Satellite tuner/ Displays guide menu. TV qd Selects preset TV channels. PRESET/ CH/ Receiver Selects preset stations. Turns the TV on or off. Blu-ray disc recorder/Hard disc recorder/ PSX TUNER wl Receiver To listen to the LD player/ previous menu. RETURN/ EXIT qa VCD player/ Returns to radio programs. TV CH +/- RM SET UP Remote 2 To set up the remote. qk Receiver Adjusts the master volume...
... DVD player Changes the subtitles. 8 SYSTEM STANDBY (Press AV ?/1 ed and ?/1 ef at the same time) Receiver/ Turns off automatically. GUIDE qa Satellite tuner/ Displays guide menu. TV qd Selects preset TV channels. PRESET/ CH/ Receiver Selects preset stations. Turns the TV on or off. Blu-ray disc recorder/Hard disc recorder/ PSX TUNER wl Receiver To listen to the LD player/ previous menu. RETURN/ EXIT qa VCD player/ Returns to radio programs. TV CH +/- RM SET UP Remote 2 To set up the remote. qk Receiver Adjusts the master volume...
Operating Instructions
Page 46
... twice To reset the remote to switch the input mode of the receiver and the remote is intended to the corresponding input mode that you cannot use the remote to the LD player/ previous menu or DVD player/ exits the menu. The indicator flashes once (twice for receiver operation. • Some functions explained in this case, press TV/VIDEO button to factory settings Press ?/1, AV ?/1 and MASTER VOL - Blu-ray disc recorder/Hard disc recorder/ PSX/Satellite tuner V/v qa Receiver Selects a menu item. You...
... twice To reset the remote to switch the input mode of the receiver and the remote is intended to the corresponding input mode that you cannot use the remote to the LD player/ previous menu or DVD player/ exits the menu. The indicator flashes once (twice for receiver operation. • Some functions explained in this case, press TV/VIDEO button to factory settings Press ?/1, AV ?/1 and MASTER VOL - Blu-ray disc recorder/Hard disc recorder/ PSX/Satellite tuner V/v qa Receiver Selects a menu item. You...

Operating Instructions
Page 47
... numeric code correspond to control other components. continued 47GB The indicator lights up in quick succession while entering the numeric code, an error has occurred. If programming is unable to control. Notes • The indicator turns off . Start again from step 1. Operations Using the Remote RM-AAP001 Programming the remote You can program the remote to control. Once the control signals have been memorized, you want to control nonSony components by changing the code...
... numeric code correspond to control other components. continued 47GB The indicator lights up in quick succession while entering the numeric code, an error has occurred. If programming is unable to control. Notes • The indicator turns off . Start again from step 1. Operations Using the Remote RM-AAP001 Programming the remote You can program the remote to control. Once the control signals have been memorized, you want to control nonSony components by changing the code...
Operating Instructions
Page 51
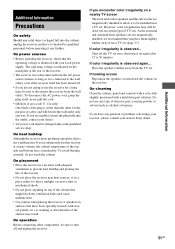
... as it is not a malfunction. If color irregularity is observed... On power sources • Before operating the receiver, check that might block the ventilation holes and cause malfunctions. • Use caution when placing the receiver or speakers on a nearby TV screen The front and center speakers and the sub woofer are not magnetically shielded, we recommend that have been specially treated (with...
... as it is not a malfunction. If color irregularity is observed... On power sources • Before operating the receiver, check that might block the ventilation holes and cause malfunctions. • Use caution when placing the receiver or speakers on a nearby TV screen The front and center speakers and the sub woofer are not magnetically shielded, we recommend that have been specially treated (with...
Operating Instructions
Page 52
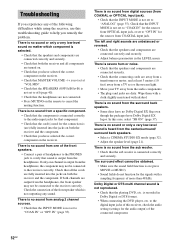
...; Check that the INPUT MODE is not set to cancel the muting function. The surround effect cannot be obtained. • Make sure the sound field function is on both channels are output from COAXIAL or OPTICAL input jack). • Check that the headphones are connected correctly and securely. • Adjust balance parameters in Dolby Digital or DTS format. • When connecting the DVD player, etc. is recorded in the LEVEL menu. The left...
...; Check that the INPUT MODE is not set to cancel the muting function. The surround effect cannot be obtained. • Make sure the sound field function is on both channels are output from COAXIAL or OPTICAL input jack). • Check that the headphones are connected correctly and securely. • Adjust balance parameters in Dolby Digital or DTS format. • When connecting the DVD player, etc. is recorded in the LEVEL menu. The left...
Operating Instructions
Page 53
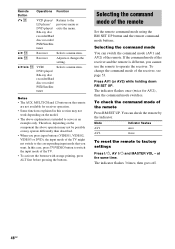
... Radio stations cannot be tuned in. • Check that the frequency appears in question. Remote control The remote does not function. • The AUX, MULTI CH and 12 buttons on the remote are connected correctly. • Select the source component with new ones, if they actually provide the service in the display. To switch the command mode of the receiver, press ?/1 to the appropriate input mode. • Move your TV to turn off the power...
... Radio stations cannot be tuned in. • Check that the frequency appears in question. Remote control The remote does not function. • The AUX, MULTI CH and 12 buttons on the remote are connected correctly. • Select the source component with new ones, if they actually provide the service in the display. To switch the command mode of the receiver, press ?/1 to the appropriate input mode. • Move your TV to turn off the power...
Operating Instructions
Page 55
.../TAPE (OUT), Voltage: 800 mV VIDEO 1 (AUDIO OUT) Impedance: 10 k ohms SUB WOOFER Voltage: 2 V Impedance: 1 k ohm Reproduction frequency range: 28 - 20,000 Hz Tone Gain levels ±6 dB, 1 dB step FM tuner section Tuning range Antenna Antenna terminals Intermediate frequency 87.5 - 108.0 MHz FM wire antenna 75 ohms, unbalanced 10.7 MHz AM tuner section Tuning range Models of area code U, CA With 10-kHz tuning scale: 530 - 1,710 kHz3...
.../TAPE (OUT), Voltage: 800 mV VIDEO 1 (AUDIO OUT) Impedance: 10 k ohms SUB WOOFER Voltage: 2 V Impedance: 1 k ohm Reproduction frequency range: 28 - 20,000 Hz Tone Gain levels ±6 dB, 1 dB step FM tuner section Tuning range Antenna Antenna terminals Intermediate frequency 87.5 - 108.0 MHz FM wire antenna 75 ohms, unbalanced 10.7 MHz AM tuner section Tuning range Models of area code U, CA With 10-kHz tuning scale: 530 - 1,710 kHz3...

Marketing Specifications
Page 2
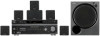
...;2005 Sony Electronics Inc. HT-DDW870 6.1CH Home Theater in a Box Package Specifications Receiver Inputs and Outputs Speaker Terminal Type: Front, Surround, Surround Back, Center Posts, Left and Right B Speakers Push Connectors Antenna Terminal(s): Yes (FM 75 ohm, AM Loop) Composite Video Output(s): 2 (Rear) Composite Video Input(s): 4 (1 Front/3 Rear) RCA Audio Output(s): 2 (Rear) Analog Audio Input(s): 3 (1 Front/2 Rear) Subwoofer Output(s): 1 (Rear Pre-out) Coaxial Audio Digital Input(s): 1 (Rear) Optical Audio Input(s): 2 (Rear) Audio Station Preset(s): 10 AM/20 FM Sound Mode: Dolby...
...;2005 Sony Electronics Inc. HT-DDW870 6.1CH Home Theater in a Box Package Specifications Receiver Inputs and Outputs Speaker Terminal Type: Front, Surround, Surround Back, Center Posts, Left and Right B Speakers Push Connectors Antenna Terminal(s): Yes (FM 75 ohm, AM Loop) Composite Video Output(s): 2 (Rear) Composite Video Input(s): 4 (1 Front/3 Rear) RCA Audio Output(s): 2 (Rear) Analog Audio Input(s): 3 (1 Front/2 Rear) Subwoofer Output(s): 1 (Rear Pre-out) Coaxial Audio Digital Input(s): 1 (Rear) Optical Audio Input(s): 2 (Rear) Audio Station Preset(s): 10 AM/20 FM Sound Mode: Dolby...


