

Limited Warranty (US Only)
Page 1
..., you must pay for all parts costs. 3. This warranty does not cover customer instruction, installation, set up adjustments or signal reception problems. This warranty does not cover cosmetic damage or damage due to acts of God, accident, misuse, abuse, negligence, commercial use, or modification of, or to you enter into a service contract with the Sony Partnership within the Warranty period...
..., you must pay for all parts costs. 3. This warranty does not cover customer instruction, installation, set up adjustments or signal reception problems. This warranty does not cover cosmetic damage or damage due to acts of God, accident, misuse, abuse, negligence, commercial use, or modification of, or to you enter into a service contract with the Sony Partnership within the Warranty period...
Operating Instructions (Receiver)
Page 2
... that any changes or modification not expressly approved in this manual could void your authority to operate this equipment does cause harmful interference to radio communications. Reorient or relocate the receiving antenna. - As an ENERGY STAR® partner, Sony Corporation has determined that provides guidelines for help. Do not use the receiver for the purpose of important operating and maintenance (servicing) instructions in...
... that any changes or modification not expressly approved in this manual could void your authority to operate this equipment does cause harmful interference to radio communications. Reorient or relocate the receiving antenna. - As an ENERGY STAR® partner, Sony Corporation has determined that provides guidelines for help. Do not use the receiver for the purpose of important operating and maintenance (servicing) instructions in...
Operating Instructions (Receiver)
Page 3
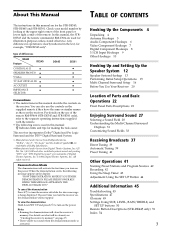
... the Components 4 Unpacking 4 Antenna Hookups 5 Audio Component Hookups 6 Video Component Hookups 7 Digital Component Hookups 8 5.1CH Input Hookups 9 Other Hookups 10 Hooking Up and Setting Up the Speaker System 12 Speaker System Hookup 13 Performing Initial Setup Operations 15 Multi Channel Surround Setup 16 Before You Use Your Receiver 20 Location of Digital Theater Systems, Inc. © 1996 Digital Theater Systems, Inc. To view the demonstration Hold down SET UP and press ?/1 to turn on page 15. • There will clear the receiver's memory. About This Manual The instructions...
... the Components 4 Unpacking 4 Antenna Hookups 5 Audio Component Hookups 6 Video Component Hookups 7 Digital Component Hookups 8 5.1CH Input Hookups 9 Other Hookups 10 Hooking Up and Setting Up the Speaker System 12 Speaker System Hookup 13 Performing Initial Setup Operations 15 Multi Channel Surround Setup 16 Before You Use Your Receiver 20 Location of Digital Theater Systems, Inc. © 1996 Digital Theater Systems, Inc. To view the demonstration Hold down SET UP and press ?/1 to turn on page 15. • There will clear the receiver's memory. About This Manual The instructions...
Operating Instructions (Receiver)
Page 8
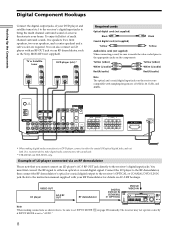
... the multi channel surround sound of a movie theater into your home. Example of LD player connected via an RF demodulator, such as shown above, be sure to match the color-coded pins to either an optical or coaxial digital signal. Hooking Up the Components Digital Component Hookups Connect the digital output jacks of your DVD player and satellite tuner (etc.) to the receiver's digital input jacks to the receiver's digital input jacks. F. TUNING + SHIFT - D. 2CH MODE I VIDEO IN VIDEO IN VIDEO OUT VIDEO IN VIDEO OUT ANTENNA L OPTICAL OPTICAL COAXIAL L L CENTER S-VIDEO IN...
... the multi channel surround sound of a movie theater into your home. Example of LD player connected via an RF demodulator, such as shown above, be sure to match the color-coded pins to either an optical or coaxial digital signal. Hooking Up the Components Digital Component Hookups Connect the digital output jacks of your DVD player and satellite tuner (etc.) to the receiver's digital input jacks to the receiver's digital input jacks. F. TUNING + SHIFT - D. 2CH MODE I VIDEO IN VIDEO IN VIDEO OUT VIDEO IN VIDEO OUT ANTENNA L OPTICAL OPTICAL COAXIAL L L CENTER S-VIDEO IN...

Operating Instructions (Receiver)
Page 9
..., adjust the level of a DVD player hookup using the 5.1 INPUT jacks VIDEO OUT DVD player 5.1 CH INPUT DVD/LD IN VIDEO etc. F. Alternatively, the 5.1CH INPUT jacks can connect them directly to the receiver to enjoy multichannel software encoded in formats other than Dolby Digital (AC-3) and DTS. LEVEL SUR BASS/ TREBLE i + SET UP NAME ENTER BASS BOOST TONE MASTER VOLUME PRESET - Front Speaker (L) Front Speaker (R) Rear Speaker (L) Rear Speaker (R) Center Speaker Active Woofer 9 SPEAKERS FRONT ? / 1 SPEAKERS R ON r OFF A B PHONES MULTI CHANNEL DECODING DIMMER DISPLAY INPUT...
..., adjust the level of a DVD player hookup using the 5.1 INPUT jacks VIDEO OUT DVD player 5.1 CH INPUT DVD/LD IN VIDEO etc. F. Alternatively, the 5.1CH INPUT jacks can connect them directly to the receiver to enjoy multichannel software encoded in formats other than Dolby Digital (AC-3) and DTS. LEVEL SUR BASS/ TREBLE i + SET UP NAME ENTER BASS BOOST TONE MASTER VOLUME PRESET - Front Speaker (L) Front Speaker (R) Rear Speaker (L) Rear Speaker (R) Center Speaker Active Woofer 9 SPEAKERS FRONT ? / 1 SPEAKERS R ON r OFF A B PHONES MULTI CHANNEL DECODING DIMMER DISPLAY INPUT...
Operating Instructions (Receiver)
Page 13
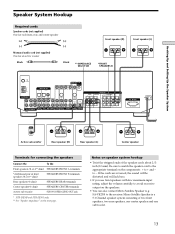
...VIDEO OUT VIDEO IN VIDEO OUT ANTENNA L OPTICAL OPTICAL COAXIAL L L CENTER S-VIDEO IN L S-VIDEO OUT L AUDIO OUT FRONT 4Ω 8Ω R SUB FRONT REAR WOOFER 5.1 CH INPUT R AUDIO IN AUDIO IN AUX CD R REC OUT IN MD/TAPE R R AUDIO IN AUDIO IN AUDIO OUT AUDIO IN SUB IMPEDANCE TV/SAT DVD/LD VIDEO WOOFER SELECTOR REAR R L SPEAKERS CENTER B FRONT A R L R L R L R L R L AC OUTLET SWITCHED 120W/1A MAX AC 120V 60Hz ] INPUT AUDIO IN }] } Active sub woofer Rear speaker (R) Rear speaker (L) ] } Center speaker Terminals for connecting the speakers Connect...
...VIDEO OUT VIDEO IN VIDEO OUT ANTENNA L OPTICAL OPTICAL COAXIAL L L CENTER S-VIDEO IN L S-VIDEO OUT L AUDIO OUT FRONT 4Ω 8Ω R SUB FRONT REAR WOOFER 5.1 CH INPUT R AUDIO IN AUDIO IN AUX CD R REC OUT IN MD/TAPE R R AUDIO IN AUDIO IN AUDIO OUT AUDIO IN SUB IMPEDANCE TV/SAT DVD/LD VIDEO WOOFER SELECTOR REAR R L SPEAKERS CENTER B FRONT A R L R L R L R L R L AC OUTLET SWITCHED 120W/1A MAX AC 120V 60Hz ] INPUT AUDIO IN }] } Active sub woofer Rear speaker (R) Rear speaker (L) ] } Center speaker Terminals for connecting the speakers Connect...

Operating Instructions (Receiver)
Page 15
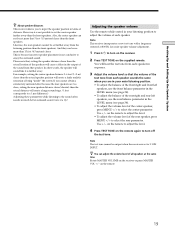
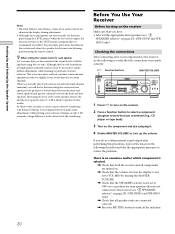
... preset stations and program sources) are cleared. 15 F. TUNING + MEMORY FM/AM FM MODE MUTING BASS BOOST TONE Performing initial setup operations Before you use your receiver for your system. Before turning on the receiver Make sure that you want to clear the receiver's memory, do the following items. For details on . 1/u ? / 1 SPEAKERS R ON r OFF A B PHONES MULTI CHANNEL DECODING DIMMER DISPLAY INPUT MODE VIDEO DVD/LD TV/SAT 5.1CH INPUT MD/TAPE CD TUNER AUX CINEMA STUDIO A B C SOUND FIELD...
... preset stations and program sources) are cleared. 15 F. TUNING + MEMORY FM/AM FM MODE MUTING BASS BOOST TONE Performing initial setup operations Before you use your receiver for your system. Before turning on the receiver Make sure that you want to clear the receiver's memory, do the following items. For details on . 1/u ? / 1 SPEAKERS R ON r OFF A B PHONES MULTI CHANNEL DECODING DIMMER DISPLAY INPUT MODE VIDEO DVD/LD TV/SAT 5.1CH INPUT MD/TAPE CD TUNER AUX CINEMA STUDIO A B C SOUND FIELD...
Operating Instructions (Receiver)
Page 19
... receiver incorporates a new test tone with a frequency centered at the same time Rotate MASTER VOLUME on the remote again to enjoy the surround sound. Use +/- For example, setting the center speaker distance 3~6 feet (1~2 m) closer than the front speakers. Use +/- If you are too close, setting the rear speaker distance closer (shorter) than 15 feet (4.5 meters) closer. on the remote to adjust the level. • To adjust the volume level of the rear speaker, press MENU to turn off the test tone...
... receiver incorporates a new test tone with a frequency centered at the same time Rotate MASTER VOLUME on the remote again to enjoy the surround sound. Use +/- For example, setting the center speaker distance 3~6 feet (1~2 m) closer than the front speakers. Use +/- If you are too close, setting the rear speaker distance closer (shorter) than 15 feet (4.5 meters) closer. on the remote to adjust the level. • To adjust the volume level of the rear speaker, press MENU to turn off the test tone...
Operating Instructions (Receiver)
Page 20
... SPEAKERS selector is because most software contains center and rear channels recorded at slightly lower levels than the two front channels. F. LEVEL SUR BASS/ TREBLE i + SET UP NAME ENTER BASS BOOST TONE MASTER VOLUME PRESET - TUNING + MEMORY FM/AM FM MODE BASS MUTING BOOST TONE 1 Press ?/1 to turn on the component and start playing it may be made correctly. 1/u Function buttons MASTER VOLUME ? / 1 SPEAKERS R ON r OFF A B PHONES MULTI CHANNEL DECODING DIMMER DISPLAY INPUT MODE VIDEO DVD/LD TV/SAT 5.1CH INPUT MD/TAPE CD TUNER AUX CINEMA STUDIO A B C SOUND...
... SPEAKERS selector is because most software contains center and rear channels recorded at slightly lower levels than the two front channels. F. LEVEL SUR BASS/ TREBLE i + SET UP NAME ENTER BASS BOOST TONE MASTER VOLUME PRESET - TUNING + MEMORY FM/AM FM MODE BASS MUTING BOOST TONE 1 Press ?/1 to turn on the component and start playing it may be made correctly. 1/u Function buttons MASTER VOLUME ? / 1 SPEAKERS R ON r OFF A B PHONES MULTI CHANNEL DECODING DIMMER DISPLAY INPUT MODE VIDEO DVD/LD TV/SAT 5.1CH INPUT MD/TAPE CD TUNER AUX CINEMA STUDIO A B C SOUND...
Operating Instructions (Receiver)
Page 23
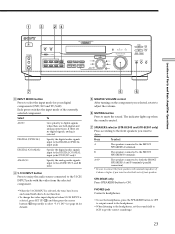
... input mode for details). 5 6 5 MASTER VOLUME control After turning on the component you want to mute the sound. PHONES jack Connects headphones. • To use the headphones, press the SPEAKERS button to OFF to output sound to the headphones. • When listening to the headphones, set the sound field to 2CH to ON. Select To AUTO Give priority to digital signals when there are no digital signals, analog is selected DIGITAL (OPTICAL) Specify the digital audio signals input to the DIGITAL OPTICAL input jacks DIGITAL...
... input mode for details). 5 6 5 MASTER VOLUME control After turning on the component you want to mute the sound. PHONES jack Connects headphones. • To use the headphones, press the SPEAKERS button to OFF to output sound to the headphones. • When listening to the headphones, set the sound field to 2CH to ON. Select To AUTO Give priority to digital signals when there are no digital signals, analog is selected DIGITAL (OPTICAL) Specify the digital audio signals input to the DIGITAL OPTICAL input jacks DIGITAL...

Operating Instructions (Receiver)
Page 24
... name of Parts and Basic Amplifier Operations !£ !¢ 8 DISPLAY button Press repeatedly to enjoy surround sound. D. 2CH MODE I - qa MULTI CHANNEL DECODING indicator This indicator lights up when the function is turned on the display window as the function button. ** Frequency appears only when the tuner is decoding signals recorded in a multi channel format. A.F.D. TUNING + MEMORY FM/AM FM MODE BASS MUTING BOOST TONE Location of the component or the preset station* v FUNCTION button indication or frequency** v Sound field applied to output sound from...
... name of Parts and Basic Amplifier Operations !£ !¢ 8 DISPLAY button Press repeatedly to enjoy surround sound. D. 2CH MODE I - qa MULTI CHANNEL DECODING indicator This indicator lights up when the function is turned on the display window as the function button. ** Frequency appears only when the tuner is decoding signals recorded in a multi channel format. A.F.D. TUNING + MEMORY FM/AM FM MODE BASS MUTING BOOST TONE Location of the component or the preset station* v FUNCTION button indication or frequency** v Sound field applied to output sound from...
Operating Instructions (Receiver)
Page 26
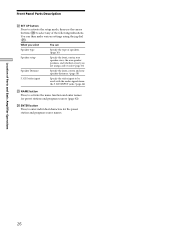
... Parts and Basic Amplifier Operations Front Panel Parts Description ws SET UP button Press to activate the setup mode, then use the cursor buttons (w;) to select any of speakers. (page 16) Speaker setup Specify the front, center, rear speaker sizes, the rear speaker position, and whether or not you select You can then make various settings using a sub woofer. (page 16) Speaker Distance Specify the front, center, and rear speaker distances. (page 18) 5.1CH video input Specify the video input to be used with the audio signals...
... Parts and Basic Amplifier Operations Front Panel Parts Description ws SET UP button Press to activate the setup mode, then use the cursor buttons (w;) to select any of speakers. (page 16) Speaker setup Specify the front, center, rear speaker sizes, the rear speaker position, and whether or not you select You can then make various settings using a sub woofer. (page 16) Speaker Distance Specify the front, center, and rear speaker distances. (page 18) 5.1CH video input Specify the video input to be used with the audio signals...
Operating Instructions (Receiver)
Page 28
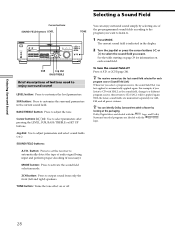
... can enjoy surround sound simply by looking at the packaging Dolby Digital discs are labeled with the logo, and Dolby Surround encoded programs are memorized separately for each sound field. or 2CH (page 24). Enjoying Surround Sound Selecting a Sound Field Cursor buttons SOUND FIELD buttons LEVEL TONE ? / 1 SPEAKERS R ON r OFF A B PHONES MULTI CHANNEL DECODING DIMMER DISPLAY INPUT MODE VIDEO DVD/LD TV/SAT 5.1CH INPUT MD/TAPE CD TUNER AUX CINEMA STUDIO A B C SOUND FIELD A. BASS/TREBLE button: Press to adjust parameters and select sound fields (etc...
... can enjoy surround sound simply by looking at the packaging Dolby Digital discs are labeled with the logo, and Dolby Surround encoded programs are memorized separately for each sound field. or 2CH (page 24). Enjoying Surround Sound Selecting a Sound Field Cursor buttons SOUND FIELD buttons LEVEL TONE ? / 1 SPEAKERS R ON r OFF A B PHONES MULTI CHANNEL DECODING DIMMER DISPLAY INPUT MODE VIDEO DVD/LD TV/SAT 5.1CH INPUT MD/TAPE CD TUNER AUX CINEMA STUDIO A B C SOUND FIELD A. BASS/TREBLE button: Press to adjust parameters and select sound fields (etc...

Operating Instructions (Receiver)
Page 31
... playing a DTS format disc, be sure that you have made digital connections and that INPUT MODE is NOT set to "NO", or the SPEAKER button is active. See pages 37 - 40 for details regarding the playback channel indicators. DIGITAL This indicator lights up when a sound field other than 2 CHANNEL is selected and the receiver is decoding signals recorded in order to output the center and surround channel signals.** ** However, this indicator does not light...
... playing a DTS format disc, be sure that you have made digital connections and that INPUT MODE is NOT set to "NO", or the SPEAKER button is active. See pages 37 - 40 for details regarding the playback channel indicators. DIGITAL This indicator lights up when a sound field other than 2 CHANNEL is selected and the receiver is decoding signals recorded in order to output the center and surround channel signals.** ** However, this indicator does not light...

Operating Instructions (Receiver)
Page 42
... tune in the preset station you 've connected all components properly. ? / 1 SPEAKERS R ON r OFF A B PHONES MULTI CHANNEL DECODING DIMMER DISPLAY INPUT MODE VIDEO DVD/LD TV/SAT 5.1CH INPUT MD/TAPE CD TUNER AUX CINEMA STUDIO A B C SOUND FIELD A. Before you begin, make sure you want to select the right character. 5 Press ENTER. c ç Other Operations Naming Preset Stations and Program Sources You can be entered for each preset station or program source. TUNING + SHIFT - Notes • You cannot record a digital audio signal using the controls...
... tune in the preset station you 've connected all components properly. ? / 1 SPEAKERS R ON r OFF A B PHONES MULTI CHANNEL DECODING DIMMER DISPLAY INPUT MODE VIDEO DVD/LD TV/SAT 5.1CH INPUT MD/TAPE CD TUNER AUX CINEMA STUDIO A B C SOUND FIELD A. Before you begin, make sure you want to select the right character. 5 Press ENTER. c ç Other Operations Naming Preset Stations and Program Sources You can be entered for each preset station or program source. TUNING + SHIFT - Notes • You cannot record a digital audio signal using the controls...
Operating Instructions (Receiver)
Page 46
.... , Make sure you set to change the display mode. Troubleshooting No sound or only a very low-level sound is heard from the audio components. Use direct tuning. , Make sure you select the correct function on the receiver. , Remove any obstacles in the path between the remote and the receiver. , Replace both batteries in the remote with direct tuning) (see page 19). , Make sure the rear speaker size parameter is set the tuning interval correctly (when tuning in with a component connected to the appropriate input mode. , Move...
.... , Make sure you set to change the display mode. Troubleshooting No sound or only a very low-level sound is heard from the audio components. Use direct tuning. , Make sure you select the correct function on the receiver. , Remove any obstacles in the path between the remote and the receiver. , Replace both batteries in the remote with direct tuning) (see page 19). , Make sure the rear speaker size parameter is set the tuning interval correctly (when tuning in with a component connected to the appropriate input mode. , Move...

Operating Instructions (Receiver)
Page 51
..." button to select tuner preset station numeric input during DIRECT TUNING or MEMORY mode. D.TUNING Receiver Tuner station direct keyin mode. ./> CD player/ Skips tracks. Remote Button Description (STR-DE445 only) You can use the remote to operate the components in DVD player/ record standby.) VCD player/ LD player/ DAT deck x CD player/ Stops play . To watch TV programs or satellite receiver. N CD player/ Starts play . Turns the audio and video components on or off automatically. Use with the picture-in-picture function. TV Selects the channel entry mode...
..." button to select tuner preset station numeric input during DIRECT TUNING or MEMORY mode. D.TUNING Receiver Tuner station direct keyin mode. ./> CD player/ Skips tracks. Remote Button Description (STR-DE445 only) You can use the remote to operate the components in DVD player/ record standby.) VCD player/ LD player/ DAT deck x CD player/ Stops play . To watch TV programs or satellite receiver. N CD player/ Starts play . Turns the audio and video components on or off automatically. Use with the picture-in-picture function. TV Selects the channel entry mode...

Operating Instructions (Receiver)
Page 52
... picture-inpicture function. Selects output signal from the receiver. Adjusts the master volume of the TUNER button cannot be controlled by this button repeatedly to output test tone. TITLE DVD Displays DVD title. * Only for the small picture. Note Some Sony equipments cannot be changed. >10 = AV SLEEP ?/1 ?/1 SYSTEM STANDBY AUX 5.1CH VIDEO DVD/LD TV/SAT MD/TAPE CD TUNER MENU F 123 G ENTER g 456 TITLE f 78 9 SHIFT >10 - /- - Additional Information 52 MENU MENU +/- Selects preset channels. Selects input signal: TV input or video input. Mutes the sound...
... picture-inpicture function. Selects output signal from the receiver. Adjusts the master volume of the TUNER button cannot be controlled by this button repeatedly to output test tone. TITLE DVD Displays DVD title. * Only for the small picture. Note Some Sony equipments cannot be changed. >10 = AV SLEEP ?/1 ?/1 SYSTEM STANDBY AUX 5.1CH VIDEO DVD/LD TV/SAT MD/TAPE CD TUNER MENU F 123 G ENTER g 456 TITLE f 78 9 SHIFT >10 - /- - Additional Information 52 MENU MENU +/- Selects preset channels. Selects input signal: TV input or video input. Mutes the sound...

Operating Instructions (Receiver)
Page 54
... the display 24 speaker volumes 19 surround parameters 34 Automatic tuning 39 B Basic receiver operations 22-26 Batteries 4 C Changing display 24 effect level 33 Checking the connections 20 Clearing receiver's memory 15 Connecting. See Recording Effect level 33 H Hookups 5.1CH Input 9 AC power cord 11 antennas 5 audio components 6 digital components 8 CONTROL A1 11 speaker system 13 video components 7 I, J, K Indexing. See Naming N, O Naming preset stations 42 program sources 42 P, Q Parameter 34, 36 Preset stations how to preset 40 how to tune 40 Preset tuning 40 R Receiving broadcasts...
... the display 24 speaker volumes 19 surround parameters 34 Automatic tuning 39 B Basic receiver operations 22-26 Batteries 4 C Changing display 24 effect level 33 Checking the connections 20 Clearing receiver's memory 15 Connecting. See Recording Effect level 33 H Hookups 5.1CH Input 9 AC power cord 11 antennas 5 audio components 6 digital components 8 CONTROL A1 11 speaker system 13 video components 7 I, J, K Indexing. See Naming N, O Naming preset stations 42 program sources 42 P, Q Parameter 34, 36 Preset stations how to preset 40 how to tune 40 Preset tuning 40 R Receiving broadcasts...
Operating Instructions (SA-VE230 Speaker System)
Page 8
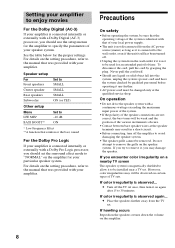
... the system from the TV set the surround effect mode to be observed on the amplifier for an extended period of TV sets. Speaker setup For Front speakers Center speaker Rear speakers Subwoofer Set to SMALL SMALL SMALL ON (or YES) Other setup Menu LFE MIX* BASS BOOST** Set to -10 dB ON * Low Frequency Effect **A function that reinforces the bass sound For the Dolby Pro Logic If your amplifier is connected internally or externally with...
... the system from the TV set the surround effect mode to be observed on the amplifier for an extended period of TV sets. Speaker setup For Front speakers Center speaker Rear speakers Subwoofer Set to SMALL SMALL SMALL ON (or YES) Other setup Menu LFE MIX* BASS BOOST** Set to -10 dB ON * Low Frequency Effect **A function that reinforces the bass sound For the Dolby Pro Logic If your amplifier is connected internally or externally with...


