Operating Guide
Page 8
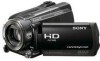
...Guide") "Handycam Handbook" (PDF) "Operating Guide" (This manual) (1) See page 43 for a long time, fragmentation of an airplane (HDR-XR500V/XR520V). To protect the internal hard disk from shock by the camcorder may not be able to record or play movies and photos. ... When connecting the camcorder to insert the connector plug in the correct way....
...Guide") "Handycam Handbook" (PDF) "Operating Guide" (This manual) (1) See page 43 for a long time, fragmentation of an airplane (HDR-XR500V/XR520V). To protect the internal hard disk from shock by the camcorder may not be able to record or play movies and photos. ... When connecting the camcorder to insert the connector plug in the correct way....
Operating Guide
Page 10
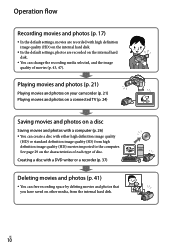
... you have saved on other media, from high definition image quality (HD) movies imported to the computer. Playing movies and photos (p. 21) Playing movies and photos on your camcorder (p. 21) Playing movies and photos on a connected TV (p. 24) Saving movies and photos on a disc Saving movies and photos with a computer (p. 26) You can change the recording...
... you have saved on other media, from high definition image quality (HD) movies imported to the computer. Playing movies and photos (p. 21) Playing movies and photos on your camcorder (p. 21) Playing movies and photos on a connected TV (p. 24) Saving movies and photos on a disc Saving movies and photos with a computer (p. 26) You can change the recording...

Operating Guide
Page 11
... 15 Changing the language setting 16 Recording Recording 17 Recording and playing movies and photos easily (Easy Handycam operation 20 Acquiring recording location information using the GPS (HDR-XR500V/XR520V 20 Playback Playback on the camcorder 21 Playing images on a TV 24 Saving movies and photos with a computer Preparing a computer (Windows 26 When using a Macintosh 26...
... 15 Changing the language setting 16 Recording Recording 17 Recording and playing movies and photos easily (Easy Handycam operation 20 Acquiring recording location information using the GPS (HDR-XR500V/XR520V 20 Playback Playback on the camcorder 21 Playing images on a TV 24 Saving movies and photos with a computer Preparing a computer (Windows 26 When using a Macintosh 26...
Operating Guide
Page 12
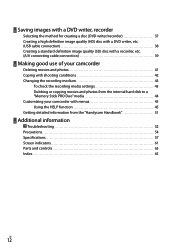
... a standard definition image quality (SD) disc with a recorder, etc. (A/V connecting cable connection 39 Making good use of your camcorder Deleting movies and photos 41 Coping with shooting conditions 42 Changing the recording medium 43 To check the recording media settings 43 Dubbing or copying... movies and photos from the internal hard disk to a "Memory Stick PRO Duo" media 44 Customizing your camcorder with menus 45 Using the HELP function 45 Getting detailed information from the "Handycam Handbook 51 Additional information Troubleshooting 52 ...
... a standard definition image quality (SD) disc with a recorder, etc. (A/V connecting cable connection 39 Making good use of your camcorder Deleting movies and photos 41 Coping with shooting conditions 42 Changing the recording medium 43 To check the recording media settings 43 Dubbing or copying... movies and photos from the internal hard disk to a "Memory Stick PRO Duo" media 44 Customizing your camcorder with menus 45 Using the HELP function 45 Getting detailed information from the "Handycam Handbook 51 Additional information Troubleshooting 52 ...
Operating Guide
Page 14
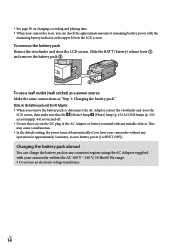
... save battery power ([A.SHUT OFF]). US 14 To remove the battery pack Retract the viewfinder and close the LCD screen, then make sure that the (Movie) lamp/ (Photo) lamp (p. 15)/ACCESS lamps (p. 13)/ access lamp(p. 44) are turned off automatically if you can charge the battery pack in... any countries/regions using the AC Adaptor supplied with your camcorder without any metallic objects. Slide the BATT (battery) release lever and remove the battery pack . Notes on the battery pack and...
... save battery power ([A.SHUT OFF]). US 14 To remove the battery pack Retract the viewfinder and close the LCD screen, then make sure that the (Movie) lamp/ (Photo) lamp (p. 15)/ACCESS lamps (p. 13)/ access lamp(p. 44) are turned off automatically if you can charge the battery pack in... any countries/regions using the AC Adaptor supplied with your camcorder without any metallic objects. Slide the BATT (battery) release lever and remove the battery pack . Notes on the battery pack and...

Operating Guide
Page 15
...SETTINGS) [CLOCK/ LANG] [CLOCK SET]. Touch the button on , and setting the date and time 1 Open the LCD screen of your camcorder when the LCD screen is turned on. To turn off the operation beeps by touching (HOME) (SETTINGS) [SOUND/DISP SET]... [BEEP] [OFF US 15 POWER (Movie): To record movies (Photo): To record photos 2 Select the desired geographical area with / , then touch [NEXT]. Step 2: Turning the power on the LCD screen. ...
...SETTINGS) [CLOCK/ LANG] [CLOCK SET]. Touch the button on , and setting the date and time 1 Open the LCD screen of your camcorder when the LCD screen is turned on. To turn off the operation beeps by touching (HOME) (SETTINGS) [SOUND/DISP SET]... [BEEP] [OFF US 15 POWER (Movie): To record movies (Photo): To record photos 2 Select the desired geographical area with / , then touch [NEXT]. Step 2: Turning the power on the LCD screen. ...

Operating Guide
Page 16
... If the viewfinder is pulled out, retract the viewfinder as shown in a specified language. The turned off. (Movie) lamp flashes several seconds, then the camcorder is turned on or off depending on -screen displays to show messages in the illustration below. To turn off the power ...; (SETTINGS) [CLOCK/ LANG] [ LANGUAGE SET] the desired language On turning the camcorder on or off using the LCD screen or the viewfinder The power of the camcorder On On Off On US 16 LCD screen Open Closed Status Viewfinder Retracted Pulled out Retracted Pulled out...
... If the viewfinder is pulled out, retract the viewfinder as shown in a specified language. The turned off. (Movie) lamp flashes several seconds, then the camcorder is turned on or off depending on -screen displays to show messages in the illustration below. To turn off the power ...; (SETTINGS) [CLOCK/ LANG] [ LANGUAGE SET] the desired language On turning the camcorder on or off using the LCD screen or the viewfinder The power of the camcorder On On Off On US 16 LCD screen Open Closed Status Viewfinder Retracted Pulled out Retracted Pulled out...
Operating Guide
Page 17
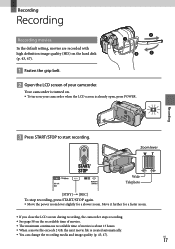
...faster zoom. If you close the LCD screen during recording, the camcorder stops recording. See page 58 on the recordable time of movies. The maximum continuous recordable time of your camcorder when the LCD screen is already open, press POWER. US 17 Recording ...Recording Recording movies In the default setting, movies are recorded with high definition image quality (HD) on...
...faster zoom. If you close the LCD screen during recording, the camcorder stops recording. See page 58 on the recordable time of movies. The maximum continuous recordable time of your camcorder when the LCD screen is already open, press POWER. US 17 Recording ...Recording Recording movies In the default setting, movies are recorded with high definition image quality (HD) on...
Operating Guide
Page 18
...58562; 90 degrees (max.) 180 degrees (max.) 90 degrees to the camcorder When you can record movies/photos in the menu. You can change the recording mode of movies (p. 47). [ STEADYSHOT] is set to [ACTIVE] in the default setting. &#...(), you make recording by touching (HOME) (SETTINGS) [MOVIE SETTINGS] [DIGITAL ZOOM] the desired setting . When viewing movies on your camcorder. You can increase the zooming level by using the viewfinder, pull out the viewfinder ...
...58562; 90 degrees (max.) 180 degrees (max.) 90 degrees to the camcorder When you can record movies/photos in the menu. You can change the recording mode of movies (p. 47). [ STEADYSHOT] is set to [ACTIVE] in the default setting. &#...(), you make recording by touching (HOME) (SETTINGS) [MOVIE SETTINGS] [DIGITAL ZOOM] the desired setting . When viewing movies on your camcorder. You can increase the zooming level by using the viewfinder, pull out the viewfinder ...

Operating Guide
Page 19
... to adjust the focus, then press it further for a slower zoom. The image file size is 8.3M when recording high definition image quality (HD) movies. Your camcorder flashes automatically when there is recorded. Move the power zoom lever slightly for a faster zoom. You can check the recordable number of...
... to adjust the focus, then press it further for a slower zoom. The image file size is 8.3M when recording high definition image quality (HD) movies. Your camcorder flashes automatically when there is recorded. Move the power zoom lever slightly for a faster zoom. You can check the recordable number of...
Operating Guide
Page 20
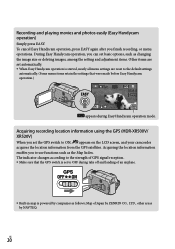
... movies and photos easily (Easy Handycam operation) Simply press EASY. Acquiring the location information enables you can set basic options, such as changing the image size or deleting images, among the setting and adjustment items. Other items are set automatically. When Easy Handycam...the GPS switch is powered by NAVTEQ. During Easy Handycam operation, you to ON, appears on the LCD screen, and your camcorder acquires the location information from the GPS satellites. Acquiring recording location information using the GPS (HDR-XR500V/ XR520V) When you finish recording, or menu ...
... movies and photos easily (Easy Handycam operation) Simply press EASY. Acquiring the location information enables you can set basic options, such as changing the image size or deleting images, among the setting and adjustment items. Other items are set automatically. When Easy Handycam...the GPS switch is powered by NAVTEQ. During Easy Handycam operation, you to ON, appears on the LCD screen, and your camcorder acquires the location information from the GPS satellites. Acquiring recording location information using the GPS (HDR-XR500V/ XR520V) When you finish recording, or menu ...

Operating Guide
Page 21
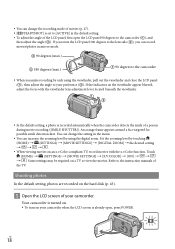
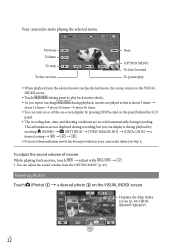
... To the screen to continue playing from the scene. Playback Playback on the camcorder In the default setting, movies and photos on the LCD screen as well. Touch the (or ) tab a desired movie . Playback The VISUAL INDEX screen appears after some seconds. ...43). Touch the image to select the index type To the list of your camcorder when the LCD screen is turned on. To turn on the movie/photo that was played or recorded most recently. Playing movies Open the LCD screen of recording dates /...
... To the screen to continue playing from the scene. Playback Playback on the camcorder In the default setting, movies and photos on the LCD screen as well. Touch the (or ) tab a desired movie . Playback The VISUAL INDEX screen appears after some seconds. ...43). Touch the image to select the index type To the list of your camcorder when the LCD screen is turned on. To turn on the movie/photo that was played or recorded most recently. Playing movies Open the LCD screen of recording dates /...
Operating Guide
Page 22
... US 22 Viewing photos Touch (Photo) a desired photo on your camcorder when you buy it. This information are not displayed during recording, but you repeat touching / during playback, movies are played as fast as about 5 times about 10 times about 30 times &#...VISUAL INDEX screen. Touch / during recording. Previous Volume To stop To fast-reverse Next OPTION MENU To fast-forward To pause/play back movies slowly. As you can turn on or off the on-screen display by touching (HOME) (SETTINGS) [VIEW IMAGES...
... US 22 Viewing photos Touch (Photo) a desired photo on your camcorder when you buy it. This information are not displayed during recording, but you repeat touching / during playback, movies are played as fast as about 5 times about 10 times about 30 times &#...VISUAL INDEX screen. Touch / during recording. Previous Volume To stop To fast-reverse Next OPTION MENU To fast-forward To pause/play back movies slowly. As you can turn on or off the on-screen display by touching (HOME) (SETTINGS) [VIEW IMAGES...

Operating Guide
Page 24
... differ depending on what type of TV is connected, and the connectors used to output movies, movies are output with standard definition image quality (SD). Play back movies and photos on your camcorder (p. 21). You can connect your camcorder, and touch (HOME) CONNECT Guide] on the LCD screen. (OTHERS) [TV When...
... differ depending on what type of TV is connected, and the connectors used to output movies, movies are output with standard definition image quality (SD). Play back movies and photos on your camcorder (p. 21). You can connect your camcorder, and touch (HOME) CONNECT Guide] on the LCD screen. (OTHERS) [TV When...
Operating Guide
Page 26
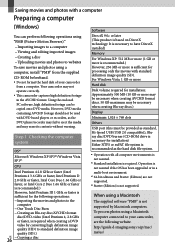
... DVD media. To process photos using a Macintosh The supplied software "PMB" is sufficient for the following operations: Importing the movies and photos to standard definition image quality (SD).) 26US Copying a disc Software DirectX 9.0c or later (This product is not...(Intel Pentium 4, 2.8 GHz or faster, is required when creating a DVD video by Macintosh computers. Your camcorder may erase its contents without warning. http://guide.d-imaging.sony.co.jp/mac/ ms/us/ Using the enclosed PC software, high definition footage can perform following website. For...
... DVD media. To process photos using a Macintosh The supplied software "PMB" is sufficient for the following operations: Importing the movies and photos to standard definition image quality (SD).) 26US Copying a disc Software DirectX 9.0c or later (This product is not...(Intel Pentium 4, 2.8 GHz or faster, is required when creating a DVD video by Macintosh computers. Your camcorder may erase its contents without warning. http://guide.d-imaging.sony.co.jp/mac/ ms/us/ Using the enclosed PC software, high definition footage can perform following website. For...

Operating Guide
Page 27
... (OTHERS) [USB CONNECT]. The [USB SELECT] screen appears on the camcorder screen automatically. Touch [ USB CONNECT] on the "Handycam Handbook." Confirm that of the "PMB" of your camcorder, uninstall "PMB" from the computer and then re-install it in order, from the lower to... number of the previously installed "PMB" is higher than that your camcorder is displayed by clicking [Help] - [About PMB].) Compare the version number of the supplied CD-ROM with a computer US 27 Saving movies and photos with that of the previously installed "PMB," check to ...
... (OTHERS) [USB CONNECT]. The [USB SELECT] screen appears on the camcorder screen automatically. Touch [ USB CONNECT] on the "Handycam Handbook." Confirm that of the "PMB" of your camcorder, uninstall "PMB" from the computer and then re-install it in order, from the lower to... number of the previously installed "PMB" is higher than that your camcorder is displayed by clicking [Help] - [About PMB].) Compare the version number of the supplied CD-ROM with a computer US 27 Saving movies and photos with that of the previously installed "PMB," check to ...

Operating Guide
Page 29
...disc playback devices (a Blu-ray disc player, PLAYSTATION3, etc.) AVCHD format playback devices (a Sony Blu-ray disc player, PLAYSTATION3, etc.) Choosing a method and disc type Importing movies and photos to a computer (Easy PC Back-up) (p. 32) SD ... (p. 31) Ordinary DVD playback devices (a DVD player, a computer that suits your camcorder are described here. SD Standard definition image quality (SD) movie converted from high definition image quality (HD) movies or photos recorded on DVD media, such as DVD-R discs, and a high definition ...
...disc playback devices (a Blu-ray disc player, PLAYSTATION3, etc.) AVCHD format playback devices (a Sony Blu-ray disc player, PLAYSTATION3, etc.) Choosing a method and disc type Importing movies and photos to a computer (Easy PC Back-up) (p. 32) SD ... (p. 31) Ordinary DVD playback devices (a DVD player, a computer that suits your camcorder are described here. SD Standard definition image quality (SD) movie converted from high definition image quality (HD) movies or photos recorded on DVD media, such as DVD-R discs, and a high definition ...

Operating Guide
Page 31
...saved on a disc automatically. Saving movies and photos with their recorded image quality. High definition image quality (HD) movies (the default setting) will make a high definition image quality (HD) disc. Movies and photos recorded on your camcorder that have not yet been saved with...from high definition image quality (HD) movies, import movies to a computer first (p. 32), and then create a standard definition image quality (SD) disc (p. 35). Install "PMB" beforehand (p. 27), however, do not start "PMB." Connect your camcorder to another device with One Touch ...
...saved on a disc automatically. Saving movies and photos with their recorded image quality. High definition image quality (HD) movies (the default setting) will make a high definition image quality (HD) disc. Movies and photos recorded on your camcorder that have not yet been saved with...from high definition image quality (HD) movies, import movies to a computer first (p. 32), and then create a standard definition image quality (SD) disc (p. 35). Install "PMB" beforehand (p. 27), however, do not start "PMB." Connect your camcorder to another device with One Touch ...

Operating Guide
Page 32
...up can select the drive or folder where the images are imported to your camcorder, and connect it to analyze movies. In the meantime, you can be imported to your camcorder. See PMB Guide for movies and photos On the [Handycam Utility] screen in step 3 above, click [Easy PC Back-up] ... [Change]. Changing the destination drive or folder for details (p. 33). It may be saved. The [Handycam Utility] window appears on the ...
...up can select the drive or folder where the images are imported to your camcorder, and connect it to analyze movies. In the meantime, you can be imported to your camcorder. See PMB Guide for movies and photos On the [Handycam Utility] screen in step 3 above, click [Easy PC Back-up] ... [Change]. Changing the destination drive or folder for details (p. 33). It may be saved. The [Handycam Utility] window appears on the ...

Operating Guide
Page 33
...not displayed on the computer screen, click [Start] [All Programs] [Sony Picture Utility] [PMB] to start "PMB" also by putting together high definition image quality (HD) movies previously imported to your computer, and place an empty disc on the DVD drive. ... screen, click [Start] [All Programs] [Sony Picture Utility] [Help] [PMB Guide]. US 33 Saving movies and photos with . You cannot save photos on a disc. To select plural movies, hold the Ctrl key down and click thumbnails. Creating a high ...
...not displayed on the computer screen, click [Start] [All Programs] [Sony Picture Utility] [PMB] to start "PMB" also by putting together high definition image quality (HD) movies previously imported to your computer, and place an empty disc on the DVD drive. ... screen, click [Start] [All Programs] [Sony Picture Utility] [Help] [PMB Guide]. US 33 Saving movies and photos with . You cannot save photos on a disc. To select plural movies, hold the Ctrl key down and click thumbnails. Creating a high ...


