
Handycam® Handbook
Page 35
...display frame. Adjust the magnification with "PMB." To start Music Transfer, click [Start] [All Programs] [PMB] [PMB Launcher] [Export] [Music Transfer]. Magnification can magnify photos from audio CDs or MP3 files to install ...; [ERASE ALL] [YES] [YES] . You can restore them with the supplied USB cable, then touch [DOWNLOAD MUSIC] on the camcorder screen. (If the [USB SELECT] screen does not appear, touch (MENU) [Show others] [MUSIC TOOL] (under [...
...display frame. Adjust the magnification with "PMB." To start Music Transfer, click [Start] [All Programs] [PMB] [PMB Launcher] [Export] [Music Transfer]. Magnification can magnify photos from audio CDs or MP3 files to install ...; [ERASE ALL] [YES] [YES] . You can restore them with the supplied USB cable, then touch [DOWNLOAD MUSIC] on the camcorder screen. (If the [USB SELECT] screen does not appear, touch (MENU) [Show others] [MUSIC TOOL] (under [...
Handycam® Handbook
Page 57
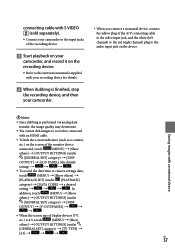
... of display devices (TV, etc.) is performed via analog data transfer, the image quality may deteriorate. You cannot dub images to the audio input jack on the screen of the A/V connecting cable to the video input jack, and the white (left channel)... [TV TYPE] [4:3] . connecting cable with S VIDEO (sold separately). Connect your camcorder to the input jacks of the recording device. Start playback on your camcorder, and record it on the recording device. Refer to the instruction manuals supplied ...
... of display devices (TV, etc.) is performed via analog data transfer, the image quality may deteriorate. You cannot dub images to the audio input jack on the screen of the A/V connecting cable to the video input jack, and the white (left channel)... [TV TYPE] [4:3] . connecting cable with S VIDEO (sold separately). Connect your camcorder to the input jacks of the recording device. Start playback on your camcorder, and record it on the recording device. Refer to the instruction manuals supplied ...
Handycam® Handbook
Page 75
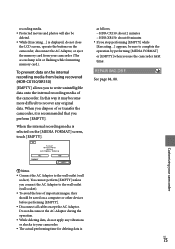
... 88. When you dispose of or transfer the camcorder, it may become more difficult to recover any vibrations or shocks to your camcorder. The actual performing time ...for deleting data is US 75 When the internal recording media is selected on a computer or other devices before performing [EMPTY]. Disconnect all cables... being recovered (HDR-CX150/XR150) [EMPTY] allows you to the wall outlet (wall socket). To avoid the loss of the camcorder. as follows; HDR-CX150: about 2 minutes HDR-XR150: about 60 ...
... 88. When you dispose of or transfer the camcorder, it may become more difficult to recover any vibrations or shocks to your camcorder. The actual performing time ...for deleting data is US 75 When the internal recording media is selected on a computer or other devices before performing [EMPTY]. Disconnect all cables... being recovered (HDR-CX150/XR150) [EMPTY] allows you to the wall outlet (wall socket). To avoid the loss of the camcorder. as follows; HDR-CX150: about 2 minutes HDR-XR150: about 60 ...
Operating Guide
Page 10
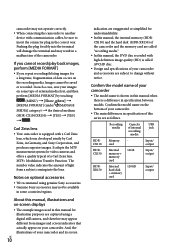
...; the desired medium (HDR-CX150/XR150) [YES] [YES] . Recording Capacity USB media of this manual, the DVD disc recorded with high definition image quality (HD) is equipped with communication cables, be saved or recorded. Memory - CX110 card Input/ output HDRCX150 Internal memory + memory card 16GB Input/ output HDRXR150 Internal hard disk + memory card 120GB...
...; the desired medium (HDR-CX150/XR150) [YES] [YES] . Recording Capacity USB media of this manual, the DVD disc recorded with high definition image quality (HD) is equipped with communication cables, be saved or recorded. Memory - CX110 card Input/ output HDRCX150 Internal memory + memory card 16GB Input/ output HDRXR150 Internal hard disk + memory card 120GB...
Operating Guide
Page 55
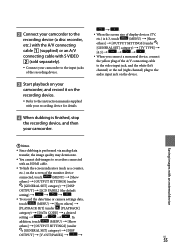
... Notes Since dubbing is performed via analog data transfer, the image quality may deteriorate. You cannot dub images to the audio input jack on the screen of the A/V connecting cable to the video input jack, and the white (left channel)...a counter, etc.) on the device. Connect your camcorder to the recording device (a disc recorder, etc.) with the A/V connecting cable (supplied) or an A/V connecting cable with S VIDEO (sold separately). Connect your camcorder to the input jacks of the recording device. Start ...
... Notes Since dubbing is performed via analog data transfer, the image quality may deteriorate. You cannot dub images to the audio input jack on the screen of the A/V connecting cable to the video input jack, and the white (left channel)...a counter, etc.) on the device. Connect your camcorder to the recording device (a disc recorder, etc.) with the A/V connecting cable (supplied) or an A/V connecting cable with S VIDEO (sold separately). Connect your camcorder to the input jacks of the recording device. Start ...


