Operating Guide
Page 5
...RECYCLING LITHIUM-ION BATTERIES Lithium-Ion batteries are located on the bottom. Regulatory Information Declaration of Conformity Trade Name: SONY Model No.: HDR-UX20 Responsible Party:Sony Electronics Inc. Telephone No.: 858-942-2230 This device complies with the specified type only. Continued , 5 .... Read this before operating your camcorder Before operating the unit, please read this manual thoroughly, and retain it for the FCC related matters only. Declaration of Conformity Trade Name: SONY Model No.: HDR-UX10 Responsible Party:Sony Electronics Inc. ACNo. For customers...
...RECYCLING LITHIUM-ION BATTERIES Lithium-Ion batteries are located on the bottom. Regulatory Information Declaration of Conformity Trade Name: SONY Model No.: HDR-UX20 Responsible Party:Sony Electronics Inc. Telephone No.: 858-942-2230 This device complies with the specified type only. Continued , 5 .... Read this before operating your camcorder Before operating the unit, please read this manual thoroughly, and retain it for the FCC related matters only. Declaration of Conformity Trade Name: SONY Model No.: HDR-UX10 Responsible Party:Sony Electronics Inc. ACNo. For customers...
Operating Guide
Page 6
... disc has a mark. The supplied interface cable must be used in order to comply with the limits for your camcorder • For recording movies, it is no guarantee that you can use Sony discs or discs with the instructions, may cause harmful interference to radio communications. For the State of California, USA...
... disc has a mark. The supplied interface cable must be used in order to comply with the limits for your camcorder • For recording movies, it is no guarantee that you can use Sony discs or discs with the instructions, may cause harmful interference to radio communications. For the State of California, USA...

Operating Guide
Page 7
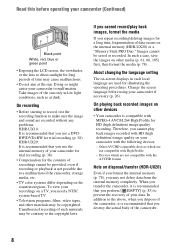
..."Memory Stick PRO" compatible equipment. • Do not attach a label or the like on the LCD screen and the viewfinder. See "About handling of your camcorder" (p. 131). • To prevent the media from being lost, do not do not affect the recording in this manual. • You cannot use . ... some tiny black points and/or bright points (white, red, blue, or green in the correct way. Viewfinder LCD screen Battery • The camcorder is lit or flashing: - to apply mechanical shock or vibration to remove the battery pack or AC Adaptor from being broken or recorded images from...
..."Memory Stick PRO" compatible equipment. • Do not attach a label or the like on the LCD screen and the viewfinder. See "About handling of your camcorder" (p. 131). • To prevent the media from being lost, do not do not affect the recording in this manual. • You cannot use . ... some tiny black points and/or bright points (white, red, blue, or green in the correct way. Viewfinder LCD screen Battery • The camcorder is lit or flashing: - to apply mechanical shock or vibration to remove the battery pack or AC Adaptor from being broken or recorded images from...
Operating Guide
Page 8
...be contrary to the copyright laws. Images cannot be copyrighted. When you transfer the camcorder, it is recommended that you cannot play back images, format the media If you may be saved or recorded. HDR-UX20: It is recommended that you perform [ EMPTY] (p. 83) to prevent the recovery... of the camcorder, storage media, etc. • TV color systems differ depending on -screen displays in low light...
...be contrary to the copyright laws. Images cannot be copyrighted. When you transfer the camcorder, it is recommended that you cannot play back images, format the media If you may be saved or recorded. HDR-UX20: It is recommended that you perform [ EMPTY] (p. 83) to prevent the recovery... of the camcorder, storage media, etc. • TV color systems differ depending on -screen displays in low light...
Operating Guide
Page 9
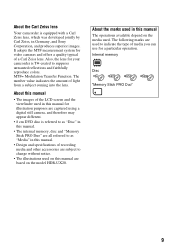
... to indicate the type of light from a subject coming into the lens. About the Carl Zeiss lens Your camcorder is equipped with a Carl Zeiss lens, which was developed jointly by Carl Zeiss, in this manual. •...Memory Stick PRO Duo" are used . The following marks are all referred to as "Media" in Germany, and Sony Corporation, and produces superior images. It adopts the MTF measurement system for illustration purposes are captured using a digital ... "Disc" in this manual The operations available depend on the model HDR-UX20. Internal memory Disc "Memory Stick PRO Duo" 9
... to indicate the type of light from a subject coming into the lens. About the Carl Zeiss lens Your camcorder is equipped with a Carl Zeiss lens, which was developed jointly by Carl Zeiss, in this manual. •...Memory Stick PRO Duo" are used . The following marks are all referred to as "Media" in Germany, and Sony Corporation, and produces superior images. It adopts the MTF measurement system for illustration purposes are captured using a digital ... "Disc" in this manual The operations available depend on the model HDR-UX20. Internal memory Disc "Memory Stick PRO Duo" 9
Operating Guide
Page 10
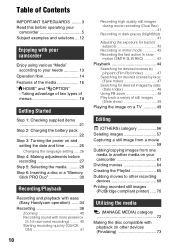
... Deleting images 57 Capturing a still image from a movie 59 Dubbing/copying images from one media to another media on your camcorder 61 Dividing movies 64 Creating the Playlist 65 Dubbing movies to other recording devices 68 Printing recorded still images (PictBridge compliant printer...the media ......... 28 Step 6: Inserting a disc or a "Memory Stick PRO Duo 30 Recording/Playback Recording and playback with ease (Easy Handycam operation) ...... 34 Recording 38 Zooming 40 Recording sound with more presence (5.1ch surround recording) ......... 40 Starting recording quickly (QUICK ON 41...
... Deleting images 57 Capturing a still image from a movie 59 Dubbing/copying images from one media to another media on your camcorder 61 Dividing movies 64 Creating the Playlist 65 Dubbing movies to other recording devices 68 Printing recorded still images (PictBridge compliant printer...the media ......... 28 Step 6: Inserting a disc or a "Memory Stick PRO Duo 30 Recording/Playback Recording and playback with ease (Easy Handycam operation) ...... 34 Recording 38 Zooming 40 Recording sound with more presence (5.1ch surround recording) ......... 40 Starting recording quickly (QUICK ON 41...
Operating Guide
Page 11
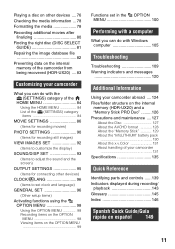
...(DISC SELECT GUIDE 81 Repairing the image database file 82 Preventing data on the internal memory of the camcorder from being recovered (HDR-UX20) .... 83 Customizing your camcorder What you can do with the (SETTINGS) category of the HOME MENU 84 Using the HOME MENU ...can do with Windows computer 105 Troubleshooting Troubleshooting 109 Warning indicators and messages 120 Additional Information Using your camcorder abroad ....124 Files/folder structure on the internal memory (HDR-UX20) and a "Memory Stick PRO Duo" .........126 Precautions and maintenance ....127 About the Disc 127 ...
...(DISC SELECT GUIDE 81 Repairing the image database file 82 Preventing data on the internal memory of the camcorder from being recovered (HDR-UX20) .... 83 Customizing your camcorder What you can do with the (SETTINGS) category of the HOME MENU 84 Using the HOME MENU ...can do with Windows computer 105 Troubleshooting Troubleshooting 109 Warning indicators and messages 120 Additional Information Using your camcorder abroad ....124 Files/folder structure on the internal memory (HDR-UX20) and a "Memory Stick PRO Duo" .........126 Precautions and maintenance ....127 About the Disc 127 ...
Operating Guide
Page 13
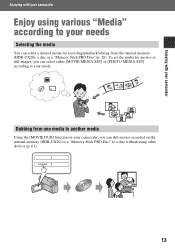
... a desired media for recording/playback/editing from one media to another media Using the [MOVIE DUB] function on your camcorder, you can dub movies recorded on the internal memory (HDR-UX20) or a "Memory Stick PRO Duo" to a disc without using various "Media" according to your needs Selecting the... media You can select either [MOVIE MEDIA SET] or [PHOTO MEDIA SET] according to your camcorder Enjoy using other devices (p. 61). 13...
... a desired media for recording/playback/editing from one media to another media Using the [MOVIE DUB] function on your camcorder, you can dub movies recorded on the internal memory (HDR-UX20) or a "Memory Stick PRO Duo" to a disc without using various "Media" according to your needs Selecting the... media You can select either [MOVIE MEDIA SET] or [PHOTO MEDIA SET] according to your camcorder Enjoy using other devices (p. 61). 13...

Operating Guide
Page 14
For details on how to your camcorder (p. 38) Your camcorder is compatible with SD (standard definition) image quality. • "AVCHD 1080i format" is the AVCHD format "1440 × 1080/60i." B Record using your needs. b Notes • The default setting is [HD SP] which is abbreviated as "...
For details on how to your camcorder (p. 38) Your camcorder is compatible with SD (standard definition) image quality. • "AVCHD 1080i format" is the AVCHD format "1440 × 1080/60i." B Record using your needs. b Notes • The default setting is [HD SP] which is abbreviated as "...

Operating Guide
Page 15
... disc or a "Memory Stick PRO Duo" with HD (high definition) image quality on the device. x Playing on AVCHD format compatible devices If your camcorder (p. 61) x Dubbing movies to other recording devices (p. 68) x Editing images on a computer (p. 105) Using the supplied application software "Picture Motion... (p. 50). • You can enjoy movies recorded with HD (high definition) image quality into a DVD based player/recorder. Enjoying with your camcorder B View movies recorded with HD (high definition) image quality x Viewing on a high definition TV You can also view movies on a non-high...
... disc or a "Memory Stick PRO Duo" with HD (high definition) image quality on the device. x Playing on AVCHD format compatible devices If your camcorder (p. 61) x Dubbing movies to other recording devices (p. 68) x Editing images on a computer (p. 105) Using the supplied application software "Picture Motion... (p. 50). • You can enjoy movies recorded with HD (high definition) image quality into a DVD based player/recorder. Enjoying with your camcorder B View movies recorded with HD (high definition) image quality x Viewing on a high definition TV You can also view movies on a non-high...

Operating Guide
Page 16
Also, you can save images on the internal memory (HDR-UX20) or DVD-RW, DVD+RW, DVDR, and DVD+R DL discs of 8 cm in a DVD drive on a computer. For details on a "Memory Stick PRO Duo." Disc ... other devices (73) a Making additional recordings on a finalized disc (80) a Formatting the used disc to use it again (79) a a a - - a a a a - - Deleting or editing images on your camcorder (57, 64) a Finalizing required to malfunction. 16 a - - - Features of the media You can save images on the compatibility of the "Memory Stick" types, see page 6.
Also, you can save images on the internal memory (HDR-UX20) or DVD-RW, DVD+RW, DVDR, and DVD+R DL discs of 8 cm in a DVD drive on a computer. For details on a "Memory Stick PRO Duo." Disc ... other devices (73) a Making additional recordings on a finalized disc (80) a Formatting the used disc to use it again (79) a a a - - a a a a - - Deleting or editing images on your camcorder (57, 64) a Finalizing required to malfunction. 16 a - - - Features of the media You can save images on the compatibility of the "Memory Stick" types, see page 6.

Operating Guide
Page 17
b Notes • The aspect ratio of images recorded with your camcorder Recording time of movies Approximate recordable time in minutes on the internal memory (HDR-UX20) and one side of the AVCHD format. This technology causes fluctuations in the table show the average bit rate. Enjoying ...). • For details on recordable time for movies on the setting of [REC MODE] (p. 86). ( ): the minimum recording time Media type Internal memory (HDR-UX20) HD (high definition) image quality AVC HD 16M (FH)* (highest quality) AVC HD 14M (FS)* (highest quality) AVC HD 9M (HQ)** (high quality...
b Notes • The aspect ratio of images recorded with your camcorder Recording time of movies Approximate recordable time in minutes on the internal memory (HDR-UX20) and one side of the AVCHD format. This technology causes fluctuations in the table show the average bit rate. Enjoying ...). • For details on recordable time for movies on the setting of [REC MODE] (p. 86). ( ): the minimum recording time Media type Internal memory (HDR-UX20) HD (high definition) image quality AVC HD 16M (FH)* (highest quality) AVC HD 14M (FS)* (highest quality) AVC HD 9M (HQ)** (high quality...

Operating Guide
Page 18
...starting point for operations with your camcorder (p. 84). *1 You can also set this menu item when the setting of [MOVIE MEDIA SET] is assigned to the internal memory (HDR-UX20) or the "Memory Stick." *3 This function can set these items during Easy Handycam operation (p. 34). Category B ... REPAIR IMG.DB F. 82 (SETTINGS) category*1 To customize your camcorder (HELP) Displays a description of menus " HOME MENU" - For the items available in the (SETTINGS), see page 84. *2 During Easy Handycam operation, you can be used on HDR-UX20. 18 " HOME" and " OPTION" - Taking advantage of ...
...starting point for operations with your camcorder (p. 84). *1 You can also set this menu item when the setting of [MOVIE MEDIA SET] is assigned to the internal memory (HDR-UX20) or the "Memory Stick." *3 This function can set these items during Easy Handycam operation (p. 34). Category B ... REPAIR IMG.DB F. 82 (SETTINGS) category*1 To customize your camcorder (HELP) Displays a description of menus " HOME MENU" - For the items available in the (SETTINGS), see page 84. *2 During Easy Handycam operation, you can be used on HDR-UX20. 18 " HOME" and " OPTION" - Taking advantage of ...
Operating Guide
Page 19
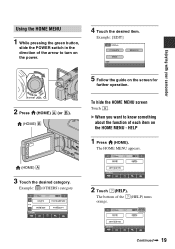
... on the screen for further operation. Continued , 19 HELP 1 Press (HOME). Example: [EDIT] 2 Press (HOME) A (or B). (HOME) B (HOME) A 3 Touch the desired category. Enjoying with your camcorder Using the HOME MENU 1 While pressing the green button, slide the POWER switch in the direction of the arrow to know something about the function...
... on the screen for further operation. Continued , 19 HELP 1 Press (HOME). Example: [EDIT] 2 Press (HOME) A (or B). (HOME) B (HOME) A 3 Touch the desired category. Enjoying with your camcorder Using the HOME MENU 1 While pressing the green button, slide the POWER switch in the direction of the arrow to know something about the function...

Operating Guide
Page 21
The number in the parentheses indicates the number of that you have the following items supplied with your camcorder. Picture Motion Browser (Software) - PMB Guide "Operating Guide" (This manual) (1) Component A/V cable (1) (p. 51, 53) Getting Started A/V connecting cable (1) (p. 53, 68) USB cable (1) (p. 69, 70) Wireless ... Step 1: Checking supplied items Make sure that item supplied. AC Adaptor (1) (p. 22) Rechargeable battery pack NP-FH60 (1) (p. 22) Power cord (Mains lead) (1) (p. 22) CD-ROM "Handycam Application Software" (1) (p. 105) -
The number in the parentheses indicates the number of that you have the following items supplied with your camcorder. Picture Motion Browser (Software) - PMB Guide "Operating Guide" (This manual) (1) Component A/V cable (1) (p. 51, 53) Getting Started A/V connecting cable (1) (p. 53, 68) USB cable (1) (p. 69, 70) Wireless ... Step 1: Checking supplied items Make sure that item supplied. AC Adaptor (1) (p. 22) Rechargeable battery pack NP-FH60 (1) (p. 22) Power cord (Mains lead) (1) (p. 22) CD-ROM "Handycam Application Software" (1) (p. 105) -
Operating Guide
Page 22
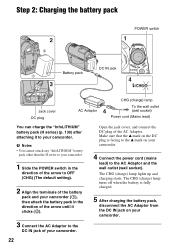
...) You can charge the "InfoLITHIUM" battery pack (H series) (p. 130) after attaching it clicks (2). 3 Connect the AC Adaptor to the DC IN jack of your camcorder. Open the jack cover, and connect the DC plug of the arrow until it to OFF (CHG) (The default setting). 2 Align the terminals of the... battery pack and your camcorder (1), then attach the battery pack in the direction of the AC Adaptor. b Notes • You cannot attach any "InfoLITHIUM" battery pack other than the H ...
...) You can charge the "InfoLITHIUM" battery pack (H series) (p. 130) after attaching it clicks (2). 3 Connect the AC Adaptor to the DC IN jack of your camcorder. Open the jack cover, and connect the DC plug of the arrow until it to OFF (CHG) (The default setting). 2 Align the terminals of the... battery pack and your camcorder (1), then attach the battery pack in the direction of the AC Adaptor. b Notes • You cannot attach any "InfoLITHIUM" battery pack other than the H ...

Operating Guide
Page 23
... quality. Continued , 23 Recording capacity (approx.) Charging time Approximate time (min.) required when you use a power source from the DC IN jack holding both the camcorder and the DC plug. To use a fully charged battery pack. To remove the battery pack 1 Slide the POWER switch to OFF (CHG), then press DISP...
... quality. Continued , 23 Recording capacity (approx.) Charging time Approximate time (min.) required when you use a power source from the DC IN jack holding both the camcorder and the DC plug. To use a fully charged battery pack. To remove the battery pack 1 Slide the POWER switch to OFF (CHG), then press DISP...

Operating Guide
Page 25
...) is disconnected from the wall outlet (wall socket) immediately if any metallic objects. On the charging/recording/playback time • Times measured when using this camcorder for the first time, go to step 3. 2 Touch (HOME) t (SETTINGS) t [CLOCK/ LANG] t [CLOCK SET]. Disconnect the AC Adaptor ... while connected to the wall outlet (wall socket) via the AC Adaptor. This may cause a malfunction. • Even if your camcorder on the conditions under which only allows short recording and playback times, with any malfunction occurs while using the AC Adaptor. Getting Started ...
...) is disconnected from the wall outlet (wall socket) immediately if any metallic objects. On the charging/recording/playback time • Times measured when using this camcorder for the first time, go to step 3. 2 Touch (HOME) t (SETTINGS) t [CLOCK/ LANG] t [CLOCK SET]. Disconnect the AC Adaptor ... while connected to the wall outlet (wall socket) via the AC Adaptor. This may cause a malfunction. • Even if your camcorder on the conditions under which only allows short recording and playback times, with any malfunction occurs while using the AC Adaptor. Getting Started ...
Operating Guide
Page 26
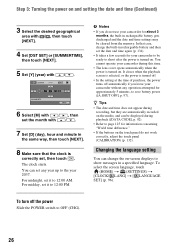
... the setting at the time of purchase, the power turns off the power Slide the POWER switch to the year 2037. You cannot operate your camcorder during recording, but they are automatically recorded on the media, and can set any operation attempted for approximately 5 minutes, to save battery power ([A.SHUT ... then set the date and time again (p. 134). • It takes a few seconds for your camcorder to be ready to shoot after the power is turned on the touch panel do not use your camcorder for about 3 months, the built-in rechargeable battery gets discharged and the date and time settings...
... the setting at the time of purchase, the power turns off the power Slide the POWER switch to the year 2037. You cannot operate your camcorder during recording, but they are automatically recorded on the media, and can set any operation attempted for approximately 5 minutes, to save battery power ([A.SHUT ... then set the date and time again (p. 134). • It takes a few seconds for your camcorder to be ready to shoot after the power is turned on the touch panel do not use your camcorder for about 3 months, the built-in rechargeable battery gets discharged and the date and time settings...
Operating Guide
Page 27
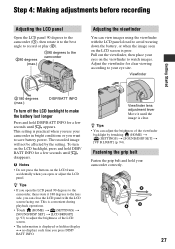
... the grip belt and hold your eye site. Step 4: Making adjustments before recording Adjusting the LCD panel Open the LCD panel 90 degrees to the camcorder (1), then rotate it 180 degrees to the lens side, you can close the LCD panel with the LCD panel closed to avoid wearing down the... until appears. z Tips • You can adjust the brightness of the LCD screen. • The information is clear. Pull out the viewfinder, then place your camcorder in bright conditions or you press DISP/ BATT INFO. b Notes • Do not press the buttons on the viewfinder to your...
... the grip belt and hold your eye site. Step 4: Making adjustments before recording Adjusting the LCD panel Open the LCD panel 90 degrees to the camcorder (1), then rotate it 180 degrees to the lens side, you can close the LCD panel with the LCD panel closed to avoid wearing down the... until appears. z Tips • You can adjust the brightness of the LCD screen. • The information is clear. Pull out the viewfinder, then place your camcorder in bright conditions or you press DISP/ BATT INFO. b Notes • Do not press the buttons on the viewfinder to your...


