Operating Guide
Page 5
... for a digital device pursuant to radio communications. For the State of Conformity Trade Name: SONY Model No.: HDR-SR8 Responsible Party: Sony Electronics Inc. However, there is on use • The camcorder is not possible due to be copyrighted. 5 Connect the equipment into the terminal will not...in order to provide reasonable protection against harmful interference in accordance with the Handycam Station Model DCRAC181 and AC Adaptor Model AC-L200/L200B. Notes HDR-SR5, HDR-SR7 and HDR-SR8 are recorded without any changes or modifications not expressly approved in this ...
... for a digital device pursuant to radio communications. For the State of Conformity Trade Name: SONY Model No.: HDR-SR8 Responsible Party: Sony Electronics Inc. However, there is on use • The camcorder is not possible due to be copyrighted. 5 Connect the equipment into the terminal will not...in order to provide reasonable protection against harmful interference in accordance with the Handycam Station Model DCRAC181 and AC Adaptor Model AC-L200/L200B. Notes HDR-SR5, HDR-SR7 and HDR-SR8 are recorded without any changes or modifications not expressly approved in this ...
Operating Guide
Page 6
... indicated, illustrations in this case, an indicator appears in the viewfinder (HDR-SR7/SR8) or on disposal/transfer • Even if you perform [ FORMAT]* or formatting the hard disk of the camcorder, you do so, your camcorder may be stopped. About this function is more than 3,000 meters (9,... drop sensor • To protect the internal hard disk from the hard disk completely. About language setting • The on the camcorder, due to "Handycam Handbook" (PDF) and "Picture Motion Browser Guide." It is recommended that you save the image data on external media. Also, you...
... indicated, illustrations in this case, an indicator appears in the viewfinder (HDR-SR7/SR8) or on disposal/transfer • Even if you perform [ FORMAT]* or formatting the hard disk of the camcorder, you do so, your camcorder may be stopped. About this function is more than 3,000 meters (9,... drop sensor • To protect the internal hard disk from the hard disk completely. About language setting • The on the camcorder, due to "Handycam Handbook" (PDF) and "Picture Motion Browser Guide." It is recommended that you save the image data on external media. Also, you...
Operating Guide
Page 7
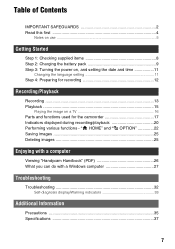
... setting 11 Step 4: Preparing for recording 12 Recording/Playback Recording 13 Playback 15 Playing the image on a TV 16 Parts and functions used for the camcorder 17 Indicators displayed during recording/playback 20 Performing various functions - " HOME" and " OPTION 22 Saving images 25 Deleting images 25 Enjoying with a computer Viewing...
... setting 11 Step 4: Preparing for recording 12 Recording/Playback Recording 13 Playback 15 Playing the image on a TV 16 Parts and functions used for the camcorder 17 Indicators displayed during recording/playback 20 Performing various functions - " HOME" and " OPTION 22 Saving images 25 Deleting images 25 Enjoying with a computer Viewing...

Operating Guide
Page 8
... Software" (1) (p. 26) - Picture Motion Browser (Software) - AC Adaptor (1) (p. 9) Wireless Remote Commander (1) A button-type lithium battery is already installed. Picture Motion Browser Guide - Handycam Handbook (PDF) "Operating Guide" (This manual) (1) 8 Remove the insulation sheet before using the Remote Commander. The number in the parentheses indicates the number of that ...
... Software" (1) (p. 26) - Picture Motion Browser (Software) - AC Adaptor (1) (p. 9) Wireless Remote Commander (1) A button-type lithium battery is already installed. Picture Motion Browser Guide - Handycam Handbook (PDF) "Operating Guide" (This manual) (1) 8 Remove the insulation sheet before using the Remote Commander. The number in the parentheses indicates the number of that ...
Operating Guide
Page 9
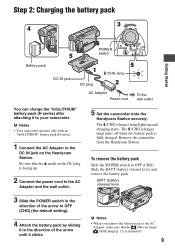
... battery pack by sliding it in the direction of the arrow until it to your camcorder. b Notes • When you remove the battery pack or the AC Adaptor, make sure that the v mark on the Handycam Station. The /CHG (charge) lamp turns off when the battery pack is turned off.... 9 To remove the battery pack Slide the POWER switch to the AC Adaptor and the wall outlet. 5 Set the camcorder onto the Handycam Station securely. Slide the BATT (battery release) lever and remove the battery pack. Step 2: Charging the battery pack 3 4 Getting Started Battery pack...
... battery pack by sliding it in the direction of the arrow until it to your camcorder. b Notes • When you remove the battery pack or the AC Adaptor, make sure that the v mark on the Handycam Station. The /CHG (charge) lamp turns off when the battery pack is turned off.... 9 To remove the battery pack Slide the POWER switch to the AC Adaptor and the wall outlet. 5 Set the camcorder onto the Handycam Station securely. Slide the BATT (battery release) lever and remove the battery pack. Step 2: Charging the battery pack 3 4 Getting Started Battery pack...
Operating Guide
Page 10
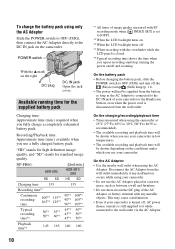
To charge the battery pack using the AC Adaptor. NP-FH60: HDR-SR5 HD SD (Unit:min.) HDR-SR7/ SR8 HD SD Charging time 135 Recording time*1 Continuous recording time 100*2 115*2 105*3 125*3...mode when [ INDEX SET] is set to 86°F) is connected to the DC IN jack of your camcorder. On the AC Adaptor • Use the nearby wall outlet when using only the AC Adaptor Slide the...) lamp/ (Still) lamp (p. 11). • The power will be shorter when you use your camcorder or the Handycam Station, even when the power cord is still supplied to it while connected to the DC IN jack ...
To charge the battery pack using the AC Adaptor. NP-FH60: HDR-SR5 HD SD (Unit:min.) HDR-SR7/ SR8 HD SD Charging time 135 Recording time*1 Continuous recording time 100*2 115*2 105*3 125*3...mode when [ INDEX SET] is set to 86°F) is connected to the DC IN jack of your camcorder. On the AC Adaptor • Use the nearby wall outlet when using only the AC Adaptor Slide the...) lamp/ (Still) lamp (p. 11). • The power will be shorter when you use your camcorder or the Handycam Station, even when the power cord is still supplied to it while connected to the DC IN jack ...
Operating Guide
Page 11
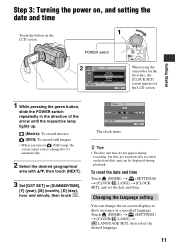
... a specified language. Step 3: Turning the power on, and setting the date and time 1 Touch the button on the LCD screen. POWER switch When using the camcorder for the first time, the [CLOCK SET] screen appears on the LCD screen.
... a specified language. Step 3: Turning the power on, and setting the date and time 1 Touch the button on the LCD screen. POWER switch When using the camcorder for the first time, the [CLOCK SET] screen appears on the LCD screen.
Operating Guide
Page 12
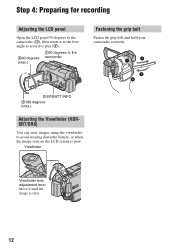
Step 4: Preparing for recording Adjusting the LCD panel Open the LCD panel 90 degrees to the camcorder (1), then rotate it until the image is poor. Viewfinder Viewfinder lens adjustment lever Move it to the best angle to record or play (2). 290 degrees (max.) 190 degrees to avoid wearing down the battery, or when the image seen on the LCD screen is clear. 12 DISP/BATT INFO 2180 degrees (max.) Adjusting the Viewfinder (HDRSR7/SR8) You can view images using the viewfinder to the camcorder Fastening the grip belt Fasten the grip belt and hold your camcorder correctly.
Step 4: Preparing for recording Adjusting the LCD panel Open the LCD panel 90 degrees to the camcorder (1), then rotate it until the image is poor. Viewfinder Viewfinder lens adjustment lever Move it to the best angle to record or play (2). 290 degrees (max.) 190 degrees to avoid wearing down the battery, or when the image seen on the LCD screen is clear. 12 DISP/BATT INFO 2180 degrees (max.) Adjusting the Viewfinder (HDRSR7/SR8) You can view images using the viewfinder to the camcorder Fastening the grip belt Fasten the grip belt and hold your camcorder correctly.
Operating Guide
Page 13
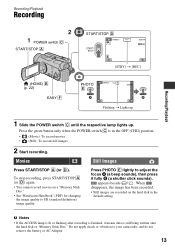
... Duo." appears beside / . When disappears, the image has been recorded. • Still images are recorded on a "Memory Stick Duo." • See "Handycam Handbook" (PDF) for changing the image quality to SD (standard definition) image quality. Do not apply shock or vibration to adjust the focus A (a beep ...sounds), then press it means data is in the default setting. Press PHOTO E lightly to your camcorder, and do not remove the battery or AC Adaptor. 13 b Notes • If the ACCESS lamp is lit or flashing after recording is finished...
... Duo." appears beside / . When disappears, the image has been recorded. • Still images are recorded on a "Memory Stick Duo." • See "Handycam Handbook" (PDF) for changing the image quality to SD (standard definition) image quality. Do not apply shock or vibration to adjust the focus A (a beep ...sounds), then press it means data is in the default setting. Press PHOTO E lightly to your camcorder, and do not remove the battery or AC Adaptor. 13 b Notes • If the ACCESS lamp is lit or flashing after recording is finished...
Operating Guide
Page 14
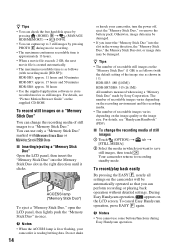
...Stick Duo" (1 GB) is lit or flashing, your camcorder, turn the power off, eject the "Memory Stick Duo," or remove the battery pack. HDR-SR5: 480 ([4.0M]) HDR-SR7/SR8: 315 ([6.1M]) All numbers measured when using a "Memory Stick Duo" made by Sony Corporation. b Notes • You cannot use only ...on the image quality or the image size. Your camcorder returns to save still images, then touch . To cancel Easy Handycam operation, press EASY F again. HDR-SR5: approx. 11 hours and 50 minutes HDR-SR7: approx. 17 hours and 50 minutes HDR-SR8: approx. 30 hours • Use the supplied ...
...Stick Duo" (1 GB) is lit or flashing, your camcorder, turn the power off, eject the "Memory Stick Duo," or remove the battery pack. HDR-SR5: 480 ([4.0M]) HDR-SR7/SR8: 315 ([6.1M]) All numbers measured when using a "Memory Stick Duo" made by Sony Corporation. b Notes • You cannot use only ...on the image quality or the image size. Your camcorder returns to save still images, then touch . To cancel Easy Handycam operation, press EASY F again. HDR-SR5: approx. 11 hours and 50 minutes HDR-SR7: approx. 17 hours and 50 minutes HDR-SR8: approx. 30 hours • Use the supplied ...
Operating Guide
Page 15
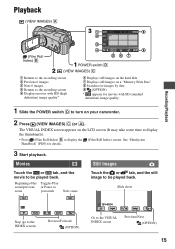
See "Handycam Handbook" (PDF) for movies with HD (high definition) image quality* 6 Displays still images on the hard disk 7 Displays still images on a "Memory Stick Duo" 8 Searches ... 2 Previous 6 images 3 Next 6 images 4 Returns to the recording screen 5 Displays movies with SD (standard definition) image quality. 1 Slide the POWER switch D to turn on your camcorder. 2 Press (VIEW IMAGES) C (or A). Slide show Stop (go to the INDEX screen) Reverse/Forward (OPTION) Go to display the (Film Roll Index) screen. Movies Still...
See "Handycam Handbook" (PDF) for movies with HD (high definition) image quality* 6 Displays still images on the hard disk 7 Displays still images on a "Memory Stick Duo" 8 Searches ... 2 Previous 6 images 3 Next 6 images 4 Returns to the recording screen 5 Displays movies with SD (standard definition) image quality. 1 Slide the POWER switch D to turn on your camcorder. 2 Press (VIEW IMAGES) C (or A). Slide show Stop (go to the INDEX screen) Reverse/Forward (OPTION) Go to display the (Film Roll Index) screen. Movies Still...
Operating Guide
Page 16
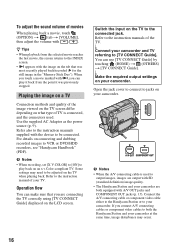
...jack. Switch the input on the TV to both equipped with i, you can play back on the tab that you are both the Handycam Station and your camcorder. If you touch a movie marked with A/V OUT jacks and COMPONENT OUT jacks (p. 17). Use the supplied AC Adaptor as the...connected. Refer also to output images, images are output with SD (standard definition) image quality. • The Handycam Station and your camcorder. r Make the required output settings on your camcorder are connecting the TV correctly using [TV CONNECT Guide] displayed on what type of the TV. z Tips &#...
...jack. Switch the input on the TV to both equipped with i, you can play back on the tab that you are both the Handycam Station and your camcorder. If you touch a movie marked with A/V OUT jacks and COMPONENT OUT jacks (p. 17). Use the supplied AC Adaptor as the...connected. Refer also to output images, images are output with SD (standard definition) image quality. • The Handycam Station and your camcorder. r Make the required output settings on your camcorder are connecting the TV correctly using [TV CONNECT Guide] displayed on what type of the TV. z Tips &#...
Operating Guide
Page 17
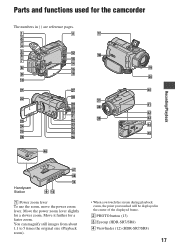
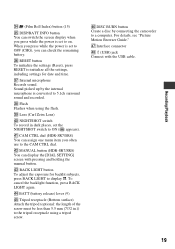
You can magnify still images from about 1.1 to 5 times the original size (Playback zoom). • When you touch the screen during playback zoom, the point you touched will be displayed in ( ) are reference pages. Parts and functions used for the camcorder The numbers in the center of the displayed frame. 2 PHOTO button (13) 3 Eyecup (HDR-SR7/SR8) 4 Viewfinder (12) (HDR-SR7/SR8) 17 Move the power zoom lever slightly for a faster zoom. Recording/Playback Handycam Station 1 Power zoom lever To use the zoom, move the power zoom lever. Move it further for a slower zoom.
You can magnify still images from about 1.1 to 5 times the original size (Playback zoom). • When you touch the screen during playback zoom, the point you touched will be displayed in ( ) are reference pages. Parts and functions used for the camcorder The numbers in the center of the displayed frame. 2 PHOTO button (13) 3 Eyecup (HDR-SR7/SR8) 4 Viewfinder (12) (HDR-SR7/SR8) 17 Move the power zoom lever slightly for a faster zoom. Recording/Playback Handycam Station 1 Power zoom lever To use the zoom, move the power zoom lever. Move it further for a slower zoom.
Operating Guide
Page 18
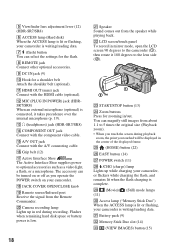
.../touch panel To record in mirror mode, open the LCD screen 90 degrees to the camcorder (1), then rotate it takes precedence over the internal microphone (p. 19). 5 Viewfinder lens adjustment lever (12) (HDR-SR7/SR8) 6 ACCESS lamp (Hard disk) When the ACCESS lamp is lit or flashing, your... camcorder is writing/reading data. 7 (flash) button You can select the settings for the flash. 8 REMOTE jack ...
.../touch panel To record in mirror mode, open the LCD screen 90 degrees to the camcorder (1), then rotate it takes precedence over the internal microphone (p. 19). 5 Viewfinder lens adjustment lever (12) (HDR-SR7/SR8) 6 ACCESS lamp (Hard disk) When the ACCESS lamp is lit or flashing, your... camcorder is writing/reading data. 7 (flash) button You can select the settings for the flash. 8 REMOTE jack ...
Operating Guide
Page 19
... the settings, including settings for backlit subjects, press BACK LIGHT to a computer. ek Flash Flashes when using a tripod screw. ra CAM CTRL dial (HDR-SR7/SR8) You can display the [DIAL SETTING] screen with the USB cable. 19 rd BACK LIGHT button To adjust the exposure for date and time. Sound... picked up by connecting the camcorder to display .. rs MANUAL button (HDR-SR7/SR8) You can assign one menu item you press while the power is set the NIGHTSHOT switch to on. rf BATT (battery release...
... the settings, including settings for backlit subjects, press BACK LIGHT to a computer. ek Flash Flashes when using a tripod screw. ra CAM CTRL dial (HDR-SR7/SR8) You can display the [DIAL SETTING] screen with the USB cable. 19 rd BACK LIGHT button To adjust the exposure for date and time. Sound... picked up by connecting the camcorder to display .. rs MANUAL button (HDR-SR7/SR8) You can assign one menu item you press while the power is set the NIGHTSHOT switch to on. rf BATT (battery release...
Operating Guide
Page 21
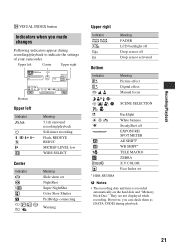
... Indicator Bottom Indicator 9 Meaning FADER LCD backlight off Drop sensor off EXPOSURE/ SPOT METER AE SHIFT* WB SHIFT* TELE MACRO ZEBRA X.V.COLOR Face Index set * HDR-SR7/SR8 b Notes • The recording date and time is recorded automatically on the hard disk and "Memory Stick Duo." Recording/Playback X VISUAL INDEX button Indicators...
... Indicator Bottom Indicator 9 Meaning FADER LCD backlight off Drop sensor off EXPOSURE/ SPOT METER AE SHIFT* WB SHIFT* TELE MACRO ZEBRA X.V.COLOR Face Index set * HDR-SR7/SR8 b Notes • The recording date and time is recorded automatically on the hard disk and "Memory Stick Duo." Recording/Playback X VISUAL INDEX button Indicators...
Operating Guide
Page 22
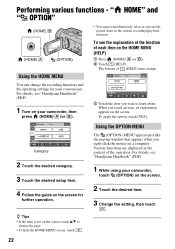
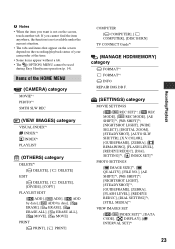
... MENU (HELP) 1 Press (HOME) A (or B). 2 Touch (HELP). For details, see the explanation of the function of each item on your camcorder, touch (OPTION) on the screen. Various functions are displayed in the current recording/playback situation. The bottom of the operation. You can change the page.... • To hide the HOME MENU screen, touch . To see "Handycam Handbook" (PDF). 1 While using your camcorder, then press (HOME) A (or B). 3 Touch the item you touch an item, its explanation appears on the screen. 2 Touch the...
... MENU (HELP) 1 Press (HOME) A (or B). 2 Touch (HELP). For details, see the explanation of the function of each item on your camcorder, touch (OPTION) on the screen. Various functions are displayed in the current recording/playback situation. The bottom of the operation. You can change the page.... • To hide the HOME MENU screen, touch . To see "Handycam Handbook" (PDF). 1 While using your camcorder, then press (HOME) A (or B). 3 Touch the item you touch an item, its explanation appears on the screen. 2 Touch the...
Operating Guide
Page 23
... items that appear on the screen depend on the screen, touch another tab. Items of your camcorder at the time. • Some items appear without a tab. • The (OPTION) MENU cannot be used during Easy Handycam operation (p. 14). b Notes • When the item you cannot find the item anywhere, the function is...
... items that appear on the screen depend on the screen, touch another tab. Items of your camcorder at the time. • Some items appear without a tab. • The (OPTION) MENU cannot be used during Easy Handycam operation (p. 14). b Notes • When the item you cannot find the item anywhere, the function is...
Operating Guide
Page 25
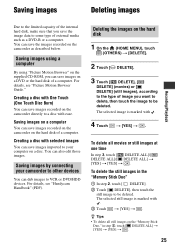
...[ DELETE]. 3 Touch [ DELETE], [ DELETE] (movies) or [ DELETE] (still images), according to the type of image you save images recorded on the camcorder on the hard disk of a computer. For details, see "Picture Motion Browser Guide." Deleting the images on a DVD or the hard disk of a computer.... touch [ DELETE]. 2 Touch [ DELETE], then touch the still image to be deleted. Creating a disc with ease. For details, see "Handycam Handbook" (PDF). Saving images Deleting images Recording/Playback Due to the limited capacity of the internal hard disk, make sure that you want to...
...[ DELETE]. 3 Touch [ DELETE], [ DELETE] (movies) or [ DELETE] (still images), according to the type of image you save images recorded on the camcorder on the hard disk of a computer. For details, see "Picture Motion Browser Guide." Deleting the images on a DVD or the hard disk of a computer.... touch [ DELETE]. 2 Touch [ DELETE], then touch the still image to be deleted. Creating a disc with ease. For details, see "Handycam Handbook" (PDF). Saving images Deleting images Recording/Playback Due to the limited capacity of the internal hard disk, make sure that you want to...
Operating Guide
Page 26
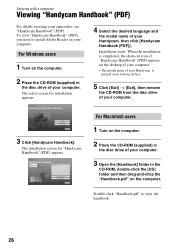
... need to view the handbook. 26 Installation starts. Double-click "Handbook.pdf" to install Adobe Reader on the computer. The select screen for "Handycam Handbook" (PDF) appears. For Macintosh users 1 Turn on the computer. 2 Place the CD-ROM (supplied) in the disc drive of your... computer. 3 Open the [Handbook] folder in the disc drive of your camcorder, see "Handycam Handbook" (PDF). The installation screen for installation appears. 4 Select the desired language and the model name of your computer. Enjoying with a...
... need to view the handbook. 26 Installation starts. Double-click "Handbook.pdf" to install Adobe Reader on the computer. The select screen for "Handycam Handbook" (PDF) appears. For Macintosh users 1 Turn on the computer. 2 Place the CD-ROM (supplied) in the disc drive of your... computer. 3 Open the [Handbook] folder in the disc drive of your camcorder, see "Handycam Handbook" (PDF). The installation screen for installation appears. 4 Select the desired language and the model name of your computer. Enjoying with a...


