Operating Guide
Page 6
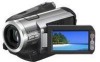
...Memory Stick PRO" compatible equipment. • Do not attach a label or the like on use "Memory Stick Duo" marked with . Your camcorder is supplied with "Memory Stick" compatible equipment Be sure to a computer (stored on a circuit different from that interference will not occur in ... television reception, which the receiver is connected. - The supplied interface cable must be used with the equipment in your camcorder.) • You cannot use mini DV cassettes marked with or (p. 93). These limits are designed to Subpart B of Part 15 of California, USA only ...
...Memory Stick PRO" compatible equipment. • Do not attach a label or the like on use "Memory Stick Duo" marked with . Your camcorder is supplied with "Memory Stick" compatible equipment Be sure to a computer (stored on a circuit different from that interference will not occur in ... television reception, which the receiver is connected. - The supplied interface cable must be used with the equipment in your camcorder.) • You cannot use mini DV cassettes marked with or (p. 93). These limits are designed to Subpart B of Part 15 of California, USA only ...
Operating Guide
Page 8
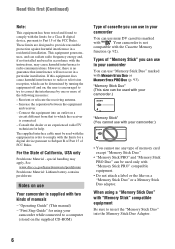
..., which was developed jointly by playing them back on this camcorder prior to playing them back on the model HDR-HC7. Check the contents of tapes by Carl Zeiss, in Germany, and Sony Corporation, and produces superior images. Also, the lens for your camcorder. • Design and specifications of recording media and other... 8 Read this first (Continued) On playing back HDV tapes on other devices You cannot play back a tape recorded in the HDV format on DV format video cameras or on the bottom of your camcorder is T -coated to suppress unwanted reflections and faithfully reproduce colors.
..., which was developed jointly by playing them back on this camcorder prior to playing them back on the model HDR-HC7. Check the contents of tapes by Carl Zeiss, in Germany, and Sony Corporation, and produces superior images. Also, the lens for your camcorder. • Design and specifications of recording media and other... 8 Read this first (Continued) On playing back HDV tapes on other devices You cannot play back a tape recorded in the HDV format on DV format video cameras or on the bottom of your camcorder is T -coated to suppress unwanted reflections and faithfully reproduce colors.

Operating Guide
Page 9
...manual Features available for the HDV format only Features available for the DV format only IMPORTANT SAFEGUARDS .........3 Read this first 5 Enjoying pictures ...Handycam 22 Recording 24 Zooming 26 Recording high quality still images during tape recording (Dual Rec 26 Controlling the image settings manually with the CAM CTRL dial (HDR-HC7... 27 Using the flash 27 Recording in dark places (NightShot 28 Adjusting the exposure for backlit subjects 28 Recording in mirror mode 28 Using the menu items .......... 40 Menu items 41 CAMERA SET menu 43 Settings to adjust your camcorder...
...manual Features available for the HDV format only Features available for the DV format only IMPORTANT SAFEGUARDS .........3 Read this first 5 Enjoying pictures ...Handycam 22 Recording 24 Zooming 26 Recording high quality still images during tape recording (Dual Rec 26 Controlling the image settings manually with the CAM CTRL dial (HDR-HC7... 27 Using the flash 27 Recording in dark places (NightShot 28 Adjusting the exposure for backlit subjects 28 Recording in mirror mode 28 Using the menu items .......... 40 Menu items 41 CAMERA SET menu 43 Settings to adjust your camcorder...
Operating Guide
Page 11
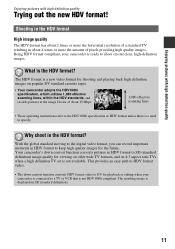
... definition). 11 The HDV format is a new video format for viewing on older wide TV formats, and on popular DV standard cassette tapes. • Your camcorder adopts the HDV1080i specification, which utilizes 1,080 effective scanning lines, within the HDV standards, and records pictures at the image...digital video format, you can record important moments in HDV format to keep high quality images for playback or editing when your camcorder is the HDV format? Enjoying pictures with high definition quality Enjoying pictures with high definition quality Trying out the new HDV format!...
... definition). 11 The HDV format is a new video format for viewing on older wide TV formats, and on popular DV standard cassette tapes. • Your camcorder adopts the HDV1080i specification, which utilizes 1,080 effective scanning lines, within the HDV standards, and records pictures at the image...digital video format, you can record important moments in HDV format to keep high quality images for playback or editing when your camcorder is the HDV format? Enjoying pictures with high definition quality Enjoying pictures with high definition quality Trying out the new HDV format!...

Operating Guide
Page 16
...; Before changing the battery pack, slide the POWER switch to the DC IN jack of your camcorder, even when the power cord is disconnected from the wall outlet. The battery pack is closed HDV DV HDV DV 105 115 120 130 140 150 160 170 230 245 255 280 525 565 590 635... NP-FH50 NP-FH60 (supplied) NP-FH70 NP-FH100 LCD panel LCD panel opened* closed HDV DV HDV DV 110 120 125 135 145 160 165 180 235 255 270 290 545 590 615 660 HDR-HC7 Battery pack Recorded Format NP-FH50 NP-FH60 (supplied) NP-FH70 NP-FH100 LCD panel LCD panel...
...; Before changing the battery pack, slide the POWER switch to the DC IN jack of your camcorder, even when the power cord is disconnected from the wall outlet. The battery pack is closed HDV DV HDV DV 105 115 120 130 140 150 160 170 230 245 255 280 525 565 590 635... NP-FH50 NP-FH60 (supplied) NP-FH70 NP-FH100 LCD panel LCD panel opened* closed HDV DV HDV DV 110 120 125 135 145 160 165 180 235 255 270 290 545 590 615 660 HDR-HC7 Battery pack Recorded Format NP-FH50 NP-FH60 (supplied) NP-FH70 NP-FH100 LCD panel LCD panel...

Operating Guide
Page 35
... the bottom of the jack cover, then rotate in the DV format are played back as the power source (p. 14). Selecting the appropriate connection method (CNNECT GUIDE) Your camcorder helps you select the appropriate connection for your camcorder before connecting. Some settings may not recognize the video signal ...properly if the [VCR HDV/DV] or [i.LINK CONV] setting is changed after the TV and your camcorder is connected and connectors used. b Notes • Make all menu settings on the screen. Refer also to the ...
... the bottom of the jack cover, then rotate in the DV format are played back as the power source (p. 14). Selecting the appropriate connection method (CNNECT GUIDE) Your camcorder helps you select the appropriate connection for your camcorder before connecting. Some settings may not recognize the video signal ...properly if the [VCR HDV/DV] or [i.LINK CONV] setting is changed after the TV and your camcorder is connected and connectors used. b Notes • Make all menu settings on the screen. Refer also to the ...
Operating Guide
Page 36
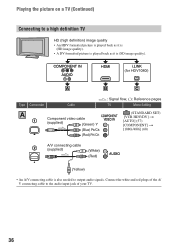
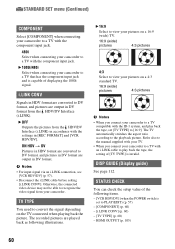
... of your TV. 36 COMPONENT IN AUDIO HDMI i.LINK (for HDV1080i) A B C Type Camcorder Cable A 1 Component video cable (supplied) (Green) Y (Blue) PB/CB (Red) PR/CR : Signal flow, ( ): Reference pages TV Menu Setting (STANDARD SET) [VCR HDV/DV] t [AUTO] (57) [COMPONENT] t [1080i/480i] (60) 2 A/V connecting cable (supplied) (White) (Red) (Yellow) • An A/V connecting cable...
... of your TV. 36 COMPONENT IN AUDIO HDMI i.LINK (for HDV1080i) A B C Type Camcorder Cable A 1 Component video cable (supplied) (Green) Y (Blue) PB/CB (Red) PR/CR : Signal flow, ( ): Reference pages TV Menu Setting (STANDARD SET) [VCR HDV/DV] t [AUTO] (57) [COMPONENT] t [1080i/480i] (60) 2 A/V connecting cable (supplied) (White) (Red) (Yellow) • An A/V connecting cable...
Operating Guide
Page 37
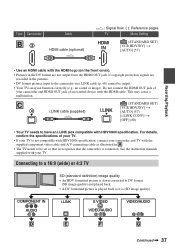
...8226; The TV needs to DV format (SD image quality) and played back. • A DV formatted picture is played back as illustrated in the pictures. • DV format pictures input to the camcorder via i.LINK cable (p. 68) cannot be set so that the camcorder is not compatible with HDV1080i ...specification, connect your camcorder and TV with your TV. For details, confirm the specifications...
...8226; The TV needs to DV format (SD image quality) and played back. • A DV formatted picture is played back as illustrated in the pictures. • DV format pictures input to the camcorder via i.LINK cable (p. 68) cannot be set so that the camcorder is not compatible with HDV1080i ...specification, connect your camcorder and TV with your TV. For details, confirm the specifications...
Operating Guide
Page 38
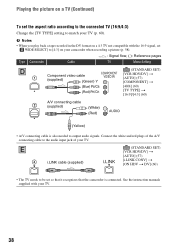
... recording a picture (p. 58). : Signal flow, ( ): Reference pages Type Camcorder Cable TV Menu Setting D 1 Component video cable (supplied) (Green) Y (Blue) PB/CB (Red) PR/CR (STANDARD SET) [VCR HDV/DV] t [AUTO] (57) [COMPONENT] t [480i] (60) [TV TYPE] t [16:9]/[4:3] (60) 2 A/V connecting cable (supplied) (White) (Red) (Yellow) • A/V connecting cable... [TV TYPE] setting to output audio signals. b Notes • When you play back a tape recorded in the DV format on a TV (Continued) To set so that it recognizes that the camcorder is also needed to match your TV.
... recording a picture (p. 58). : Signal flow, ( ): Reference pages Type Camcorder Cable TV Menu Setting D 1 Component video cable (supplied) (Green) Y (Blue) PB/CB (Red) PR/CR (STANDARD SET) [VCR HDV/DV] t [AUTO] (57) [COMPONENT] t [480i] (60) [TV TYPE] t [16:9]/[4:3] (60) 2 A/V connecting cable (supplied) (White) (Red) (Yellow) • A/V connecting cable... [TV TYPE] setting to output audio signals. b Notes • When you play back a tape recorded in the DV format on a TV (Continued) To set so that it recognizes that the camcorder is also needed to match your TV.
Operating Guide
Page 39
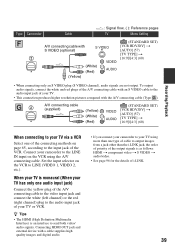
... This connection produces higher resolution pictures compared with a cable supplies high quality images and digital audio. • If you connect your camcorder to your TV via a VCR Select one audio input jack) Connect the yellow plug of the A/V connecting cable to the video ... HDMI OUT jack and external device with the A/V connecting cable (Type ). 2 A/V connecting cable (supplied) (Yellow) (White) (Red) (STANDARD SET) [VCR HDV/DV] t [AUTO] (57) [TV TYPE] t [16:9]/[4:3] (60) Recording/Playback When connecting to LINE (VIDEO 1, VIDEO 2, etc.). Set the input selector on page...
... This connection produces higher resolution pictures compared with a cable supplies high quality images and digital audio. • If you connect your camcorder to your TV via a VCR Select one audio input jack) Connect the yellow plug of the A/V connecting cable to the video ... HDMI OUT jack and external device with the A/V connecting cable (Type ). 2 A/V connecting cable (supplied) (Yellow) (White) (Red) (STANDARD SET) [VCR HDV/DV] t [AUTO] (57) [TV TYPE] t [16:9]/[4:3] (60) Recording/Playback When connecting to LINE (VIDEO 1, VIDEO 2, etc.). Set the input selector on page...
Operating Guide
Page 56
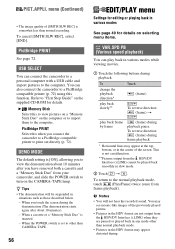
...reverse direction: (frame) during : PICT.APPLI. To cancel [SMTH SLW REC], select [END]. B Memory Stick Select this function. You can also connect the camcorder to a PictBridge compatible printer (p. 72) using this to view pictures on a "Memory Stick Duo" on the computer or to import them to the computer. ... Horizontal lines may see mosaic-like images of the previously played picture. • Pictures in the HDV format are not output from the HDV/DV Interface (i.LINK) cannot be suspended in the center of [SMTH SLW REC] is set to print out directly (p. 72). USB SELECT You ...
...reverse direction: (frame) during : PICT.APPLI. To cancel [SMTH SLW REC], select [END]. B Memory Stick Select this function. You can also connect the camcorder to a PictBridge compatible printer (p. 72) using this to view pictures on a "Memory Stick Duo" on the computer or to import them to the computer. ... Horizontal lines may see mosaic-like images of the previously played picture. • Pictures in the HDV format are not output from the HDV/DV Interface (i.LINK) cannot be suspended in the center of [SMTH SLW REC] is set to print out directly (p. 72). USB SELECT You ...
Operating Guide
Page 57
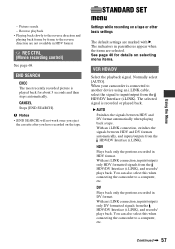
...LINK connection, switches the signals between HDV and DV format automatically when playing back a tape. You can also select this when connecting the camcorder to a computer, etc. Continued , 57 HDV Plays back only the portions recorded in DV format. DV Plays back only the portions recorded in HDV... not work once you eject the cassette after you have recorded on selecting menu items. VCR HDV/DV Select the playback signal. You can also select this when connecting the camcorder to a computer, etc. The selected signal is recorded or played back. With an i.LINK connection...
...LINK connection, switches the signals between HDV and DV format automatically when playing back a tape. You can also select this when connecting the camcorder to a computer, etc. Continued , 57 HDV Plays back only the portions recorded in DV format. DV Plays back only the portions recorded in HDV... not work once you eject the cassette after you have recorded on selecting menu items. VCR HDV/DV Select the playback signal. You can also select this when connecting the camcorder to a computer, etc. The selected signal is recorded or played back. With an i.LINK connection...
Operating Guide
Page 58
... tape playback, you can monitor the sound recorded by other camcorders or VCRs. • When you play back the tape on other camcorders using an i.LINK cable, set to the TV connected when recording. at [DV], a DV signal is output as it is converted to the instruction manuals... When [i.LINK CONV] is . - b Notes • If you record in the 16-bit mode (1 stereo sound with your camcorder. • When [AUTO] is automatically recorded in the DV format. b Notes • When recording in the HDV format, sound is selected, if the signal switches between the scenes. b...
... tape playback, you can monitor the sound recorded by other camcorders or VCRs. • When you play back the tape on other camcorders using an i.LINK cable, set to the TV connected when recording. at [DV], a DV signal is output as it is converted to the instruction manuals... When [i.LINK CONV] is . - b Notes • If you record in the 16-bit mode (1 stereo sound with your camcorder. • When [AUTO] is automatically recorded in the DV format. b Notes • When recording in the HDV format, sound is selected, if the signal switches between the scenes. b...
Operating Guide
Page 60
...that has the component input jack and is capable of displaying the 1080i signal. The recorded pictures are played back as following items. - [VCR HDV/DV] (when the POWER switch is invalid. B 1080i/480i Select when connecting your camcorder. DISP GUIDE (Display guide) See page 112. b Notes &#...8226; For input signal via an i.LINK connection, see [VCR HDV/DV] (p. 57). • Disconnect the i.LINK ...
...that has the component input jack and is capable of displaying the 1080i signal. The recorded pictures are played back as following items. - [VCR HDV/DV] (when the POWER switch is invalid. B 1080i/480i Select when connecting your camcorder. DISP GUIDE (Display guide) See page 112. b Notes &#...8226; For input signal via an i.LINK connection, see [VCR HDV/DV] (p. 57). • Disconnect the i.LINK ...
Operating Guide
Page 66
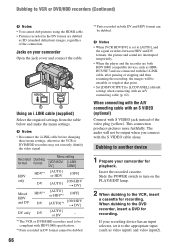
...regardless of the video plug (yellow). This connection produces pictures more faithfully. When dubbing to the DVD recorder, insert a DVD for playback. HDV/DV A/V OUT 1 2 Using an i.LINK cable (supplied) Select the required settings from the table below and make the menu settings. If your ...as HDRHC5/HC7 and are dubbed as video input1 and video input2). b Notes • Disconnect the i.LINK cable before changing these menu settings, otherwise the VCR or DVD/HDD recorders may not correctly identify the video signal. Dubbing to another device 1 Prepare your camcorder Open the...
...regardless of the video plug (yellow). This connection produces pictures more faithfully. When dubbing to the DVD recorder, insert a DVD for playback. HDV/DV A/V OUT 1 2 Using an i.LINK cable (supplied) Select the required settings from the table below and make the menu settings. If your ...as HDRHC5/HC7 and are dubbed as video input1 and video input2). b Notes • Disconnect the i.LINK cable before changing these menu settings, otherwise the VCR or DVD/HDD recorders may not correctly identify the video signal. Dubbing to another device 1 Prepare your camcorder Open the...
Operating Guide
Page 67
... displayed or recorded depending on the device or application. - See page 65 for details. 5 When dubbing is paused on your camcorder while recording to HDV or DV on your DVD recorder and can . Pictures edited with an i.LINK cable: - 3 Connect your recording device (VCR or DVD... 55) or [D.EFFECT] (p. 54) - The recorded picture becomes rough when a picture is complete, stop your camcorder and the recording device. • When dubbing to a DVD recorder from the HDV/DV Interface (i.LINK) during playback pause or in "Dubbing to another device." • When you can set [TV ...
... displayed or recorded depending on the device or application. - See page 65 for details. 5 When dubbing is paused on your camcorder while recording to HDV or DV on your DVD recorder and can . Pictures edited with an i.LINK cable: - 3 Connect your recording device (VCR or DVD... 55) or [D.EFFECT] (p. 54) - The recorded picture becomes rough when a picture is complete, stop your camcorder and the recording device. • When dubbing to a DVD recorder from the HDV/DV Interface (i.LINK) during playback pause or in "Dubbing to another device." • When you can set [TV ...
Operating Guide
Page 68
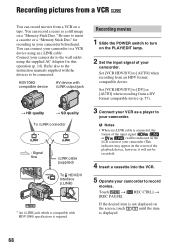
Recording movies 1 Slide the POWER switch to your VCR as a still image on a tape. Set [VCR HDV/DV] to [AUTO] when recording from a DV format compatible device (p. 57). 3 Connect your camcorder. b Notes • When an i.LINK cable is not displayed on the PLAY/EDIT lamp. 2 Set the input ..., it will be indicated on the LCD screen of your camcorder (This indicator may appear on the screen of your camcorder to [DV] or [AUTO] when recording from an HDV format compatible device. Connect your camcorder. Set [VCR HDV/DV] to the wall outlet using an i.LINK cable. If ...
Recording movies 1 Slide the POWER switch to your VCR as a still image on a tape. Set [VCR HDV/DV] to [AUTO] when recording from a DV format compatible device (p. 57). 3 Connect your camcorder. b Notes • When an i.LINK cable is not displayed on the PLAY/EDIT lamp. 2 Set the input ..., it will be indicated on the LCD screen of your camcorder (This indicator may appear on the screen of your camcorder to [DV] or [AUTO] when recording from an HDV format compatible device. Connect your camcorder. Set [VCR HDV/DV] to the wall outlet using an i.LINK cable. If ...
Operating Guide
Page 69
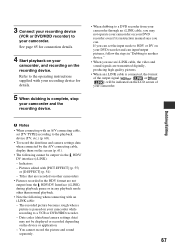
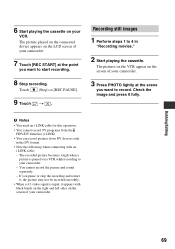
...b Notes • You need an i.LINK cable for this operation. • You cannot record TV programs from the HDV/DV Interface (i.LINK). • You can record pictures from DV devices only in "Recording movies." 2 Start playing the cassette. Dubbing/Editing 69 You cannot record the picture and sound separately. ... picture becomes rough when a picture is input, it fully. The picture played on the connected device appears on the LCD screen of your camcorder. 7 Touch [REC START] at the scene you want to start recording. 8 Stop recording. Check the image and press it appears with...
...b Notes • You need an i.LINK cable for this operation. • You cannot record TV programs from the HDV/DV Interface (i.LINK). • You can record pictures from DV devices only in "Recording movies." 2 Start playing the cassette. Dubbing/Editing 69 You cannot record the picture and sound separately. ... picture becomes rough when a picture is input, it fully. The picture played on the connected device appears on the LCD screen of your camcorder. 7 Touch [REC START] at the scene you want to start recording. 8 Stop recording. Check the image and press it appears with...
Operating Guide
Page 70
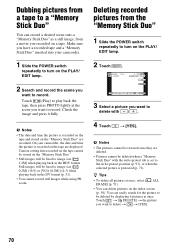
... cannot be stored on the tape are displayed. You can easily search for the picture to image size [ 1.2M] when playing back in the DV format (p. 51). • You cannot record still images while using PB zoom. Dubbing pictures from a movie you want to record. Make sure... you have a recorded tape and a "Memory Stick Duo" inserted into your camcorder, the date and time the picture is protected (p. 71). On your camcorder. 1 Slide the POWER switch repeatedly to turn on the PLAY/ EDIT lamp. 2 Touch . 6 0 min 6.1M 101-0001...
... cannot be stored on the tape are displayed. You can easily search for the picture to image size [ 1.2M] when playing back in the DV format (p. 51). • You cannot record still images while using PB zoom. Dubbing pictures from a movie you want to record. Make sure... you have a recorded tape and a "Memory Stick Duo" inserted into your camcorder, the date and time the picture is protected (p. 71). On your camcorder. 1 Slide the POWER switch repeatedly to turn on the PLAY/ EDIT lamp. 2 Touch . 6 0 min 6.1M 101-0001...
Operating Guide
Page 75
...) image quality content only, 256 MB of using the Memory Stick slot on discs created subsequently will not be provided as standard), DV Interface (IEEE1394, i.LINK) (to the computer. • When using "Picture Motion Browser" OS: Microsoft Windows 2000 Professional, Windows...playing still images recorded on a "Memory Stick Duo" on DirectX technology. System requirements When using a "Memory Stick PRO Duo" and your camcorder with HD (high definition) image quality, resulting in a multiboot environment. For processing HD footage, Windows XP SP2 is required. Application: DirectX...
...) image quality content only, 256 MB of using the Memory Stick slot on discs created subsequently will not be provided as standard), DV Interface (IEEE1394, i.LINK) (to the computer. • When using "Picture Motion Browser" OS: Microsoft Windows 2000 Professional, Windows...playing still images recorded on a "Memory Stick Duo" on DirectX technology. System requirements When using a "Memory Stick PRO Duo" and your camcorder with HD (high definition) image quality, resulting in a multiboot environment. For processing HD footage, Windows XP SP2 is required. Application: DirectX...


