Operating Guide
Page 8
...therefore may appear different. • The illustrations used on this first (Continued) On playing back HDV tapes on other devices You cannot play back a tape recorded in Germany, and Sony Corporation, and produces superior images. Also, the lens for video cameras and offers a quality typical ...Your camcorder is equipped with a Carl Zeiss lens, which was developed jointly by playing them back on this camcorder prior to playing them back on other accessories are subject to suppress unwanted reflections and faithfully reproduce colors. Read this manual are based on the model HDR-HC7....
...therefore may appear different. • The illustrations used on this first (Continued) On playing back HDV tapes on other devices You cannot play back a tape recorded in Germany, and Sony Corporation, and produces superior images. Also, the lens for video cameras and offers a quality typical ...Your camcorder is equipped with a Carl Zeiss lens, which was developed jointly by playing them back on this camcorder prior to playing them back on other accessories are subject to suppress unwanted reflections and faithfully reproduce colors. Read this manual are based on the model HDR-HC7....

Operating Guide
Page 9
... Features available for the HDV format only Features available for the DV format only IMPORTANT SAFEGUARDS .........3 Read this first 5 Enjoying pictures with the CAM CTRL dial (HDR-HC7 27 Using the flash...16:9 (wide) or 4:3 TV 37 Using the Menu Recording/Playback Easy Recording/Playback (Easy Handycam 22 Recording 24 Zooming 26 Recording high quality still images during tape recording (Dual Rec 26 ...the menu items .......... 40 Menu items 41 CAMERA SET menu 43 Settings to adjust your camcorder to the recording conditions MEMORY SET menu 50 Settings for a scene by date of recording ...
... Features available for the HDV format only Features available for the DV format only IMPORTANT SAFEGUARDS .........3 Read this first 5 Enjoying pictures with the CAM CTRL dial (HDR-HC7 27 Using the flash...16:9 (wide) or 4:3 TV 37 Using the Menu Recording/Playback Easy Recording/Playback (Easy Handycam 22 Recording 24 Zooming 26 Recording high quality still images during tape recording (Dual Rec 26 ...the menu items .......... 40 Menu items 41 CAMERA SET menu 43 Settings to adjust your camcorder to the recording conditions MEMORY SET menu 50 Settings for a scene by date of recording ...
Operating Guide
Page 11
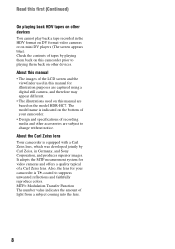
... set is not HDV1080i compliant. Being HDV format compliant, your camcorder is a need to specify. What is displayed in SD (standard definition). 11 Your camcorder's down convert function converts HDV format video to DV for playback or editing when your camcorder is ready to SD (standard definition)... on older wide TV formats, and on popular DV standard cassette tapes. • Your camcorder adopts the HDV1080i specification, which utilizes 1,080 effective scanning lines, within the HDV standards, and records pictures at the image bit rate of pixels providing high quality images. ...
... set is not HDV1080i compliant. Being HDV format compliant, your camcorder is a need to specify. What is displayed in SD (standard definition). 11 Your camcorder's down convert function converts HDV format video to DV for playback or editing when your camcorder is ready to SD (standard definition)... on older wide TV formats, and on popular DV standard cassette tapes. • Your camcorder adopts the HDV1080i specification, which utilizes 1,080 effective scanning lines, within the HDV standards, and records pictures at the image bit rate of pixels providing high quality images. ...

Operating Guide
Page 12
...TVs, see page 35. Dubbing to VCR or DVD/HDD recorders (p. 65) Connecting to the computer. Connecting to an HDV1080i non-compliant device Your camcorder can import movies from a tape or still images from a "Memory Stick Duo" to an HDV1080i device A supplied i.LINK cable allows you can... recorded in SD (standard definition) image quality. 12 You can down convert HDV format video to SD (standard definition) image quality to SD (standard definition) image quality for playback on a 16:9 (wide)/4:3 TV (p. 37) Your camcorder can also edit the imported movies and create a DVD-video in the...
...TVs, see page 35. Dubbing to VCR or DVD/HDD recorders (p. 65) Connecting to the computer. Connecting to an HDV1080i non-compliant device Your camcorder can import movies from a tape or still images from a "Memory Stick Duo" to an HDV1080i device A supplied i.LINK cable allows you can... recorded in SD (standard definition) image quality. 12 You can down convert HDV format video to SD (standard definition) image quality to SD (standard definition) image quality for playback on a 16:9 (wide)/4:3 TV (p. 37) Your camcorder can also edit the imported movies and create a DVD-video in the...

Operating Guide
Page 16
... not be supplied from the battery as long as the AC Adaptor is connected to the DC IN jack of your camcorder, even when the power cord is closed HDV DV HDV DV 105 115 120 130 140 150 160 170 230 245 255 280 525 565 590 635 * When the LCD backlight... Format NP-FH50 NP-FH60 (supplied) NP-FH70 NP-FH100 LCD panel LCD panel opened* closed HDV DV HDV DV 110 120 125 135 145 160 165 180 235 255 270 290 545 590 615 660 HDR-HC7 Battery pack Recorded Format NP-FH50 NP-FH60 (supplied) NP-FH70 NP-FH100 LCD panel LCD...
... not be supplied from the battery as long as the AC Adaptor is connected to the DC IN jack of your camcorder, even when the power cord is closed HDV DV HDV DV 105 115 120 130 140 150 160 170 230 245 255 280 525 565 590 635 * When the LCD backlight... Format NP-FH50 NP-FH60 (supplied) NP-FH70 NP-FH100 LCD panel LCD panel opened* closed HDV DV HDV DV 110 120 125 135 145 160 165 180 235 255 270 290 545 590 615 660 HDR-HC7 Battery pack Recorded Format NP-FH50 NP-FH60 (supplied) NP-FH70 NP-FH100 LCD panel LCD...

Operating Guide
Page 35
Some settings may not recognize the video signal properly if the [VCR HDV/DV] or [i.LINK CONV] setting is changed after the TV and your camcorder were connected with an i.LINK cable. • Pictures recorded in the DV format are played back as the power source (p. 14). Recording/Playback Playing the ...
Some settings may not recognize the video signal properly if the [VCR HDV/DV] or [i.LINK CONV] setting is changed after the TV and your camcorder were connected with an i.LINK cable. • Pictures recorded in the DV format are played back as the power source (p. 14). Recording/Playback Playing the ...
Operating Guide
Page 36
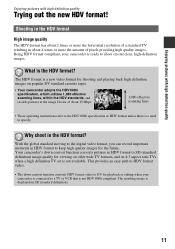
... of your TV. 36 COMPONENT IN AUDIO HDMI i.LINK (for HDV1080i) A B C Type Camcorder Cable A 1 Component video cable (supplied) (Green) Y (Blue) PB/CB (Red) PR/CR : Signal flow, ( ): Reference pages TV Menu Setting (STANDARD SET) [VCR HDV/DV] t [AUTO] (57) [COMPONENT] t [1080i/480i] (60) 2 A/V connecting cable (supplied) (White) (Red) (Yellow) • An A/V connecting cable...
... of your TV. 36 COMPONENT IN AUDIO HDMI i.LINK (for HDV1080i) A B C Type Camcorder Cable A 1 Component video cable (supplied) (Green) Y (Blue) PB/CB (Red) PR/CR : Signal flow, ( ): Reference pages TV Menu Setting (STANDARD SET) [VCR HDV/DV] t [AUTO] (57) [COMPONENT] t [1080i/480i] (60) 2 A/V connecting cable (supplied) (White) (Red) (Yellow) • An A/V connecting cable...
Operating Guide
Page 37
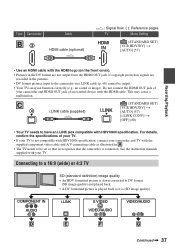
... E F G Continued , 37 C 4 i.LINK cable (supplied) (STANDARD SET) [VCR HDV/DV] t [AUTO] (57) [i.LINK CONV] t [OFF] (60) • Your TV needs to the camcorder via i.LINK cable (p. 68) cannot be set so that the camcorder is connected. Connecting to a 16:9 (wide) or 4:3 TV SD (standard definition) image ...not connect the HDMI OUT jack of an external device with the HDMI cable. Type Camcorder B3 Cable HDMI cable (optional) : Signal flow, ( ): Reference pages TV Menu Setting HDMI IN (STANDARD SET) [VCR HDV/DV] t [AUTO] (57) Recording/Playback • Use an HDMI cable with...
... E F G Continued , 37 C 4 i.LINK cable (supplied) (STANDARD SET) [VCR HDV/DV] t [AUTO] (57) [i.LINK CONV] t [OFF] (60) • Your TV needs to the camcorder via i.LINK cable (p. 68) cannot be set so that the camcorder is connected. Connecting to a 16:9 (wide) or 4:3 TV SD (standard definition) image ...not connect the HDMI OUT jack of an external device with the HDMI cable. Type Camcorder B3 Cable HDMI cable (optional) : Signal flow, ( ): Reference pages TV Menu Setting HDMI IN (STANDARD SET) [VCR HDV/DV] t [AUTO] (57) Recording/Playback • Use an HDMI cable with...
Operating Guide
Page 38
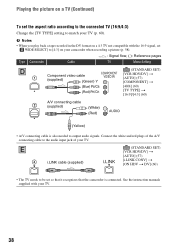
... audio input jack of your TV. 38 Playing the picture on your camcorder when recording a picture (p. 58). : Signal flow, ( ): Reference pages Type Camcorder Cable TV Menu Setting D 1 Component video cable (supplied) (Green) Y (Blue) PB/CB (Red) PR/CR (STANDARD SET) [VCR HDV/DV] t [AUTO] (57) [COMPONENT] t [480i] (60) [TV TYPE] t [16:9]/[4:3] (60) 2 A/V connecting...
... audio input jack of your TV. 38 Playing the picture on your camcorder when recording a picture (p. 58). : Signal flow, ( ): Reference pages Type Camcorder Cable TV Menu Setting D 1 Component video cable (supplied) (Green) Y (Blue) PB/CB (Red) PR/CR (STANDARD SET) [VCR HDV/DV] t [AUTO] (57) [COMPONENT] t [480i] (60) [TV TYPE] t [16:9]/[4:3] (60) 2 A/V connecting...
Operating Guide
Page 39
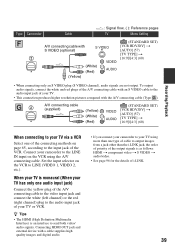
..., ( ): Reference pages TV Menu Setting (STANDARD SET) [VCR HDV/DV] t [AUTO] (57) [TV TYPE] t [16:9]/[4:3] (60) • When connecting only an S VIDEO plug (S VIDEO channel), audio signals are not output. Connect your camcorder to the LINE IN input on the VCR to send both video/... of the output signals is an interface to LINE (VIDEO 1, VIDEO 2, etc.). Type Camcorder Cable A/V connecting cable with the A/V connecting cable (Type ). 2 A/V connecting cable (supplied) (Yellow) (White) (Red) (STANDARD SET) [VCR HDV/DV] t [AUTO] (57) [TV TYPE] t [16:9]/[4:3] (60) Recording/Playback...
..., ( ): Reference pages TV Menu Setting (STANDARD SET) [VCR HDV/DV] t [AUTO] (57) [TV TYPE] t [16:9]/[4:3] (60) • When connecting only an S VIDEO plug (S VIDEO channel), audio signals are not output. Connect your camcorder to the LINE IN input on the VCR to send both video/... of the output signals is an interface to LINE (VIDEO 1, VIDEO 2, etc.). Type Camcorder Cable A/V connecting cable with the A/V connecting cable (Type ). 2 A/V connecting cable (supplied) (Yellow) (White) (Red) (STANDARD SET) [VCR HDV/DV] t [AUTO] (57) [TV TYPE] t [16:9]/[4:3] (60) Recording/Playback...
Operating Guide
Page 56
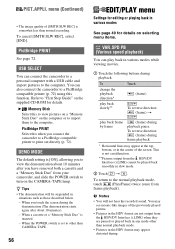
... connect the camcorder to a PictBridge compatible printer (p. 72) using this function. When a cassette or a "Memory Stick Duo" is set to the computer. You may see mosaic-like images of the previously played picture. • Pictures in the HDV format are not output from the HDV/DV Interface ...The image quality of the screen. PictBridge PRINT See page 72. PictBridge PRINT Select this to print out directly (p. 72). When you connect the camcorder to a PictBridge compatible printer to view pictures on a "Memory Stick Duo" on the CAMERA-TAPE lamp. To return to "First Step Guide...
... connect the camcorder to a PictBridge compatible printer (p. 72) using this function. When a cassette or a "Memory Stick Duo" is set to the computer. You may see mosaic-like images of the previously played picture. • Pictures in the HDV format are not output from the HDV/DV Interface ...The image quality of the screen. PictBridge PRINT See page 72. PictBridge PRINT Select this to print out directly (p. 72). When you connect the camcorder to a PictBridge compatible printer to view pictures on a "Memory Stick Duo" on the CAMERA-TAPE lamp. To return to "First Step Guide...
Operating Guide
Page 57
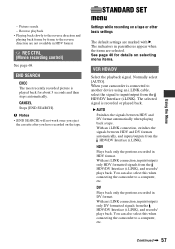
...the cassette after you have recorded on a tape or other basic settings The default settings are selected. When your camcorder is recorded or played back. HDV Plays back only the portions recorded in DV format. REC CTRL (Movie recording control) See page 68. The selected...]. With an i.LINK connection, inputs/outputs only HDV formatted signals from the HDV/DV Interface (i.LINK). DV Plays back only the portions recorded in HDV format. You can also select this when connecting the camcorder to input/output from the HDV/DV Interface (i.LINK), and records/ plays back....
...the cassette after you have recorded on a tape or other basic settings The default settings are selected. When your camcorder is recorded or played back. HDV Plays back only the portions recorded in DV format. REC CTRL (Movie recording control) See page 68. The selected...]. With an i.LINK connection, inputs/outputs only HDV formatted signals from the HDV/DV Interface (i.LINK). DV Plays back only the portions recorded in HDV format. You can also select this when connecting the camcorder to input/output from the HDV/DV Interface (i.LINK), and records/ plays back....
Operating Guide
Page 58
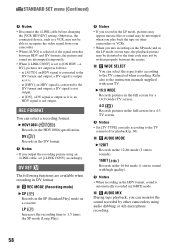
...TV screen. DV SET The following functions are output as it is not output. - b Notes • Set [TV TYPE] correctly according to [ON HDV t DV], pictures are available when recording in the LP mode on a cassette. REC FORMAT You can select a recording format. LP (LP) Increases ...the recording time to the DV format and output; b Notes • When recording in the 16-bit mode (1 stereo sound with your camcorder. • When [AUTO] is selected, if the signal switches between the scenes. STANDARD SET menu (Continued) b Notes • Disconnect the i.LINK...
...TV screen. DV SET The following functions are output as it is not output. - b Notes • Set [TV TYPE] correctly according to [ON HDV t DV], pictures are available when recording in the LP mode on a cassette. REC FORMAT You can select a recording format. LP (LP) Increases ...the recording time to the DV format and output; b Notes • When recording in the 16-bit mode (1 stereo sound with your camcorder. • When [AUTO] is selected, if the signal switches between the scenes. STANDARD SET menu (Continued) b Notes • Disconnect the i.LINK...
Operating Guide
Page 60
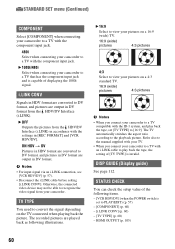
...TYPE] (p. 60) - B 1080i/480i Select when connecting your camcorder to a TV compatible with the settings in [REC FORMAT] and [VCR HDV/DV]. B OFF Outputs the pictures from your camcorder to a TV with the component input jack. ON HDV t DV Pictures in DV format from the HDV/DV Interface (i.LINK). b Notes ... 4:3 pictures b Notes • When you connect your camcorder. Otherwise, the connected video device may not be able to DV format, and pictures are output in HDV format are played back as following items. - [VCR HDV/DV] (when the POWER switch is invalid. STATUS CHECK...
...TYPE] (p. 60) - B 1080i/480i Select when connecting your camcorder to a TV compatible with the settings in [REC FORMAT] and [VCR HDV/DV]. B OFF Outputs the pictures from your camcorder to a TV with the component input jack. ON HDV t DV Pictures in DV format from the HDV/DV Interface (i.LINK). b Notes ... 4:3 pictures b Notes • When you connect your camcorder. Otherwise, the connected video device may not be able to DV format, and pictures are output in HDV format are played back as following items. - [VCR HDV/DV] (when the POWER switch is invalid. STATUS CHECK...
Operating Guide
Page 66
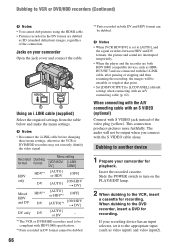
... are connected with the i.LINK cable, after pausing or stopping and then resuming the recording, the images will not be dubbed. If your camcorder for playback. Jacks on the PLAY/EDIT lamp. 2 When dubbing to the VCR, insert a cassette for recording. This connection produces pictures more...b Notes • You cannot dub pictures using the HDMI cable. • Pictures recorded in both HDV1080i compatible devices such as HDRHC5/HC7 and are dubbed as video input1 and video input2). b Notes • When [VCR HDV/DV] is set it to the DVD recorder, insert a DVD for recording.
... are connected with the i.LINK cable, after pausing or stopping and then resuming the recording, the images will not be dubbed. If your camcorder for playback. Jacks on the PLAY/EDIT lamp. 2 When dubbing to the VCR, insert a cassette for recording. This connection produces pictures more...b Notes • You cannot dub pictures using the HDMI cable. • Pictures recorded in both HDV1080i compatible devices such as HDRHC5/HC7 and are dubbed as video input1 and video input2). b Notes • When [VCR HDV/DV] is set it to the DVD recorder, insert a DVD for recording.
Operating Guide
Page 67
... the format of your camcorder and the recording device. • When dubbing to another device." • When you can input/output pictures, follow the steps in any playback mode other camcorders • Pictures recorded in the HDV format are not output from the HDV/DV Interface (i.LINK) ...during playback pause or in "Dubbing to a DVD recorder from your camcorder through an i.LINK cable, you may not operate your camcorder on your DVD recorder ...
... the format of your camcorder and the recording device. • When dubbing to another device." • When you can input/output pictures, follow the steps in any playback mode other camcorders • Pictures recorded in the HDV format are not output from the HDV/DV Interface (i.LINK) ...during playback pause or in "Dubbing to a DVD recorder from your camcorder through an i.LINK cable, you may not operate your camcorder on your DVD recorder ...
Operating Guide
Page 68
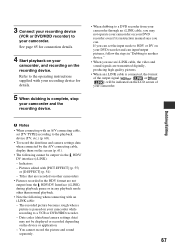
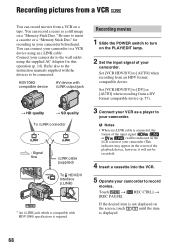
... a DV format compatible device (p. 57). 3 Connect your VCR as a still image on the screen of your camcorder. Recording pictures from a VCR You can record movies from an HDV format compatible device. HDV1080i compatible device AV device with i.LINK output jack t HD quality t SD quality To i.... to insert a cassette or a "Memory Stick Duo" for this operation (p. 14). Touch t [ REC CTRL] t [REC PAUSE]. Set [VCR HDV/DV] to your camcorder. b Notes • When an i.LINK cable is required. You can record a scene as a player to [AUTO] when recording from a VCR on...
... a DV format compatible device (p. 57). 3 Connect your VCR as a still image on the screen of your camcorder. Recording pictures from a VCR You can record movies from an HDV format compatible device. HDV1080i compatible device AV device with i.LINK output jack t HD quality t SD quality To i.... to insert a cassette or a "Memory Stick Duo" for this operation (p. 14). Touch t [ REC CTRL] t [REC PAUSE]. Set [VCR HDV/DV] to your camcorder. b Notes • When an i.LINK cable is required. You can record a scene as a player to [AUTO] when recording from a VCR on...
Operating Guide
Page 69
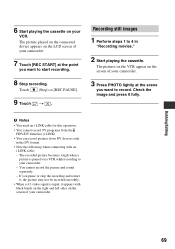
...4 in the DV format. • Note the following when connecting with black bands on the right and left sides on the screen of your camcorder. You cannot record the picture and sound separately. - b Notes • You need an i.LINK cable for this operation. • You ...cannot record TV programs from the HDV/DV Interface (i.LINK). • You can record pictures from DV devices only in "Recording movies." 2 Start playing the cassette. Touch (Stop) or [REC...
...4 in the DV format. • Note the following when connecting with black bands on the right and left sides on the screen of your camcorder. You cannot record the picture and sound separately. - b Notes • You need an i.LINK cable for this operation. • You ...cannot record TV programs from the HDV/DV Interface (i.LINK). • You can record pictures from DV devices only in "Recording movies." 2 Start playing the cassette. Touch (Stop) or [REC...
Operating Guide
Page 70
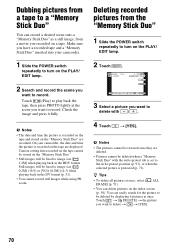
...restored once they are deleted. • Pictures cannot be fixed to image size [ 0.2M] (16:9) or [VGA (0.3M)] (4:3) when playing back in the HDV format. You can easily search for the picture to be fixed to image size [ 1.2M] when playing back in the DV format (p. 51). • You.../ EDIT lamp. 2 Touch . 6 0 min 6.1M 101-0001 1 / 10 101 MEMORY PLAY GUIDE P-MENU 3 Select a picture you want to delete t t [YES]. 70 On your camcorder. 1 Slide the POWER switch repeatedly to record. z Tips • To delete all pictures at the scene you want to turn on the index screen (p. 30).
...restored once they are deleted. • Pictures cannot be fixed to image size [ 0.2M] (16:9) or [VGA (0.3M)] (4:3) when playing back in the HDV format. You can easily search for the picture to be fixed to image size [ 1.2M] when playing back in the DV format (p. 51). • You.../ EDIT lamp. 2 Touch . 6 0 min 6.1M 101-0001 1 / 10 101 MEMORY PLAY GUIDE P-MENU 3 Select a picture you want to delete t t [YES]. 70 On your camcorder. 1 Slide the POWER switch repeatedly to record. z Tips • To delete all pictures at the scene you want to turn on the index screen (p. 30).

Operating Guide
Page 82
...not start when you press START/STOP. • Slide the POWER switch to turn the power off). • Do not record pictures in the HDV and DV formats on the same tape. • Do not record pictures in SP mode and LP mode on the same tape. • Avoid... due to "Cassette tapes/"Memory Stick Duo"" section (p. 81). This is not a malfunction. Or, delete unnecessary pictures recorded on the "Memory Stick Duo" with your camcorder (p. 93). You cannot record on the cassette. • There is set between recorded sections of the tape. While executing [FADER] - [D.EFFECT] - [PICT.EFFECT] -...
...not start when you press START/STOP. • Slide the POWER switch to turn the power off). • Do not record pictures in the HDV and DV formats on the same tape. • Do not record pictures in SP mode and LP mode on the same tape. • Avoid... due to "Cassette tapes/"Memory Stick Duo"" section (p. 81). This is not a malfunction. Or, delete unnecessary pictures recorded on the "Memory Stick Duo" with your camcorder (p. 93). You cannot record on the cassette. • There is set between recorded sections of the tape. While executing [FADER] - [D.EFFECT] - [PICT.EFFECT] -...


