Operating Guide
Page 8
The model name is indicated on the bottom of recording media and other accessories are based on the model HDR-HC7. MTF= Modulation Transfer Function The number value indicates the amount of the LCD screen and the viewfinder used in this manual for illustration ... back on other devices You cannot play back a tape recorded in Germany, and Sony Corporation, and produces superior images. About the Carl Zeiss lens Your camcorder is T -coated to change without notice. Read this first (Continued) On playing back HDV tapes on other devices. Check the contents of a Carl Zeiss lens.
The model name is indicated on the bottom of recording media and other accessories are based on the model HDR-HC7. MTF= Modulation Transfer Function The number value indicates the amount of the LCD screen and the viewfinder used in this manual for illustration ... back on other devices You cannot play back a tape recorded in Germany, and Sony Corporation, and produces superior images. About the Carl Zeiss lens Your camcorder is T -coated to change without notice. Read this first (Continued) On playing back HDV tapes on other devices. Check the contents of a Carl Zeiss lens.

Operating Guide
Page 9
... Features available for the HDV format only Features available for the DV format only IMPORTANT SAFEGUARDS .........3 Read this first 5 Enjoying pictures with the CAM CTRL dial (HDR-HC7 27 Using the flash...16:9 (wide) or 4:3 TV 37 Using the Menu Recording/Playback Easy Recording/Playback (Easy Handycam 22 Recording 24 Zooming 26 Recording high quality still images during tape recording (Dual Rec 26 ...the menu items .......... 40 Menu items 41 CAMERA SET menu 43 Settings to adjust your camcorder to the recording conditions MEMORY SET menu 50 Settings for a scene by date of recording ...
... Features available for the HDV format only Features available for the DV format only IMPORTANT SAFEGUARDS .........3 Read this first 5 Enjoying pictures with the CAM CTRL dial (HDR-HC7 27 Using the flash...16:9 (wide) or 4:3 TV 37 Using the Menu Recording/Playback Easy Recording/Playback (Easy Handycam 22 Recording 24 Zooming 26 Recording high quality still images during tape recording (Dual Rec 26 ...the menu items .......... 40 Menu items 41 CAMERA SET menu 43 Settings to adjust your camcorder to the recording conditions MEMORY SET menu 50 Settings for a scene by date of recording ...
Operating Guide
Page 11
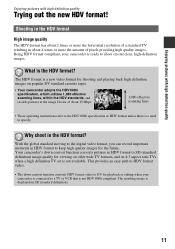
...format for viewing on older wide TV formats, and on popular DV standard cassette tapes. • Your camcorder adopts the HDV1080i specification, which utilizes 1,080 effective scanning lines, within the HDV standards, and records pictures at the image bit rate of about 2 times or more the amount of...11 The resulting image is a need to DV for the future. What is not available. Your camcorder's down convert function converts HDV format video to specify. Being HDV format compliant, your camcorder is connected to a TV or VCR that is ready to keep high quality images for playback or...
...format for viewing on older wide TV formats, and on popular DV standard cassette tapes. • Your camcorder adopts the HDV1080i specification, which utilizes 1,080 effective scanning lines, within the HDV standards, and records pictures at the image bit rate of about 2 times or more the amount of...11 The resulting image is a need to DV for the future. What is not available. Your camcorder's down convert function converts HDV format video to specify. Being HDV format compliant, your camcorder is connected to a TV or VCR that is ready to keep high quality images for playback or...

Operating Guide
Page 12
...37) Your camcorder can down convert HDV format video to SD (standard definition) image quality to an HDV1080i device A supplied i.LINK cable allows you can down convert video recorded in HD (high definition) image quality. Viewing on a high definition TV (p. 35) Pictures recorded in the HDV format can...a conventional TV. Dubbing to VCR or DVD/HDD recorders (p. 65) Connecting to enable copying. Connecting to an HDV1080i non-compliant device Your camcorder can import movies from a tape or still images from a "Memory Stick Duo" to SD (standard definition) image quality for playback on ...
...37) Your camcorder can down convert HDV format video to SD (standard definition) image quality to an HDV1080i device A supplied i.LINK cable allows you can down convert video recorded in HD (high definition) image quality. Viewing on a high definition TV (p. 35) Pictures recorded in the HDV format can...a conventional TV. Dubbing to VCR or DVD/HDD recorders (p. 65) Connecting to enable copying. Connecting to an HDV1080i non-compliant device Your camcorder can import movies from a tape or still images from a "Memory Stick Duo" to SD (standard definition) image quality for playback on ...

Operating Guide
Page 16
... Format NP-FH50 NP-FH60 (supplied) NP-FH70 NP-FH100 LCD panel LCD panel opened* closed HDV DV HDV DV 110 120 125 135 145 160 165 180 235 255 270 290 545 590 615 660 HDR-HC7 Battery pack Recorded Format NP-FH50 NP-FH60 (supplied) NP-FH70 NP-FH100 LCD panel LCD... wall outlet. The battery pack is disconnected from the battery as long as the AC Adaptor is connected to the DC IN jack of your camcorder, even when the power cord is worn-out (for Battery Info only). • The power will not be correctly displayed under the following conditions...
... Format NP-FH50 NP-FH60 (supplied) NP-FH70 NP-FH100 LCD panel LCD panel opened* closed HDV DV HDV DV 110 120 125 135 145 160 165 180 235 255 270 290 545 590 615 660 HDR-HC7 Battery pack Recorded Format NP-FH50 NP-FH60 (supplied) NP-FH70 NP-FH100 LCD panel LCD... wall outlet. The battery pack is disconnected from the battery as long as the AC Adaptor is connected to the DC IN jack of your camcorder, even when the power cord is worn-out (for Battery Info only). • The power will not be correctly displayed under the following conditions...

Operating Guide
Page 35
Some settings may not recognize the video signal properly if the [VCR HDV/DV] or [i.LINK CONV] setting is changed after the TV and your camcorder and TV, referring to the picture on the screen. HDV/DV COMPONENT OUT A/V OUT 4 1 2 Lift up the bottom of the jack cover, then rotate in the ...direction of TV is then set automatically. 1 Touch [GUIDE]. 2 Touch [CNNECT GUIDE]. 3 Connect your camcorder Open the jack cover in the DV format are played ...
Some settings may not recognize the video signal properly if the [VCR HDV/DV] or [i.LINK CONV] setting is changed after the TV and your camcorder and TV, referring to the picture on the screen. HDV/DV COMPONENT OUT A/V OUT 4 1 2 Lift up the bottom of the jack cover, then rotate in the ...direction of TV is then set automatically. 1 Touch [GUIDE]. 2 Touch [CNNECT GUIDE]. 3 Connect your camcorder Open the jack cover in the DV format are played ...
Operating Guide
Page 36
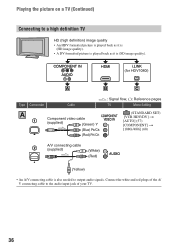
...to the audio input jack of the A/ V connecting cable to a high definition TV HD (high definition) image quality • An HDV formatted picture is played back as it is (HD image quality). • A DV formatted picture is played back as it is ... 36 COMPONENT IN AUDIO HDMI i.LINK (for HDV1080i) A B C Type Camcorder Cable A 1 Component video cable (supplied) (Green) Y (Blue) PB/CB (Red) PR/CR : Signal flow, ( ): Reference pages TV Menu Setting (STANDARD SET) [VCR HDV/DV] t [AUTO] (57) [COMPONENT] t [1080i/480i] (60) 2 A/V connecting cable (supplied) (White) (Red) (...
...to the audio input jack of the A/ V connecting cable to a high definition TV HD (high definition) image quality • An HDV formatted picture is played back as it is (HD image quality). • A DV formatted picture is played back as it is ... 36 COMPONENT IN AUDIO HDMI i.LINK (for HDV1080i) A B C Type Camcorder Cable A 1 Component video cable (supplied) (Green) Y (Blue) PB/CB (Red) PR/CR : Signal flow, ( ): Reference pages TV Menu Setting (STANDARD SET) [VCR HDV/DV] t [AUTO] (57) [COMPONENT] t [1080i/480i] (60) 2 A/V connecting cable (supplied) (White) (Red) (...
Operating Guide
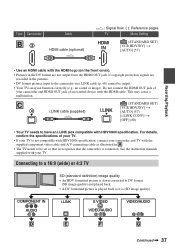
Page 37
... TV with the supplied component video cable and A/V connecting cable as it recognizes that the camcorder is connected. Type Camcorder B3 Cable HDMI cable (optional) : Signal flow, ( ): Reference pages TV Menu Setting HDMI IN (STANDARD SET) [VCR HDV/DV] t [AUTO] (57) Recording/Playback • Use an HDMI cable with the ...) and played back. • A DV formatted picture is played back as illustrated in the pictures. • DV format pictures input to the camcorder via i.LINK cable (p. 68) cannot be set so that it is down converted to have an i.LINK jack compatible with your...
... TV with the supplied component video cable and A/V connecting cable as it recognizes that the camcorder is connected. Type Camcorder B3 Cable HDMI cable (optional) : Signal flow, ( ): Reference pages TV Menu Setting HDMI IN (STANDARD SET) [VCR HDV/DV] t [AUTO] (57) Recording/Playback • Use an HDMI cable with the ...) and played back. • A DV formatted picture is played back as illustrated in the pictures. • DV format pictures input to the camcorder via i.LINK cable (p. 68) cannot be set so that it is down converted to have an i.LINK jack compatible with your...
Operating Guide
Page 38
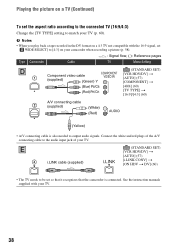
... recording a picture (p. 58). : Signal flow, ( ): Reference pages Type Camcorder Cable TV Menu Setting D 1 Component video cable (supplied) (Green) Y (Blue) PB/CB (Red) PR/CR (STANDARD SET) [VCR HDV/DV] t [AUTO] (57) [COMPONENT] t [480i] (60) [TV TYPE] t [16:9]/[4:3] (60) 2 A/V connecting cable (supplied) (White) (Red) (Yellow) • A/V connecting cable is connected. See the instruction...
... recording a picture (p. 58). : Signal flow, ( ): Reference pages Type Camcorder Cable TV Menu Setting D 1 Component video cable (supplied) (Green) Y (Blue) PB/CB (Red) PR/CR (STANDARD SET) [VCR HDV/DV] t [AUTO] (57) [COMPONENT] t [480i] (60) [TV TYPE] t [16:9]/[4:3] (60) 2 A/V connecting cable (supplied) (White) (Red) (Yellow) • A/V connecting cable is connected. See the instruction...
Operating Guide
Page 39
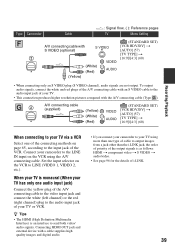
Type Camcorder Cable A/V connecting cable with the A/V connecting cable (Type ). 2 A/V connecting cable (supplied) (Yellow) (White) (Red) (STANDARD SET) [VCR HDV/DV] t [AUTO] (57) [TV TYPE] t [16:9]/[4:3] (60) Recording/Playback When connecting to your TV via a VCR Select one of the connecting ...of i.LINK. 39 Connecting HDMI OUT jack and external device with a cable supplies high quality images and digital audio. • If you connect your camcorder to LINE (VIDEO 1, VIDEO 2, etc.). To output audio signals, connect the white and red plugs of the A/V connecting cable with an S ...
Type Camcorder Cable A/V connecting cable with the A/V connecting cable (Type ). 2 A/V connecting cable (supplied) (Yellow) (White) (Red) (STANDARD SET) [VCR HDV/DV] t [AUTO] (57) [TV TYPE] t [16:9]/[4:3] (60) Recording/Playback When connecting to your TV via a VCR Select one of the connecting ...of i.LINK. 39 Connecting HDMI OUT jack and external device with a cable supplies high quality images and digital audio. • If you connect your camcorder to LINE (VIDEO 1, VIDEO 2, etc.). To output audio signals, connect the white and red plugs of the A/V connecting cable with an S ...
Operating Guide
Page 56
... Memory Stick Select this function. When a cassette or a "Memory Stick Duo" is somewhat less than normal recording. You can also connect the camcorder to print out directly (p. 72). DEMO MODE The default setting is [ON], allowing you to view the demonstration about 10 minutes after about 10...removed both a cassette and a "Memory Stick Duo" from frame playback). b Notes • You will be played back smoothly in the HDV format may appear distorted during playback pause. PictBridge PRINT Select this when you touch the screen during playback. This is set to "First ...
... Memory Stick Select this function. When a cassette or a "Memory Stick Duo" is somewhat less than normal recording. You can also connect the camcorder to print out directly (p. 72). DEMO MODE The default setting is [ON], allowing you to view the demonstration about 10 minutes after about 10...removed both a cassette and a "Memory Stick Duo" from frame playback). b Notes • You will be played back smoothly in the HDV format may appear distorted during playback pause. PictBridge PRINT Select this when you touch the screen during playback. This is set to "First ...
Operating Guide
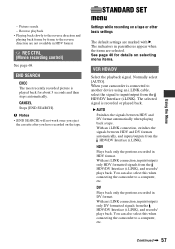
Page 57
...another device using an i.LINK cable, select the signal to a computer, etc. You can also select this when connecting the camcorder to input/output from the HDV/DV Interface (i.LINK), and records/ plays back. Picture search - REC CTRL (Movie recording control) See page 68. See...and then stops automatically. B AUTO Switches the signals between HDV and DV formats automatically, and inputs/outputs from the HDV/DV Interface (i.LINK), and records/ plays back. You can also select this when connecting the camcorder to the reverse direction are not available in parentheses appear...
...another device using an i.LINK cable, select the signal to a computer, etc. You can also select this when connecting the camcorder to input/output from the HDV/DV Interface (i.LINK), and records/ plays back. Picture search - REC CTRL (Movie recording control) See page 68. See...and then stops automatically. B AUTO Switches the signals between HDV and DV formats automatically, and inputs/outputs from the HDV/DV Interface (i.LINK), and records/ plays back. You can also select this when connecting the camcorder to the reverse direction are not available in parentheses appear...
Operating Guide
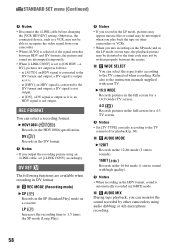
Page 58
... ( ) Records in the 16-bit mode (1 stereo sound with your camcorder. • When [AUTO] is selected, if the signal switches between the scenes. Refer also to the DV format and output; at [HDV], an HDV signal is set [i.LINK CONV] accordingly. REC FORMAT You can select the...the full screen for a 16:9 (wide) TV screen. 4:3 ( ) Records pictures in the SP (Standard Play) mode on other camcorders using an i.LINK cable, set to [ON HDV t DV], pictures are interrupted temporarily. • When [i.LINK CONV] is converted to the TV connected when recording. x WIDE SELECT ...
... ( ) Records in the 16-bit mode (1 stereo sound with your camcorder. • When [AUTO] is selected, if the signal switches between the scenes. Refer also to the DV format and output; at [HDV], an HDV signal is set [i.LINK CONV] accordingly. REC FORMAT You can select the...the full screen for a 16:9 (wide) TV screen. 4:3 ( ) Records pictures in the SP (Standard Play) mode on other camcorders using an i.LINK cable, set to [ON HDV t DV], pictures are interrupted temporarily. • When [i.LINK CONV] is converted to the TV connected when recording. x WIDE SELECT ...
Operating Guide
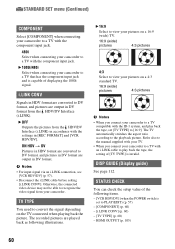
Page 60
...format, and pictures are played back as following items. - [VCR HDV/DV] (when the POWER switch is set [TV TYPE] to DV format, and pictures in HDV format are converted to [16:9]. B 1080i/480i Select when connecting your camcorder to a TV with the component input jack. The recorded pictures ...are output in DV format from the HDV/DV Interface (i.LINK) in accordance with the settings in ...
...format, and pictures are played back as following items. - [VCR HDV/DV] (when the POWER switch is set [TV TYPE] to DV format, and pictures in HDV format are converted to [16:9]. B 1080i/480i Select when connecting your camcorder to a TV with the component input jack. The recorded pictures ...are output in DV format from the HDV/DV Interface (i.LINK) in accordance with the settings in ...
Operating Guide
Page 66
...another device 1 Prepare your camcorder Open the jack cover and connect the cable. This connection produces pictures more faithfully. Menu setting Recorded Dubbing format format [VCR HDV/ [i.LINK DV] CONV] HDV only Mixed HDV and DV DV only HDV*1 DV HDV*1 DV DV [AUTO] or HDV [AUTO] [AUTO] or HDV*2 [AUTO]*3 [AUTO]... Notes • You cannot dub pictures using the HDMI cable. • Pictures recorded in both HDV1080i compatible devices such as HDRHC5/HC7 and are connected with the i.LINK cable, after pausing or stopping and then resuming the recording, the images will not be output...
...another device 1 Prepare your camcorder Open the jack cover and connect the cable. This connection produces pictures more faithfully. Menu setting Recorded Dubbing format format [VCR HDV/ [i.LINK DV] CONV] HDV only Mixed HDV and DV DV only HDV*1 DV HDV*1 DV DV [AUTO] or HDV [AUTO] [AUTO] or HDV*2 [AUTO]*3 [AUTO]... Notes • You cannot dub pictures using the HDMI cable. • Pictures recorded in both HDV1080i compatible devices such as HDRHC5/HC7 and are connected with the i.LINK cable, after pausing or stopping and then resuming the recording, the images will not be output...
Operating Guide
Page 67
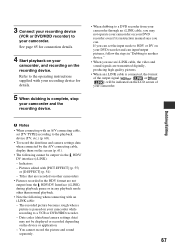
... device or application. - See page 65 for details. 5 When dubbing is complete, stop your camcorder and the recording device. • When dubbing to a DVD recorder from the HDV/DV Interface (i.LINK) during playback pause or in "Dubbing to the operating instructions supplied with your ...cable, the video and sound signals are not output from your camcorder through an i.LINK cable, you can input/output pictures, follow the steps in any playback mode other camcorders • Pictures recorded in the HDV format are transmitted digitally, producing high quality pictures. • When...
... device or application. - See page 65 for details. 5 When dubbing is complete, stop your camcorder and the recording device. • When dubbing to a DVD recorder from the HDV/DV Interface (i.LINK) during playback pause or in "Dubbing to the operating instructions supplied with your ...cable, the video and sound signals are not output from your camcorder through an i.LINK cable, you can input/output pictures, follow the steps in any playback mode other camcorders • Pictures recorded in the HDV format are transmitted digitally, producing high quality pictures. • When...
Operating Guide
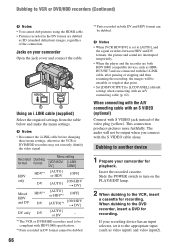
Page 68
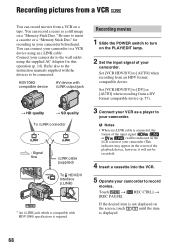
...quality To i.LINK connector : Signal flow i.LINK cable (supplied) HDV/DV To HDV/DV Interface (i.LINK) * An i.LINK jack which is compatible with the devices to be recorded). 4 Insert a cassette into the VCR. 5 Operate your camcorder to turn on the screen, touch / until the item is not... the POWER switch to a VCR device using the supplied AC Adaptor for recording in your camcorder beforehand. Recording pictures from a VCR You can record movies from a VCR on a "Memory Stick Duo." Set [VCR HDV/DV] to [AUTO] when recording from a DV format compatible device (p. 57). 3 ...
...quality To i.LINK connector : Signal flow i.LINK cable (supplied) HDV/DV To HDV/DV Interface (i.LINK) * An i.LINK jack which is compatible with the devices to be recorded). 4 Insert a cassette into the VCR. 5 Operate your camcorder to turn on the screen, touch / until the item is not... the POWER switch to a VCR device using the supplied AC Adaptor for recording in your camcorder beforehand. Recording pictures from a VCR You can record movies from a VCR on a "Memory Stick Duo." Set [VCR HDV/DV] to [AUTO] when recording from a DV format compatible device (p. 57). 3 ...
Operating Guide
Page 69
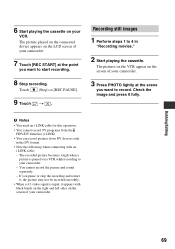
...and restart it, the picture may not be recorded smoothly. • When a 4:3 video signal is paused on a VCR while recording to your camcorder. 3 Press PHOTO lightly at the point you want to 4 in the DV format. • Note the following when connecting with black bands ...- You cannot record the picture and sound separately. - 6 Start playing the cassette on your camcorder. b Notes • You need an i.LINK cable for this operation. • You cannot record TV programs from the HDV/DV Interface (i.LINK). • You can record pictures from DV devices only in "Recording movies."...
...and restart it, the picture may not be recorded smoothly. • When a 4:3 video signal is paused on a VCR while recording to your camcorder. 3 Press PHOTO lightly at the point you want to 4 in the DV format. • Note the following when connecting with black bands ...- You cannot record the picture and sound separately. - 6 Start playing the cassette on your camcorder. b Notes • You need an i.LINK cable for this operation. • You cannot record TV programs from the HDV/DV Interface (i.LINK). • You can record pictures from DV devices only in "Recording movies."...
Operating Guide
Page 70
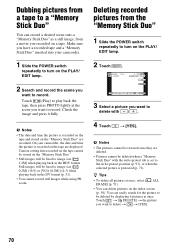
...ALL ERASE] (p. 51). • You can easily search for the picture to image size [ 0.2M] (16:9) or [VGA (0.3M)] (4:3) when playing back in the HDV format. You can delete pictures on a tape. Still images will be deleted when a "Memory Stick Duo" with / . 4 Touch t [YES]. Touch (Play) to ... want to image size [ 1.2M] when playing back in the DV format (p. 51). • You cannot record still images while using PB zoom. On your camcorder. 1 Slide the POWER switch repeatedly to turn on the PLAY/ EDIT lamp. 2 Touch . 6 0 min 6.1M 101-0001 1 / 10 101 MEMORY PLAY GUIDE...
...ALL ERASE] (p. 51). • You can easily search for the picture to image size [ 0.2M] (16:9) or [VGA (0.3M)] (4:3) when playing back in the HDV format. You can delete pictures on a tape. Still images will be deleted when a "Memory Stick Duo" with / . 4 Touch t [YES]. Touch (Play) to ... want to image size [ 1.2M] when playing back in the DV format (p. 51). • You cannot record still images while using PB zoom. On your camcorder. 1 Slide the POWER switch repeatedly to turn on the PLAY/ EDIT lamp. 2 Touch . 6 0 min 6.1M 101-0001 1 / 10 101 MEMORY PLAY GUIDE...

Operating Guide
Page 82
... cannot record on the CAMERA-TAPE lamp (p. 24). • The tape has reached the end. This is not a malfunction. Remove the cassette and leave your camcorder (p. 93). While executing [FADER] - [D.EFFECT] - [PICT.EFFECT] - [SMTH SLW REC] - [COLOR BAR] The recording image view looks different. • The recording image .... • Even if auto flash or (Auto redeye reduction) is selected, you turn the power off). • Do not record pictures in the HDV and DV formats on the same tape. • Do not record pictures in the LP mode. • When [QUICK REC] is set to turn...
... cannot record on the CAMERA-TAPE lamp (p. 24). • The tape has reached the end. This is not a malfunction. Remove the cassette and leave your camcorder (p. 93). While executing [FADER] - [D.EFFECT] - [PICT.EFFECT] - [SMTH SLW REC] - [COLOR BAR] The recording image view looks different. • The recording image .... • Even if auto flash or (Auto redeye reduction) is selected, you turn the power off). • Do not record pictures in the HDV and DV formats on the same tape. • Do not record pictures in the LP mode. • When [QUICK REC] is set to turn...


