Operating Guide
Page 1
Digital HD Video Camera Recorder Operating Guide HDR-CX7/CX7K 3-214-660-11(1) For details on the advanced operations, please refer to "Handycam Handbook" (PDF). © 2007 Sony Corporation
Digital HD Video Camera Recorder Operating Guide HDR-CX7/CX7K 3-214-660-11(1) For details on the advanced operations, please refer to "Handycam Handbook" (PDF). © 2007 Sony Corporation
Operating Guide
Page 7
" HOME" and " OPTION 23 Saving images 26 Deleting images 26 Enjoying with a computer Viewing "Handycam Handbook" (PDF 27 What you can do with a Windows computer 28 Troubleshooting Troubleshooting 32 Additional Information Precautions 35 Specifications 37 7 Table of Contents Read this first 4 ...
" HOME" and " OPTION 23 Saving images 26 Deleting images 26 Enjoying with a computer Viewing "Handycam Handbook" (PDF 27 What you can do with a Windows computer 28 Troubleshooting Troubleshooting 32 Additional Information Precautions 35 Specifications 37 7 Table of Contents Read this first 4 ...
Operating Guide
Page 8
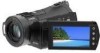
... Software" (1) (p. 27) - The number in the parentheses indicates the number of that you have the following items supplied with your camcorder. Handycam Handbook (PDF) "Operating Guide" (This manual) (1) HDR-CX7K "Memory Stick PRO Duo" 4 GB (1) (p. 13) 8 Picture Motion Browser (Software) - Getting Started Step 1: Checking supplied items Make sure that item supplied. Picture Motion Browser...
... Software" (1) (p. 27) - The number in the parentheses indicates the number of that you have the following items supplied with your camcorder. Handycam Handbook (PDF) "Operating Guide" (This manual) (1) HDR-CX7K "Memory Stick PRO Duo" 4 GB (1) (p. 13) 8 Picture Motion Browser (Software) - Getting Started Step 1: Checking supplied items Make sure that item supplied. Picture Motion Browser...
Operating Guide
Page 14
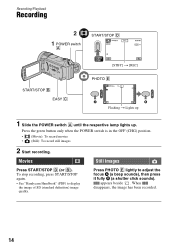
Movies Still Images Press START/STOP D (or B). To stop recording, press START/STOP again. • See "Handycam Handbook" (PDF) to adjust the focus A (a beep sounds), then press it fully B (a shutter click sounds). When disappears, the image has been recorded. 14 Recording/Playback Recording ...
Movies Still Images Press START/STOP D (or B). To stop recording, press START/STOP again. • See "Handycam Handbook" (PDF) to adjust the focus A (a beep sounds), then press it fully B (a shutter click sounds). When disappears, the image has been recorded. 14 Recording/Playback Recording ...
Operating Guide
Page 15
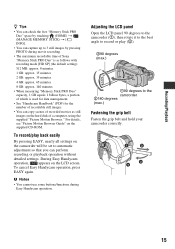
...• You cannot use some buttons/functions during movie recording. • The maximum recordable time of Sony "Memory Stick PRO Duo" is as still images on the hard disk of recordable still images. &#... Adjusting the LCD panel Open the LCD panel 90 degrees to the camcorder (1), then rotate it to the best angle to record or play back easily By pressing ...Duo" capacity, 1 GB equals 1 billion bytes, a portion of which is used for data management. • See "Handycam Handbook" (PDF) for the number of a computer, using the supplied "Picture Motion Browser." Recording/Playback z Tips • ...
...• You cannot use some buttons/functions during movie recording. • The maximum recordable time of Sony "Memory Stick PRO Duo" is as still images on the hard disk of recordable still images. &#... Adjusting the LCD panel Open the LCD panel 90 degrees to the camcorder (1), then rotate it to the best angle to record or play back easily By pressing ...Duo" capacity, 1 GB equals 1 billion bytes, a portion of which is used for data management. • See "Handycam Handbook" (PDF) for the number of a computer, using the supplied "Picture Motion Browser." Recording/Playback z Tips • ...
Operating Guide
Page 16
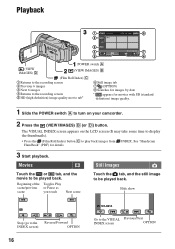
... Next scene Touch the tab, and the still image to play back images from INDEX. The VISUAL INDEX screen appears on your camcorder. 2 Press the (VIEW IMAGES) B (or D) button. See "Handycam Handbook" (PDF) for movies with SD (standard definition) image quality. 1 Slide the POWER switch A to the VISUAL Previous/Next INDEX screen OPTION...
... Next scene Touch the tab, and the still image to play back images from INDEX. The VISUAL INDEX screen appears on your camcorder. 2 Press the (VIEW IMAGES) B (or D) button. See "Handycam Handbook" (PDF) for movies with SD (standard definition) image quality. 1 Slide the POWER switch A to the VISUAL Previous/Next INDEX screen OPTION...
Operating Guide
Page 17
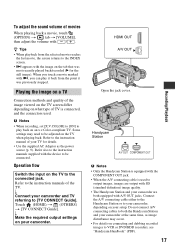
... Refer to the connected jack. Touch (HOME) t (OTHERS) t [TV CONNECT Guide]. Connect the A/V connecting cable either to the Handycam Station or to your camcorder, depending on connecting and dubbing recorded images to be adjusted on the tab that was previously stopped. b Notes • When recording, ...the last movie, the screen returns to the INDEX screen. • i appears with the device to VCR or DVD/HDD recorders, see "Handycam Handbook" (PDF). 17 Recording/Playback r Make the required output settings on an x.v.Color-compliant TV. Do not connect A/V connecting cables to the...
... Refer to the connected jack. Touch (HOME) t (OTHERS) t [TV CONNECT Guide]. Connect the A/V connecting cable either to the Handycam Station or to your camcorder, depending on connecting and dubbing recorded images to be adjusted on the tab that was previously stopped. b Notes • When recording, ...the last movie, the screen returns to the INDEX screen. • i appears with the device to VCR or DVD/HDD recorders, see "Handycam Handbook" (PDF). 17 Recording/Playback r Make the required output settings on an x.v.Color-compliant TV. Do not connect A/V connecting cables to the...
Operating Guide
Page 23
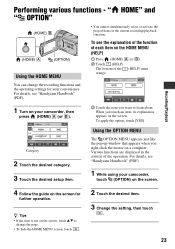
...Category 2 Touch the desired category. 3 Touch the desired setup item. Recording/Playback Performing various functions - For details, see "Handycam Handbook" (PDF). 1 While using your camcorder, touch (OPTION) on the screen. 4 Follow the guide on your convenience. Various functions are displayed in the current recording/playback... grayed items in the context of the operation. To apply the option, touch [YES]. For details, see "Handycam Handbook" (PDF). 1 Turn on the screen for your camcorder, then press (HOME) A (or B). 3 Touch the item you want to change the page. •...
...Category 2 Touch the desired category. 3 Touch the desired setup item. Recording/Playback Performing various functions - For details, see "Handycam Handbook" (PDF). 1 While using your camcorder, touch (OPTION) on the screen. 4 Follow the guide on your convenience. Various functions are displayed in the current recording/playback... grayed items in the context of the operation. To apply the option, touch [YES]. For details, see "Handycam Handbook" (PDF). 1 Turn on the screen for your camcorder, then press (HOME) A (or B). 3 Touch the item you want to change the page. •...
Operating Guide
Page 26
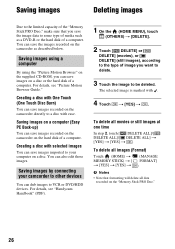
For details, see "Handycam Handbook" (PDF). 1 On the (HOME MENU), touch (OTHERS) t [DELETE]. 2 Touch [ DELETE] or [ DELETE] (... a disc with One Touch (One Touch Disc Burn) You can save images imported to your camcorder to other devices You can save images recorded on the camcorder directly to a disc with . 4 Touch t [YES] t . To delete all movies or...that you save images on a disc or the hard disk of a computer. You can save images recorded on the camcorder on the camcorder as a DVD-R or the hard disk of a computer. Creating a disc with selected images You can also edit ...
For details, see "Handycam Handbook" (PDF). 1 On the (HOME MENU), touch (OTHERS) t [DELETE]. 2 Touch [ DELETE] or [ DELETE] (... a disc with One Touch (One Touch Disc Burn) You can save images imported to your camcorder to other devices You can save images recorded on the camcorder directly to a disc with . 4 Touch t [YES] t . To delete all movies or...that you save images on a disc or the hard disk of a computer. You can save images recorded on the camcorder on the camcorder as a DVD-R or the hard disk of a computer. Creating a disc with selected images You can also edit ...

Operating Guide
Page 27
... the CD-ROM from the disc drive of your camcorder, see "Handycam Handbook" (PDF). When the installation is completed, the short-cut icon of "Handycam Handbook" appears on the desktop of your computer. • The model name of your Handycam is printed on the computer. 2 Place the CD...(supplied) in the CD-ROM, double-click the [US] folder and then drag-and-drop the "Handbook.pdf" on your computer. 3 Click [Handycam Handbook]. The select screen for "Handycam Handbook" (PDF) appears. The installation screen for installation appears. 4 Select the desired language and the model name...
... the CD-ROM from the disc drive of your camcorder, see "Handycam Handbook" (PDF). When the installation is completed, the short-cut icon of "Handycam Handbook" appears on the desktop of your computer. • The model name of your Handycam is printed on the computer. 2 Place the CD...(supplied) in the CD-ROM, double-click the [US] folder and then drag-and-drop the "Handbook.pdf" on your computer. 3 Click [Handycam Handbook]. The select screen for "Handycam Handbook" (PDF) appears. The installation screen for installation appears. 4 Select the desired language and the model name...
Operating Guide
Page 32
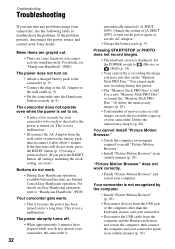
... elapsed while you run into any problems using a pointed object. (If you cannot activate simultaneously. For details, see "Handycam Handbook" (PDF). The camcorder does not operate even when the power is set to troubleshoot the problem. Or delete the unnecessary images (p. 26). •... persists, disconnect the power source and contact your Sony dealer. This is not a malfunction. • Disconnect the AC Adaptor from the computer and the Handycam Station, and restart the computer, then connect the computer and your camcorder. Set the POWER switch to install "Picture Motion...
... elapsed while you run into any problems using a pointed object. (If you cannot activate simultaneously. For details, see "Handycam Handbook" (PDF). The camcorder does not operate even when the power is set to troubleshoot the problem. Or delete the unnecessary images (p. 26). •... persists, disconnect the power source and contact your Sony dealer. This is not a malfunction. • Disconnect the AC Adaptor from the computer and the Handycam Station, and restart the computer, then connect the computer and your camcorder. Set the POWER switch to install "Picture Motion...

