Operating Guide
Page 6
... of the reach of used rechargeable batteries to charge the battery pack using a genuine Sony battery charger or a device that may result. Use the nearby wall outlet (wall socket) when using your camcorder. Even if your used battery packs promptly as between a wall and furniture. For ... wall outlet (wall socket) via the AC Adaptor. This Class B digital apparatus complies with the same or equivalent type recommended by returning your camcorder is turned off, AC power source (mains) is subject to the following cautions. Do not disassemble. Do not crush ...
... of the reach of used rechargeable batteries to charge the battery pack using a genuine Sony battery charger or a device that may result. Use the nearby wall outlet (wall socket) when using your camcorder. Even if your used battery packs promptly as between a wall and furniture. For ... wall outlet (wall socket) via the AC Adaptor. This Class B digital apparatus complies with the same or equivalent type recommended by returning your camcorder is turned off, AC power source (mains) is subject to the following cautions. Do not disassemble. Do not crush ...
Operating Guide
Page 8
...PMB" (software, including "PMB Guide") "Handycam" Handbook (PDF) "Operating Guide" (This manual) (1) See page 47 for the "Memory Stick" media you repeat recording/deleting images for a long time, fragmentation of data occurs on the camcorder, due to the protection features of the following when... take off and landing of an airplane (HDR-CX500V/CX520V). If you can use . Images cannot be able to record or play movies and photos. When connecting the camcorder to ON. Note on the camcorder/battery pack temperature When the temperature...
...PMB" (software, including "PMB Guide") "Handycam" Handbook (PDF) "Operating Guide" (This manual) (1) See page 47 for the "Memory Stick" media you repeat recording/deleting images for a long time, fragmentation of data occurs on the camcorder, due to the protection features of the following when... take off and landing of an airplane (HDR-CX500V/CX520V). If you can use . Images cannot be able to record or play movies and photos. When connecting the camcorder to ON. Note on the camcorder/battery pack temperature When the temperature...
Operating Guide
Page 9
... scenes may erase its contents without warning. Also, you cannot play back images recorded with high definition image quality (HD) on the camcorder with the following devices; Other AVCHD format compatible devices which are not compatible with High Profile Devices which are not... media are referred as "Memory Stick PRO Duo" media. You will find the "Handycam" Handbook (PDF) on a compatible Blu-ray Disc player/recorder or other devices The camcorder is recommended that you need an NTSC system-based TV. Television programs, films, video ...
... scenes may erase its contents without warning. Also, you cannot play back images recorded with high definition image quality (HD) on the camcorder with the following devices; Other AVCHD format compatible devices which are not compatible with High Profile Devices which are not... media are referred as "Memory Stick PRO Duo" media. You will find the "Handycam" Handbook (PDF) on a compatible Blu-ray Disc player/recorder or other devices The camcorder is recommended that you need an NTSC system-based TV. Television programs, films, video ...

Operating Guide
Page 10
...movies and photos (p. 45) You can free recording space by deleting movies and photos that you have saved on other media, from the your camcorder (p. 22) Playing movies and photos on a connected TV (p. 25) Saving movies and photos on a disc Saving movies and photos with a computer ...; You can change the recording media selected, and the image quality of disc. Creating a disc with high definition image quality (HD) on your camcorder's media. Playing movies and photos Playing movies and photos on the internal memory. You can create a disc with either high definition image ...
...movies and photos (p. 45) You can free recording space by deleting movies and photos that you have saved on other media, from the your camcorder (p. 22) Playing movies and photos on a connected TV (p. 25) Saving movies and photos on a disc Saving movies and photos with a computer ...; You can change the recording media selected, and the image quality of disc. Creating a disc with high definition image quality (HD) on your camcorder's media. Playing movies and photos Playing movies and photos on the internal memory. You can create a disc with either high definition image ...

Operating Guide
Page 11
... on, and setting the date and time 15 Changing the language setting 16 Recording Recording 17 Acquiring location information using the GPS (HDR-CX500V/CX520V 21 Playback Playback on the camcorder 22 Playing images on a TV 25 Saving movies and photos with a computer Preparing a computer (Windows 27 When using a Macintosh 28 Selecting the...
... on, and setting the date and time 15 Changing the language setting 16 Recording Recording 17 Acquiring location information using the GPS (HDR-CX500V/CX520V 21 Playback Playback on the camcorder 22 Playing images on a TV 25 Saving movies and photos with a computer Preparing a computer (Windows 27 When using a Macintosh 28 Selecting the...

Operating Guide
Page 12
...recording media settings 47 Dubbing or copying movies and photos from the internal memory to "Memory Stick PRO Duo" media 48 Customizing your camcorder Deleting movies and photos 45 Adjusting for creating a disc (DVD writer/recorder 38 Creating a disc with the dedicated DVD writer, ...DVDirect Express 39 Creating a high definition image quality (HD) disc with menus 49 Getting detailed information from the "Handycam" Handbook 56 Additional information Troubleshooting 57 Precautions 59 Specifications 61 Screen indicators 64 Parts and controls 66 Index 68 US 12 other than...
...recording media settings 47 Dubbing or copying movies and photos from the internal memory to "Memory Stick PRO Duo" media 48 Customizing your camcorder Deleting movies and photos 45 Adjusting for creating a disc (DVD writer/recorder 38 Creating a disc with the dedicated DVD writer, ...DVDirect Express 39 Creating a high definition image quality (HD) disc with menus 49 Getting detailed information from the "Handycam" Handbook 56 Additional information Troubleshooting 57 Precautions 59 Specifications 61 Screen indicators 64 Parts and controls 66 Index 68 US 12 other than...
Operating Guide
Page 13
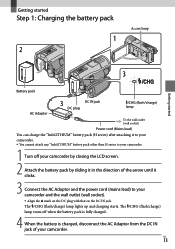
... lead) You can charge the "InfoLITHIUM" battery pack (H series) after attaching it clicks. 3 Connect the AC Adaptor and the power cord (mains lead) to your camcorder. 1 Turn off when the battery pack is fully charged. 4 When the battery is charged, disconnect the AC Adaptor from the DC IN jack of your... camcorder and the wall outlet (wall socket). Align the mark on the DC plug with that on the DC IN jack. The /CHG (flash/...
... lead) You can charge the "InfoLITHIUM" battery pack (H series) after attaching it clicks. 3 Connect the AC Adaptor and the power cord (mains lead) to your camcorder. 1 Turn off when the battery pack is fully charged. 4 When the battery is charged, disconnect the AC Adaptor from the DC IN jack of your... camcorder and the wall outlet (wall socket). Align the mark on the DC plug with that on the DC IN jack. The /CHG (flash/...

Operating Guide
Page 14
... short-circuit the DC plug of the battery pack is low. To use an electronic voltage transformer. US 14 Remove the battery pack from your camcorder without any metallic objects. This may cause a malfunction. In the default setting, the power turns off . The /CHG (flash/charge...not attached correctly. The battery pack is high. To remove the battery pack Close the LCD screen. Remove the battery pack from your camcorder and put it in a warm place. The temperature of the battery pack is damaged. The temperature of the AC Adaptor or...
... short-circuit the DC plug of the battery pack is low. To use an electronic voltage transformer. US 14 Remove the battery pack from your camcorder without any metallic objects. This may cause a malfunction. In the default setting, the power turns off . The /CHG (flash/charge...not attached correctly. The battery pack is high. To remove the battery pack Close the LCD screen. Remove the battery pack from your camcorder and put it in a warm place. The temperature of the battery pack is damaged. The temperature of the AC Adaptor or...
Operating Guide
Page 15
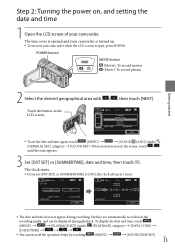
...; . You can be displayed during recording, but they are automatically recorded on , and setting the date and time 1 Open the LCD screen of your camcorder. To display the date and time, touch (MENU) [PLAYBACK SET] (under [GENERAL SET] category) [CLOCK SET]. POWER button...; To turn off the operation beeps by touching (MENU) [SOUND/DISP SET] US 15 The lens cover is opened and your camcorder when the LCD screen is not on the screen, touch / until the item appears. 3 Set [DST SET] or [SUMMERTIME], date and time, then ...
...; . You can be displayed during recording, but they are automatically recorded on , and setting the date and time 1 Open the LCD screen of your camcorder. To display the date and time, touch (MENU) [PLAYBACK SET] (under [GENERAL SET] category) [CLOCK SET]. POWER button...; To turn off the operation beeps by touching (MENU) [SOUND/DISP SET] US 15 The lens cover is opened and your camcorder when the LCD screen is not on the screen, touch / until the item appears. 3 Set [DST SET] or [SUMMERTIME], date and time, then ...

Operating Guide
Page 16
Changing the language setting You can turn off your camcorder by pressing POWER. When [POWER ON BY LCD] (p. 55) is automatically adjusted with [AUTO CLOCK ADJ] and [AUTO AREA ADJ] set [AUTO CLOCK ADJ] ... the power is turned POWER button You can change the on-screen displays to [OFF] (HDR-CX500V/CX520V). (under [GENERAL SET] category) [ LANGUAGE SET] a desired language . To turn off your camcorder. The off the power Close the LCD screen. Touch (MENU) [CLOCK/ LANG] (under [GENERAL...
Changing the language setting You can turn off your camcorder by pressing POWER. When [POWER ON BY LCD] (p. 55) is automatically adjusted with [AUTO CLOCK ADJ] and [AUTO AREA ADJ] set [AUTO CLOCK ADJ] ... the power is turned POWER button You can change the on-screen displays to [OFF] (HDR-CX500V/CX520V). (under [GENERAL SET] category) [ LANGUAGE SET] a desired language . To turn off your camcorder. The off the power Close the LCD screen. Touch (MENU) [CLOCK/ LANG] (under [GENERAL...

Operating Guide
Page 17
The lens cover is opened and your camcorder is turned on. To turn on the internal memory (p. 47, 52). Fasten the grip belt. Open the LCD screen of your camcorder when the LCD screen is already open, press POWER. Recording Recording Recording Recording movies In the default setting, movies are recorded with high definition image quality (HD) on your camcorder. US 17 POWER button Press START/STOP to start recording. You can start recording also by touching on the LCD screen.
The lens cover is opened and your camcorder is turned on. To turn on the internal memory (p. 47, 52). Fasten the grip belt. Open the LCD screen of your camcorder when the LCD screen is already open, press POWER. Recording Recording Recording Recording movies In the default setting, movies are recorded with high definition image quality (HD) on your camcorder. US 17 POWER button Press START/STOP to start recording. You can start recording also by touching on the LCD screen.
Operating Guide
Page 18
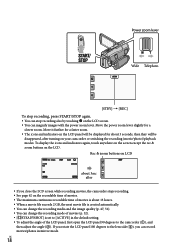
... can record movies/photos in the default setting. To adjust the angle of movies (p. 52). [ STEADYSHOT] is set to the camcorder (), and then adjust the angle (). US 18 Rec & zoom buttons on LCD about 3sec after turning on the recordable time of movies. ...rotate the LCD panel 180 degrees to the lens side (), you close the LCD screen while recording movies, the camcorder stops recording. See page 62 on your camcorder or switching the recording (movie/photo)/playback modes. Power zoom lever Wide Telephoto [STBY] [REC] To ...
... can record movies/photos in the default setting. To adjust the angle of movies (p. 52). [ STEADYSHOT] is set to the camcorder (), and then adjust the angle (). US 18 Rec & zoom buttons on LCD about 3sec after turning on the recordable time of movies. ...rotate the LCD panel 180 degrees to the lens side (), you close the LCD screen while recording movies, the camcorder stops recording. See page 62 on your camcorder or switching the recording (movie/photo)/playback modes. Power zoom lever Wide Telephoto [STBY] [REC] To ...
Operating Guide
Page 19
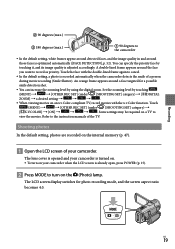
...cancel. In the default setting, a photo is already open, press POWER (p. 15). Press MODE to turn on your camcorder. The lens cover is opened and your camcorder is turned on. To turn on the (Photo) lamp. Recording 90 degrees (max.) 180 degrees (max....) 90 degrees to the camcorder In the default setting, white frames appear around detected faces, and the image quality in and around a face targeted for photo recording mode...
...cancel. In the default setting, a photo is already open, press POWER (p. 15). Press MODE to turn on your camcorder. The lens cover is opened and your camcorder is turned on. To turn on the (Photo) lamp. Recording 90 degrees (max.) 180 degrees (max....) 90 degrees to the camcorder In the default setting, white frames appear around detected faces, and the image quality in and around a face targeted for photo recording mode...

Operating Guide
Page 20
... power zoom lever slightly for a faster zoom. You can record photos also by touching on the LCD screen (p. 64). To change how your camcorder flashes by pressing PHOTO. Move it fully. You can check the recordable number of photos on the LCD screen. US 20 The flash does... ambient light. You can record photos also during movie recording. The image size is 8.3M when recording high definition image quality (HD) movies. Your camcorder flashes automatically when there is displayed.
... power zoom lever slightly for a faster zoom. You can record photos also by touching on the LCD screen (p. 64). To change how your camcorder flashes by pressing PHOTO. Move it fully. You can check the recordable number of photos on the LCD screen. US 20 The flash does... ambient light. You can record photos also during movie recording. The image size is 8.3M when recording high definition image quality (HD) movies. Your camcorder flashes automatically when there is displayed.

Operating Guide
Page 21
Map of an airplane. Built-in map is powered by NAVTEQ. Recording Acquiring location information using the GPS (HDR-CX500V/CX520V) When you to ON, appears on the LCD screen, and your camcorder acquires the location information from the GPS satellites. The indicator changes according to the strength of GPS signal reception. ...
Map of an airplane. Built-in map is powered by NAVTEQ. Recording Acquiring location information using the GPS (HDR-CX500V/CX520V) When you to ON, appears on the LCD screen, and your camcorder acquires the location information from the GPS satellites. The indicator changes according to the strength of GPS signal reception. ...

Operating Guide
Page 22
... the LCD screen is already open, press POWER (p. 15). Press (VIEW IMAGES). The lens cover is opened and your camcorder. CX500V/CX520V)/[ FILM ROLL]/[ FACE]) (p. 53). : Displays high definition image quality (HD) movies.* Displays photos. / : Displays movies recorded ... button display. To MENU screen Displays the screen to select the index type ([DATE INDEX]/[ MAP] (HDR- US 22 Playback Playback on the camcorder In the default setting, movies and photos on the previous/next date.** / : Displays the previous/next movie.
... the LCD screen is already open, press POWER (p. 15). Press (VIEW IMAGES). The lens cover is opened and your camcorder. CX500V/CX520V)/[ FILM ROLL]/[ FACE]) (p. 53). : Displays high definition image quality (HD) movies.* Displays photos. / : Displays movies recorded ... button display. To MENU screen Displays the screen to select the index type ([DATE INDEX]/[ MAP] (HDR- US 22 Playback Playback on the camcorder In the default setting, movies and photos on the previous/next date.** / : Displays the previous/next movie.

Operating Guide
Page 23
...during recording. Viewing photos Touch the (Photo) () a desired photo () on the "Memory Stick PRO Duo" media.) Your camcorder starts playing the selected movie. US 23 This information is touched. You can scroll the display by touching (MENU) ...MENU) [PLAYBACK SET] (under [PLAYBACK] category). The recording date, time, and shooting conditions, and coordinates (HDR-CX500V/CX520V) are played as fast as about 5 times about 10 times about 30 times about 60 times. You...
...during recording. Viewing photos Touch the (Photo) () a desired photo () on the "Memory Stick PRO Duo" media.) Your camcorder starts playing the selected movie. US 23 This information is touched. You can scroll the display by touching (MENU) ...MENU) [PLAYBACK SET] (under [PLAYBACK] category). The recording date, time, and shooting conditions, and coordinates (HDR-CX500V/CX520V) are played as fast as about 5 times about 10 times about 30 times about 60 times. You...

Operating Guide
Page 24
Your camcorder displays the selected photo. Previous To the VISUAL INDEX screen To start/stop slide show Next OPTION MENU You can zoom in the frame. &#... is touched. US 24 If you touch a point in the PB ZOOM frame, the point comes to select the index type ([DATE INDEX]/[ MAP] (HDR- CX500V/CX520V)) (p. 53).*1 : Displays high definition image quality (HD) movies.*2 Displays photos. / : Displays photos recorded on the screen. Switches operating button display...
Your camcorder displays the selected photo. Previous To the VISUAL INDEX screen To start/stop slide show Next OPTION MENU You can zoom in the frame. &#... is touched. US 24 If you touch a point in the PB ZOOM frame, the point comes to select the index type ([DATE INDEX]/[ MAP] (HDR- CX500V/CX520V)) (p. 53).*1 : Displays high definition image quality (HD) movies.*2 Displays photos. / : Displays photos recorded on the screen. Switches operating button display...

Operating Guide
Page 25
... (SD)) viewed on the TV screen differ depending on what type of the TV. Turn on your camcorder, and touch (MENU) [TV CONNECT Guide] (under [GENERAL SET] category) [COMPONENT] [1080i/480i] To connect a non-high-definition TV via component video jacks: (MENU) ...
... (SD)) viewed on the TV screen differ depending on what type of the TV. Turn on your camcorder, and touch (MENU) [TV CONNECT Guide] (under [GENERAL SET] category) [COMPONENT] [1080i/480i] To connect a non-high-definition TV via component video jacks: (MENU) ...
Operating Guide
Page 26
... displaying photos. **Setup of your Photo TV HD- compatible TV for highly-detailed, photo-like depiction of subtle textures and colors. US 26 By connecting Sony's Photo TV HD-compatible devices using an HDMI cable* or the component A/V cable**, a whole new world of photos can be necessary. "Photo TV HD" allows...) [OUTPUT SETTINGS] (under [GENERAL SET] category) [CTRL FOR HDMI] [ON] (the default setting) On "Photo TV HD" This camcorder is compatible with the "Photo TV HD" standard.
... displaying photos. **Setup of your Photo TV HD- compatible TV for highly-detailed, photo-like depiction of subtle textures and colors. US 26 By connecting Sony's Photo TV HD-compatible devices using an HDMI cable* or the component A/V cable**, a whole new world of photos can be necessary. "Photo TV HD" allows...) [OUTPUT SETTINGS] (under [GENERAL SET] category) [CTRL FOR HDMI] [ON] (the default setting) On "Photo TV HD" This camcorder is compatible with the "Photo TV HD" standard.


