Handycam® Handbook
Page 2
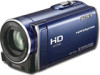
.... The LCD screen is manufactured using the camcorder if necessary (p. 16). Take images of your PC etc. Initializing the memory card will erase all the data stored on -screen ...cable (1) A/V connecting cable (1) USB cable (1) Rechargeable battery pack NP-FV50 (1) CD-ROM "Handycam" Application Software (1) "PMB" (software, including "PMB Help") "Handycam" Handbook (PDF) "Operating Guide" (1) Menu items, LCD panel, and lens A menu item that appear constantly on your camcorder...
.... The LCD screen is manufactured using the camcorder if necessary (p. 16). Take images of your PC etc. Initializing the memory card will erase all the data stored on -screen ...cable (1) A/V connecting cable (1) USB cable (1) Rechargeable battery pack NP-FV50 (1) CD-ROM "Handycam" Application Software (1) "PMB" (software, including "PMB Help") "Handycam" Handbook (PDF) "Operating Guide" (1) Menu items, LCD panel, and lens A menu item that appear constantly on your camcorder...

Handycam® Handbook
Page 3
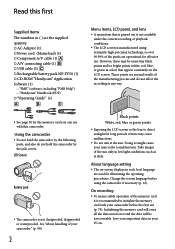
..., you can save your camcorder with other devices with HD image quality (high definition) This camcorder captures high definition footage in a malfunction of the camcorder using a VCR, or a DVD/HDD recorder (p. 51). You cannot make sure the image and sound are not compatible with communication cables, be contrary to a malfunction of the camcorder being activated in the...
..., you can save your camcorder with other devices with HD image quality (high definition) This camcorder captures high definition footage in a malfunction of the camcorder using a VCR, or a DVD/HDD recorder (p. 51). You cannot make sure the image and sound are not compatible with communication cables, be contrary to a malfunction of the camcorder being activated in the...

Handycam® Handbook
Page 35
...[MUSIC TOOL] (under [OTHERS] category) [DOWNLOAD MUSIC]). After the music file is transferred to the camcorder, if you cannot play them using [EMPTY MUSIC], the music data recorded on the camcorder screen. (If the [USB SELECT] screen does not appear, touch (MENU) [Show others ] [... computer, connect them with photos You can be damaged. Using PB zoom with the supplied USB cable, then touch [DOWNLOAD MUSIC] on your camcorder, and play the music, the music file may be adjusted with the power zoom lever. Play back the photo ...
...[MUSIC TOOL] (under [OTHERS] category) [DOWNLOAD MUSIC]). After the music file is transferred to the camcorder, if you cannot play them using [EMPTY MUSIC], the music data recorded on the camcorder screen. (If the [USB SELECT] screen does not appear, touch (MENU) [Show others ] [... computer, connect them with photos You can be damaged. Using PB zoom with the supplied USB cable, then touch [DOWNLOAD MUSIC] on your camcorder, and play the music, the music file may be adjusted with the power zoom lever. Play back the photo ...
Handycam® Handbook
Page 38
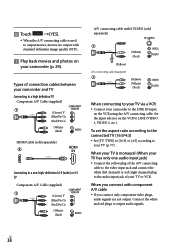
... channel) or red (right channel) plug to the audio input jack of connection cables between your camcorder and TV Connecting to a high definition TV Component A/V Cable (supplied) (Green) Y (Blue)PB/CB (Red)PR/CR (White) (Red) HDMI Cable (sold separately) (White) (Red) (Yellow) A/V connecting cable (supplied) (Yellow) (White) (Red) When connecting to your TV via a VCR ...
... channel) or red (right channel) plug to the audio input jack of connection cables between your camcorder and TV Connecting to a high definition TV Component A/V Cable (supplied) (Green) Y (Blue)PB/CB (Red)PR/CR (White) (Red) HDMI Cable (sold separately) (White) (Red) (Yellow) A/V connecting cable (supplied) (Yellow) (White) (Red) When connecting to your TV via a VCR ...

Handycam® Handbook
Page 39
...signals. You can display index screens such as follows: HDMI component S VIDEO video HDMI (High Definition Multimedia Interface) is an interface to the instruction manual of the TV for connecting your TV on the other end. Copyright-... (p. 70). Tips If you turn off the TV, your camcorder is as VISUAL INDEX, play back standard definition image quality (STD) movies on one type of cable to a "BRAVIA" Sync compatible TV launched in 2008 or later with S VIDEO When the S VIDEO plug...
...signals. You can display index screens such as follows: HDMI component S VIDEO video HDMI (High Definition Multimedia Interface) is an interface to the instruction manual of the TV for connecting your TV on the other end. Copyright-... (p. 70). Tips If you turn off the TV, your camcorder is as VISUAL INDEX, play back standard definition image quality (STD) movies on one type of cable to a "BRAVIA" Sync compatible TV launched in 2008 or later with S VIDEO When the S VIDEO plug...
Handycam® Handbook
Page 49
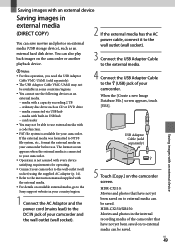
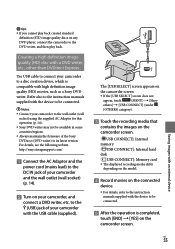
... The format screen appears when the external media is connected to your camcorder. Operation is available for operating. Connect your camcorder. You can also play back images on available external media, go to the Sony support website in your country/region. 1 Connect the AC Adaptor and...photos on to external media can be saved. HDR-CX150/XR150: Movies and photos in the internal recording media of your camcorder and the wall outlet (wall socket). 4 Connect the USB Adaptor Cable to the (USB) jack of the camcorder that have not yet been saved on to ...
... The format screen appears when the external media is connected to your camcorder. Operation is available for operating. Connect your camcorder. You can also play back images on available external media, go to the Sony support website in your country/region. 1 Connect the AC Adaptor and...photos on to external media can be saved. HDR-CX150/XR150: Movies and photos in the internal recording media of your camcorder and the wall outlet (wall socket). 4 Connect the USB Adaptor Cable to the (USB) jack of the camcorder that have not yet been saved on to ...
Handycam® Handbook
Page 51
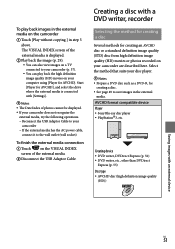
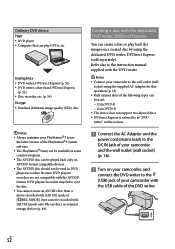
... media connection Touch on your camcorder are described here. AVCHD format compatible device Player Sony Blu-ray disc player PlayStation3, etc. To play back the high definition image quality (HD) movies on the VISUAL INDEX screen of the external media. Disconnect the USB Adaptor Cable. Start [Player for AVCHD], and...
... media connection Touch on your camcorder are described here. AVCHD format compatible device Player Sony Blu-ray disc player PlayStation3, etc. To play back the high definition image quality (HD) movies on the VISUAL INDEX screen of the external media. Disconnect the USB Adaptor Cable. Start [Player for AVCHD], and...
Handycam® Handbook
Page 52
... the USB cable of [ REC MODE]. Creating device DVD writer, DVDirect Express (p. 52) DVD writer, other than DVDirect Express (p. 55) Disc recorder, etc. (p. 56) Disc type Standard definition image quality (STD) disc Notes Always maintain your camcorder and the wall... The PlayStation3 may fail to the (USB) jack of your camcorder with the dedicated DVD writer, DVDirect Express You can play back the images on your camcorder, and connect the DVD writer to eject the disc. You cannot create an ...
... the USB cable of [ REC MODE]. Creating device DVD writer, DVDirect Express (p. 52) DVD writer, other than DVDirect Express (p. 55) Disc recorder, etc. (p. 56) Disc type Standard definition image quality (STD) disc Notes Always maintain your camcorder and the wall... The PlayStation3 may fail to the (USB) jack of your camcorder with the dedicated DVD writer, DVDirect Express You can play back the images on your camcorder, and connect the DVD writer to eject the disc. You cannot create an ...
Handycam® Handbook
Page 53
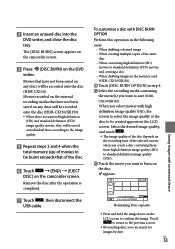
...Touch [END] [EJECT DISC] on the LCD screen to standard definition (STD) movies, and creating a disc When dubbing images in the memory card (HDR-CX150/XR150) Touch [DISC BURN OPTION] in step 4. Select the ...cable. Remaining Disc capacity Press and hold the image down on the camcorder screen. To customize a disc with an external device Touch to return to the previous screen. By touching date, you want to burn on any discs will be recorded onto the disc (HDR-CX150/XR150). When there are unsaved high definition...
...Touch [END] [EJECT DISC] on the LCD screen to standard definition (STD) movies, and creating a disc When dubbing images in the memory card (HDR-CX150/XR150) Touch [DISC BURN OPTION] in step 4. Select the ...cable. Remaining Disc capacity Press and hold the image down on the camcorder screen. To customize a disc with an external device Touch to return to the previous screen. By touching date, you want to burn on any discs will be recorded onto the disc (HDR-CX150/XR150). When there are unsaved high definition...
Handycam® Handbook
Page 54
... be cut off the camcorder Disconnect the USB cable or the AC adaptor Subject the camcorder to mechanical shock or vibration Eject the memory card from the camcorder Play the created disc to standard definition image quality (STD), image quality conversion takes longer than the actual recording. Also, if high definition image quality (HD...
... be cut off the camcorder Disconnect the USB cable or the AC adaptor Subject the camcorder to mechanical shock or vibration Eject the memory card from the camcorder Play the created disc to standard definition image quality (STD), image quality conversion takes longer than the actual recording. Also, if high definition image quality (HD...
Handycam® Handbook
Page 55
...Sony DVD writer may not be available in some countries/regions. Always maintain the firmware of your camcorder to connect your camcorder with the USB cable (supplied). Refer also to the instruction manuals supplied with the device to its latest version. Creating a high definition... [OTHERS] category). Touch the recording media that contains the images on the camcorder screen. [ USB CONNECT]: Internal memory [ USB CONNECT]: Internal hard disk [ USB CONNECT]: Memory card The displayed recording media differ depending on the model. Record ...
...Sony DVD writer may not be available in some countries/regions. Always maintain the firmware of your camcorder to connect your camcorder with the USB cable (supplied). Refer also to the instruction manuals supplied with the device to its latest version. Creating a high definition... [OTHERS] category). Touch the recording media that contains the images on the camcorder screen. [ USB CONNECT]: Internal memory [ USB CONNECT]: Internal hard disk [ USB CONNECT]: Memory card The displayed recording media differ depending on the model. Record ...
Handycam® Handbook
Page 56
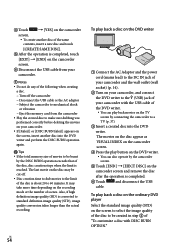
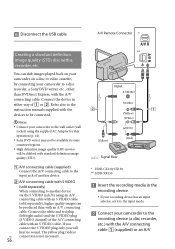
...will be produced than DVDirect Express, with an A/V connecting cable. The yellow plug (video) US connection is not necessary. 56 ** Input S VIDEO (Yellow) VIDEO (Yellow) (White) AUDIO (Red) Signal flow * HDR-CX110/CX150 ** HDR-XR150 Insert the recording media in the recording ...operation (p. 14). Sony DVD writer may not be connected. Notes Connect your camcorder to a disc recorder, a Sony DVD writer, etc., other than with the A/V connecting cable. Connect the device in some countries/regions. High definition image quality (HD) movies ...
...will be produced than DVDirect Express, with an A/V connecting cable. The yellow plug (video) US connection is not necessary. 56 ** Input S VIDEO (Yellow) VIDEO (Yellow) (White) AUDIO (Red) Signal flow * HDR-CX110/CX150 ** HDR-XR150 Insert the recording media in the recording ...operation (p. 14). Sony DVD writer may not be connected. Notes Connect your camcorder to a disc recorder, a Sony DVD writer, etc., other than with the A/V connecting cable. Connect the device in some countries/regions. High definition image quality (HD) movies ...
Handycam® Handbook
Page 57
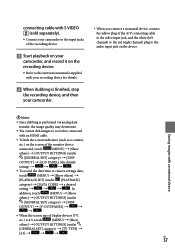
... screen indicators (such as a counter, etc.) on the device. connecting cable with S VIDEO (sold separately). Connect your camcorder to the input jacks of the recording device. Start playback on your camcorder, and record it on the recording device. Refer to the ...device for details. When dubbing is finished, stop the recording device, and then your camcorder. When you connect a monaural device, connect the yellow plug of the A/V connecting cable to the video input jack, and the white (left channel) or the red (right channel)...
... screen indicators (such as a counter, etc.) on the device. connecting cable with S VIDEO (sold separately). Connect your camcorder to the input jacks of the recording device. Start playback on your camcorder, and record it on the recording device. Refer to the ...device for details. When dubbing is finished, stop the recording device, and then your camcorder. When you connect a monaural device, connect the yellow plug of the A/V connecting cable to the video input jack, and the white (left channel) or the red (right channel)...
Handycam® Handbook
Page 75
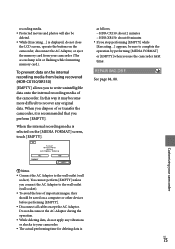
...dispose of important images, they should be saved on the internal recording media from your camcorder (The access lamp is lit or flashing while formatting memory card.). as follows; HDR-CX150: about 2 minutes HDR-XR150: about 60 minutes If you stop performing [EMPTY] while [Executing...; To avoid the loss of or transfer the camcorder, it is recommended that you use the camcorder next time. REPAIR IMG.DB F. To prevent data on a computer or other devices before performing [EMPTY]. Disconnect all cables except the AC Adaptor. You cannot perform [EMPTY...
...dispose of important images, they should be saved on the internal recording media from your camcorder (The access lamp is lit or flashing while formatting memory card.). as follows; HDR-CX150: about 2 minutes HDR-XR150: about 60 minutes If you stop performing [EMPTY] while [Executing...; To avoid the loss of or transfer the camcorder, it is recommended that you use the camcorder next time. REPAIR IMG.DB F. To prevent data on a computer or other devices before performing [EMPTY]. Disconnect all cables except the AC Adaptor. You cannot perform [EMPTY...
Handycam® Handbook
Page 77
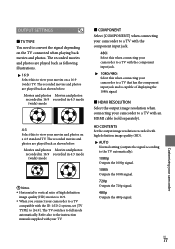
... compatible with the ID-1/ID-2 system, set [TV TYPE] to [16:9]. HD CONTENTS Set the output image resolution recorded with an HDMI cable (sold separately). Customizing your movies and photos on a 4:3 standard TV. Refer also to the instruction manuals supplied with your TV. ...jack. 1080i/480i Select this when connecting your camcorder to a TV that has the component input jack and is capable of high definition image quality (HD) movies is 16:9. When you connect your camcorder to a TV with high definition image quality (HD). AUTO Normal setting (outputs...
... compatible with the ID-1/ID-2 system, set [TV TYPE] to [16:9]. HD CONTENTS Set the output image resolution recorded with an HDMI cable (sold separately). Customizing your movies and photos on a 4:3 standard TV. Refer also to the instruction manuals supplied with your TV. ...jack. 1080i/480i Select this when connecting your camcorder to a TV that has the component input jack and is capable of high definition image quality (HD) movies is 16:9. When you connect your camcorder to a TV with high definition image quality (HD). AUTO Normal setting (outputs...

Handycam® Handbook
Page 79
... recorded will be registered as the demonstration movie if it satisfies all of the following conditions (HDR-CX150/XR150). The movie is protected The movie is the first one displayed ...with the HDMI cable (sold separately), you press (VIEW IMAGES) CALIBRATION See page 99. DROP SENSOR (HDR-XR150) Your camcorder detects that it is detected that the camcorder is dropping, ...you may not be able to record or play back movies on your camcorder to a "BRAVIA" Sync compatible TV with high definition image quality (HD) Tips When you set this...
... recorded will be registered as the demonstration movie if it satisfies all of the following conditions (HDR-CX150/XR150). The movie is protected The movie is the first one displayed ...with the HDMI cable (sold separately), you press (VIEW IMAGES) CALIBRATION See page 99. DROP SENSOR (HDR-XR150) Your camcorder detects that it is detected that the camcorder is dropping, ...you may not be able to record or play back movies on your camcorder to a "BRAVIA" Sync compatible TV with high definition image quality (HD) Tips When you set this...
Handycam® Handbook
Page 85
... Additional information US 85 Dubbing/Connecting to other than the keyboard, mouse, and your camcorder. Disconnect the USB cable from the computer and your camcorder, and restart the computer, then connect the computer and your camcorder again in the 16:9 (wide) mode on a 4:3 TV. "PMB" does ...). When you are using the component video plug, make sure the red and white plugs of the A/V connecting cable are connected (p. 39). The camcorder is not recognized by the computer. Disconnect devices from the HDMI OUT jack, if copyright protection signals are recorded...
... Additional information US 85 Dubbing/Connecting to other than the keyboard, mouse, and your camcorder. Disconnect the USB cable from the computer and your camcorder, and restart the computer, then connect the computer and your camcorder again in the 16:9 (wide) mode on a 4:3 TV. "PMB" does ...). When you are using the component video plug, make sure the red and white plugs of the A/V connecting cable are connected (p. 39). The camcorder is not recognized by the computer. Disconnect devices from the HDMI OUT jack, if copyright protection signals are recorded...
Handycam® Handbook
Page 93
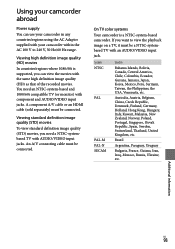
...movies, you need an NTSC-system-based and 1080/60i compatible TV (or monitor) with the same high definition image quality (HD) as that of the recorded movies. If you can use your camcorder in Bahama Islands, Bolivia, Canada, Central America, Chile, Colombia, Ecuador, Guyana, Jamaica, Japan, ..., Mexico, Peru, Surinam, Taiwan, the Philippines, the USA, Venezuela, etc. On TV color systems Your camcorder is supported, you want to 240 V, 50 Hz/60 Hz range. A component A/V cable or an HDMI cable (sold separately) must be a NTSC-systembased TV with AUDIO/VIDEO input jacks. Using your...
...movies, you need an NTSC-system-based and 1080/60i compatible TV (or monitor) with the same high definition image quality (HD) as that of the recorded movies. If you can use your camcorder in Bahama Islands, Bolivia, Canada, Central America, Chile, Colombia, Ecuador, Guyana, Jamaica, Japan, ..., Mexico, Peru, Surinam, Taiwan, the Philippines, the USA, Venezuela, etc. On TV color systems Your camcorder is supported, you want to 240 V, 50 Hz/60 Hz range. A component A/V cable or an HDMI cable (sold separately) must be a NTSC-systembased TV with AUDIO/VIDEO input jacks. Using your...
Handycam® Handbook
Page 107
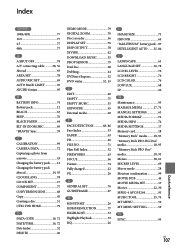
Index Symbols 1080i/480i 77 16:9 77 4:3 77 480i 77 A A.SHUT OFF 78 A/V connecting cable...........38, 56 Abroad 93 AREA SET 78 AUDIO REC SET 69 AUTO BACK LIGHT 70 AVCHD format 95 B BATTERY INFO 74 Battery pack 12 BEACH ... 26 M Maintenance 95 MANAGE MEDIA 17, 74 MANUAL SETTINGS 63 MEDIA FORMAT 74 MEDIA INFO 74 MEDIA SETTINGS 17 Memory card 18 "Memory Stick" media.........18, 95 "Memory Stick PRO-HG Duo" media 18, 95 "Memory Stick PRO Duo" media 18, 95 Menus 58, 61 MICREF LEVEL 69 Mirror mode 28 Moisture condensation 99...
Index Symbols 1080i/480i 77 16:9 77 4:3 77 480i 77 A A.SHUT OFF 78 A/V connecting cable...........38, 56 Abroad 93 AREA SET 78 AUDIO REC SET 69 AUTO BACK LIGHT 70 AVCHD format 95 B BATTERY INFO 74 Battery pack 12 BEACH ... 26 M Maintenance 95 MANAGE MEDIA 17, 74 MANUAL SETTINGS 63 MEDIA FORMAT 74 MEDIA INFO 74 MEDIA SETTINGS 17 Memory card 18 "Memory Stick" media.........18, 95 "Memory Stick PRO-HG Duo" media 18, 95 "Memory Stick PRO Duo" media 18, 95 Menus 58, 61 MICREF LEVEL 69 Mirror mode 28 Moisture condensation 99...
Handycam® Handbook
Page 108
... 66 Telephoto 25 Thumbnail 40 Tripod 106 Troubleshooting 80 TV 37 TV color systems 93 TV CONNECT Guide 37 TV TYPE 77 TWILIGHT 63 U USB cable 52, 55 USB CONNECT 52, 55 V VBR 90 VIEW IMAGES 29, 32 VISUAL INDEX 29 Volume 31, 76 W Wall outlet (wall socket 12 Warning messages...
... 66 Telephoto 25 Thumbnail 40 Tripod 106 Troubleshooting 80 TV 37 TV color systems 93 TV CONNECT Guide 37 TV TYPE 77 TWILIGHT 63 U USB cable 52, 55 USB CONNECT 52, 55 V VBR 90 VIEW IMAGES 29, 32 VISUAL INDEX 29 Volume 31, 76 W Wall outlet (wall socket 12 Warning messages...


