
Operating Guide
Page 6
... or leaking lithium ion batteries. Be sure to any malfunction occurs while using your camcorder is turned off, AC power source (mains) is mishandled, the battery pack can help preserve our environment by Sony. Dispose of the FCC Rules. Use the nearby wall outlet (wall socket) when...such as between a wall and furniture. CAUTION Battery pack If the battery pack is still supplied to it for future reference. Even if your camcorder. UL is subject to the following cautions. Do not disassemble. Do not crush and do not allow metal objects to come...
... or leaking lithium ion batteries. Be sure to any malfunction occurs while using your camcorder is turned off, AC power source (mains) is mishandled, the battery pack can help preserve our environment by Sony. Dispose of the FCC Rules. Use the nearby wall outlet (wall socket) when...such as between a wall and furniture. CAUTION Battery pack If the battery pack is still supplied to it for future reference. Even if your camcorder. UL is subject to the following cautions. Do not disassemble. Do not crush and do not allow metal objects to come...

Operating Guide
Page 7
... could void your authority to comply with Part 15 of Conformity Trade Name: SONY Model No.: HDR-CX100 Responsible Party: Sony Electronics Inc. The number below is encouraged to try to correct the interference by... USB cable (1) Rechargeable battery pack NP-FH50 (1) CD-ROM "Handycam Application Software" (1) (p. 26) "PMB" (software, including "PMB Guide") "Handycam Handbook" (PDF) "Operating Guide" (This manual) (1) See page 44 for a Class B ... have any questions about this equipment. If this camcorder.
... could void your authority to comply with Part 15 of Conformity Trade Name: SONY Model No.: HDR-CX100 Responsible Party: Sony Electronics Inc. The number below is encouraged to try to correct the interference by... USB cable (1) Rechargeable battery pack NP-FH50 (1) CD-ROM "Handycam Application Software" (1) (p. 26) "PMB" (software, including "PMB Guide") "Handycam Handbook" (PDF) "Operating Guide" (This manual) (1) See page 44 for a Class B ... have any questions about this equipment. If this camcorder.
Operating Guide
Page 8
... color) that you need an NTSC system-based TV. Television programs, films, video tapes, and other devices The camcorder is manufactured using your recorded images on the recording media. Change the screen language before using a VCR, or a DVD/HDD recorder. Otherwise... perform [MEDIA FORMAT] (p. 42). The LCD screen is compatible with HD image quality (high definition) This camcorder captures high definition footage in each local language are recorded without warning. These points are not compatible with the AVCHD format Discs recorded ...
... color) that you need an NTSC system-based TV. Television programs, films, video tapes, and other devices The camcorder is manufactured using your recorded images on the recording media. Change the screen language before using a VCR, or a DVD/HDD recorder. Otherwise... perform [MEDIA FORMAT] (p. 42). The LCD screen is compatible with HD image quality (high definition) This camcorder captures high definition footage in each local language are recorded without warning. These points are not compatible with the AVCHD format Discs recorded ...
Operating Guide
Page 9
... CD-ROM (p. 51). The screenshots are from the actual images of the LCD screen. In this Operating Guide, the internal memory of the camcorder and "Memory Stick PRO Duo" media are called "recording media." In this Operating Guide, both "Memory Stick PRO Duo" media and "Memory Stick PRO...
... CD-ROM (p. 51). The screenshots are from the actual images of the LCD screen. In this Operating Guide, the internal memory of the camcorder and "Memory Stick PRO Duo" media are called "recording media." In this Operating Guide, both "Memory Stick PRO Duo" media and "Memory Stick PRO...

Operating Guide
Page 10
... of each type of movies (p. 43, 48). Creating a disc with either high definition image quality (HD) or standard definition image quality (SD) from the your camcorder (p. 21) Playing movies and photos on a connected TV (p. 24) Saving movies and photos on a disc Saving movies and photos with a computer (p. 26) You can...
... of each type of movies (p. 43, 48). Creating a disc with either high definition image quality (HD) or standard definition image quality (SD) from the your camcorder (p. 21) Playing movies and photos on a connected TV (p. 24) Saving movies and photos on a disc Saving movies and photos with a computer (p. 26) You can...
Operating Guide
Page 11
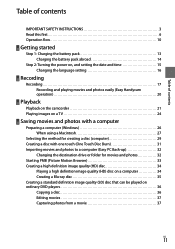
... setting the date and time 15 Changing the language setting 16 Recording Recording 17 Recording and playing movies and photos easily (Easy Handycam operation 20 Playback Playback on the camcorder 21 Playing images on a TV 24 Saving movies and photos with a computer Preparing a computer (Windows 26 When using a Macintosh 27 Selecting the...
... setting the date and time 15 Changing the language setting 16 Recording Recording 17 Recording and playing movies and photos easily (Easy Handycam operation 20 Playback Playback on the camcorder 21 Playing images on a TV 24 Saving movies and photos with a computer Preparing a computer (Windows 26 When using a Macintosh 27 Selecting the...
Operating Guide
Page 12
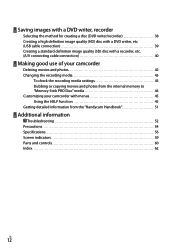
...Creating a standard definition image quality (SD) disc with a recorder, etc. (A/V connecting cable connection 40 Making good use of your camcorder Deleting movies and photos 42 Changing the recording media 43 To check the recording media settings 43 Dubbing or copying movies and photos from... the internal memory to "Memory Stick PRO Duo" media 44 Customizing your camcorder with menus 45 Using the HELP function 45 Getting detailed information from the "Handycam Handbook 51 Additional information Troubleshooting 52 Precautions 54 Specifications 56 Screen indicators 59 Parts ...
...Creating a standard definition image quality (SD) disc with a recorder, etc. (A/V connecting cable connection 40 Making good use of your camcorder Deleting movies and photos 42 Changing the recording media 43 To check the recording media settings 43 Dubbing or copying movies and photos from... the internal memory to "Memory Stick PRO Duo" media 44 Customizing your camcorder with menus 45 Using the HELP function 45 Getting detailed information from the "Handycam Handbook 51 Additional information Troubleshooting 52 Precautions 54 Specifications 56 Screen indicators 59 Parts ...

Operating Guide
Page 13
... off when the battery pack is fully charged. 4 When the battery is facing right. The CHG (charge) lamp turns off your camcorder by closing the LCD screen. 2 Attach the battery pack by sliding it in the direction of the arrow until it clicks. 3 Connect the AC Adaptor ...and the power cord (mains lead) to your camcorder and the wall outlet (wall socket). Be sure that the mark on the DC plug is charged, disconnect the AC Adaptor from the...
... off when the battery pack is fully charged. 4 When the battery is facing right. The CHG (charge) lamp turns off your camcorder by closing the LCD screen. 2 Attach the battery pack by sliding it in the direction of the arrow until it clicks. 3 Connect the AC Adaptor ...and the power cord (mains lead) to your camcorder and the wall outlet (wall socket). Be sure that the mark on the DC plug is charged, disconnect the AC Adaptor from the...

Operating Guide
Page 14
... with any operation for about 5 minutes, to save battery power ([A.SHUT OFF]). See page 57 on charging, recording and playing time. When your camcorder within the AC 100 V - 240 V, 50 Hz/60 Hz range. Do not use a wall outlet (wall socket) as a power source Make the same...pack (). Charging the battery pack abroad You can charge the battery pack in any countries/regions using the AC Adaptor supplied with your camcorder is on, you can check the approximate amount of the AC Adaptor or battery terminal with the remaining battery indicator at the upper left on...
... with any operation for about 5 minutes, to save battery power ([A.SHUT OFF]). See page 57 on charging, recording and playing time. When your camcorder within the AC 100 V - 240 V, 50 Hz/60 Hz range. Do not use a wall outlet (wall socket) as a power source Make the same...pack (). Charging the battery pack abroad You can charge the battery pack in any countries/regions using the AC Adaptor supplied with your camcorder is on, you can check the approximate amount of the AC Adaptor or battery terminal with the remaining battery indicator at the upper left on...

Operating Guide
Page 15
Getting started Step 2: Turning the power on, and setting the date and time 1 Open the LCD screen of your camcorder when the LCD screen is open, press POWER. To display the date and time, touch (HOME) (SETTINGS) [VIEW IMAGES SET] [...] or [SUMMERTIME] to [ON], the clock advances 1 hour. The date and time does not appear during recording, but they are automatically recorded on your camcorder. Your camcorder is not on . To turn off the operation beeps by touching (HOME) (SETTINGS) [SOUND/DISP SET] [BEEP] ...
Getting started Step 2: Turning the power on, and setting the date and time 1 Open the LCD screen of your camcorder when the LCD screen is open, press POWER. To display the date and time, touch (HOME) (SETTINGS) [VIEW IMAGES SET] [...] or [SUMMERTIME] to [ON], the clock advances 1 hour. The date and time does not appear during recording, but they are automatically recorded on your camcorder. Your camcorder is not on . To turn off the operation beeps by touching (HOME) (SETTINGS) [SOUND/DISP SET] [BEEP] ...

Operating Guide
Page 16
The off. (Movie) lamp flashes for a few seconds and the power is set to show messages in a specified language. Changing the language setting You can turn off the power Close the LCD screen. Touch (HOME) (SETTINGS) [CLOCK/ LANG] [ LANGUAGE SET] a desired language US 16 To turn off your camcorder also by pressing POWER. When [POWER ON BY LCD] is turned POWER button You can change the on-screen displays to [OFF], turn off your camcorder by pressing POWER (p. 49).
The off. (Movie) lamp flashes for a few seconds and the power is set to show messages in a specified language. Changing the language setting You can turn off the power Close the LCD screen. Touch (HOME) (SETTINGS) [CLOCK/ LANG] [ LANGUAGE SET] a desired language US 16 To turn off your camcorder also by pressing POWER. When [POWER ON BY LCD] is turned POWER button You can change the on-screen displays to [OFF], turn off your camcorder by pressing POWER (p. 49).

Operating Guide
Page 17
Your camcorder is turned on. To turn on the internal memory (p. 43, 48). Fasten the grip belt. Open the lens cover. Open the LCD screen of your camcorder when the LCD screen is already open, press POWER (p. 15). Recording Recording Recording Recording movies In the default setting, movies are recorded with high definition image quality (HD) on your camcorder. POWER button US 17
Your camcorder is turned on. To turn on the internal memory (p. 43, 48). Fasten the grip belt. Open the lens cover. Open the LCD screen of your camcorder when the LCD screen is already open, press POWER (p. 15). Recording Recording Recording Recording movies In the default setting, movies are recorded with high definition image quality (HD) on your camcorder. POWER button US 17

Operating Guide
Page 18
...([SMILE SHUTTER]). You can change the setting in mirror mode. 90 degrees (max.) 180 degrees (max.) 90 degrees to the camcorder When you close the LCD screen, or adjust the angle, be careful not to press the buttons on the side of the LCD screen... by mistake. In the default setting, a photo is recorded automatically when the camcorder detects the smile of a person during recording, the camcorder stops recording. See page 57 on the recordable time of movies. When a movie file exceeds 2 GB, ...
...([SMILE SHUTTER]). You can change the setting in mirror mode. 90 degrees (max.) 180 degrees (max.) 90 degrees to the camcorder When you close the LCD screen, or adjust the angle, be careful not to press the buttons on the side of the LCD screen... by mistake. In the default setting, a photo is recorded automatically when the camcorder detects the smile of a person during recording, the camcorder stops recording. See page 57 on the recordable time of movies. When a movie file exceeds 2 GB, ...
Operating Guide
Page 19
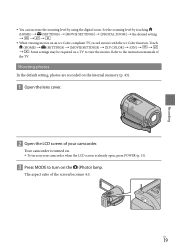
... using the digital zoom. Shooting photos In the default setting, photos are recorded on an x.v.Color-compliant TV, record movies with the x.v.Color function. Your camcorder is turned on. To turn on a TV to view the movies. US 19 Refer to the instruction manuals of the screen becomes 4:3. Some settings... setting . When viewing movies on the internal memory (p. 43). Open the lens cover. Open the LCD screen of your camcorder when the LCD screen is already open, press POWER (p. 15). Press MODE to turn on your...
... using the digital zoom. Shooting photos In the default setting, photos are recorded on an x.v.Color-compliant TV, record movies with the x.v.Color function. Your camcorder is turned on. To turn on a TV to view the movies. US 19 Refer to the instruction manuals of the screen becomes 4:3. Some settings... setting . When viewing movies on the internal memory (p. 43). Open the lens cover. Open the LCD screen of your camcorder when the LCD screen is already open, press POWER (p. 15). Press MODE to turn on your...

Operating Guide
Page 21
...of scenes by pressing (VIEW IMAGES) on the "Memory Stick PRO Duo" media.) US 21 Playback Playback on the camcorder In the default setting, movies and photos on your camcorder. Your camcorder is turned on. To turn on the internal memory are played (p. 43, 48). Playing movies ... To the list of recording dates Next To return to recording mode To the list of high definition (HD) movies To the list of your camcorder when the LCD screen is already open, press POWER (p. 15). Press (VIEW IMAGES). Playback The VISUAL INDEX screen appears after some ...
...of scenes by pressing (VIEW IMAGES) on the "Memory Stick PRO Duo" media.) US 21 Playback Playback on the camcorder In the default setting, movies and photos on your camcorder. Your camcorder is turned on. To turn on the internal memory are played (p. 43, 48). Playing movies ... To the list of recording dates Next To return to recording mode To the list of high definition (HD) movies To the list of your camcorder when the LCD screen is already open, press POWER (p. 15). Press (VIEW IMAGES). Playback The VISUAL INDEX screen appears after some ...

Operating Guide
Page 22
... OPTION MENU To fast-forward To pause/play back movies slowly. As you repeat touching / during playback, movies are recorded automatically during recording. Your camcorder starts playing the selected movie. Viewing photos Touch the (Photo) tab () a desired photo () on the panel behind the LCD panel. The...
... OPTION MENU To fast-forward To pause/play back movies slowly. As you repeat touching / during playback, movies are recorded automatically during recording. Your camcorder starts playing the selected movie. Viewing photos Touch the (Photo) tab () a desired photo () on the panel behind the LCD panel. The...

Operating Guide
Page 23
Your camcorder displays the selected photo. Previous To the VISUAL INDEX screen To start/stop slide show Next OPTION MENU You can zoom in the frame. When viewing photos recorded on "Memory Stick PRO Duo" media, (playback folder) appears on the screen. Playback US 23 If you touch a point in the PB ZOOM frame, the point comes to the center in the photo by moving the power zoom lever while viewing photos (PB ZOOM).
Your camcorder displays the selected photo. Previous To the VISUAL INDEX screen To start/stop slide show Next OPTION MENU You can zoom in the frame. When viewing photos recorded on "Memory Stick PRO Duo" media, (playback folder) appears on the screen. Playback US 23 If you touch a point in the PB ZOOM frame, the point comes to the center in the photo by moving the power zoom lever while viewing photos (PB ZOOM).
Operating Guide
Page 24
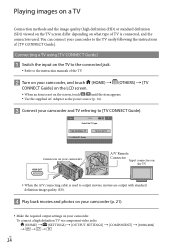
... TV via component video jacks: (HOME) (SETTINGS) [OUTPUT SETTINGS] [COMPONENT] [1080i/480i] US 24 Connectors on your camcorder A/V Remote Connector Input connectors on the TV When the A/V connecting cable is used . Connecting a TV using [TV... the item appears. Use the supplied AC Adaptor as the power source (p. 14). Connect your camcorder. You can connect your camcorder to the TV easily following the instructions of [TV CONNECT Guide]. Playing images on a TV Connection methods and the...
... TV via component video jacks: (HOME) (SETTINGS) [OUTPUT SETTINGS] [COMPONENT] [1080i/480i] US 24 Connectors on your camcorder A/V Remote Connector Input connectors on the TV When the A/V connecting cable is used . Connecting a TV using [TV... the item appears. Use the supplied AC Adaptor as the power source (p. 14). Connect your camcorder. You can connect your camcorder to the TV easily following the instructions of [TV CONNECT Guide]. Playing images on a TV Connection methods and the...
Operating Guide
Page 25
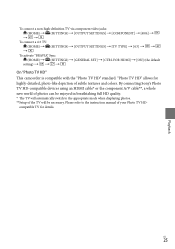
... To activate "BRAVIA" Sync: (HOME) (SETTINGS) [GENERAL SET] [CTRL FOR HDMI] [ON] (the default setting On "Photo TV HD" This camcorder is compatible with the "Photo TV HD" standard. Please refer to the appropriate mode when displaying photos. **Setup of the TV will be enjoyed in... manual of your Photo TV HD- compatible TV for highly-detailed, photo-like depiction of photos can be necessary. By connecting Sony's Photo TV HD-compatible devices using an HDMI cable* or the component A/V cable**, a whole new world of subtle textures and colors.
... To activate "BRAVIA" Sync: (HOME) (SETTINGS) [GENERAL SET] [CTRL FOR HDMI] [ON] (the default setting On "Photo TV HD" This camcorder is compatible with the "Photo TV HD" standard. Please refer to the appropriate mode when displaying photos. **Setup of the TV will be enjoyed in... manual of your Photo TV HD- compatible TV for highly-detailed, photo-like depiction of photos can be necessary. By connecting Sony's Photo TV HD-compatible devices using an HDMI cable* or the component A/V cable**, a whole new world of subtle textures and colors.
Operating Guide
Page 26
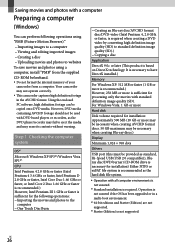
... recommended.) However, 256 MB or more may be necessary when creating AVCHD format discs. 50 GB maximum may not operate correctly. This camcorder captures high definition footage in a multi-boot environment. *2 64-bit editions and Starter (Edition) are not supported. *3 Starter (Edition) is ...or faster is sufficient for processing only the movies with all computer environments is not assured. *1 Standard installation is not supported. Your camcorder may be necessary when creating Blu-ray discs.) Display Minimum 1,024 × 768 dots Others USB port (this must be copied onto...
... recommended.) However, 256 MB or more may be necessary when creating AVCHD format discs. 50 GB maximum may not operate correctly. This camcorder captures high definition footage in a multi-boot environment. *2 64-bit editions and Starter (Edition) are not supported. *3 Starter (Edition) is ...or faster is sufficient for processing only the movies with all computer environments is not assured. *1 Standard installation is not supported. Your camcorder may be necessary when creating Blu-ray discs.) Display Minimum 1,024 × 768 dots Others USB port (this must be copied onto...


